bish
Full Member
  
Member since: January 2013
Horatio Nelson 'I am a Norfolk man, and i glory in being so'
Posts: 555
Jan 13, 2013 8:57:43 GMT -5
Jan 13, 2013 8:57:43 GMT -5
|
Post by bish on Feb 26, 2017 8:53:58 GMT -5
So while taking a break from my 4 kit Rudel build, i am easing off a bit and doing 3 He 162 kits. But where as the Rudel build has been on the burner for the best part of 20 years, this one has only be an idea for 18 months. After doimng my first, and up till now only 1/32nd kit, a Bf 109, i thought it would be interesting to build 2 kits of the same subject in 2 differant scales. My main scale 1/72nd and my occasional one, 1/32nd. I kew i wanted my next 32nd kit to be a jet and so it made sense to go for the 32nd kit that was my first addition, Revell He 162. and so that meant also building Dragons 1/72nd version.   But that was not all. Earlier in 2015 i had built the HPH 1/18th DB 605 engine and even then i knew i wanted to do their BMW 003 engine, as used in the He 162. So soon after decideing to build the 2 kits, i figured i migt as well make it 3 and add the engine. c1.staticflickr.com/1/281/32252560326_07dc71f792_z.jpgwas planning on doing this last year. But not having the time to fit it in combined with not having the engine kit meant i had to put it off. Finally having got the engine in Dec, i decided this was going to be an early build this year. The plan is to work on both aircraft in the same way as i am with the Rudel build, working on the 72nd to a certain stage, then the 32nd and then painting. And I'll put one or two nights aside each week for the engine. As with most aircraft builds, i started with the cockpits. For the Dragon, i am adding a resin pit from pavla. Unlike resin ones from companies like Aires, this has no PE, but i do have an Eduard PE set i can use if needed.   And on the larger kit, i am using the Eduard Big Ed set. I got all this before i discovered HGW but i decided to stick with what i have, PE belts and all. The side walls are a good example of PE not being the right option. The moulded on kit sidewalls looked more like the real thing than the PE does which is to flat. But i didn't spot this until after i started sanding. There is still the pre coloured buts to add after painting and weathering.   I do rather like the ejection seat and its supports with this PE set.  And then off to the paint booth for some primer and RLM 66.     And while that was drying, i started on the big engine. Most of the main body is together. 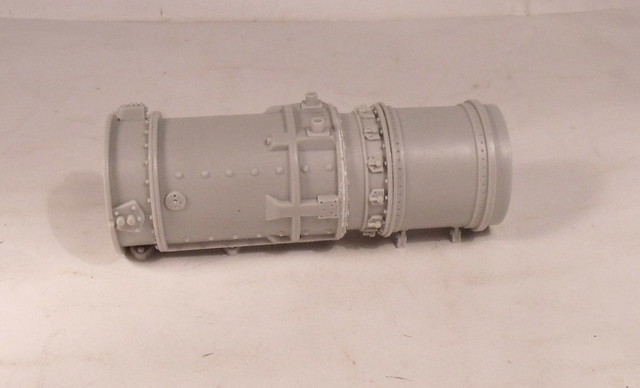 And the sub assemblies are cleaned up and ready for painting which i will do before fitting. 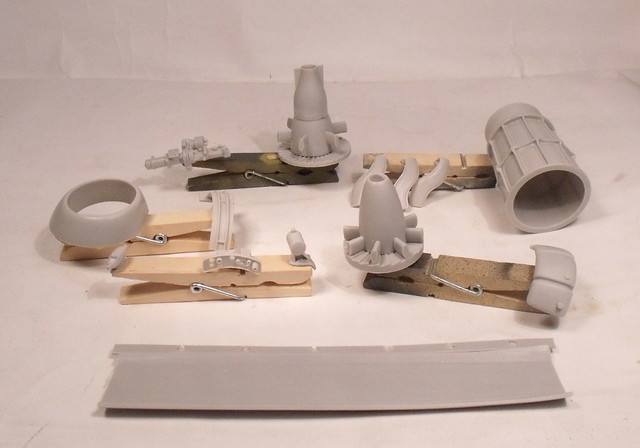 Next up will be getting some primer on the engine and some washes and dry brushing in the pits before adding the finer details and getting the fuselages together. More soon. Thanks for looking and all comments welcome as always. |
|
|
|
Post by Leon on Feb 26, 2017 9:08:46 GMT -5
Don't know how you manage working on two kits! Your off to a great start.  |
|
bish
Full Member
  
Member since: January 2013
Horatio Nelson 'I am a Norfolk man, and i glory in being so'
Posts: 555
Jan 13, 2013 8:57:43 GMT -5
Jan 13, 2013 8:57:43 GMT -5
|
Post by bish on Feb 26, 2017 9:53:56 GMT -5
Thanks Leon. Normally I can't, but because I treat this as one build, I find it easier. Its like doing one kit, working on the pit, then doing the wheel wells while the pit dries.
|
|
|
|
Post by dierk on Feb 26, 2017 11:22:43 GMT -5
Another interesting subject Bish!
But looking at the boxart, the 1/32 kit looks more bulbous and squat than the pointier, sleeker looking Dragon offering - is this reflected by the kits? And if so, which one's the accurate representation?
|
|
Rick
Full Member
  
Member since: March 2013
what to build, what to build . . . Ok THAT one!
Posts: 854 
|
Post by Rick on Feb 26, 2017 13:14:36 GMT -5
Bish, I'm not sure if going from four kits down to three is what I'd call taking a break since that means seven altogether but hey, why not! (I got no room to talk since I'm trying to finish up multiple kits too!). Don't think I've ever seen s 1:32 162 so looking forward to see how that shakes out. Build on!
Rick
|
|
bish
Full Member
  
Member since: January 2013
Horatio Nelson 'I am a Norfolk man, and i glory in being so'
Posts: 555
Jan 13, 2013 8:57:43 GMT -5
Jan 13, 2013 8:57:43 GMT -5
|
Post by bish on Feb 26, 2017 13:48:37 GMT -5
Thanks guys.
dierk, now you mention it, the box art does look like that, but I think that's just the pic, the kit doesn't look so squat as that and when put next to the 72nd kit they both look in proportion. I don't have any scale plans for the 162 in any scale so I will take some measurements, got me curious now.
I like a challenge Rick. Though I will be glad when this and the other build are done and I can get back to normal. What ever that is.
|
|
|
|
Post by panzerjager2 on Feb 26, 2017 16:07:08 GMT -5
Volksjager...... VERY BERRY COOL
|
|
adt70hk
Forum Moderator      November '24 Showcased Model Awarded
Member since: November 2015
Currently attempting to build something decent!!! ;)
Posts: 2,836 
MSC Staff
|
Post by adt70hk on Feb 26, 2017 17:33:05 GMT -5
Nice start Bish!
|
|
bish
Full Member
  
Member since: January 2013
Horatio Nelson 'I am a Norfolk man, and i glory in being so'
Posts: 555
Jan 13, 2013 8:57:43 GMT -5
Jan 13, 2013 8:57:43 GMT -5
|
Post by bish on Feb 27, 2017 13:04:04 GMT -5
Thanks guys.
|
|
|
|
Post by deafpanzer on Feb 28, 2017 2:47:37 GMT -5
Too cool! I think I have seen the real thing at Smithsonian's new museum in Virginia. I am gonna see if I got the pictures or not...
|
|
bish
Full Member
  
Member since: January 2013
Horatio Nelson 'I am a Norfolk man, and i glory in being so'
Posts: 555
Jan 13, 2013 8:57:43 GMT -5
Jan 13, 2013 8:57:43 GMT -5
|
Post by bish on Mar 12, 2017 6:32:56 GMT -5
Cheers Andy. I've seen the one at the IWM in London. Its hanging from the ceiling but you can get very close to it. Been falling behind a bit on this so time to do some catching up. After getting the pits painted RLM 66 it was time to add some colour. I did this is reverse by adding the colour PE to the 32nd kit and then using that as a guide to paint the 72nd one. On the resin pit for the Dragon kit, there some nice moulded detail on the side walls which i much prefer to the usual PE levers and such. I have had to thin the fuselage sides to fit the rear and front cockpit bulkheads.    On the Revell kit was added the remaining PE and some masking tape on the gun barrels. The guns in the Revell kit are pretty awful bearing no resemblance to the real thing. Good thing they can't be seen. I do like this PE pit, but if i was to do this again or be asked for a suggestion, i would go for the CMK resin pit.   And the ejecion set all ready to slide into place.  And the main wheel bay fitted with PE added. Still got to put the indentation in one piece.  Then finally time to close up. Still have some seams to clean up and some more to add to the wheel well on the Revell kit.     And both together. The Dragon is the one in front, just in case your wondering.  The engine is down in the shed having been primed and the first paint added. Still some more to add to that. Hopefully will have some pics next time along with the two aircraft having their wings on. |
|
|
|
Post by Leon on Mar 12, 2017 6:45:23 GMT -5
Nice progress Bish!
|
|
|
|
Post by dierk on Mar 12, 2017 7:37:01 GMT -5
Very cool!
|
|
|
|
Post by panzerjager2 on Mar 12, 2017 8:35:14 GMT -5
The Salamander is looking good............. If it becomes to much of a pain, you could stop where your at and do a salt mine staging thing.....very realistic tooooooooooooo
|
|
joelsmith
Full Member
  
Member since: July 2012
There no winners in war, only survivors.
Posts: 1,404
Jul 5, 2012 22:33:58 GMT -5
Jul 5, 2012 22:33:58 GMT -5
|
Post by joelsmith on Mar 12, 2017 12:12:53 GMT -5
Looking very nice!
|
|
bish
Full Member
  
Member since: January 2013
Horatio Nelson 'I am a Norfolk man, and i glory in being so'
Posts: 555
Jan 13, 2013 8:57:43 GMT -5
Jan 13, 2013 8:57:43 GMT -5
|
Post by bish on Mar 12, 2017 15:17:01 GMT -5
Cheers guys.
Panzer, now there's an idea. Though I am enjoying these, I will be glad to get back to doing one at a time.
|
|
bbrowniii
Full Member
  
Member since: March 2012
If you are not part of the solution, you are part of the precipitate.
Posts: 1,239
Mar 25, 2012 22:08:04 GMT -5
Mar 25, 2012 22:08:04 GMT -5
|
Post by bbrowniii on Mar 12, 2017 16:30:58 GMT -5
Bish
I love it! The same subject in different scales is a really cool build idea. Love the work so far!
|
|
|
|
Post by deafpanzer on Mar 13, 2017 14:05:35 GMT -5
Great update!
|
|
bish
Full Member
  
Member since: January 2013
Horatio Nelson 'I am a Norfolk man, and i glory in being so'
Posts: 555
Jan 13, 2013 8:57:43 GMT -5
Jan 13, 2013 8:57:43 GMT -5
|
Post by bish on Mar 17, 2017 1:26:17 GMT -5
Cheers guys.
brownie, its not one I will be doing often. I much prefer just working on one kit at a time. But I thought it would be an interesting experiment.
|
|
bish
Full Member
  
Member since: January 2013
Horatio Nelson 'I am a Norfolk man, and i glory in being so'
Posts: 555
Jan 13, 2013 8:57:43 GMT -5
Jan 13, 2013 8:57:43 GMT -5
|
Post by bish on Mar 20, 2017 16:48:35 GMT -5
Getting some where with this now. Painting has begun. The Dragon kit went together well with just a bit of filler on the wings and tail cone which i had expected.   And after a coat of primer, got the RLM 76 put on the underside.  because i need to mask for the top colours i left it for a couple of days. Was able to get the RLM 81 on tonight so that's now drying before doing the 82. But i was able to get a bit further on the Revell kit. Wings and tail went on really well.   And then after letting it dry for a day i applied the top colours freehand. On both kits i used Xtracolour RLM 76 but colorcoats 81 and 82 as they do the 81 in the brown version rather than green. But this means i'll have to apply a gloss coat before the decals.   I did a bit of tidying up along the edges tonight, so will gloss coat tomorrow. In the mean time i have been working on the engines. The 2 kit engines have had a primer coat and the aluminium parts painted as well as the rear.  And the HPH is now all painted up. I still have 2 small parts to add plus the intake cowling which i will do at the end. The engine is painted in using several Alclad colours in some cases mixed. 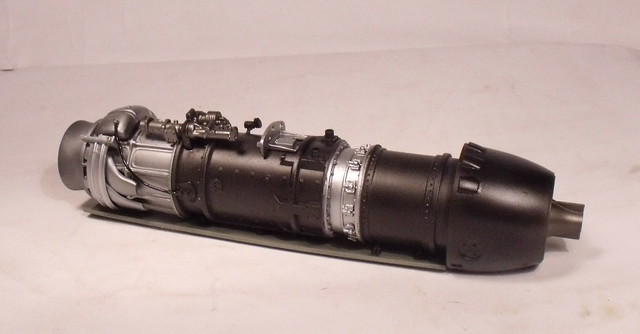 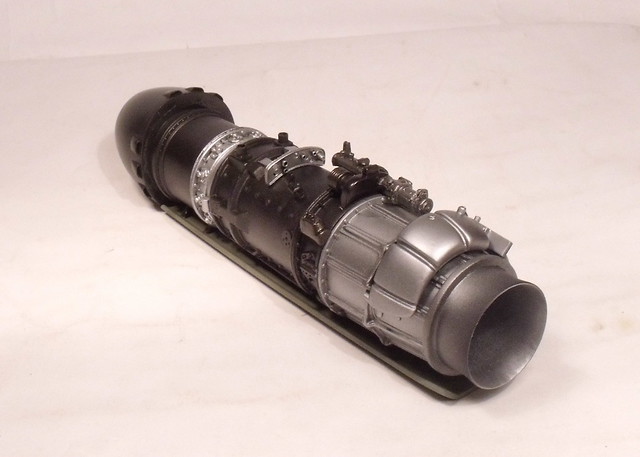 I can now focus on the wiring for this while everything else is drying. And finally, made a start on the dio base for the 72nd kit.  I got the concrete painted tonight so i can get to the celluclay over the next couple of days. Thanks for looking, more soon. |
|
|
|
Post by panzerjager2 on Mar 20, 2017 17:04:14 GMT -5
Volksjager looking very nice  PJ2 PJ2
|
|
bish
Full Member
  
Member since: January 2013
Horatio Nelson 'I am a Norfolk man, and i glory in being so'
Posts: 555
Jan 13, 2013 8:57:43 GMT -5
Jan 13, 2013 8:57:43 GMT -5
|
Post by bish on Mar 20, 2017 17:25:52 GMT -5
Thanks PJ.
|
|
|
|
Post by wing_nut on Mar 20, 2017 18:06:39 GMT -5
Cool beans brotha Bish.
|
|
|
|
Post by Leon on Mar 20, 2017 18:08:04 GMT -5
Fantastic work on the painting Bish!  |
|
bish
Full Member
  
Member since: January 2013
Horatio Nelson 'I am a Norfolk man, and i glory in being so'
Posts: 555
Jan 13, 2013 8:57:43 GMT -5
Jan 13, 2013 8:57:43 GMT -5
|
Post by bish on Mar 21, 2017 0:58:39 GMT -5
Cheers guys.
|
|
|
|
Post by deafpanzer on Mar 24, 2017 11:25:56 GMT -5
Great update!
|
|
bish
Full Member
  
Member since: January 2013
Horatio Nelson 'I am a Norfolk man, and i glory in being so'
Posts: 555
Jan 13, 2013 8:57:43 GMT -5
Jan 13, 2013 8:57:43 GMT -5
|
Post by bish on Mar 25, 2017 12:33:16 GMT -5
Cheers Andy. Almost done with the decals and wiring for he big engine is underway, so more soon.
|
|
plasticjunkie
Full Member
   Sept '24 Showcased Model Awarded
Member since: December 2016
Posts: 132
Dec 25, 2016 1:04:48 GMT -5
Dec 25, 2016 1:04:48 GMT -5
|
Post by plasticjunkie on Apr 6, 2017 7:13:18 GMT -5
Sweet Bish. I'm waiting for my decals to arrive also grabbed the new ROG Me262 Night Fighter.
|
|
bish
Full Member
  
Member since: January 2013
Horatio Nelson 'I am a Norfolk man, and i glory in being so'
Posts: 555
Jan 13, 2013 8:57:43 GMT -5
Jan 13, 2013 8:57:43 GMT -5
|
Post by bish on Apr 9, 2017 10:49:14 GMT -5
Thanks PJ. Sorry for the absence guys, bout time I wrapped this up. So, after painting and a gloss coat, i added the decals then a little Flory wash. Keeping these clean given their very short service life. For the Dragon kit i just used the kit decals.    Revell kit had a mix of kit and Eagle Cal decals.    And got the engine all wired up. 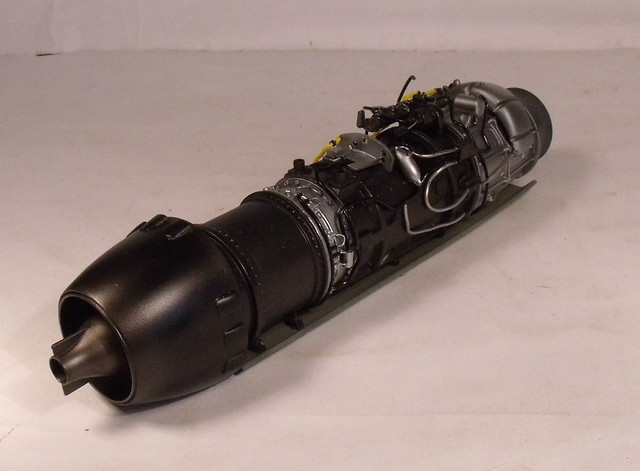 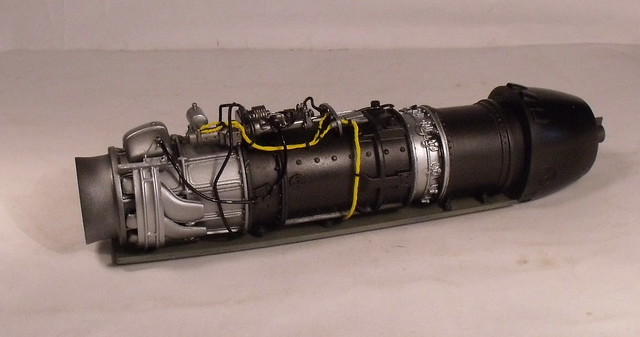 The final stage was adding canopy engine undercarriage and a few final touches and then get them on there bases. For the Dragon kit a very simple dio. The engine intake is shown in several colours and i went for the red option as i rather like that.     As with red 1, the intake on yellow 11 i have seen in a couple of colours and i went for the NMF option.     And finally the engine. Again, went for the red cowling. The part underneath is supposed to mate up with the back of the intake. Buts its a touch to long, maybe i took to much of one of the engine sections, and it doesn't curve up. I tried to force it but no go and i didn't want to break anything so decided to leave as is. 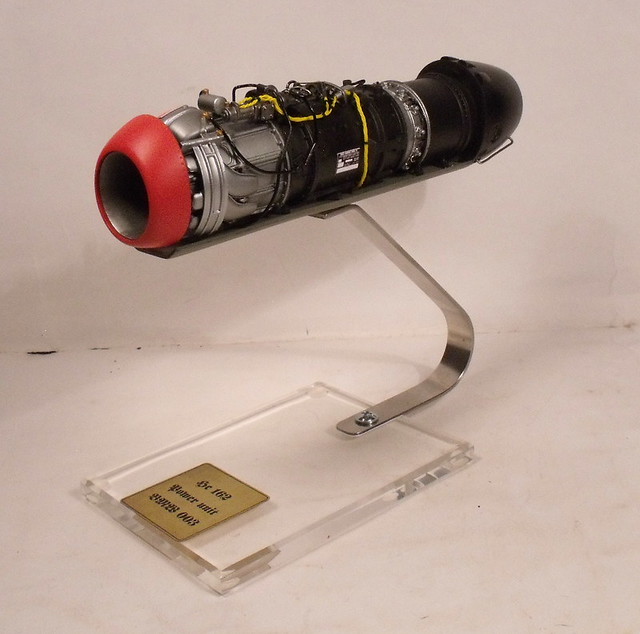 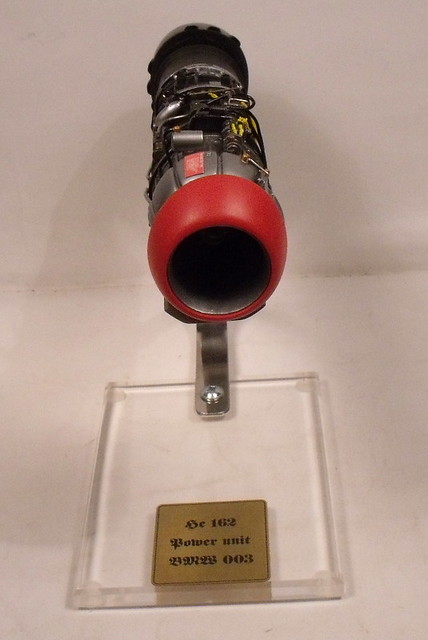 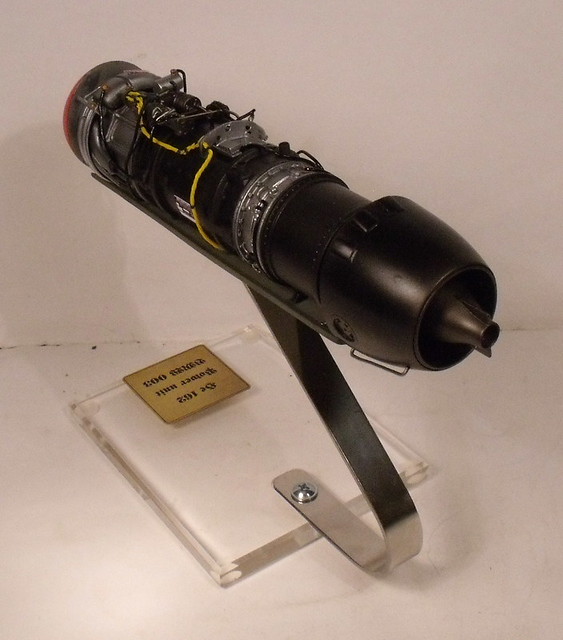 And all 3 together. 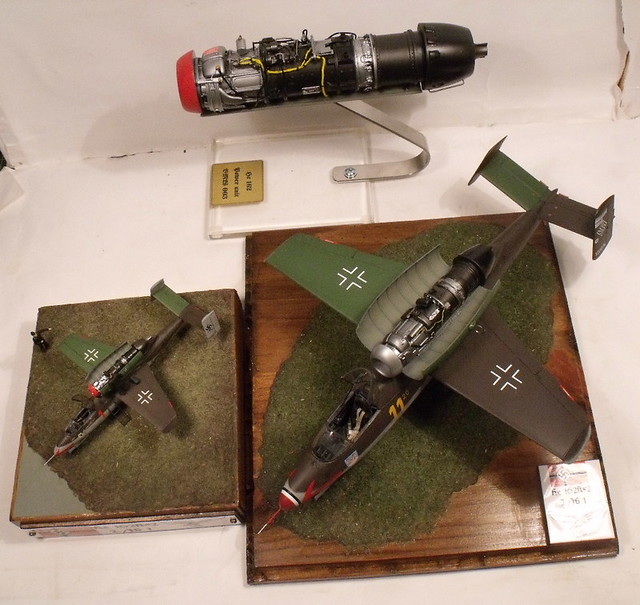 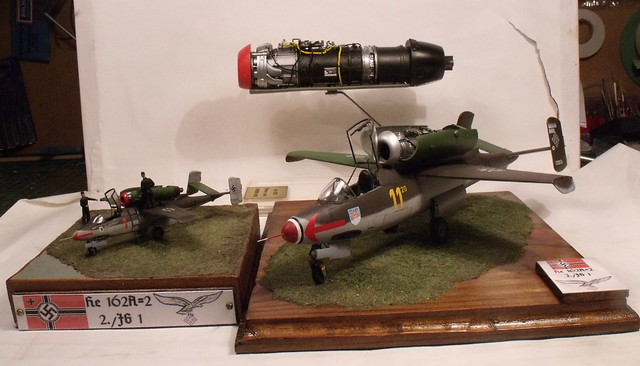 And i decided to get a pic of the two German engine together. I have been hoping they would produce some new ones, a Jumo 211 would be my choice, but so far nothing new. But i live in hope. 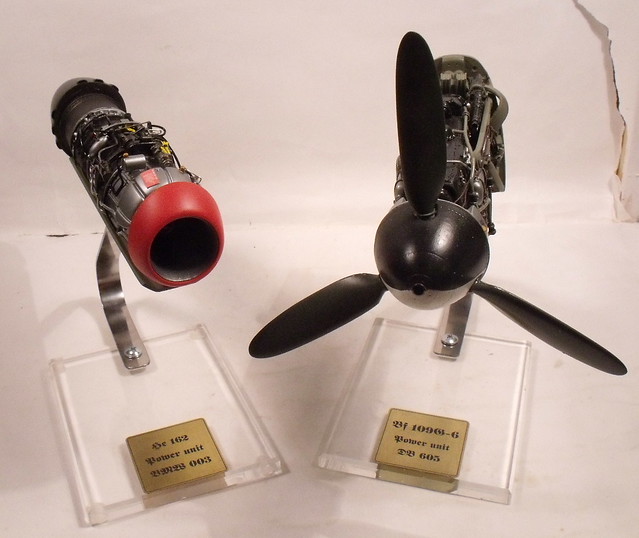 Glad to have these done, something a bit different. But now to a bit of normality. Thanks for following along. All comments welcome as always. |
|
|
|
Post by dierk on Apr 9, 2017 11:01:19 GMT -5
Excellent result(s) Bish! Very impressive!
|
|


