Post by Michael on May 12, 2018 1:04:19 GMT -5
Hi all - I completed a build of the Vimoutier Tiger back in 2010 and created the following article soon after. The article itself is a bit long so hope its ok, but other than that strap yourslef in and enjoy the read. There are plenty of pretty images along the way to demonstrate progress etc.
Here goes....................
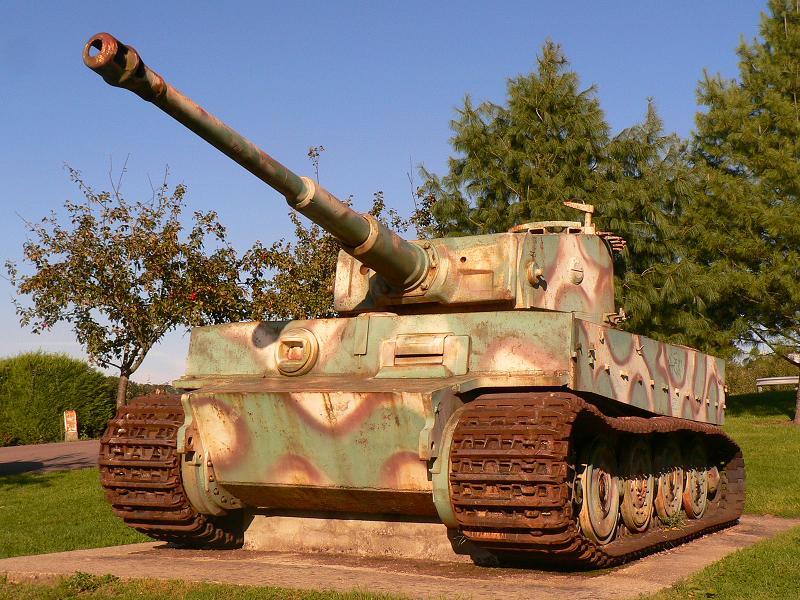
Its funny how you can be surfing the net, flicking through a book or magazine and then suddenly you see something that triggers a land slide of inspiration. My sudden trigger turned into reality with the recreation of the famous Tiger stuck by the road side not far outside of Vimoutiers, France along the D979 highway. The monster itself had a tragic end where it was one of 5 Tigers that broke out of the Falaise pocket and was in the process of taking up position in the Guerquesalles area. This vehicle, Tiger 231, which had probably run out of fuel was destroyed by its crew using two explosive charges. Over time, this Tiger was left abandoned and later pushed to the side of the road where it sat until 1975, before it was recovered and put on public display. It shows the scares of the explosions and also the prominent oxy torch cuts made by scrap metal merchants. Fortunately it escaped to smelter, and today it is a proud reminder of a war gone by and its previous owners. Even in peace time the Tiger still portrays a menacing sight and one that draws a lot of attention from the modeling community – I am no exception and it was love at first sight – well almost…………
The kit I chose as the basis for this build was the Dragon Tiger I Late Production which I picked up for $30.00AUD at the 2010 Melbourne IPMS Expo swap meet. This kit has the base requirements such as the square securing points for the track guards, but has no metal barrel, and the tracks were the newer Dragon DS type which are nice but couldn’t be used due to the join being too exposed on this build. I saw a Premium Late Tiger I, for another $20.00 but walked past it, and as it turns out had all the bits I needed. Because I bought this one, I had to later go out and buy some Friulmodel tracks and a metal barrel that cost me another $70.00 - ouch yes and lesson learned - do your home work!

Anyway, the bulk of the el cheapo kit (come mega expensive kit), was not used as the Vimoutiers Tiger has had most of the external bits stripped over time and for the scrap heap. There was however, a lot of exterior parts removal and forming of mounting brackets, cable hangers etc with most of the work being around the rear hull.
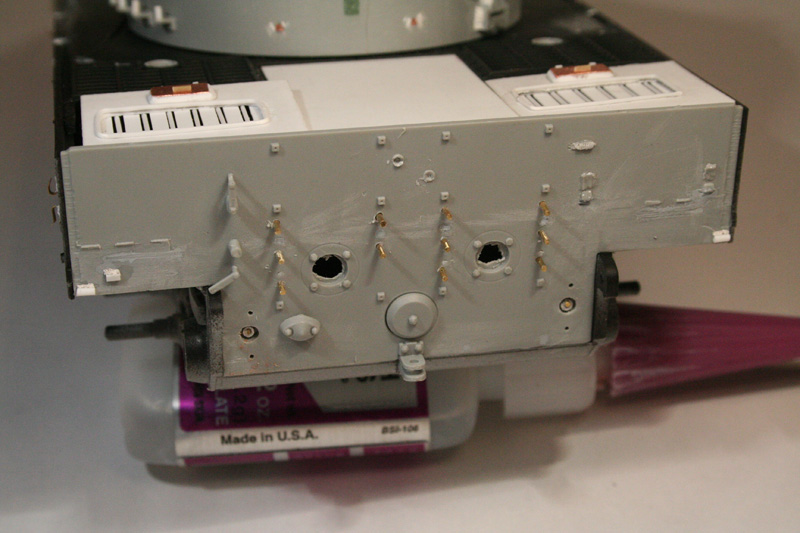

The original has extensive damage due to the crew destroying the vehicle after being abandoned in the town. The resulting damage can be seen in the original pics, which I have also tried to replicate as closely as possible.
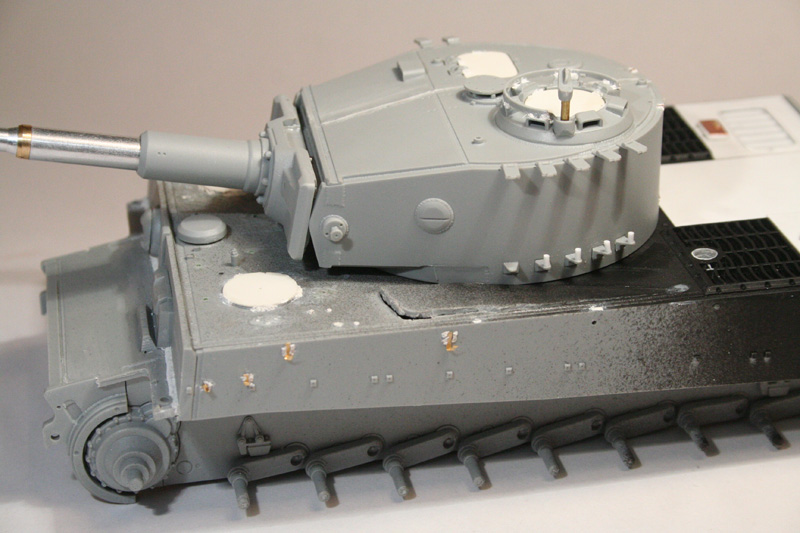
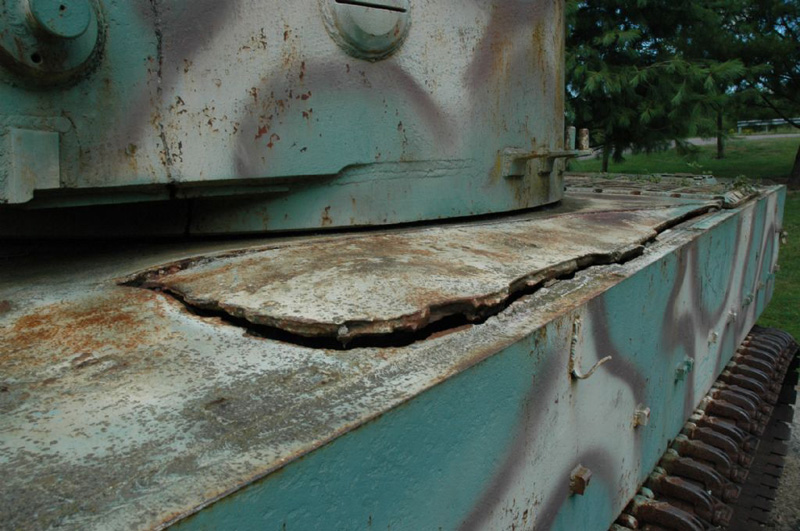
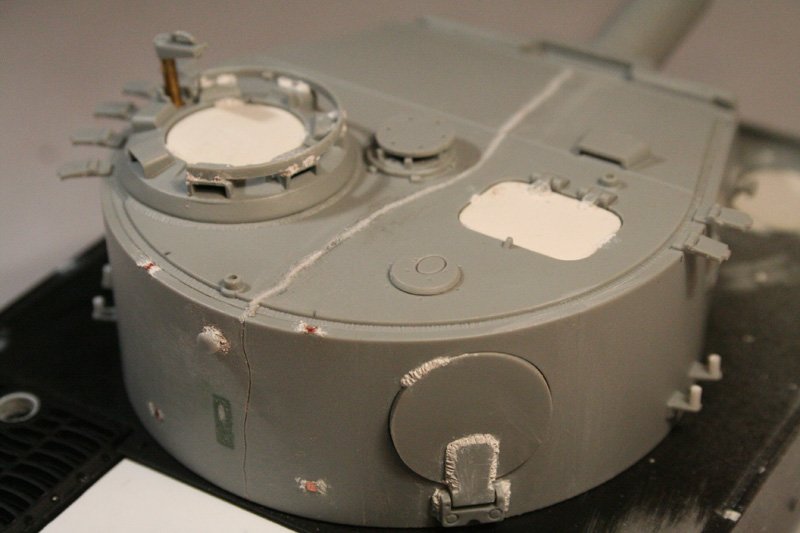
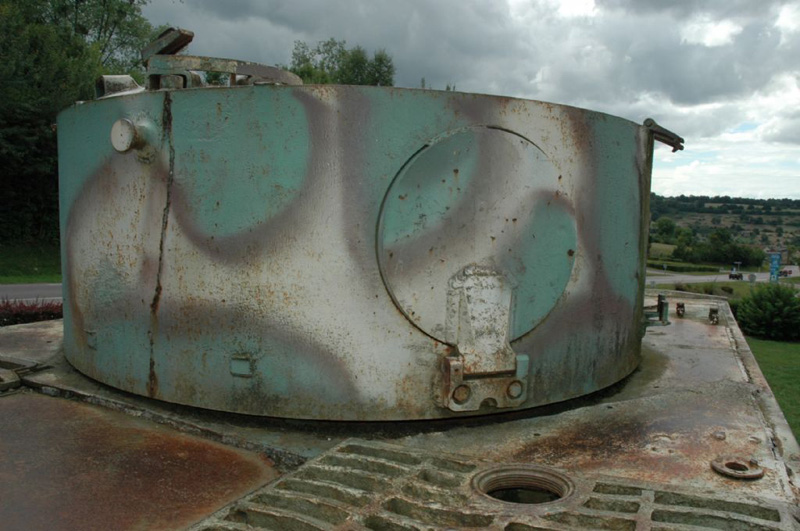
The engine deck included two Panzer IV grills which originally had me stumped, and I call myself an AFV builder! I tried to scratch build a set of grills using plastic card, but my efforts weren’t the best but at least I gave it a shot. This was the cause of delay but I was determined to hit them on the head and hopefully come up with a better solution short of buying two Panzer IV kits just for the grills.
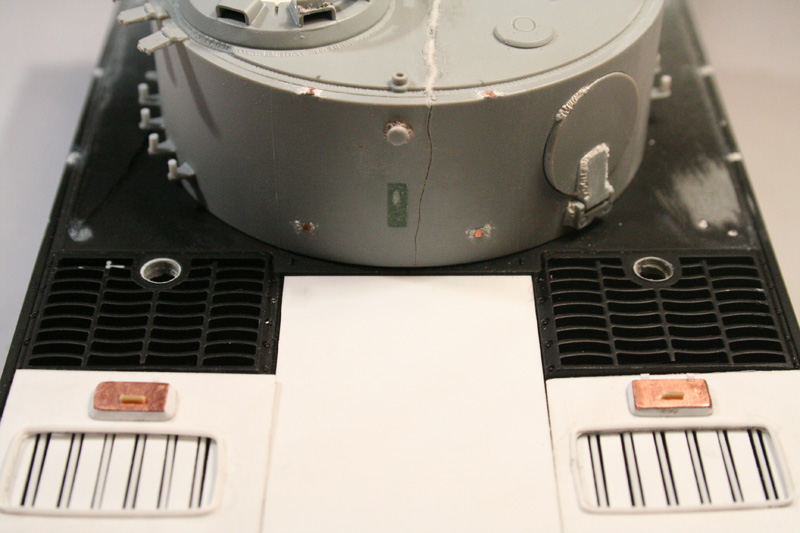
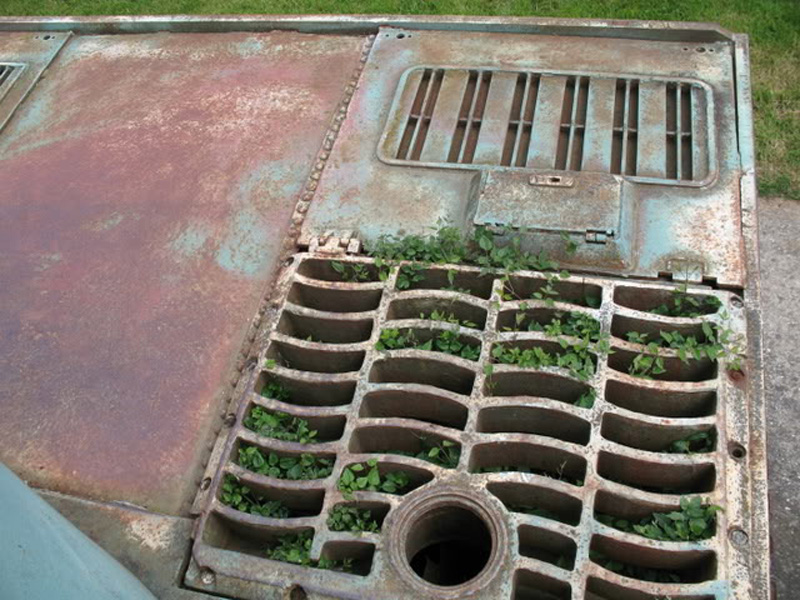
The weeds growing through those grills will have to be replicated, and I have a product that will do the job nicely.
One major undertaking has been the creation of the weld seams, a job that I have not yet attempted. I first tried to use plastic rod for the weld seam on the turret roof, but it ended up a little nasty as the rod was a bit too thick and I tried to work it before it was soft enough. I got it in the end but then decided to move onto a nicer method – MilliPut Superfine. Basically, the two parts were mixed together in the finger tips and rolled as fine as possible and put in place with a wet brush and the tip of a hobby blade. The welded surface was pressed into place with the blade tip, and is not all that easy as the smaller welds are very tiny. It was actually a pleasing process as I could see the results almost immediately.
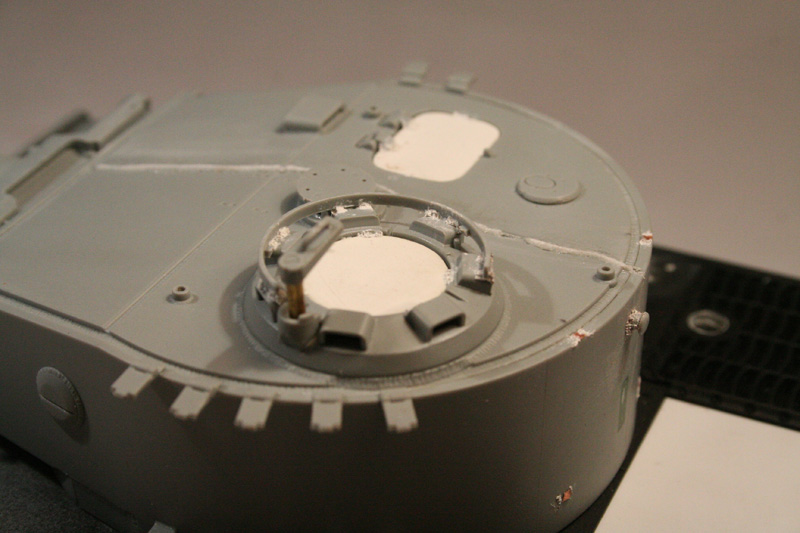
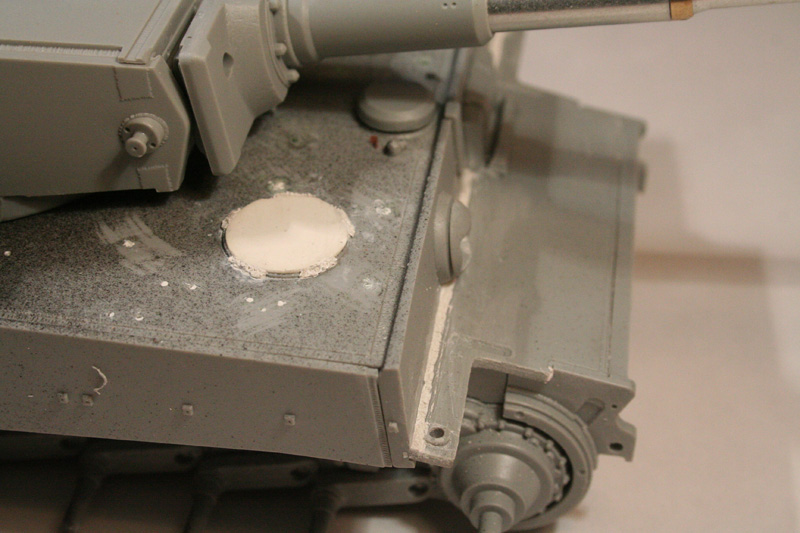
At this point I have been thinking of the painting stage and will be a real challenge due to a lot of surface rust and faded cammo scheme. There are so many variations in color tone, that there will be many skills employed and researched to bring her to life.
I was told the 'Euro Modelisimo's' "Panzer Aces #12 Tiger 1 special' has a build by Fernando Perales Tobajas or this vehicle, so I picked up a copy to help as a guide. There are 6 pages of the kit featured and another 5 photos of the real subject. I have dozens of pics of this particular vehicle, but wouldnt you know it, there was one photo in the mag that very clearly showed another major crack just in front of the left side engine grill (looking from the front). Fortunately this area on my build was still accessible, and was able to add the missing crack with not too much fuss at all.
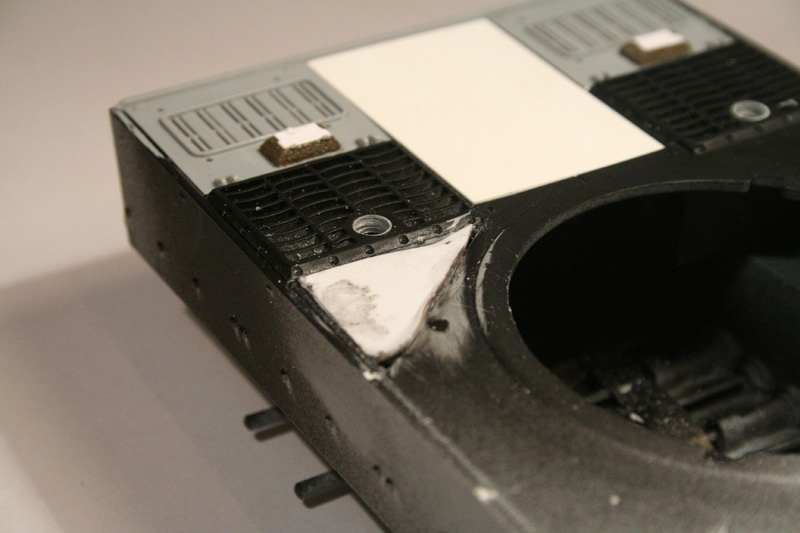
First I marked the area for the crack with a pencil and cut out the kit plastic and added a damaged section. I just used thicker plastic card that was close to the scale steel thickness, and formed using the heat from a match. There will be some more work to follow, but has filled the gap for now.
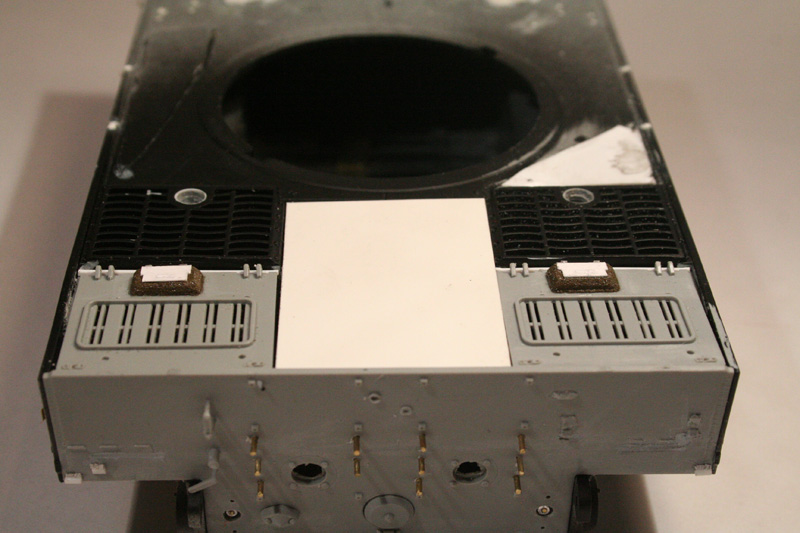
I was lucky enough to score two panzer IV grills from my friend Tom, which saved me a lot of grief trying to make my own. The parts were minus the box thing on top, so I formed two of these using balsa foam and thin card for the lids. The balsa foam was later sealed and sanded smooth for a more realistic finish.
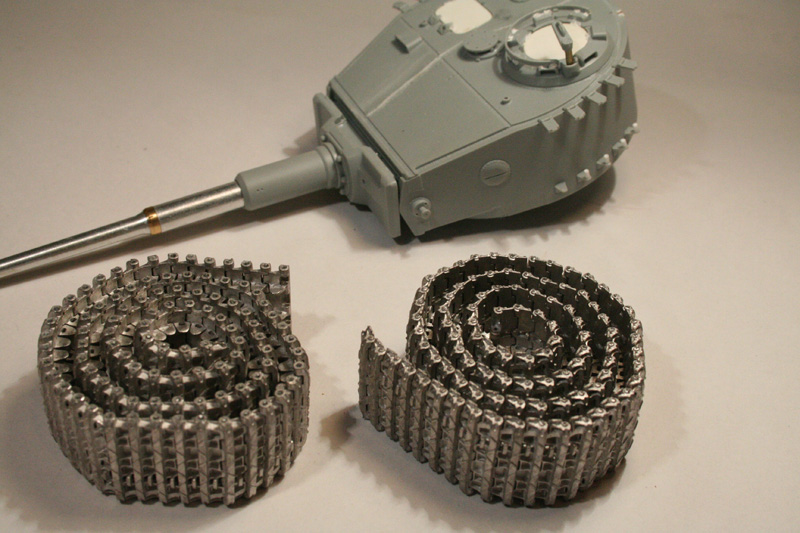
Oh, I also picked up a set of Fruilmodel Middle-Late Tiger I metal tracks, and are my first set. These are fantastic and no clean up required here, but you do need to insert wire track pins and ream out the pin holes which take most of the time.
Ok,sorry, but I really jumped ahead and missed a few pics before the painting really took shape. A fair bit of time was spent on this stage and the weathering, but very quickly realized how complex it would be. To begin with the colors of the photos varied a lot for the shade of the green, or is it blue cammo. The brown line that breaks up the pattern seems to be a combination of sprayed and possibly brush painted, with the photos indicating both or are they just bad photos. All the pics are taken over a period of time as evident with missing graffiti and changes in rust patterns. After a while I was going crazy for what effects I was trying to replicate, so in the end I have a build that is looking like a mix of age over time plus random graffiti. I was working towards a happy balance between what I can realistically do and what is evident from the photos.
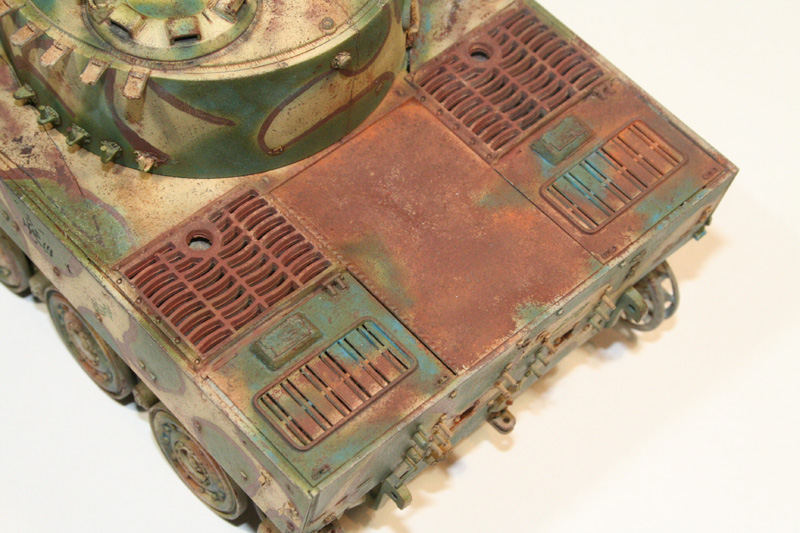
The rear engine deck includes the two Panzer IV engine covers, steel plate and rusting using MIG pigments Light Rust and Dark Rust.
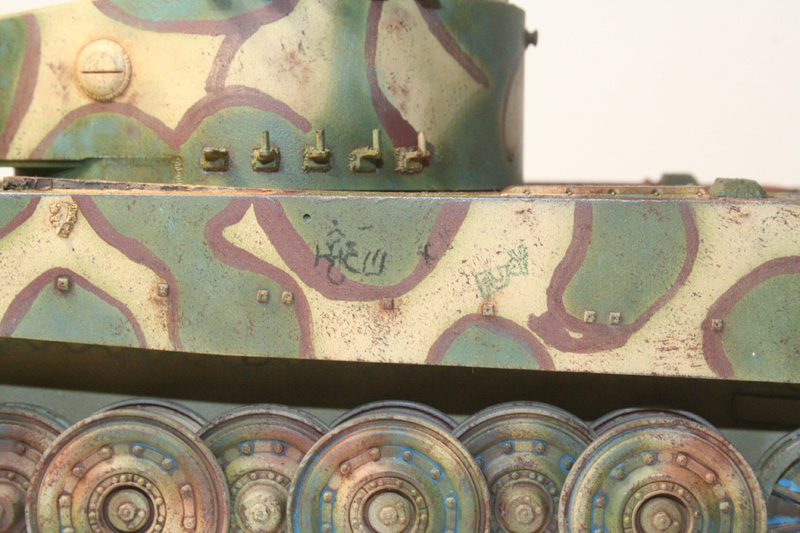
Left hand side view showing some of the graffiti and brass rod track hangers with Milliput weld seams
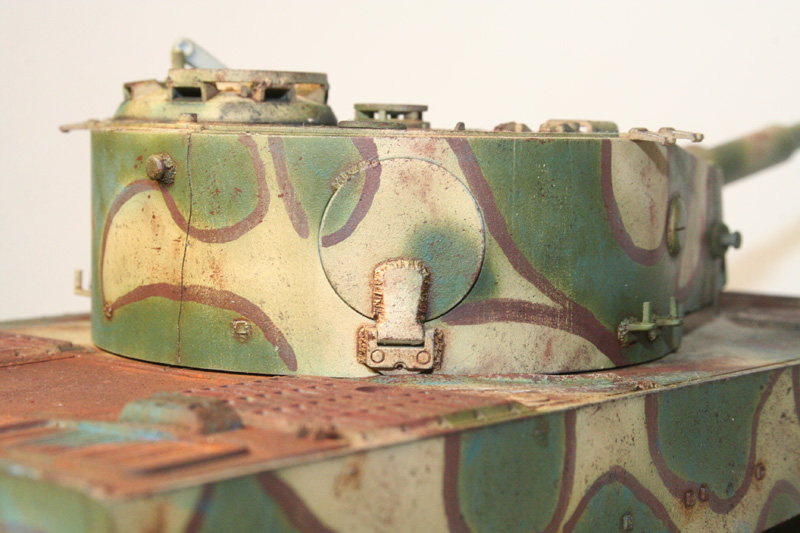
Turret hatch also with weld seams as it was sealed as per the real sample.
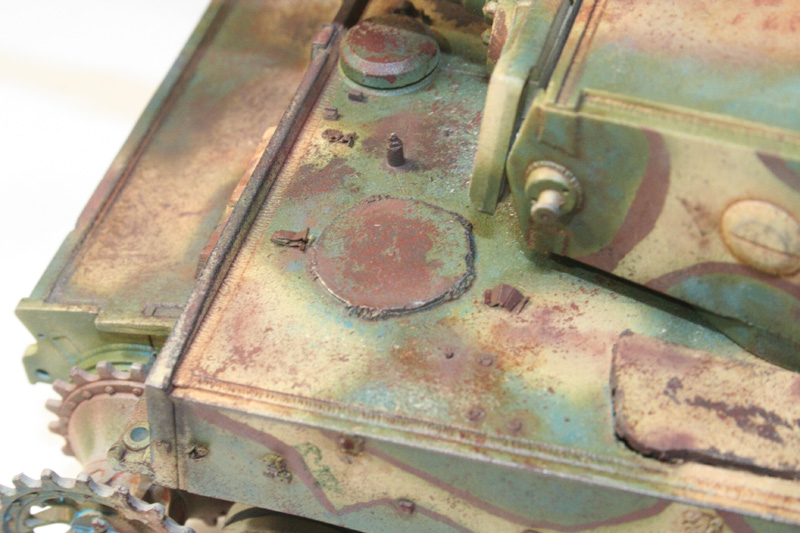
Left hand side driver hatch also sealed.
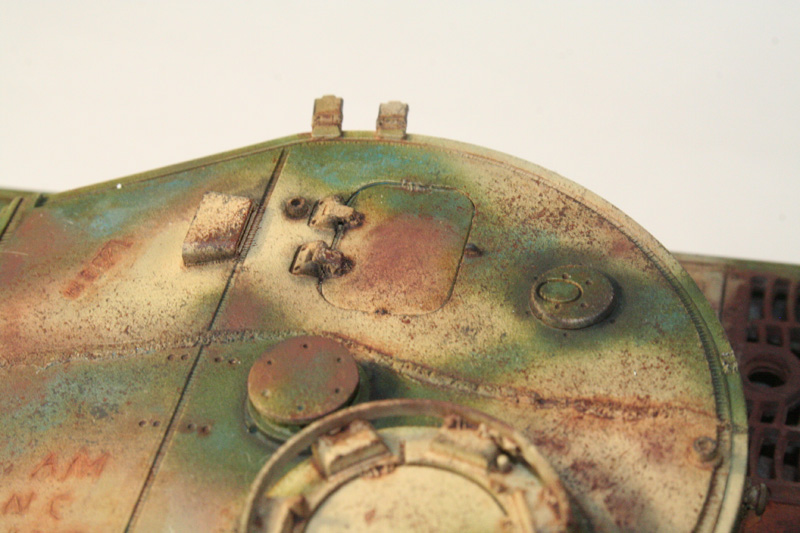
Top view of the turret showing oxy torch cut and weld seam plus sealed loaders hatch.
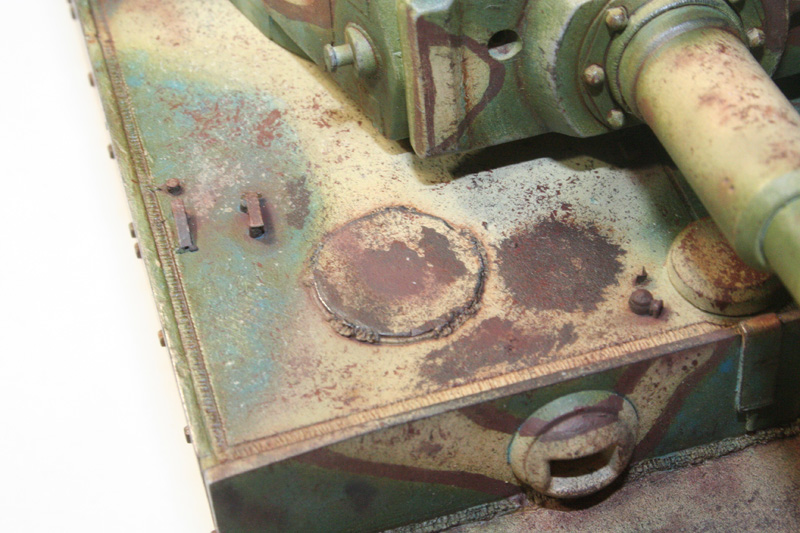
Right side radio operators hatch and yes, sealed
All the paint chipping was applied using a small piece of sponge dipped in a combination of Vallejo Hull Red and Cam Black Brown. The excess paint was removed and very randomly dabbed onto the surface. The larger chipped areas were hand painted before using the sponge to break up the lines.
The graffiti was added using a Fabre Castell pencil for the green and a Charcoal pencil for the black. On top of the green cammo I applied a very thin layer of Cerulean Blue Hue oil to add the blue tint as it appears in the photos. Also applied 502 Wash Brown to all the details areas as a pin wash in an effort not to darken too much.
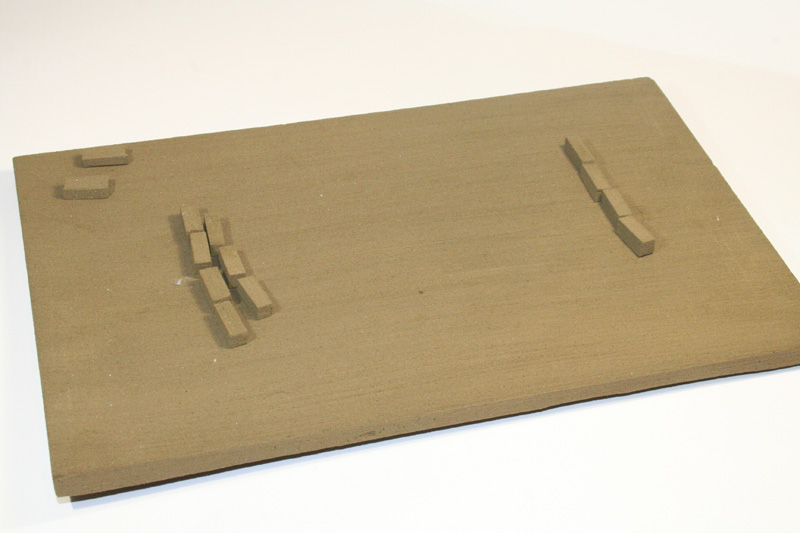
Here you can see I have started the concrete slab made from Balsa Foam, which was a very simple exercise of measuring and cutting using a fine saw. What you see here is the raw color of the product but will be sealed and then painted a much lighter gray color, plus the usual weathering and dirt deposit's etc.
The tracks received the Blacken-IT treatment by pouring half the contents into two small plastic containers, and then placing the tracks directly into it. The product changes into a merky brown sludge as it does its magic. The tracks came out fairly black after about an hour, but not all surfaces were covered, leaving some bare metal in between the track detail areas. I later read that I should have first soaked the tracks in white vinegar followed by a rinse in water. This would have then allowed a better coloring of the tracks. The tracks were later treated to MIG Dark and Light Rust as a base color, but are yet to receive additional detailing.
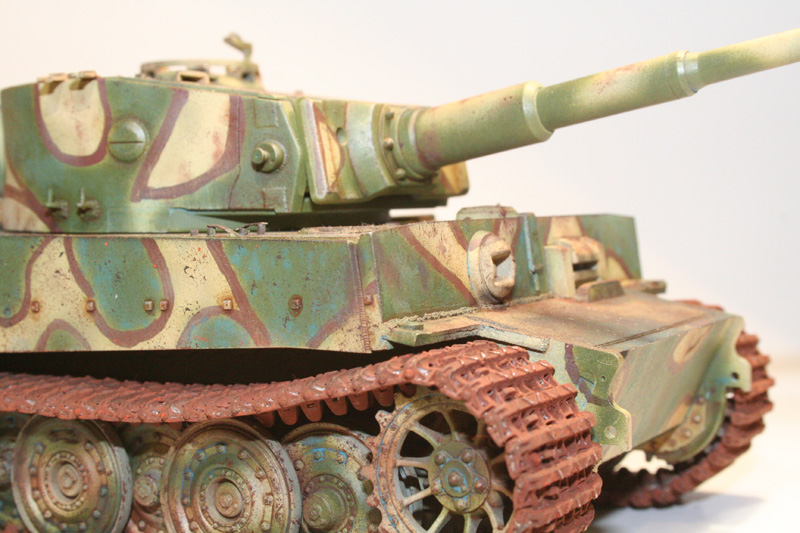
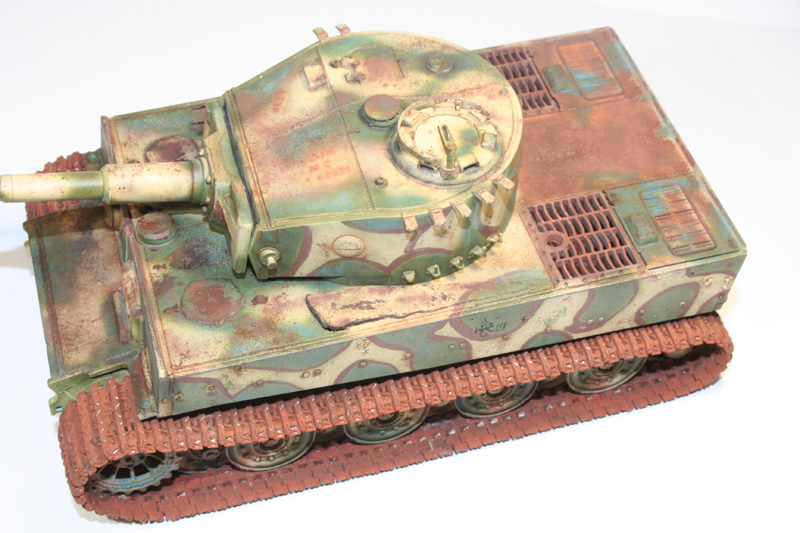
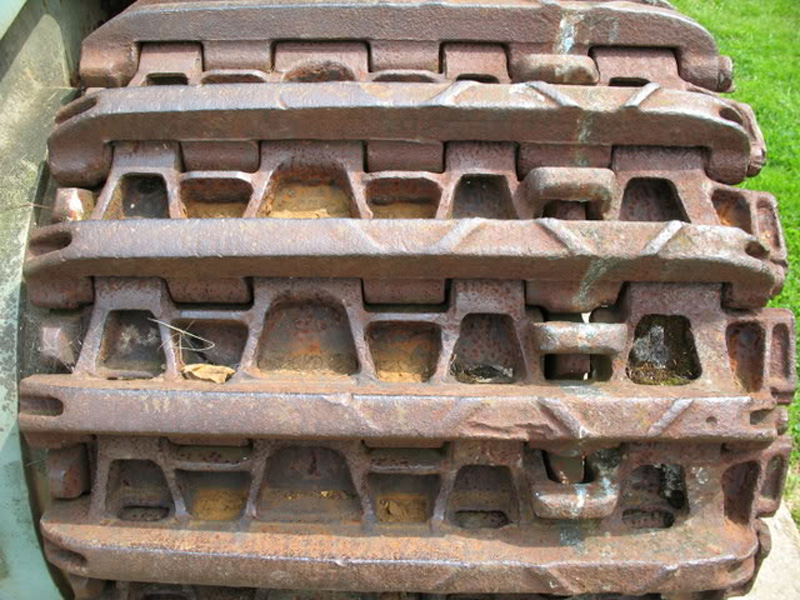
As you can see below the original tracks are fairly rusted up and appear to be a darker shade, so I will still need to work on this, perhaps using an oil wash.
As you can see I now have the concrete slab ready to go with the addition of a very thin layer of a product called Simply Stucco. This stuff is a pasty grainy substance that is easily applied with a paint scrapper or something similar. This was spread over the balsa foam very thin so that the grain is visible to represent the texture of the concrete in a realistic manner. Once dry with the help of a hair dryer (10 mins), I then added Alclad II primer which became the main base color. On top of this I stippled on a fairly thick random layer of MIG Pigment Panzer Grey Fading P035 to add tone variations to the primer grey. Inside the concrete bricks walls under the hull I added MIG Russian Earth pigment to act as a layer of dark dirt build up. After all this I then created tufts of dead grass under the tracks using craft string cut to very small sizes and glued in place using a mix of PVA and water. The concrete slab was then bordered using model ship building timbers which will become a step up from the wood base that I have prepared (not quite happy with it so not yet displayed). Have also added the weeds that are growing through the rear engine deck using pieces of Super Trees.
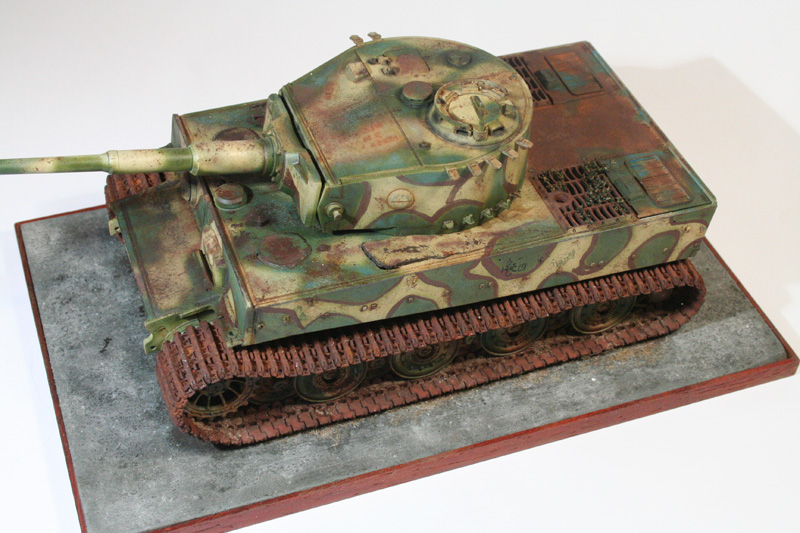
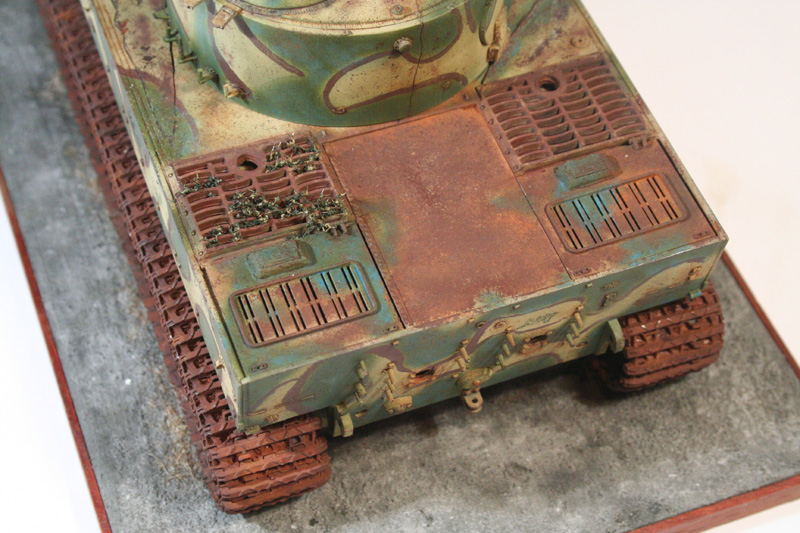
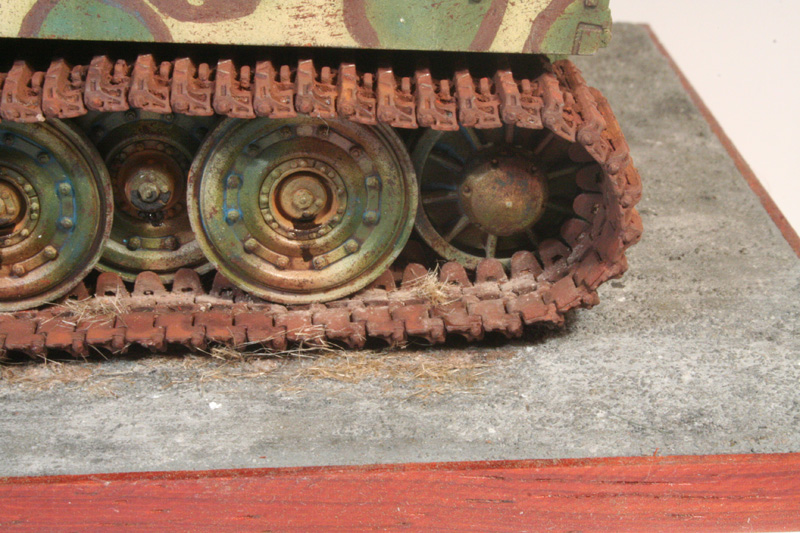
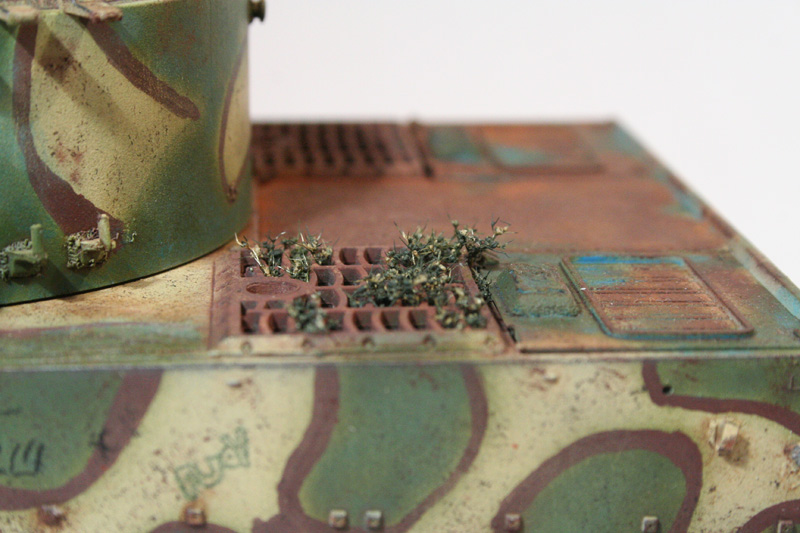
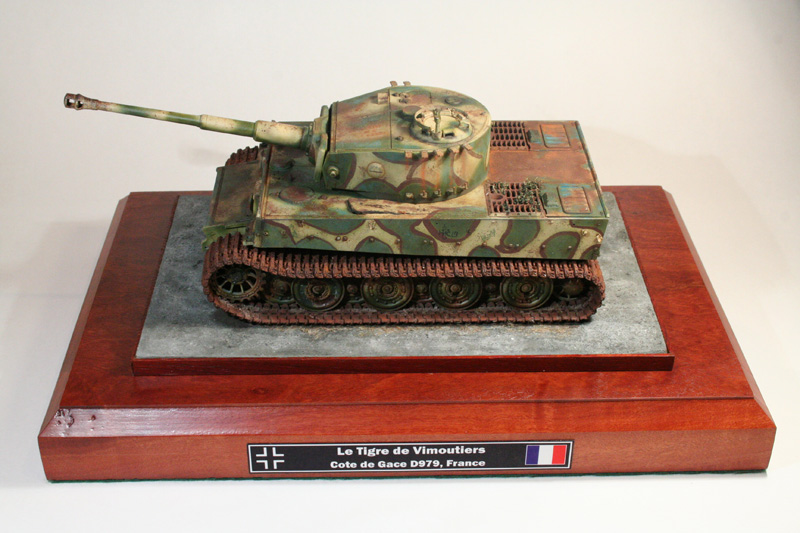
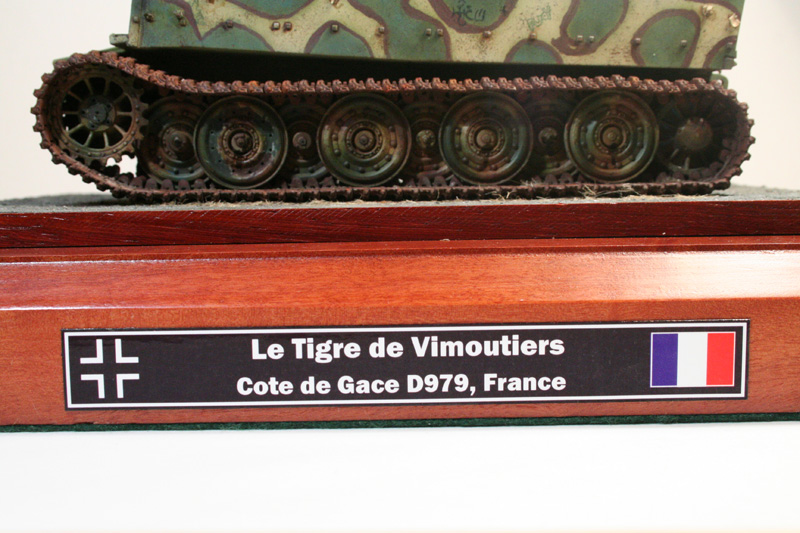
The base is a piece of Red Gum that has been edge routered and oiled with a green felt lining on the underside. The name plate was created in Adobe Photoshop, but this time printed on Glossy InkJet paper. The result was that the black printed very close to true black as opposed to printing on a Matt finish paper, which gives a kind of faded black.

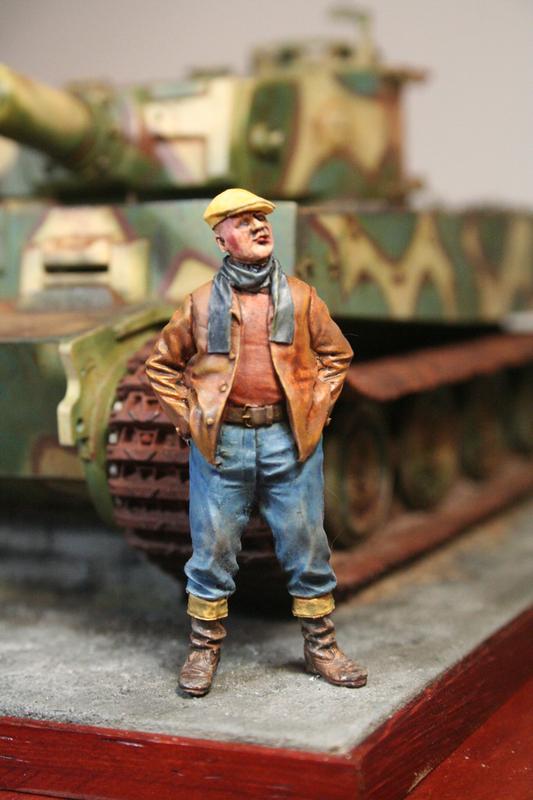
The figure that I have chosen was one I found today at a local competition, and is a MIG figure called Civil Russian Hooligan. Even with this name he can easily pass as a Frenchman right up to modern day, so I thought he would fit well as the final touch.
Here is the completed build with the figure painted and mounted. I have a very basic approach to my figures, but is one I am happy with....for now that is. Here is a very basic description of how I went about it.
I firstly primed using Citadel spray white primer, but would have used black but didn't have any handy.
The face was then painted using oils to add highlights and shadows but in very small quantities with attention to blending to smooth out any lines.
All other pieces of clothing and the boots were first painted using a slightly thinned base coat of Vallejo. The pants were painted using Life Color as it was what I had that best suited the color shown. It is very important to make sure that every part of the figure is coated, otherwise the top coat can turn out patchy or uneven in color.
The top coat was applied using oils of a similar color and it is this layer that gives depth and richness to the figure.
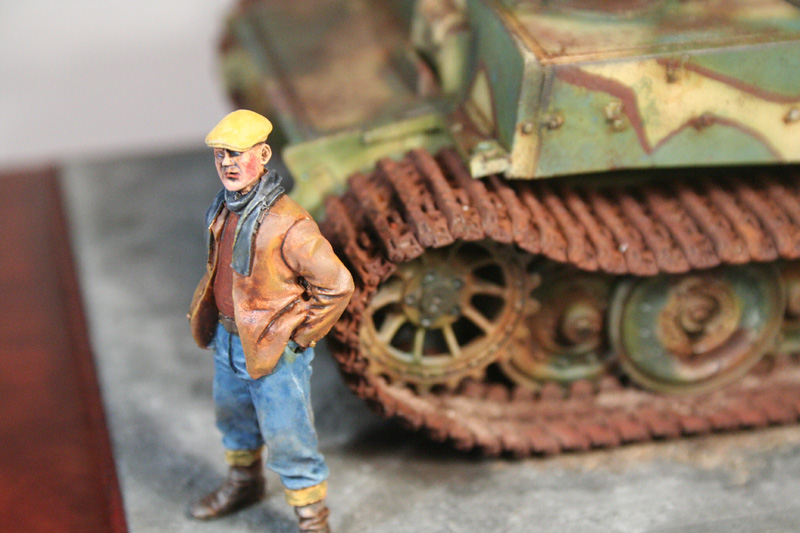
This build was the first one that I planed from start to finish, and as a result I am very happy with what I have achieved. It was a build where most of the molded kit parts were removed and nearly half of the kit parts left in the box as spares. This is a bare bones Tiger but with a very challenging paint job that was a real test of endurance and patience. The Fruil tracks were a first and what a pleasure to use and will definitely grab some more in the future. Well, that’s a wrap and I guess there will be more to come – oh by the way there are many road side tank displays throughout Europe , so give one a try!!
Here goes....................
Its funny how you can be surfing the net, flicking through a book or magazine and then suddenly you see something that triggers a land slide of inspiration. My sudden trigger turned into reality with the recreation of the famous Tiger stuck by the road side not far outside of Vimoutiers, France along the D979 highway. The monster itself had a tragic end where it was one of 5 Tigers that broke out of the Falaise pocket and was in the process of taking up position in the Guerquesalles area. This vehicle, Tiger 231, which had probably run out of fuel was destroyed by its crew using two explosive charges. Over time, this Tiger was left abandoned and later pushed to the side of the road where it sat until 1975, before it was recovered and put on public display. It shows the scares of the explosions and also the prominent oxy torch cuts made by scrap metal merchants. Fortunately it escaped to smelter, and today it is a proud reminder of a war gone by and its previous owners. Even in peace time the Tiger still portrays a menacing sight and one that draws a lot of attention from the modeling community – I am no exception and it was love at first sight – well almost…………

The kit I chose as the basis for this build was the Dragon Tiger I Late Production which I picked up for $30.00AUD at the 2010 Melbourne IPMS Expo swap meet. This kit has the base requirements such as the square securing points for the track guards, but has no metal barrel, and the tracks were the newer Dragon DS type which are nice but couldn’t be used due to the join being too exposed on this build. I saw a Premium Late Tiger I, for another $20.00 but walked past it, and as it turns out had all the bits I needed. Because I bought this one, I had to later go out and buy some Friulmodel tracks and a metal barrel that cost me another $70.00 - ouch yes and lesson learned - do your home work!

Anyway, the bulk of the el cheapo kit (come mega expensive kit), was not used as the Vimoutiers Tiger has had most of the external bits stripped over time and for the scrap heap. There was however, a lot of exterior parts removal and forming of mounting brackets, cable hangers etc with most of the work being around the rear hull.


The original has extensive damage due to the crew destroying the vehicle after being abandoned in the town. The resulting damage can be seen in the original pics, which I have also tried to replicate as closely as possible.


The engine deck included two Panzer IV grills which originally had me stumped, and I call myself an AFV builder! I tried to scratch build a set of grills using plastic card, but my efforts weren’t the best but at least I gave it a shot. This was the cause of delay but I was determined to hit them on the head and hopefully come up with a better solution short of buying two Panzer IV kits just for the grills.


The weeds growing through those grills will have to be replicated, and I have a product that will do the job nicely.
One major undertaking has been the creation of the weld seams, a job that I have not yet attempted. I first tried to use plastic rod for the weld seam on the turret roof, but it ended up a little nasty as the rod was a bit too thick and I tried to work it before it was soft enough. I got it in the end but then decided to move onto a nicer method – MilliPut Superfine. Basically, the two parts were mixed together in the finger tips and rolled as fine as possible and put in place with a wet brush and the tip of a hobby blade. The welded surface was pressed into place with the blade tip, and is not all that easy as the smaller welds are very tiny. It was actually a pleasing process as I could see the results almost immediately.


At this point I have been thinking of the painting stage and will be a real challenge due to a lot of surface rust and faded cammo scheme. There are so many variations in color tone, that there will be many skills employed and researched to bring her to life.
I was told the 'Euro Modelisimo's' "Panzer Aces #12 Tiger 1 special' has a build by Fernando Perales Tobajas or this vehicle, so I picked up a copy to help as a guide. There are 6 pages of the kit featured and another 5 photos of the real subject. I have dozens of pics of this particular vehicle, but wouldnt you know it, there was one photo in the mag that very clearly showed another major crack just in front of the left side engine grill (looking from the front). Fortunately this area on my build was still accessible, and was able to add the missing crack with not too much fuss at all.

First I marked the area for the crack with a pencil and cut out the kit plastic and added a damaged section. I just used thicker plastic card that was close to the scale steel thickness, and formed using the heat from a match. There will be some more work to follow, but has filled the gap for now.
I was lucky enough to score two panzer IV grills from my friend Tom, which saved me a lot of grief trying to make my own. The parts were minus the box thing on top, so I formed two of these using balsa foam and thin card for the lids. The balsa foam was later sealed and sanded smooth for a more realistic finish.

Oh, I also picked up a set of Fruilmodel Middle-Late Tiger I metal tracks, and are my first set. These are fantastic and no clean up required here, but you do need to insert wire track pins and ream out the pin holes which take most of the time.

Ok,sorry, but I really jumped ahead and missed a few pics before the painting really took shape. A fair bit of time was spent on this stage and the weathering, but very quickly realized how complex it would be. To begin with the colors of the photos varied a lot for the shade of the green, or is it blue cammo. The brown line that breaks up the pattern seems to be a combination of sprayed and possibly brush painted, with the photos indicating both or are they just bad photos. All the pics are taken over a period of time as evident with missing graffiti and changes in rust patterns. After a while I was going crazy for what effects I was trying to replicate, so in the end I have a build that is looking like a mix of age over time plus random graffiti. I was working towards a happy balance between what I can realistically do and what is evident from the photos.

The rear engine deck includes the two Panzer IV engine covers, steel plate and rusting using MIG pigments Light Rust and Dark Rust.

Left hand side view showing some of the graffiti and brass rod track hangers with Milliput weld seams

Turret hatch also with weld seams as it was sealed as per the real sample.

Left hand side driver hatch also sealed.

Top view of the turret showing oxy torch cut and weld seam plus sealed loaders hatch.

Right side radio operators hatch and yes, sealed
All the paint chipping was applied using a small piece of sponge dipped in a combination of Vallejo Hull Red and Cam Black Brown. The excess paint was removed and very randomly dabbed onto the surface. The larger chipped areas were hand painted before using the sponge to break up the lines.
The graffiti was added using a Fabre Castell pencil for the green and a Charcoal pencil for the black. On top of the green cammo I applied a very thin layer of Cerulean Blue Hue oil to add the blue tint as it appears in the photos. Also applied 502 Wash Brown to all the details areas as a pin wash in an effort not to darken too much.
Here you can see I have started the concrete slab made from Balsa Foam, which was a very simple exercise of measuring and cutting using a fine saw. What you see here is the raw color of the product but will be sealed and then painted a much lighter gray color, plus the usual weathering and dirt deposit's etc.

The tracks received the Blacken-IT treatment by pouring half the contents into two small plastic containers, and then placing the tracks directly into it. The product changes into a merky brown sludge as it does its magic. The tracks came out fairly black after about an hour, but not all surfaces were covered, leaving some bare metal in between the track detail areas. I later read that I should have first soaked the tracks in white vinegar followed by a rinse in water. This would have then allowed a better coloring of the tracks. The tracks were later treated to MIG Dark and Light Rust as a base color, but are yet to receive additional detailing.


As you can see below the original tracks are fairly rusted up and appear to be a darker shade, so I will still need to work on this, perhaps using an oil wash.

As you can see I now have the concrete slab ready to go with the addition of a very thin layer of a product called Simply Stucco. This stuff is a pasty grainy substance that is easily applied with a paint scrapper or something similar. This was spread over the balsa foam very thin so that the grain is visible to represent the texture of the concrete in a realistic manner. Once dry with the help of a hair dryer (10 mins), I then added Alclad II primer which became the main base color. On top of this I stippled on a fairly thick random layer of MIG Pigment Panzer Grey Fading P035 to add tone variations to the primer grey. Inside the concrete bricks walls under the hull I added MIG Russian Earth pigment to act as a layer of dark dirt build up. After all this I then created tufts of dead grass under the tracks using craft string cut to very small sizes and glued in place using a mix of PVA and water. The concrete slab was then bordered using model ship building timbers which will become a step up from the wood base that I have prepared (not quite happy with it so not yet displayed). Have also added the weeds that are growing through the rear engine deck using pieces of Super Trees.


The base is a piece of Red Gum that has been edge routered and oiled with a green felt lining on the underside. The name plate was created in Adobe Photoshop, but this time printed on Glossy InkJet paper. The result was that the black printed very close to true black as opposed to printing on a Matt finish paper, which gives a kind of faded black.


The figure that I have chosen was one I found today at a local competition, and is a MIG figure called Civil Russian Hooligan. Even with this name he can easily pass as a Frenchman right up to modern day, so I thought he would fit well as the final touch.
Here is the completed build with the figure painted and mounted. I have a very basic approach to my figures, but is one I am happy with....for now that is. Here is a very basic description of how I went about it.
I firstly primed using Citadel spray white primer, but would have used black but didn't have any handy.
The face was then painted using oils to add highlights and shadows but in very small quantities with attention to blending to smooth out any lines.
All other pieces of clothing and the boots were first painted using a slightly thinned base coat of Vallejo. The pants were painted using Life Color as it was what I had that best suited the color shown. It is very important to make sure that every part of the figure is coated, otherwise the top coat can turn out patchy or uneven in color.
The top coat was applied using oils of a similar color and it is this layer that gives depth and richness to the figure.


This build was the first one that I planed from start to finish, and as a result I am very happy with what I have achieved. It was a build where most of the molded kit parts were removed and nearly half of the kit parts left in the box as spares. This is a bare bones Tiger but with a very challenging paint job that was a real test of endurance and patience. The Fruil tracks were a first and what a pleasure to use and will definitely grab some more in the future. Well, that’s a wrap and I guess there will be more to come – oh by the way there are many road side tank displays throughout Europe , so give one a try!!


