george
Full Member
  
Member since: February 2014
Posts: 277 
|
Post by george on May 26, 2022 18:50:53 GMT -5
It's a real masterpiece!
|
|
|
|
Post by Steve Zuleski on May 29, 2022 11:36:34 GMT -5
Hey thanks, George!
|
|
|
|
Post by Steve Zuleski on May 29, 2022 11:37:50 GMT -5
Battle of the Tartans, Part 2After wrapping my head around the correct pattern, the Battle of the Tartans was well underway. The Officer figure has a checker board pattern which is incorrect whereas this pattern on Hatchet man is more correct. I’m no expert by any means when it comes to this portion of the process and had to have my pretty little woman, my wife, get my head straight on what I was looking at. She recognized it right off, but oh no, not me, HA! She’s a keeper! 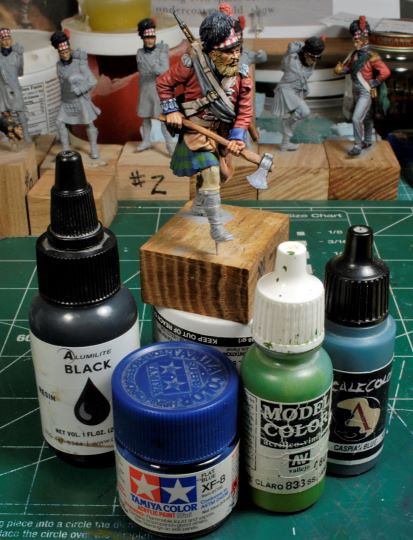 The colors used are pictured above, all acrylics. All of the black acrylics I have would not cooperate with the thin line process so I dug up my black resin dye and proceeded. I thinned it with water using small amounts on the brush to avoid “blob” lines. It was a long painful process to get the lines in place and, as you can see, it ain’t pretty. I went back with each color to fix some of the line “blobs” wherever possible, but the thickness of some of the lines are glaring me in the face. These pleats are nothing but a nightmare, for me anyway, just sayin. This is a frustrating process, but it turned out acceptable enough, especially when later I’ll give the tartan a few tonal washes so most of my boofs will not be easily visible. Like a good carpenter, ya gotta know how to hide your mistakes, right? It sure would have been really swell to leave the tartan without the lines, but that would not be correct. 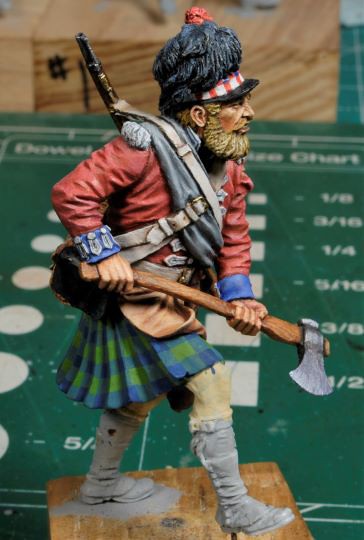 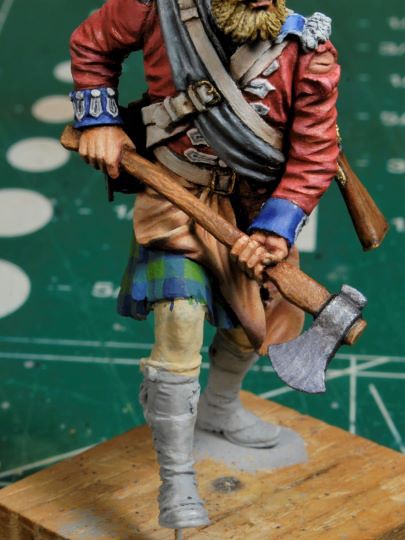 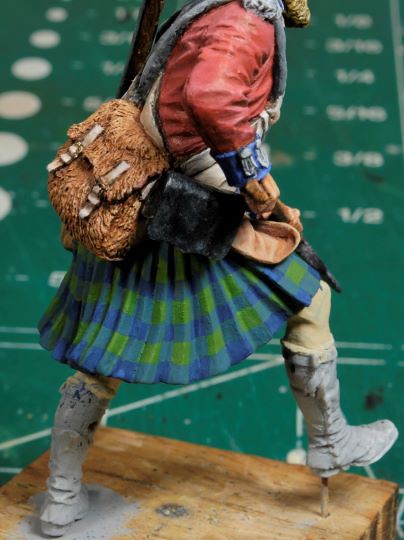 Being self-critical, as I often am, I was not exactly pleased with the outcome of the lines. I recon after the last figure I will have perfected some process or technique that will make these tartans look real, but not yet, lol. Even using a 0000 brush doesn’t seem to help me with these lines. I’ve seen several examples of 54mm tartans painted, all different patterns, but they seem to have the patterns larger than they should be. I really didn’t want to over exaggerate the size of the pattern and therefore I made the job much harder than it could have been. Oh well, I carry on. 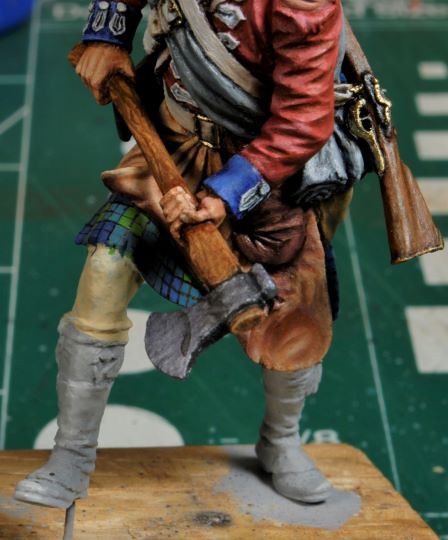 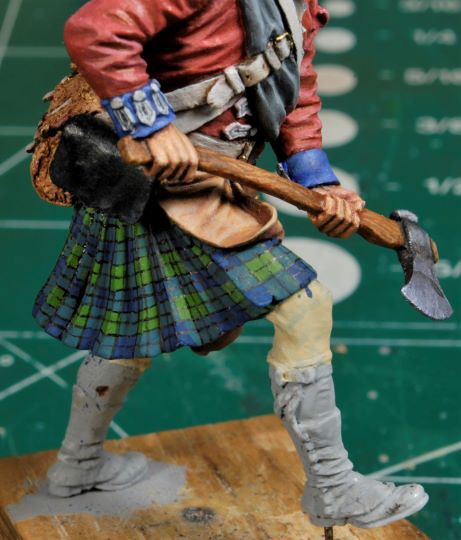 I will keep working my way down to the boots and set Hatchet Man aside to dry within the next few days. More to follow and thanks for watching. Cheers, Ski.
|
|
|
|
Post by Steve Zuleski on May 30, 2022 16:12:04 GMT -5
Hatchet Man Reporting for DutyThis fine chap is ready for battle. It’s kinda funny, after 17 years of working mid-night shift I still occasionally wake up around midnight and can’t get back to sleep, and I’ve been retired for over three years, sheesh! Rather than lay there tossing and turning for hours it only makes sense to get back into the bunker and “sniff some paint”, and that I did. I was really tempted to redo the tartan, but after a light and dark wash I was told by my wise council to carry on. I’m glad I did, because I really wasn’t in the mood to do this twice. So, this morning I started working the socks and come to find out it wasn’t as difficult as I had imagined. Ya never know till ya take that dive and it becomes real apparent right quick, wouldn’t ya say? Working my way down the figure I painted the flesh tones of the legs in standard fashion. Whenever I get this far on a figure, I like to close out anything above so I won’t inadvertently rub off any oils or damage anything done prior. Usually, the nose paint gets rubbed off during handling and gets a touch up, but not much else. That canteen may need attention as well since I’m not exactly sure what markings are appropriate. Hopefully someone will know the answer to that question, because I’m not finding anything concrete that is clearly visible in reference photos. 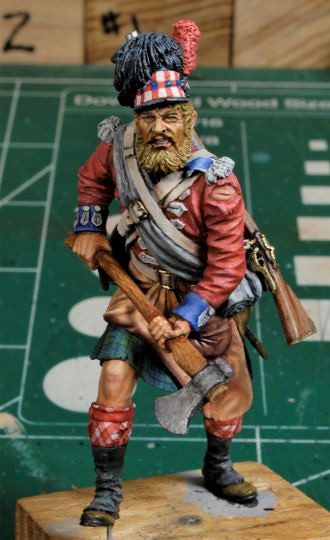 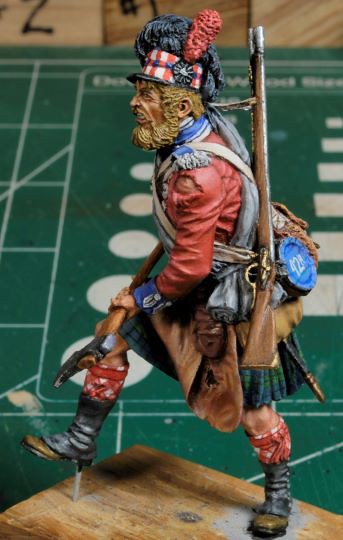 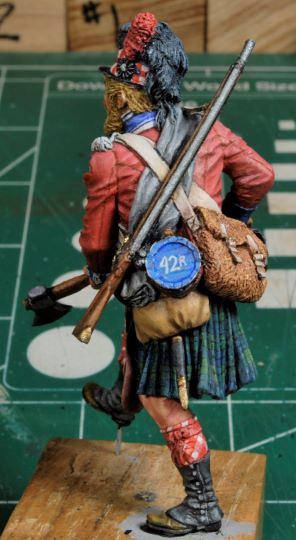 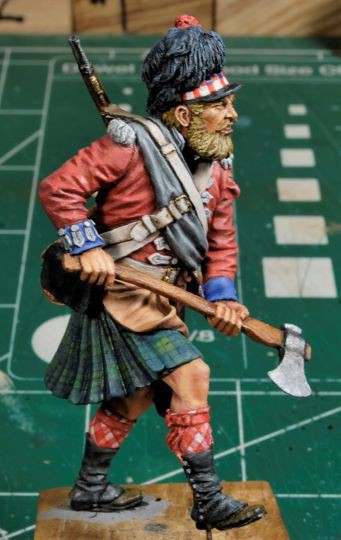 I used thinned Tamyia XF-7 Flat Red and began to draw out the stripes around the sock keeping in mind that there is a seam in the back. Actually, that was a big help in that I did not have to try to keep the symmetry in mind and the pattern could end naturally at that seam. It’s not really noticeable, but it is there. Then, each diamond shape that does not over-lap was given a light touch of Titanium White oils and then washed out so the pattern looks like a true stitch pattern as seen in the reference photos. I reemphasized the outline of the pattern with a super thin line at the edges of each stripe. Now why couldn’t the tartan stripes be this easy? Next, I used a mix of Ultra Marine Blue and Cadmium Red oils to create the shadows and a mix of Titanium White and Cadmium Red for the highlights. Lastly the boots and leggings were done in the standard fashion and will receive more attention when the final weathering takes place to mate these figures to the base. 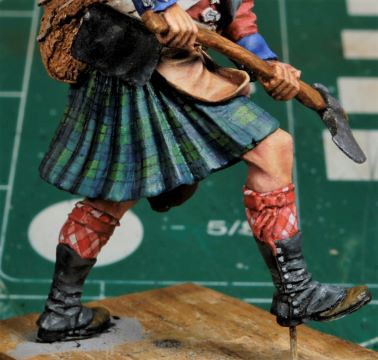 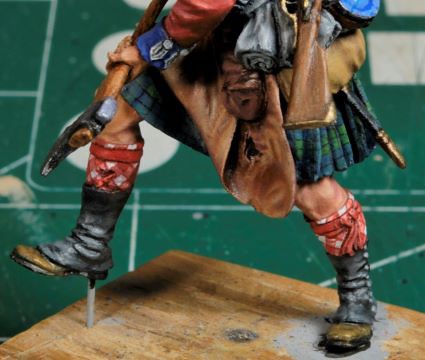 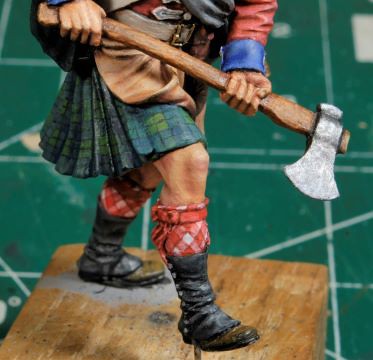 Hatchet Man will now take a side step for the next figure and off we go. If you see anything I may have miss, sing out, I’ll get er done. Thanks for watching. Cheers, Ski.
|
|
|
|
Post by mustang1989 on Jun 3, 2022 6:35:51 GMT -5
Unbelievable work!!! I did manage to join up at PF Steve and thanks again ol buddy. I also saw all the posting on at OSM on the "direction" thread.......
You had some good ideas with that I thought.
|
|
|
|
Post by Steve Zuleski on Jun 9, 2022 10:03:36 GMT -5
Thanks, Joe. Yes, PF is great, I learn a lot from those guys.
|
|
|
|
Post by Steve Zuleski on Jun 12, 2022 9:44:21 GMT -5
Bag PiperJust a quick update for now. As you can see the process has been unchanged on the Piper from Hatchet Man. It’s moving along much smoother now. The right arm has been painted but will remain detached until the final paint down to the boot. That sword is too delicate to take the chance of snapping. The tartan pattern took quite less time this go round, but the lines were very time consuming. There is essentially two tartans to paint on the Piper, the pipe bag being the second pattern to place. The usual dark wash and light filter was applied as before. 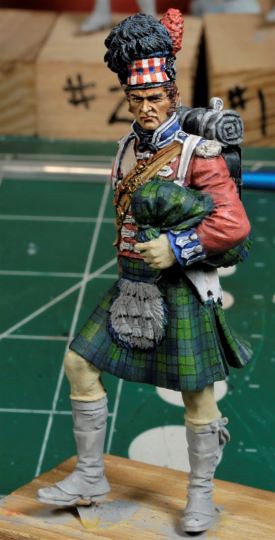 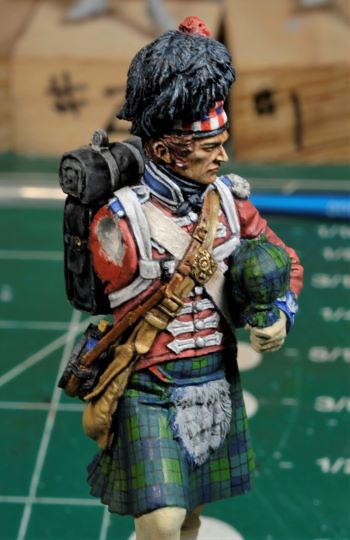 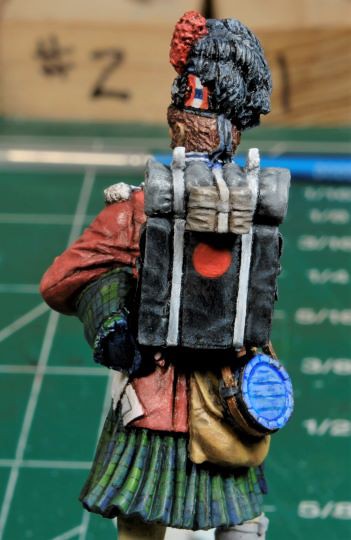 I’ve got a few more days of rain coming, so I’ll try to finish this one by the middle of the week. Thanks for watching, all comments welcome. Cheers, Ski.
|
|
|
|
Post by mustang1989 on Jun 12, 2022 20:02:56 GMT -5
Gaaaaah!! I've gotta start learning this stuff. Way to go so far Steve!!
|
|
|
|
Post by Steve Zuleski on Jun 13, 2022 12:16:42 GMT -5
Get after it, Brotha! It's only a matter of practice, and don't quit, just have fun.
|
|
|
|
Post by Steve Zuleski on Jun 19, 2022 12:18:12 GMT -5
Three’s a Charm. Piper Finished.Here’s the line up so far with the piper finished this morning. Nothing has changed in the process other than the fact that I had to fabricate the mouth piece twice. Yes, twice! I couldn’t tell yah were the original went, but my first fabricated mouth piece made a distinct ”ping” sound as it flew from my tweezers right at about the time I was installing it, HA! The carpet monster refused to fess up with it, so I had to make another one. So goes life in the bunker. 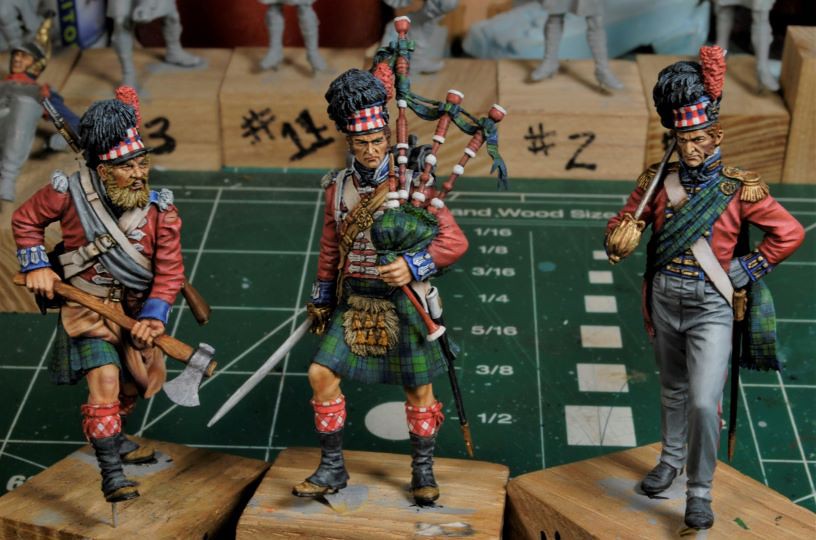 The piper will set aside with the rest of the growing crew as I begin working the Flag Bearer. 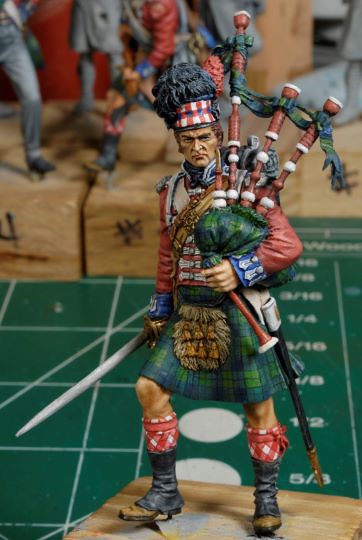 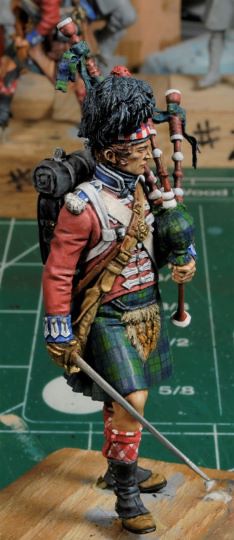 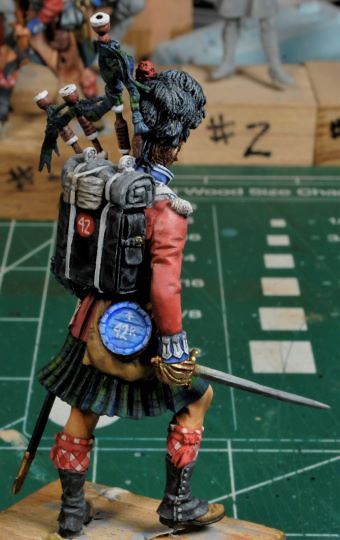 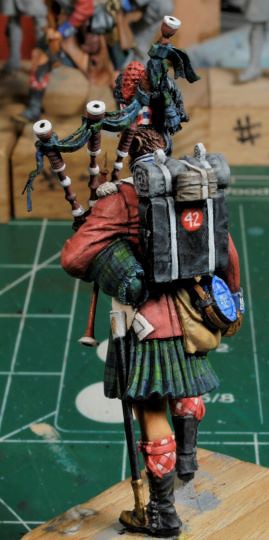 If you see anything I may have missed, sing out, I’ll get after it right away. Thanks for watching. Cheers, Ski.
|
|
|
|
Post by Steve Zuleski on Jul 13, 2022 17:10:35 GMT -5
Flag Bearer FinishedFinally, I can show some progress and close out the Flag Bearer. Bunker time has become a premium lately due to summer work, but we do what we can, right? You’d think after painting four tartans by now that they would have been the toughest part, but working these long socks was no walk in the park. I had to redo the right sock twice while trying to keep the pattern straight as it wound around the leg. I sure do appreciate all the others to come, they’ll be a piece of cake, lol. Using the methods and techniques mentioned before this figure moved along much quicker, minus the socks. He really doesn’t have a lot of detail to him, but the right side of the flag had to be tackled. That wasn’t as difficult as before either. There are a few areas I thought were a bit off, but you’d really have to look closely to find them. So, I’m calling this figure done. 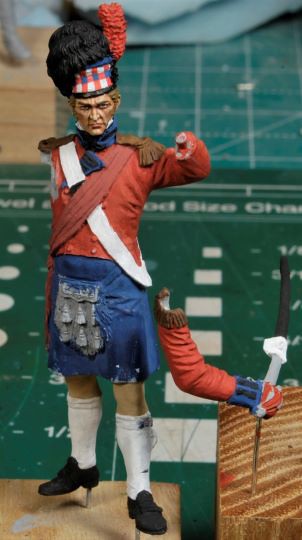 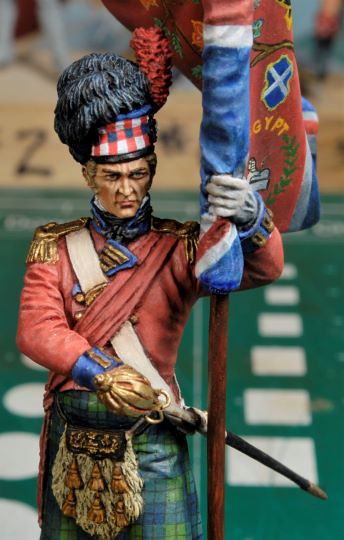 I aplauogize for the poor photos. Trying to capture the flag with the figure will be handle differently when the final pics are taken. For now, this figure is in the curio cabinet safely tucked away until the base and weathering are done.  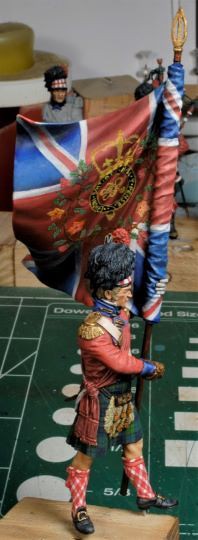 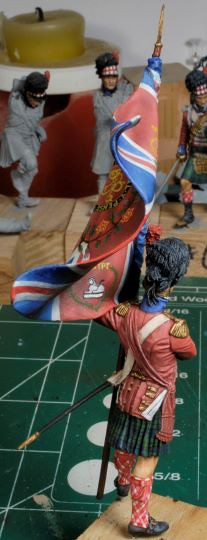 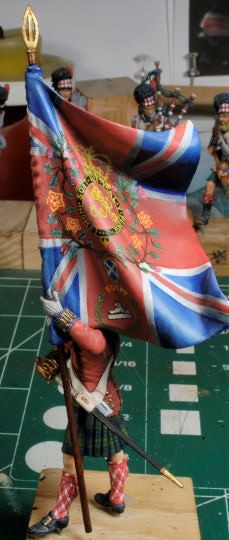 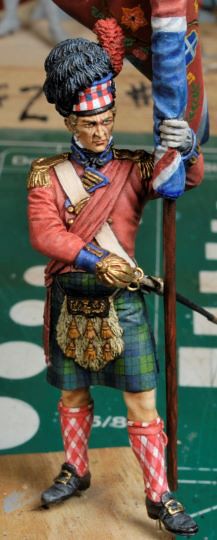 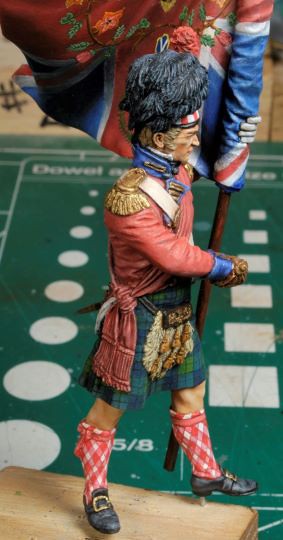 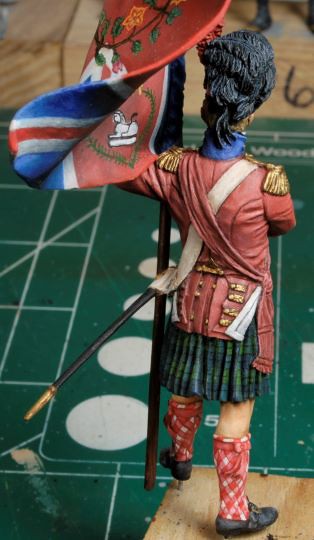 Thanks for watching. Cheers, Ski.
|
|
|
|
Post by Steve Zuleski on Jul 26, 2022 18:20:07 GMT -5
Sargent LancerSgt Lancer is finally done, but it took a bit longer than expected due to other than bunker issues, i.e., outside work. Ok, no worries, we Ruck On. I really love how this resin used has made so many problems with scratch and slag just easily disappear. The rework is quite nice from a flexibility stand point, and the time involved is very short. Fix it, get er done. This really is fast becoming the best set I have ever worked. And let’s just say this, working colors in the arena has been a challenge, but a fun run, to say the least. And no, I won’t be making a habit of it any time soon, HA! 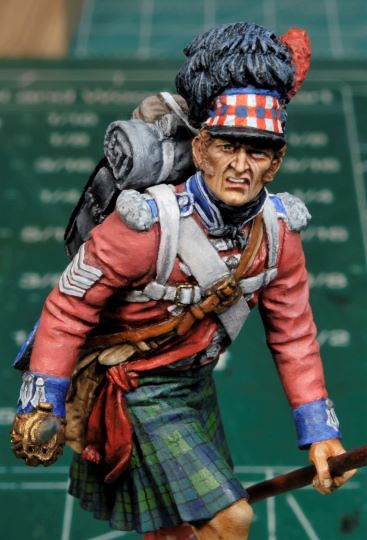 Please disregard the resin visible on his boot, it got rubbed off, even after a dull coat and several days drying time. Why does it always happen during the photo sessions? Who knows, but it does, HA! T’sall good, it’ll get taken care of in short order. 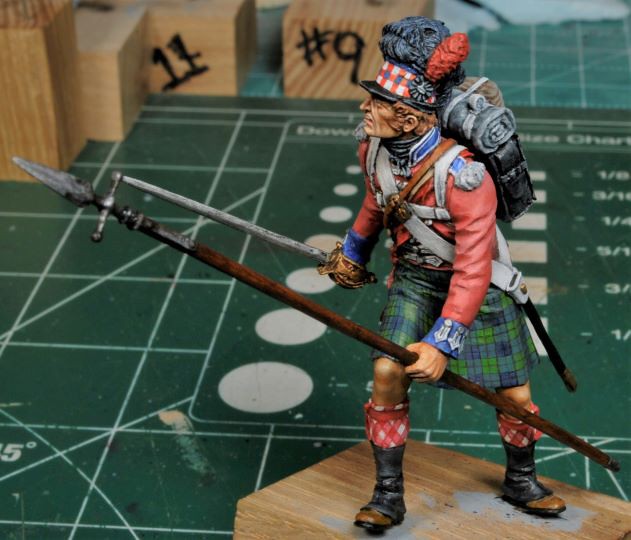 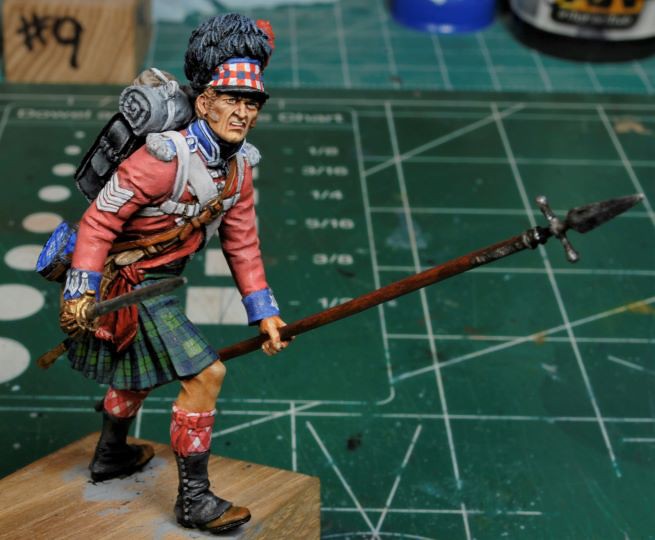 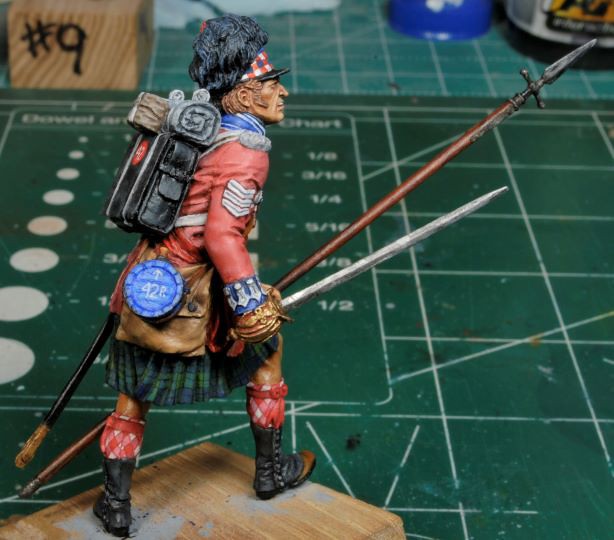 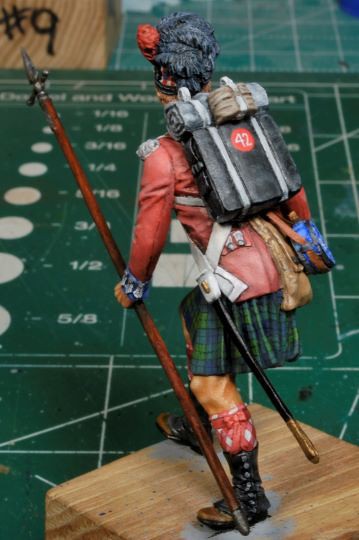 As you can see, nothing has changed in the process, nor has there been any major issues to deal with, so Sgt Lancer will be set aside with the other four to await the 42nd Highland Infantry Regiment "Black Watch" unit reunion. Did I mention I’m still having fun with each and every figure so far? Well, I am, and I really can’t wait to tackle that drum that Drummer boy has hanging from his waist,…………..Sheesh, really, ya gotta be kiddin me, right? Ah, I dream of olive drab in my sleep,………….. Ruck On. Thanks for watchin. Cheers, Ski.
|
|
|
|
Post by Steve Zuleski on Aug 20, 2022 22:07:53 GMT -5
Believe it or not, we are still here, HA!!!! First RiflemanThe lineup is getting larger as time progresses. I’ve been behind the power curve lately, but things will pick up shortly. There are three more Highlanders to paint and two French troops left in the line-up, then the base work. Here he is for your comments. Nothing in the process has changed from above, so we Ruck On, Bby! Looks like these guys are getting anxious! 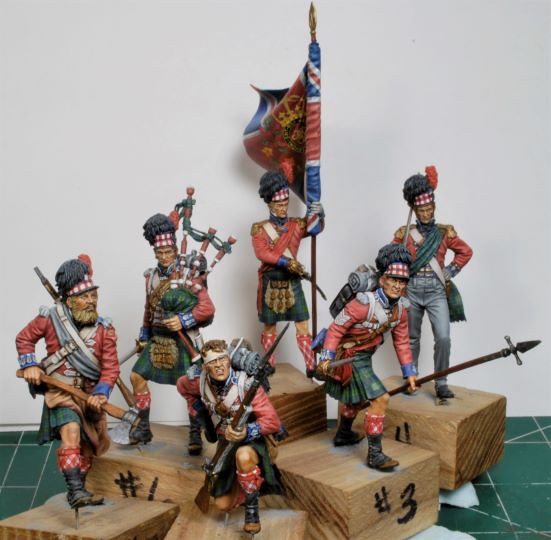 The blood splatter and weathering will be taken care of later. 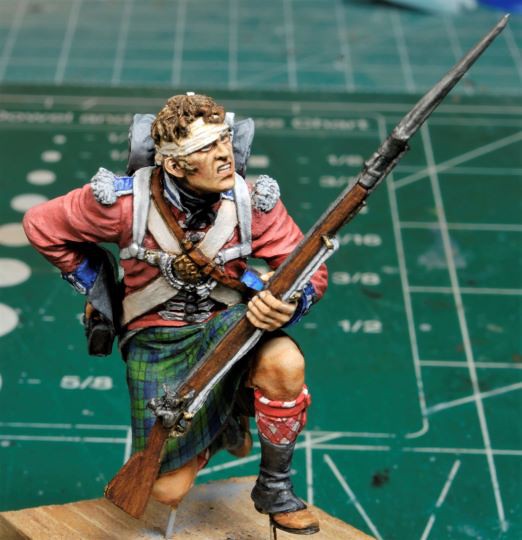 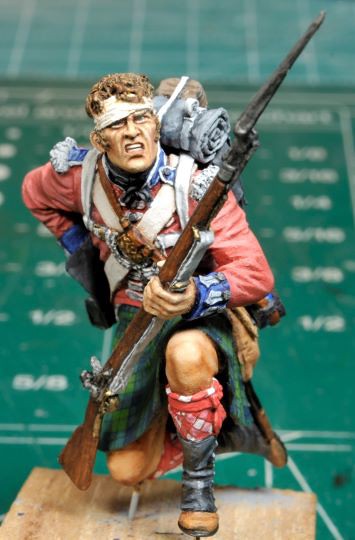 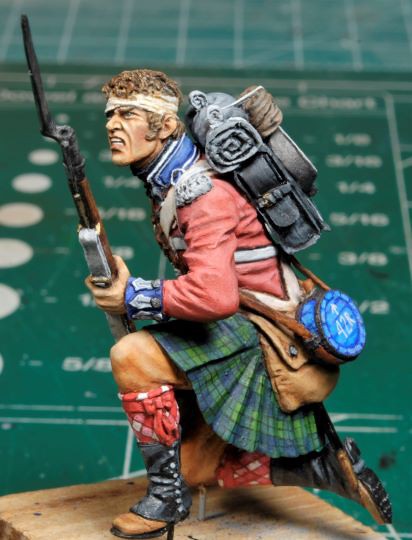 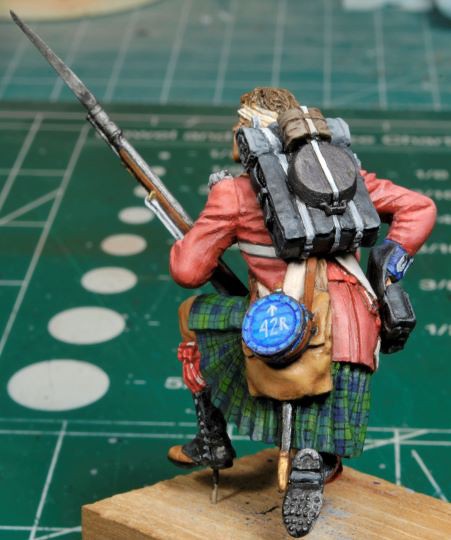 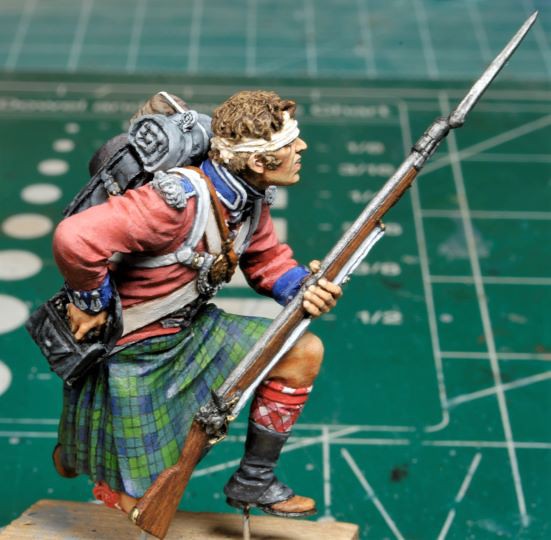 Thanks for watching, more to follow ASAP. Cheers, Ski. |
|
captfue
Full Member
  
Member since: October 2012
Posts: 311
Oct 1, 2012 22:25:19 GMT -5
Oct 1, 2012 22:25:19 GMT -5
|
Post by captfue on Aug 23, 2022 22:29:43 GMT -5
Steve, that is fantastic work!
|
|
|
|
Post by Steve Zuleski on Sept 16, 2022 18:03:49 GMT -5
Steve, that is fantastic work! Dang, Capt., sorry for the absurdly late reply. Thanks, Brother! |
|
|
|
Post by Steve Zuleski on Sept 16, 2022 18:05:30 GMT -5
Dual to the End!Suffering from a mild case of “burnout” on this set I was finally able to complete this latest figure. This one has a lot of action not only in his pose, but that face, sheesh! He’s about the ugliest bugger in the group, but he seems to have the situation under control, lol. He’s viewed here in the upright position, but within the scene he’s leaning over the French Coursier and it looks like a battle to the death. This is one of the more dynamic figures within Vladimir’s set and it looks like a difficult sculpt, regardless. I really appreciate this sculpt, it’s incredible in this scale and very impressive, to say the least. Painting these figures have become routine, so if there’s anything you’re not sure of, check the posts above, they’re all there in more detail. 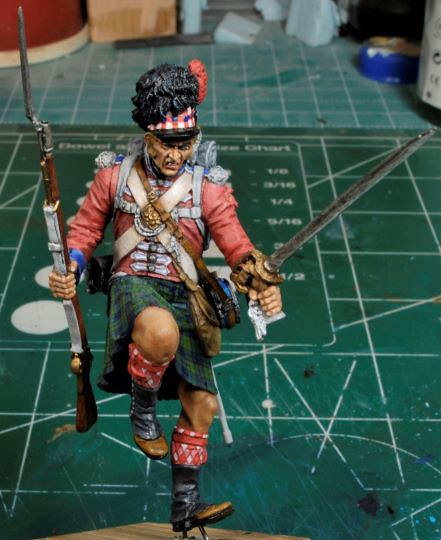 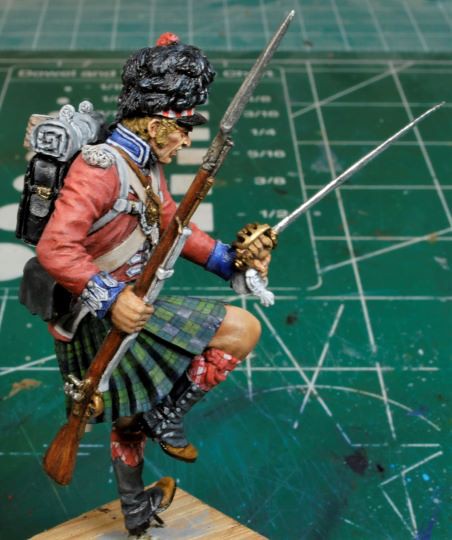 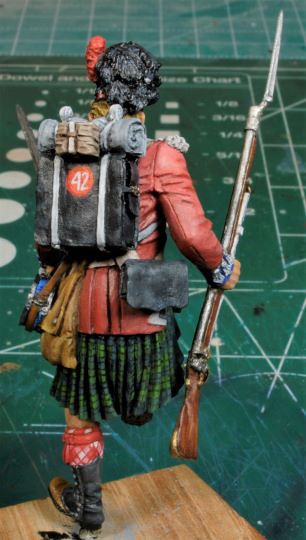 Looking closely, it appears I have missed filling the gaps within the arm pit, oops! No worries, that will be handle mighty right quick. The bayonet scabbard must be painted and installed as well as a layer of Dull Coat within a few days to dull down the sheen. As mentioned before all weathering and blood splatters will be done when all the figures are completed. 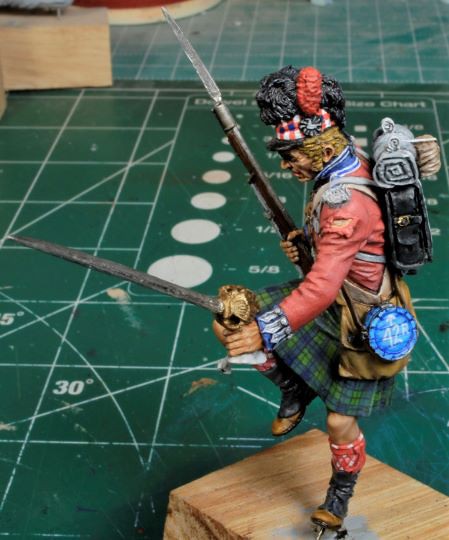 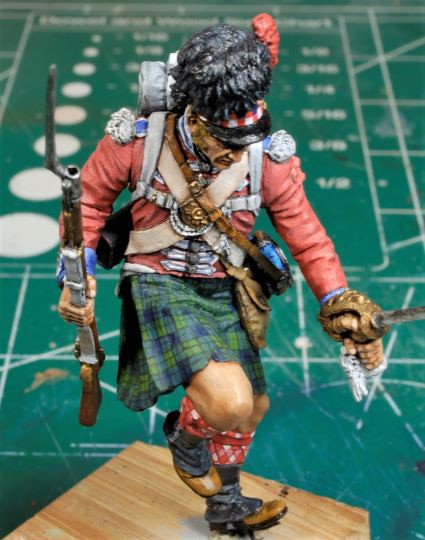 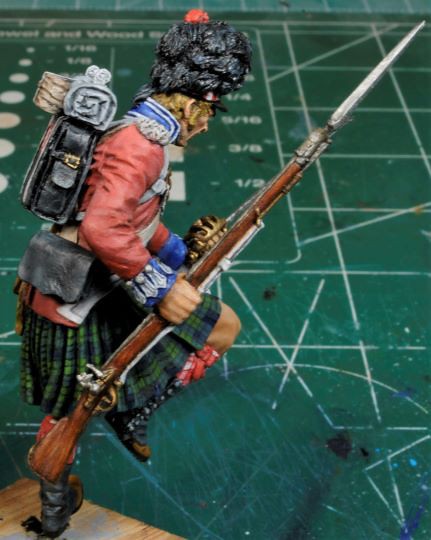 Well, I’m down to two more “tartan” lads, so hopefully before the snow flies I’ll have this beauty of a set completed. I fully expect to have the base started by mid-November. That will be fun for me, I always love doing ground work. Thanks for watchin, comments are always welcome. If you see anything else I may have missed, please holler. Cheers, Ski.
|
|
adt70hk
Forum Moderator     
Member since: November 2015
Currently attempting to build something decent!!! ;)
Posts: 2,831 
MSC Staff
|
Post by adt70hk on Sept 21, 2022 2:22:40 GMT -5
Very cool!
|
|
|
|
Post by Steve Zuleski on Sept 24, 2022 14:35:38 GMT -5
Thanks, good to see someone else on here, HA!
|
|
|
|
Post by Steve Zuleski on Oct 6, 2022 16:20:56 GMT -5
RiflemanSaving the easiest one for last,….well almost last, this rifleman was very straight forward in painting. Using all the techniques as mentioned before this paint went smoothly. One change was to use a “liner” brush for the tartan black stripes, as someone had mentioned I do. I hesitated to use it, but decided; heck, there’s enough room to screw this up and clean it, why not. With a little more practice I think I’ll have this brush type dialed in, but there was certainly a learning curve that came with that brush. I’m now a convert! Stretch the envelope, right? 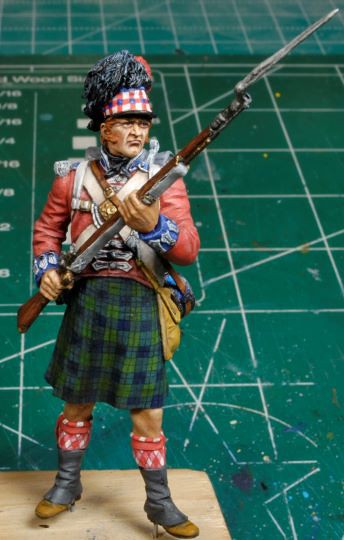 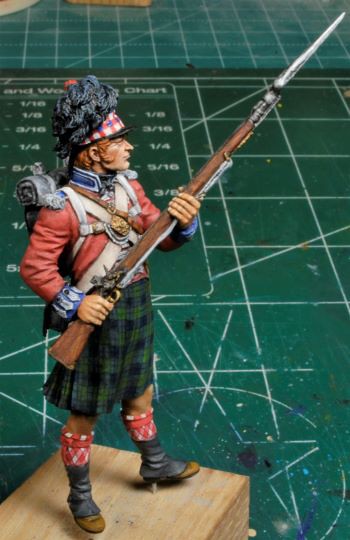 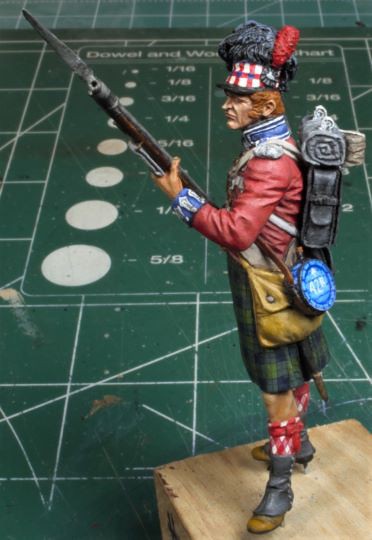 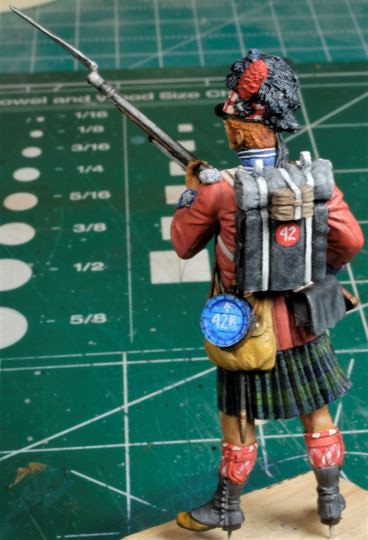 I hear the drums a-beating, ratta tat tat, ratta tat tat,………………… Yes, Drummer Boy is next up to bat. He’s got a lot of fluff to him as well. Now comes the sneak-peak. This really looks pretty shabby, IMHO, but when it’s all painted and shaded correctly, I don’t think much will be noticed. I certainly can’t get that “high speed, low drag” intense brush work on this drum as others have done, but I know my limitations, and this is one of them. Who knows, when it’s all said and done, I may scrub it and repaint it. It won’t be the first time I’ve done a scrubbing, lol. 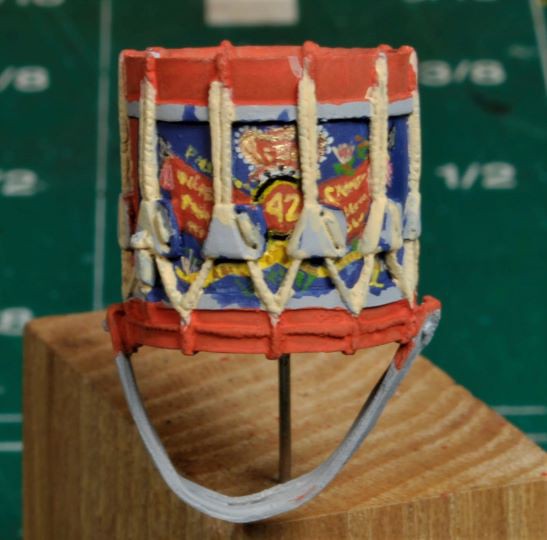 Thanks for watching, all comments welcome, of course. Cheers, Ski.
|
|
|
|
Post by Steve Zuleski on Oct 9, 2022 8:37:13 GMT -5
Drum WorksFortunately, I didn’t see the need to redo this drum emblem pattern. It’s not perfect, but it will work out just fine. Now back to the Drummer boy! 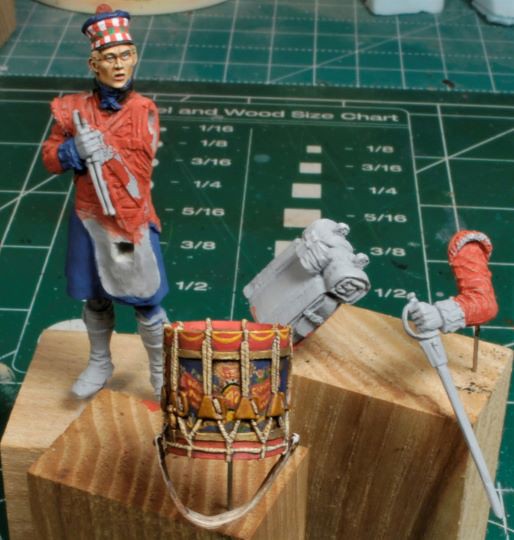 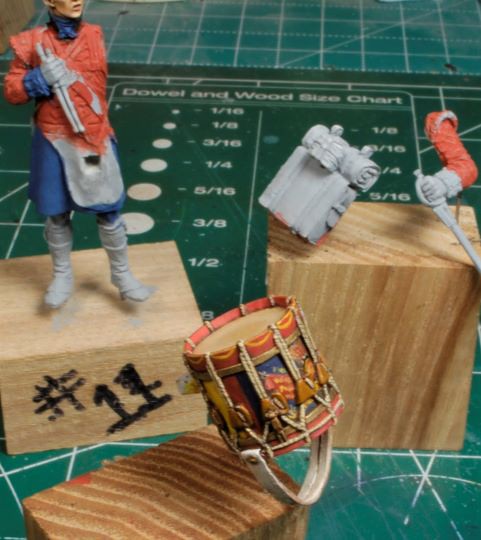 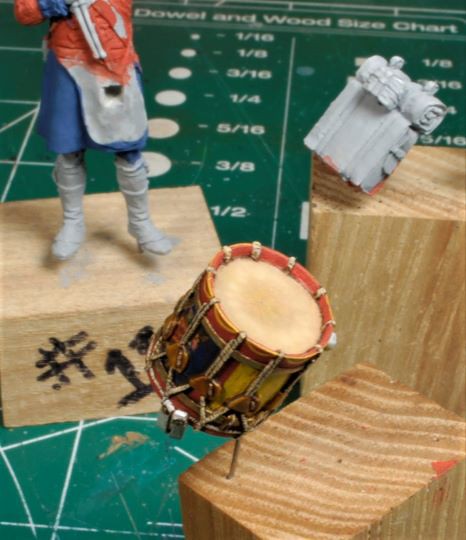 All comments welcome. Cheers, Ski.
|
|
|
|
Post by Steve Zuleski on Oct 17, 2022 15:26:02 GMT -5
Drummer BoyThis lil feller can rattle away all he wants now, he’s done. The task of accurately depicting his sleeve details wasn’t as bad as I had expected, simply because they are not accurate, HA! I never got a reply from the Black Watch Museum in Scotland and some photos found online just weren’t clear enough for me to be sure exactly what these emblems are. I’ve had plenty of advisors tell me what they were, but I gotta see it for myself. I did make several tempts to add fleur di lis’ to no avail, total failure. My brush work just wasn’t cutting it. The more I tried the worse they got, so I called “time out”. As I stated earlier, I hate being inaccurate if I can help it, especially on something so visible, but my brush talents had reached their limit. Ya just gotta know when to move on, so that is what I’ve done. 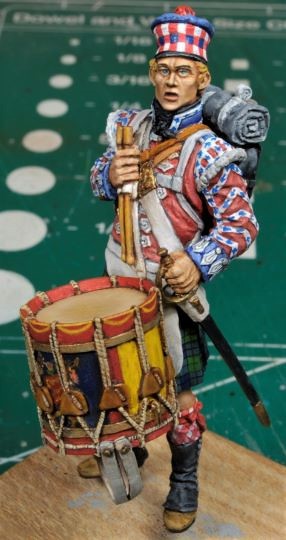 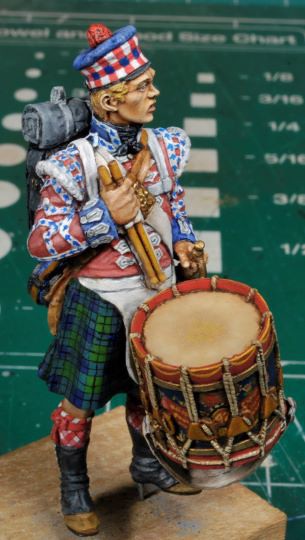 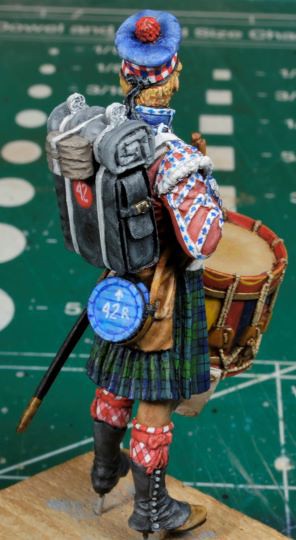 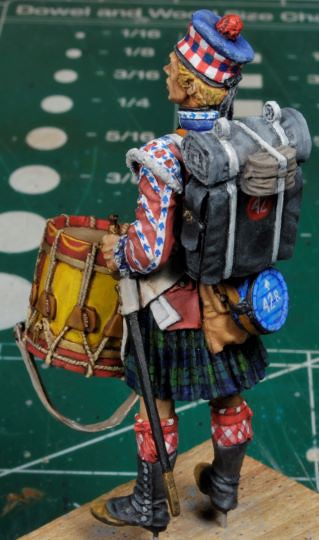 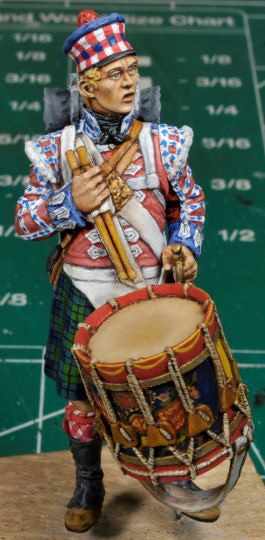 All of the techniques and processes for this lil guy are the same as all of the other Highlander figures, except one. I utilized a technique I’ve been studying lately, “stippling”, one used quite successfully by “Mike the Kiwi” in his new book “Modelling and Painting World War I Allied Figures”. It’s a new release and I just received my copy a few weeks back. I stippled the bonnet/cap on the Drummer Boy with oils. Yes, that’s right, oils. It can be done successfully with a bit of trial and error. I know this is such a minor attempt, but it gave me a good idea of just how this will work with oils, my preferred medium. Next up, the Frenchmen, and what a relief, lol. I can’t say I won’t ever go back to the Napoleonic era; the colors are just too spectacular to pass up and the learning potential from working bright colors is astounding. I’m just not hip on the “Battle of the Tartans” enough to take on another fight like this one any time soon, HA! Thanks for watching, all comments welcome. Cheers, Ski. Mike Butler’s book is available here: www.crowood.com/products/modelling-and-painting-world-war-i-allied-figures-by-mike-butler?_pos=2&_sid=1670b538c&_ss=rPrime example of how Mike paints using the techniques he explains in his book: www.planetfigure.com/attachments/mikemaoriboy-jpg.453840/Now that is a goal to strive for, to say the least. You’d swear this figure was alive!
|
|
|
|
Post by chromdome35 on Oct 17, 2022 22:18:34 GMT -5
Excellent work, I love them!
|
|
|
|
Post by Steve Zuleski on Oct 19, 2022 8:37:38 GMT -5
Thanks, man!
|
|
Prop Duster
Full Member
  
Member since: January 2013
just learned to spell CA. workin' on PE now.
Posts: 242
Jan 27, 2013 19:17:30 GMT -5
Jan 27, 2013 19:17:30 GMT -5
|
Post by Prop Duster on Oct 19, 2022 18:33:40 GMT -5
I have just finished reading this epic work up to date, Have to say that it is impressive is like saying the Titanic was just a boat. I have come to appreciate painting figures lately and am getting into the mood to give it a try, someday, fairly soon, maybe, I think. Seriously really fine work and your explanations of how your do the work is informative and understandable.
|
|
|
|
Post by Steve Zuleski on Oct 19, 2022 20:45:09 GMT -5
Hey, thanks, Steve! It's one heck of a fun art form, lemme tell yuz! Go for it, and have fun, cause it's only a matter of practice.
Cheers, Ski.
|
|
|
|
Post by Steve Zuleski on Oct 21, 2022 8:34:12 GMT -5
Base RedoSeveral of the keen eyes reviewing this build log have come to the same conclusion as I have. The base was way too big and the figures really lost meaning when they were placed so far apart. This set is intended to be “up close and personal” and the base really had to go bye-bye. Great test run, though. Taking another chunk from my wife’s drift wood stash pile I cut a section that had the most character. I had originally intended on using this slab, but passed it up, hmmm. I recon I needed some practice first, HA! Spoiler alert: I’m intentionally not showing the front view. This is a placement test and it would be bad form to jump ahead and expose the intended final result before it’s time. 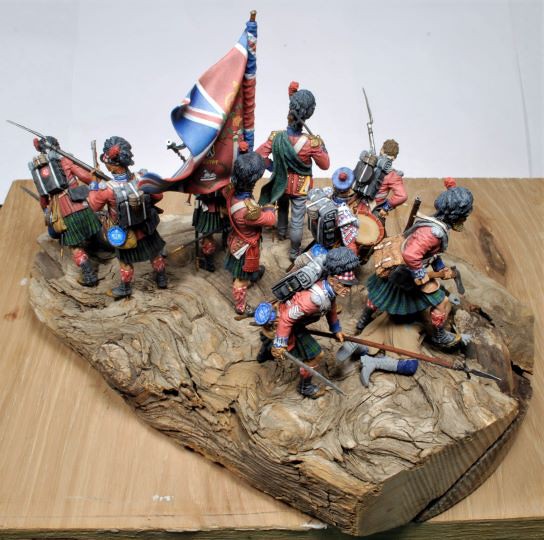 You may notice after close scrutiny that some of those delicate parts, such as a bayonet, a few bayonet scabbards, and one thumb, plus some other minor parts might be missing from the finished figs. Clumsy sausage fingers, what else can I say? This happens every time and the final punch list is standing by as usual. There is a way to make the ground work mesh with these swirls in the drift wood and preserve its uniqueness. I’ll post SBS pics on that portion. Stand-by for the finale, it’s not far off now. Thanks for watching and all comments are welcome. Cheers, Ski.
|
|
|
|
Post by chromdome35 on Oct 21, 2022 8:54:16 GMT -5
I love the driftwood!
You have true talent.
|
|
|
|
Post by Steve Zuleski on Oct 23, 2022 9:53:00 GMT -5
Thanks, CD!
|
|
|
|
Post by Steve Zuleski on Oct 29, 2022 19:48:23 GMT -5
|
|
|
|
Post by mustang1989 on Nov 1, 2022 5:26:30 GMT -5
Blown............................ .away.....................  |
|