|
|
Post by mustang1989 on Jan 4, 2023 11:34:02 GMT -5
Yes CD, #4 goes into depth on the OPR and other techniques. Remember, #1 was an intro, still loaded with intel, but I'm using #4 as the guide, #1 as the backup for minor details. It's posts like this that inspire me to take on an armor project. After a couple more builds, I may just try my hand at one. Excuses, excuses, excuses, you keep laying out excuses Joe and you'll never take that leap. Procrastination is a killer. I say, close out your current project and take the dive, the water is warm and cozy.  I've got to finish out this Camaro and then I've got the holy grail of all holy grails for me and that's the Kingfisher. After that......we'll give 'er a go.  |
|
Prop Duster
Full Member
  
Member since: January 2013
just learned to spell CA. workin' on PE now.
Posts: 242
Jan 27, 2013 19:17:30 GMT -5
Jan 27, 2013 19:17:30 GMT -5
|
Post by Prop Duster on Jan 4, 2023 23:23:57 GMT -5
Why are you putting tape on top of the silly putty, to keep paint off of it? CD didn't see an answer to your question. So, Yes  the tape is to cover the parts of the model, inside the putty dams, to avoid overspray of the "wrong color". It also is quicker and more practical that using up great globs of putty and it will help keep from using up the putty (all mixed up with paint and debris) for a longer time. This technique will work on any kind of modeling where you need to have different colors next to each other in a controlled manner and wish to have a "soft" edge, vs a "hard" tape edge. Wheew I wore myself out -time for me nap.  |
|
|
|
Post by Steve Zuleski on Jan 6, 2023 12:50:46 GMT -5
I've got to finish out this Camaro and then I've got the holy grail of all holy grails for me and that's the Kingfisher. After that......we'll give 'er a go.  [/quote] Ok, you get a pass this time, HA! |
|
reserve
Senior Member
   
Member since: July 2012
Si vis pacem para bellum
Posts: 2,372
Jul 11, 2012 9:11:45 GMT -5
Jul 11, 2012 9:11:45 GMT -5
|
Post by reserve on Jan 6, 2023 13:13:13 GMT -5
Ha prove to me that there was not a KettenKrad in WW II painted thus I dare ya. This looks very good to me and I can't pick out anything to be critical of with your airbrush work.
One thing you might try for dirt/mud texture is some of the MIG acrylic ground texture pastes, I use their desert sand texture in 1/35 scale all the time and it's not only convincing but much more durable than pigments
|
|
|
|
Post by Tobi on Jan 6, 2023 13:23:53 GMT -5
I've got to finish out this Camaro and then I've got the holy grail of all holy grails for me and that's the Kingfisher. After that......we'll give 'er a go.  Ohhh, a Kingfisher. The 1:32 bird? I got this, too, and so far have read only one build report about it. That will be good stuff. |
|
|
|
Post by Steve Zuleski on Jan 7, 2023 12:10:22 GMT -5
One thing you might try for dirt/mud texture is some of the MIG acrylic ground texture pastes, I use their desert sand texture in 1/35 scale all the time and it's not only convincing but much more durable than pigments Thanks, Mark. I've got quite a few tubs of Mig's pigments, using sparingly, but no the pastes. The key here is to pretty much use oils only, but that "would" show a minor involvement in any kind of action. Besides, this is too much fun to leave it in show room condition, HA! I'm using what I have on hand, so pastes are on the inventory "buy" list. Pics coming soon, Bro. |
|
|
|
Post by mustang1989 on Jan 10, 2023 6:07:55 GMT -5
I've got to finish out this Camaro and then I've got the holy grail of all holy grails for me and that's the Kingfisher. After that......we'll give 'er a go.  Ohhh, a Kingfisher. The 1:32 bird? I got this, too, and so far have read only one build report about it. That will be good stuff. Not that one. I've heard alot of bad stuff about that kit (it is the Kittyhawk kit right?) but then again, I know of someone else on the forums who's building on and it's building up nicely. I've got the old Monogram kit BUT have a GREAT looking 3D printed update set for it. I'm pretty stoked about it because I've wanted to build one of these aircraft all my life. |
|
|
|
Post by Tobi on Jan 10, 2023 8:47:41 GMT -5
Sorry for wandering off-topic here. Yes, I was talking about the Kittyhawk model. The build in the magazine I saw was great, though the author mentioned some problems.
Apart from that, sometimes I wonder if not a lot of the nagging people out there got spoiled over the years with shake 'n bake kits? What qualifies today as "awful fit problems" was absolutely fine 30 years ago.
Instead of being happy about the ever-growing selection of kits of even the most peculiar subjects they have turned into mere model kit assemblers (if any) with a high-level consumer attitude. I never get to see any models of the loudest hyper-critics? Just my 2 Cents.
Now that Monogram kit sounds fun, too. I'm sure you will do it justice Joe, and with your fine standard we got used to.
And Steve, I made good experiences with the Tamiya ground effect colors, too.
|
|
|
|
Post by mustang1989 on Jan 10, 2023 10:57:05 GMT -5
Sorry for wandering off-topic here. Yes, I was talking about the Kittyhawk model. The build in the magazine I saw was great, though the author mentioned some problems. Apart from that, sometimes I wonder if not a lot of the nagging people out there got spoiled over the years with shake 'n bake kits? What qualifies today as "awful fit problems" was absolutely fine 30 years ago. Instead of being happy about the ever-growing selection of kits of even the most peculiar subjects they have turned into mere model kit assemblers (if any) with a high-level consumer attitude. I never get to see any models of the loudest hyper-critics? Just my 2 Cents. Now that Monogram kit sounds fun, too. I'm sure you will do it justice Joe, and with your fine standard we got used to. And Steve, I made good experiences with the Tamiya ground effect colors, too. First off, Tobi's right. We did get off topic somewhat. Sorry bro. Secondly, I hear EXACTLY what you're sayin' Tobi. There's a kit for just about everything. Hell, they've even got a kit for Cup Noodles!!!  |
|
|
|
Post by Steve Zuleski on Jan 11, 2023 14:53:34 GMT -5
Yall have chastised yourselves, so no need for me to interdict, HA! No worries, we're back on track. Hmm,......speaking of tracks,.............
|
|
|
|
Post by Steve Zuleski on Jan 11, 2023 14:54:03 GMT -5
Trackin it Now!The Trak-bike has been completed, finally. Ok, for the technically inclined, it’s really a German Sd.kfz.2 Kettenkraftrad Typ HK 101. That’s a mouthful, so it shall henceforth be referred to as a “Trak-bike” for purposes of this article. Note: As mentioned before, these tracks for this kit are pathetic and have a real tendency to break at the most inopportune time, while being installed. I painted, weathered, and left the sprockets uninstalled, so I could install the tracks over the sprockets, place the back end of the link over the rear running wheel, and carefully slip the sprocket into place. HA, ya right, they still broke. I had to “pin” each side in at least one link to keep these buggers from coming apart during installation. The design team gets a “swift kick in the pants” for that brain dead maneuver, IMHO! Ok, onward. After using Mike Rinaldi’s “Oil Paint Rendering”, or OPR, I was decently happy with the results. This was, after all, my first attempt at weathering a vehicle using oils only,………..well almost. I did use Mig’s pigments to add a bit of mud crusty above the running gear and I also used a mix of pigments to form a Euro-earth tone and added thinner to splatter a bit on the rig lower sections. All in all, I do like the OPR method and will be using this quite a bit from here on out. Like I said before, I’m an oiler anyway, so what’s the big deal, right? 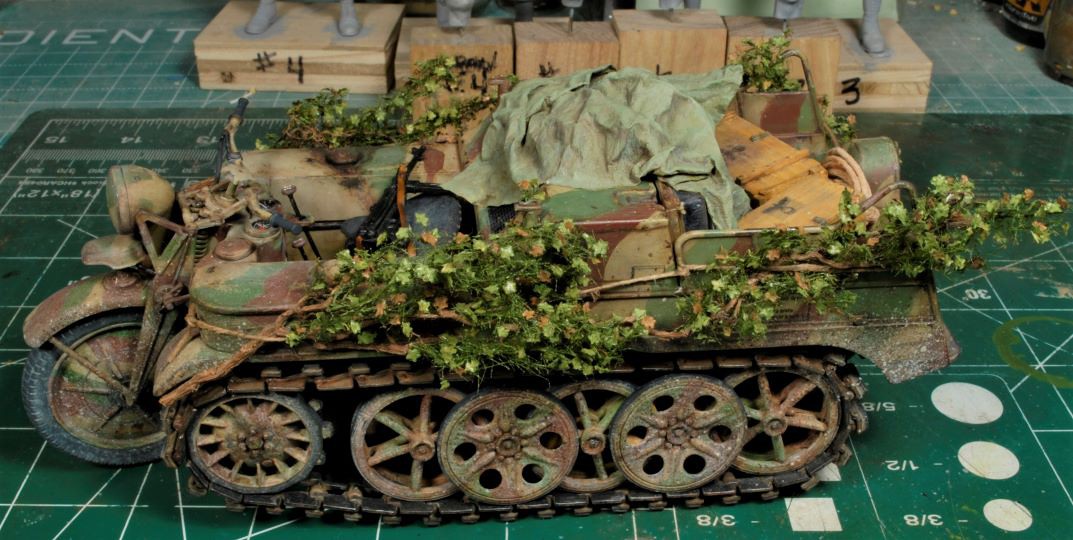 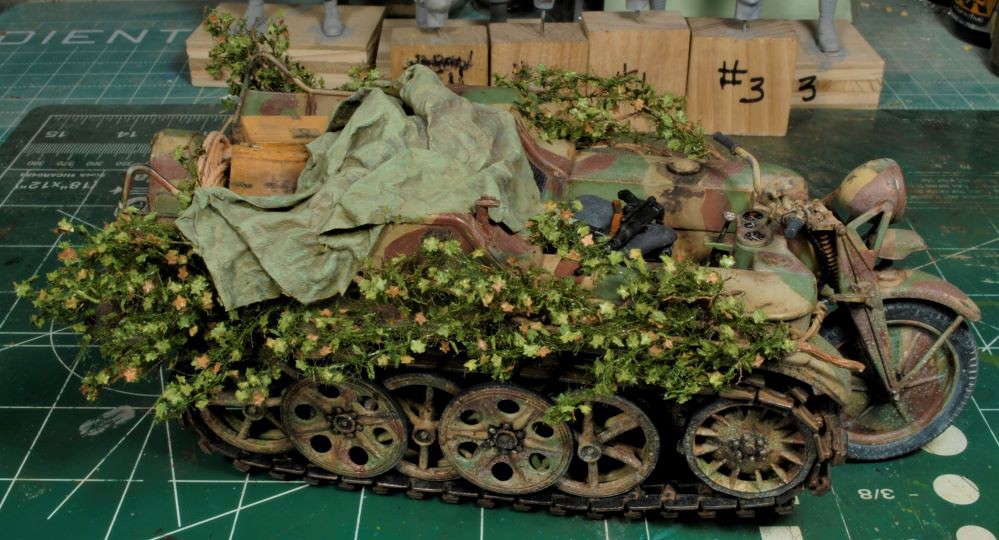 As you can see from the photos, I added some foliage using MiniNatur Plant tree foliage from Germany, to add interest and help support the story line. This stuff is great and I now need to replenish my stock, it’s very handy. I also made a few crates and some rope for the back end of the trak-bike as well as a cover tarp that has been drawn over by some of our characters. More on that later. 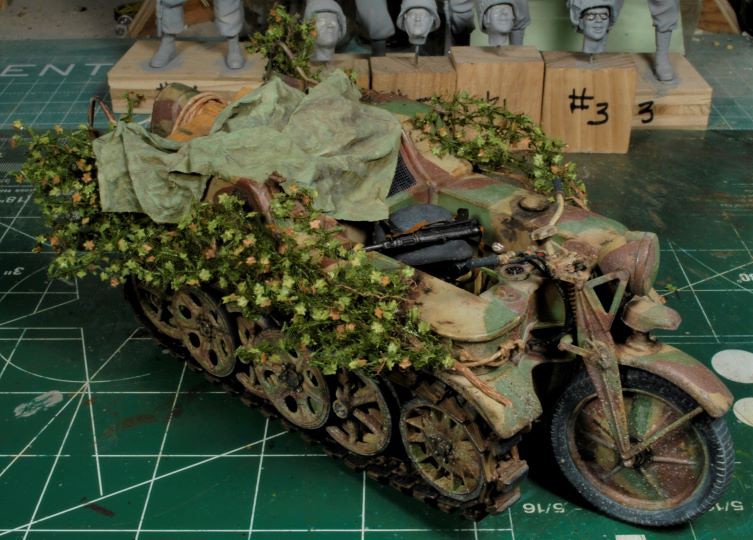 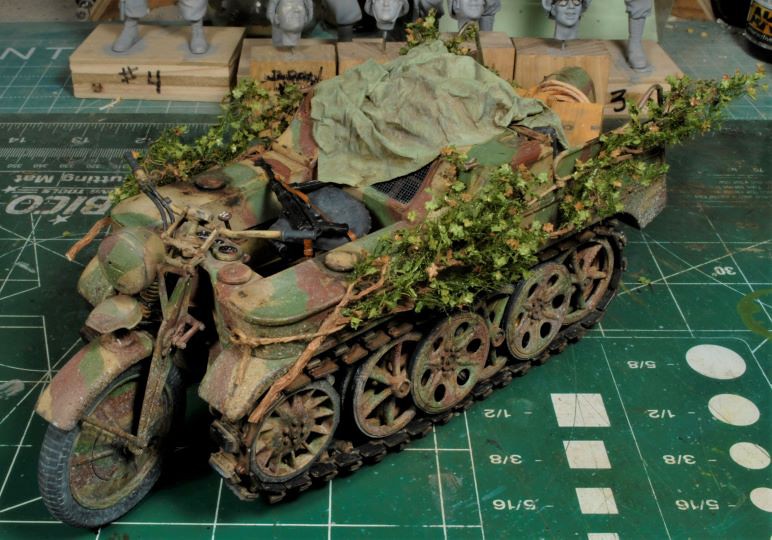 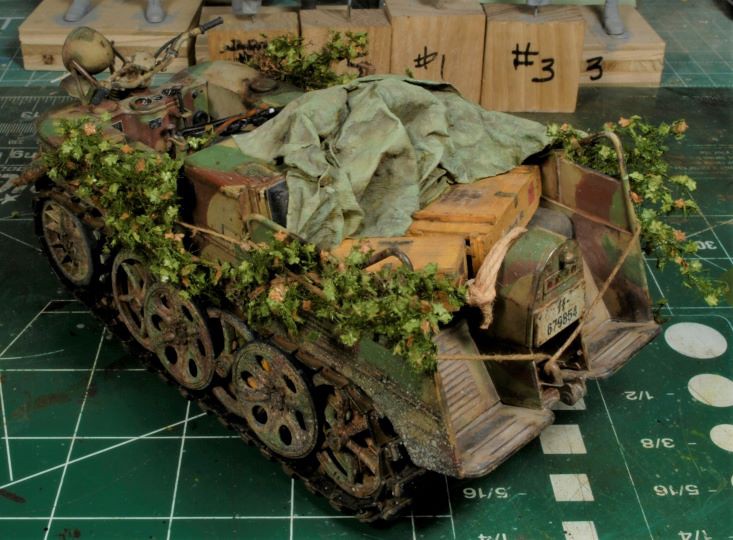 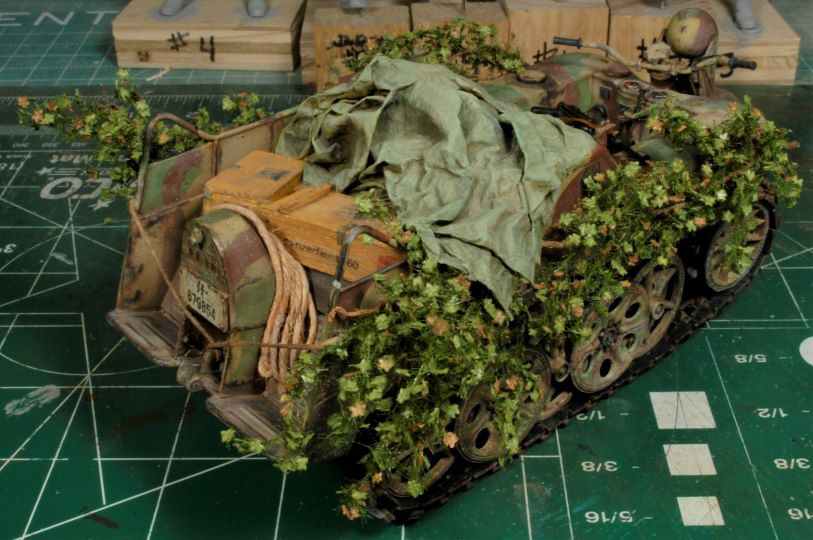 It might seem a bit odd having that MP40 sitting on the driver’s seat, but that will become obvious later, HA! I’m really not going to give up the story line just yet, but I’m sure there a few that have already figured this out. 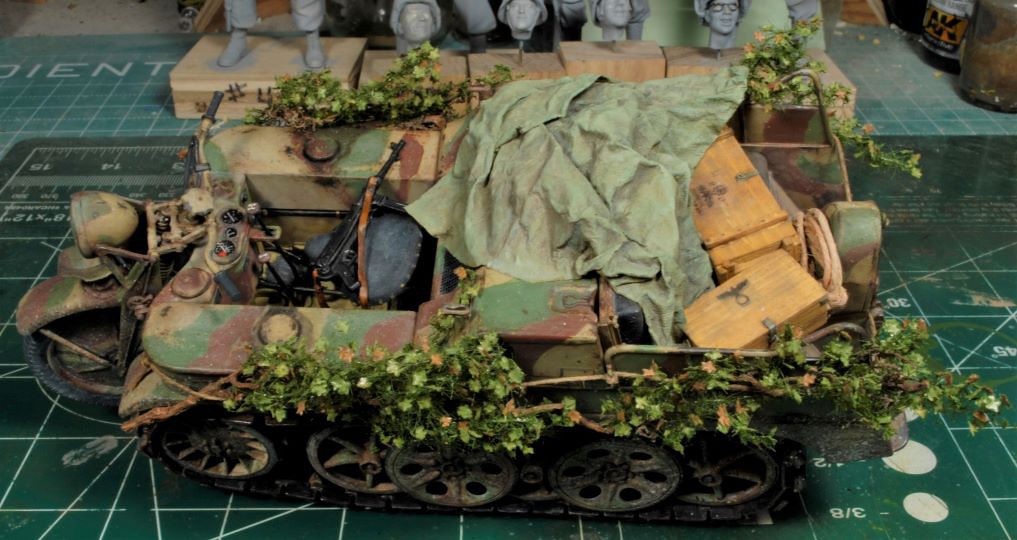 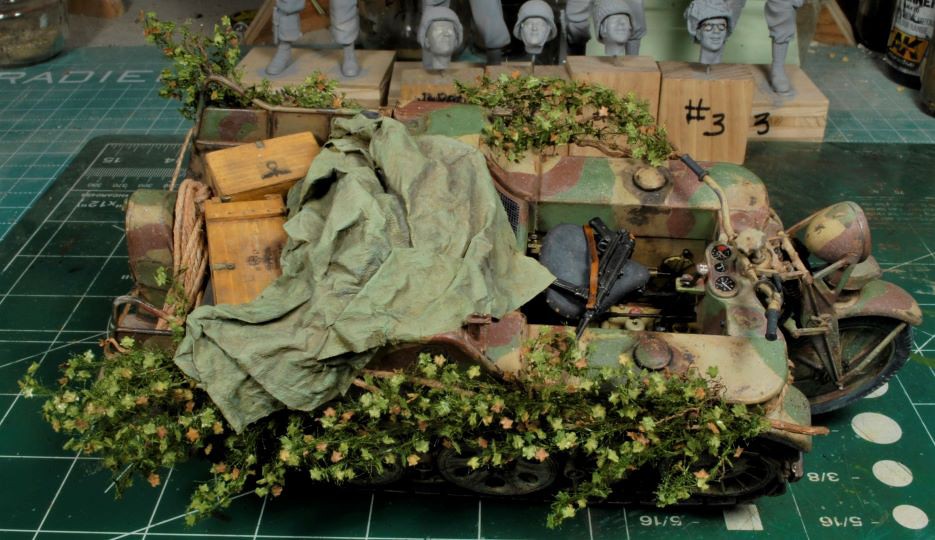 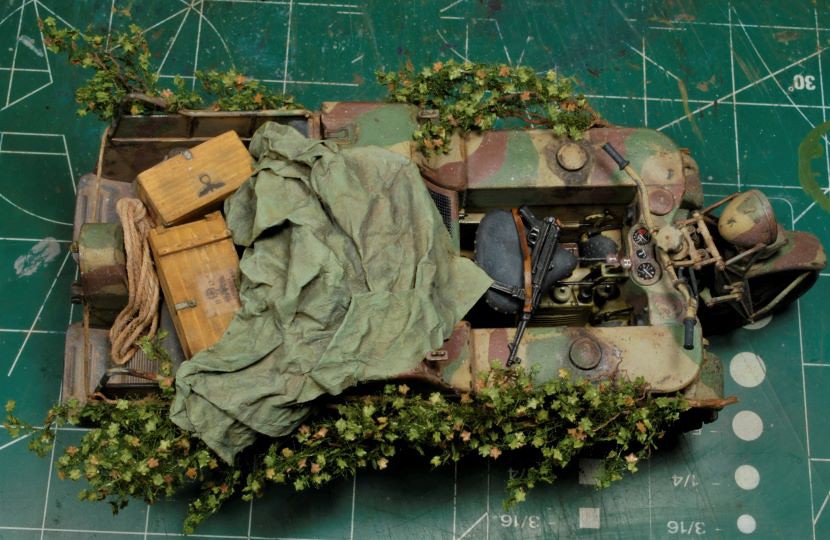 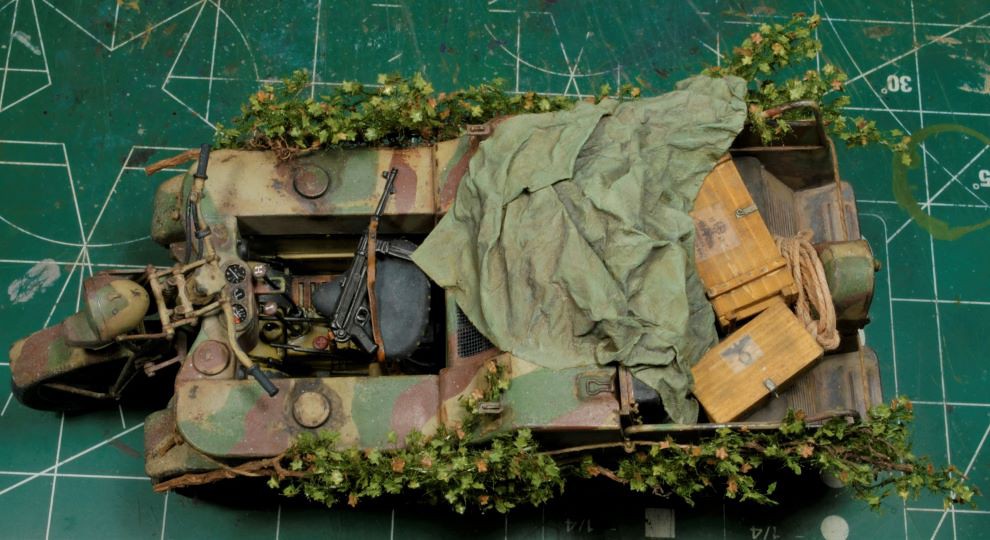 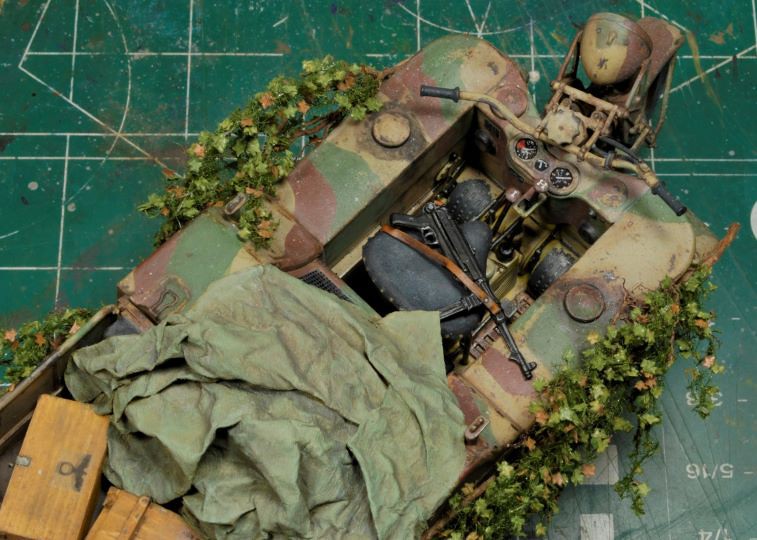 Now that this trak-bike has been finished it will sit safely in the curio cabinet until the final dio placement. Next up, changing gears and painting faces, Yehaaaa! Thanks for watchin. Cheers, Ski.
|
|
|
|
Post by chromdome35 on Jan 11, 2023 15:19:38 GMT -5
This is looking great Steve!
What material did you make the tarp out of?
|
|
|
|
Post by mustang1989 on Jan 11, 2023 17:42:43 GMT -5
Oh my GOSH man!!! The painting, weathering and detailing are just out of this world on this one Steve!!! Excellent usage of the oils and splatters to bring out the dingy effects!! I'll be one of the ones trying to figure out the MP40 in the seat but I'm a patient guy and love a good story.  |
|
|
|
Post by Steve Zuleski on Jan 12, 2023 11:19:42 GMT -5
What material did you make the tarp out of? Thanks, CD. I used good old snot-rag tissues, HA! I was going for a more puffed look, but the paint knocked it down a bit more than I was hoping for. Thanks Joe! Weathering rigs ain't so tou0gh once you get your hands dirty. The MP40,................  |
|
reserve
Senior Member
   
Member since: July 2012
Si vis pacem para bellum
Posts: 2,372
Jul 11, 2012 9:11:45 GMT -5
Jul 11, 2012 9:11:45 GMT -5
|
Post by reserve on Jan 14, 2023 12:51:12 GMT -5
Way to go Z 'tis a fine looking beast
|
|
|
|
Post by Steve Zuleski on Jan 17, 2023 13:46:08 GMT -5
Tanks, Mark!!
|
|
roland66
Full Member
  
Member since: January 2013
at the workbench
Posts: 286
Jan 6, 2013 16:15:14 GMT -5
Jan 6, 2013 16:15:14 GMT -5
|
Post by roland66 on Jan 18, 2023 14:55:10 GMT -5
Wow, great job.
|
|
|
|
Post by Steve Zuleski on Jan 19, 2023 11:55:47 GMT -5
Thanks, Roland!
|
|
|
|
Post by Steve Zuleski on Jan 23, 2023 13:43:51 GMT -5
Let’s Face It, again,…….Finally, I’m back to painting the faces, my favorite part, because I have so much to learn. So much so that I’ve already given #4 a wash down at least three times. As some of you may remember, this happens pretty much every time I get back to painting faces. I recon a more analytical approach might help my process. The fact that I was rushing the process might have something to do with it, too. That was a Bozo No-no. So, I let go and let it happen, so far so good. Here's the line-up, but as you can see the fella in the back left has some serious eye issues that will need to be addressed before he gets a brush put to him. I was not impressed with this goofy overexaggerated face, but I’ll work with it as best as I can. A little scraping and putty work should bring him in line with the rest. 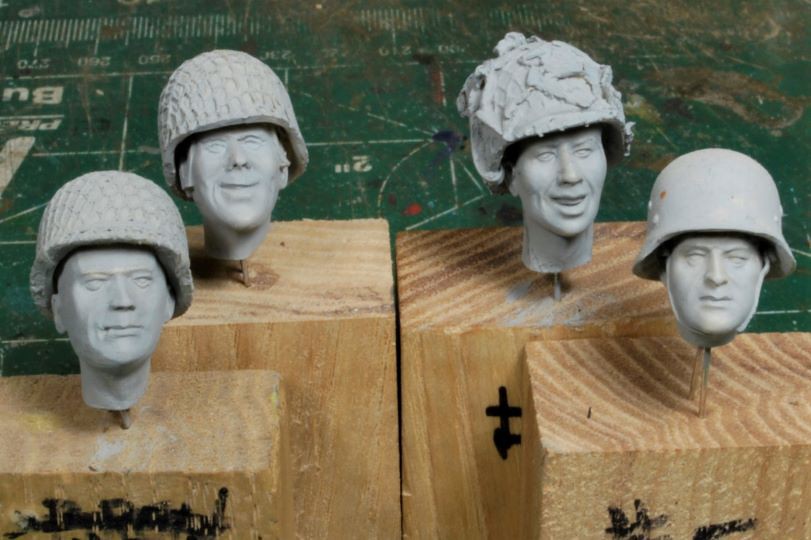 There is still quite a bit of work to be done to #4, but the basic tones are on and now some of the detail will be worked as soon as I get a hard dry on the oils. #3 has a very basic oil placement on him now, but he’s a long way behind #4. 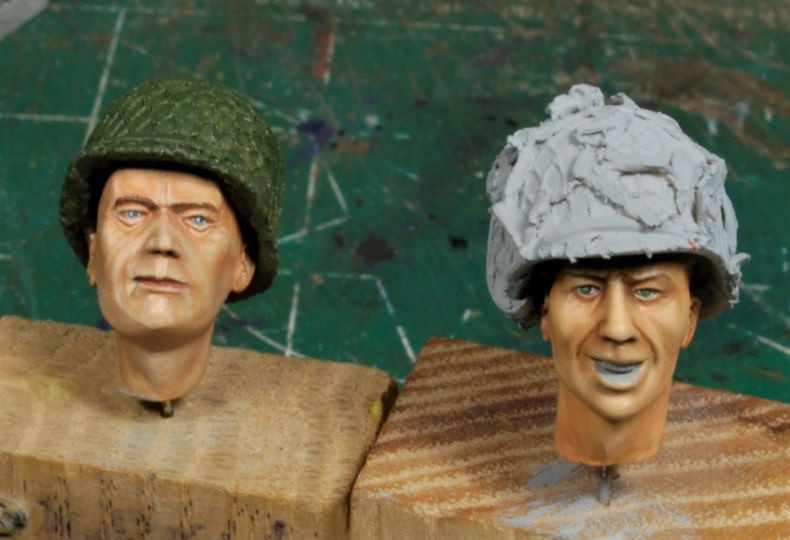 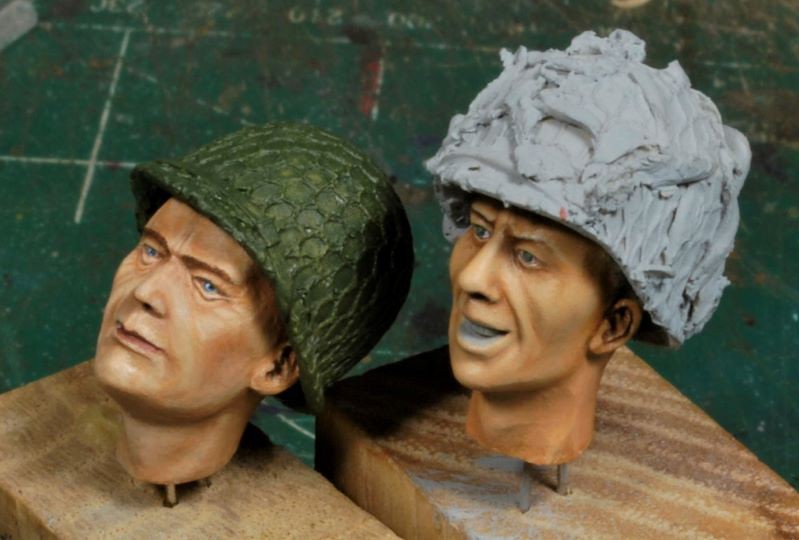 Now that I’m happy with the eyes and the basic overall color tones I will work in the more defined shadows and highlights. I like to snap a few pics and scrutinize the faces on the computer where I can see just how they will appear once posted online. I already see areas of concern and they will be addressed soon enough. I will also be using some of Mike-the-Kiwi’s techniques from his recently released book. The facial textures are what I’d like to learn and there’s no better time than the present. Also, I recently heard an interview from Mental Dental, David Lane, so I will work on some oil feathering as well. If I jack it up, I’ll break out the oven cleaner and Ruck Onward, what else am I gonna do, right? 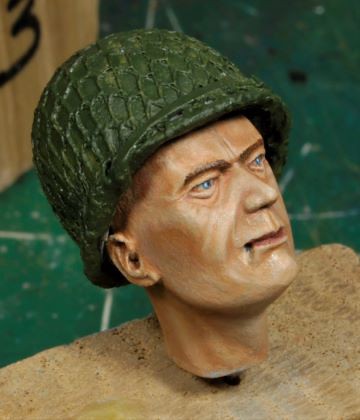 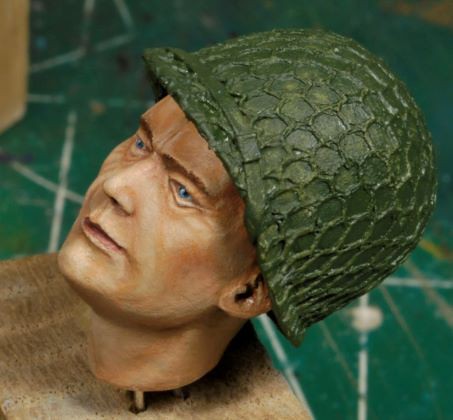 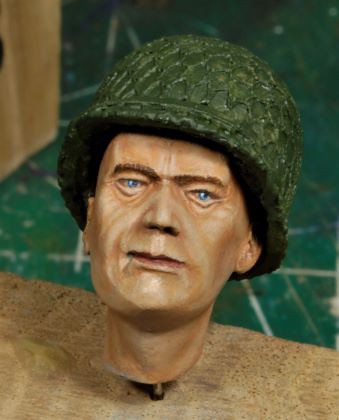 You may have noticed the skin tone on #4 is much lighter than #3, but that will change to a more compatible appearance. Not everybody is going to look the same anyway, but I don’t want #4 looking sickly, if ya know what I mean. I was able to knock out #3 much quicker, within an hour or so. See, once back in the groove things move much more smoothly, or kinda sorta? Thanks for watching. Cheers, Ski.
|
|
|
|
Post by chromdome35 on Jan 23, 2023 23:22:33 GMT -5
I admire anyone who can paint that well on such a small canvas. How do you get the eyes looking so real?
|
|
|
|
Post by Tobi on Jan 24, 2023 2:12:00 GMT -5
Is it just me or does #4 look like Eisenhower with a helmet? :-)
|
|
|
|
Post by Steve Zuleski on Jan 24, 2023 16:00:12 GMT -5
I admire anyone who can paint that well on such a small canvas. How do you get the eyes looking so real? Remember Bro, it's just a ton of practice, and then ya still might hav3e to fight the brush, HA! Thanks. Tobi, I might agree, but I see hair under the helmet that has to be painted, lol. |
|
|
|
Post by Leon on Jan 24, 2023 16:26:18 GMT -5
Doing a great job there Steve!
|
|
|
|
Post by mustang1989 on Jan 25, 2023 6:28:58 GMT -5
I saw this yesterday and was going to comment but got busy with something that came up. All of your techniques used throughout the painting process of these figures results in such a realistic outcome Steve. You're truly mastering the skill bro.
|
|
|
|
Post by Steve Zuleski on Jan 25, 2023 19:14:53 GMT -5
Doing a great job there Steve! Thanks, Leon, glad ya like em so far. Tanks, Joe! got a bit more on these two, but we are making progress  |
|
|
|
Post by Steve Zuleski on Jan 25, 2023 20:02:20 GMT -5
#3, Almost AcceptableAfter a day of adjusting skin tones and “feathering in” the oils I am satisfied with the results so far. This one is about 80% finished. I still need a bit more work before I set it aside to dry hard before working in some facial textures. 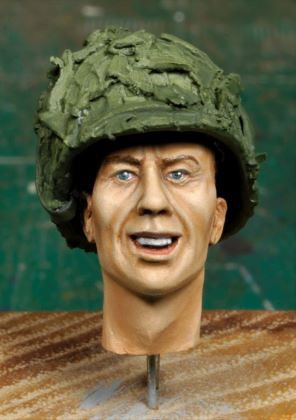 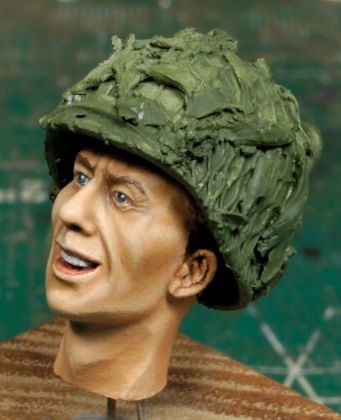 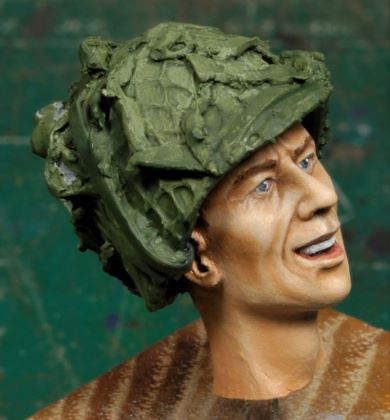 Time to get the last two heads up to speed and work the new techniques as a set. I may give all of them a dull coat to seal in the work so far. It’s always a dice roll when working in a new technique after getting this far, but I’m willing to take that chance. Thanks for watching. Cheers, Ski. P.S. Let me not forget the red tones as well. Sheesh, just caught that, lol.
|
|
|
|
Post by mustang1989 on Jan 25, 2023 22:28:22 GMT -5
I've read about painting the pupils of the eyes so that they don't appear crossed or misaligned somewhere. I'm assuming that's a pretty tricky part of painting faces? Still lookin' good Steve!!
|
|
captfue
Full Member
  
Member since: October 2012
Posts: 311
Oct 1, 2012 22:25:19 GMT -5
Oct 1, 2012 22:25:19 GMT -5
|
Post by captfue on Jan 25, 2023 23:23:26 GMT -5
Great looking
|
|
|
|
Post by Tobi on Jan 26, 2023 2:56:57 GMT -5
I've read about painting the pupils of the eyes so that they don't appear crossed or misaligned somewhere. I'm assuming that's a pretty tricky part of painting faces? Still lookin' good Steve!! I don't want to anticipate anything since Steve is the figure paint master here, but I've learned early in my modelling days that the pupils shall be aligned with the corners of the mouth to prevent this. |
|
|
|
Post by Steve Zuleski on Jan 26, 2023 8:12:01 GMT -5
I've read about painting the pupils of the eyes so that they don't appear crossed or misaligned somewhere. I'm assuming that's a pretty tricky part of painting faces? Still lookin' good Steve!! I don't want to anticipate anything since Steve is the figure paint master here, but I've learned early in my modelling days that the pupils shall be aligned with the corners of the mouth to prevent this. Eyes are a pain in the hind quarter and can ruin a great figure immediately if not done correctly. This is, btw, the most difficult portion of face painting if you don't get a handle on it early, which is why most painters do the eyes first. It also helps to have some serious focal equipment, #6 readers or optivisor, and also a few seriously pointed brushes, 0000 Windsor & Newton brushes, to be exact, lol. I've blown this pic up so we can see exactly how difficult it really is to do this correctly. 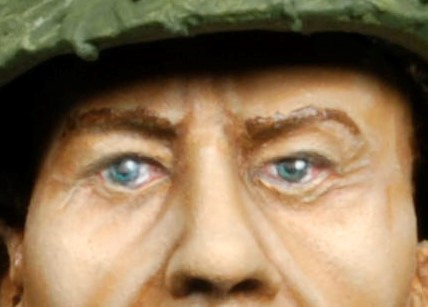 Mind you, I don't normally blow up my pics to get this close, I should, but Joe, you brought up a great point, worthy of further exploration. I think there's a figure painter deep inside you that you haven't discovered just yet, hint, hint.  So, as we can all see now, what appears to be a slight inaccuracy from a distance within the spectrum of the initial photo, is proven that it "actually is" an inaccuracy, in fact. I'm not gonna go all anal retentive here, but Joe, your eyes told you something didn't look right and they are correct. I fought the glint on the left facing eye for about 15mins, but that's not uncommon. Normally I would paint the eyes in an off-line position to avoid such illusional issues. Even if the measurements are within an acceptable range from right to left, the illusion of the eyes being off is noticeable and should be corrected. Honestly, in this scale, 120mm, the slight misalignment won’t be visible to nearly everyone. The "birth control" glasses might take up the slack from here, but now it's bugging me, HA! Eyes are a b@tch to paint and they are still my weak area. Closer examination dictates a correction. So, lesson learned, time to correct the left facing eye. I hope I didn’t rattle on too much, but your question was an excellent one, Joe! |
|