modelcarjr
Full Member
   July '24 Showcased Build Awarded
Member since: March 2023
Posts: 634
Mar 3, 2023 13:07:26 GMT -5
Mar 3, 2023 13:07:26 GMT -5
|
Post by modelcarjr on Sept 15, 2023 10:53:26 GMT -5
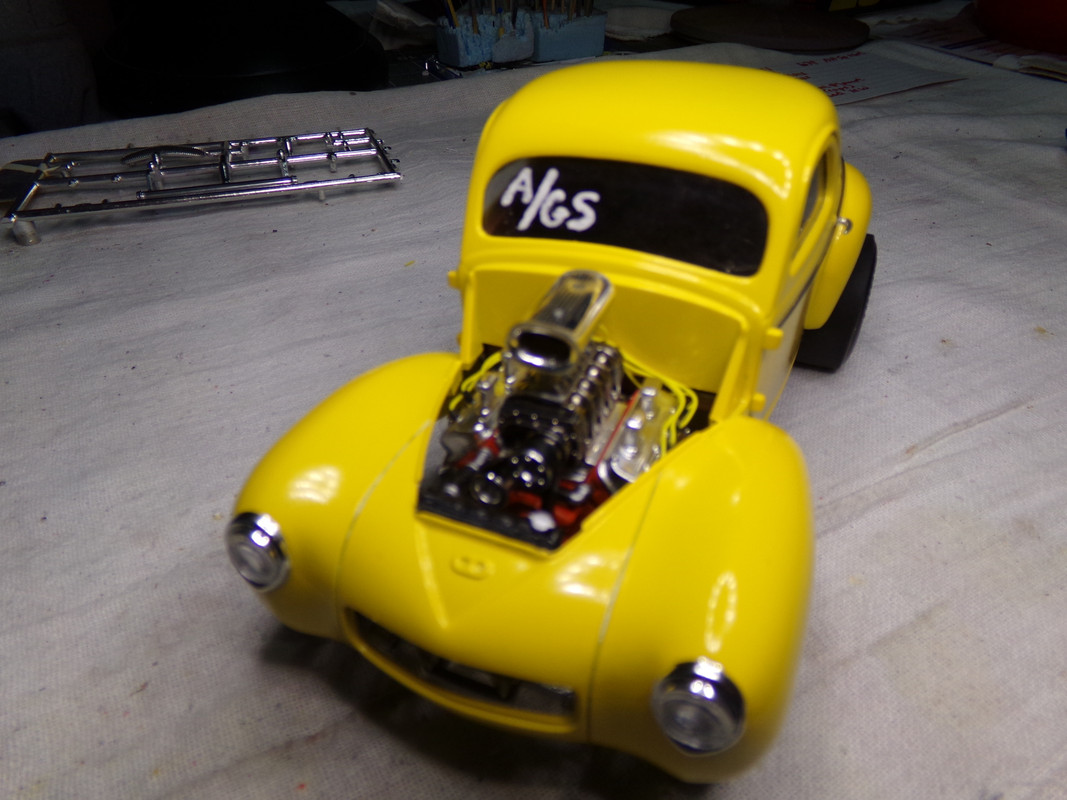
This is the Big John Mazmanian 41 Willys Gasser that I bought from a Louisiana modeler at the last Houston show. He had his collection ruined by Hurricane Ida in 2021. He bagged a lot of kits and the decals are ruined but the rest of the plastic is in good shape. So I bought a couple of kits and this is one of them. I could get another set of decals and some Candy Apple Red paint but I probably will just paint it with something I have and mark it with an A/GS in the window and call it good. I have built two of these as street rods and both came out very well and placed in two different contests. Its a simple kit but builds up so well. It paints and rubs out easily and looks great once complete. I won't chop it or flare the fenders or anything and its just a coincidence that I am building this one while another is also being built. It rained yesterday and will again today. But that's great since we haven't had much rain in two months so I won't complain. For the moment, I just wash off the Louisiana mud and put a few things together to get ready for paint. Thanks for looking! 😎  |
|
|
|
Post by 406 Silverado on Sept 15, 2023 11:22:12 GMT -5
Glad you got this one as I think this is the good one from Revell. The older one......YEESH!!!
|
|
|
|
Post by keavdog on Sept 15, 2023 11:30:28 GMT -5
I have this kit in the stash. Following!
|
|
|
|
Post by kyledehart5 on Sept 16, 2023 1:44:29 GMT -5
Nice!! Willys are the prototypical gasser to me. Absolutely love them
|
|
handiabled
Administrator      Apr '23 Showcased Build Awarded
Member since: February 2023
Posts: 4,427 
MSC Staff
|
Post by handiabled on Sept 16, 2023 3:00:05 GMT -5
Sweet! I look forward to seeing this come together
|
|
modelcarjr
Full Member
   July '24 Showcased Build Awarded
Member since: March 2023
Posts: 634
Mar 3, 2023 13:07:26 GMT -5
Mar 3, 2023 13:07:26 GMT -5
|
Post by modelcarjr on Sept 16, 2023 9:42:53 GMT -5
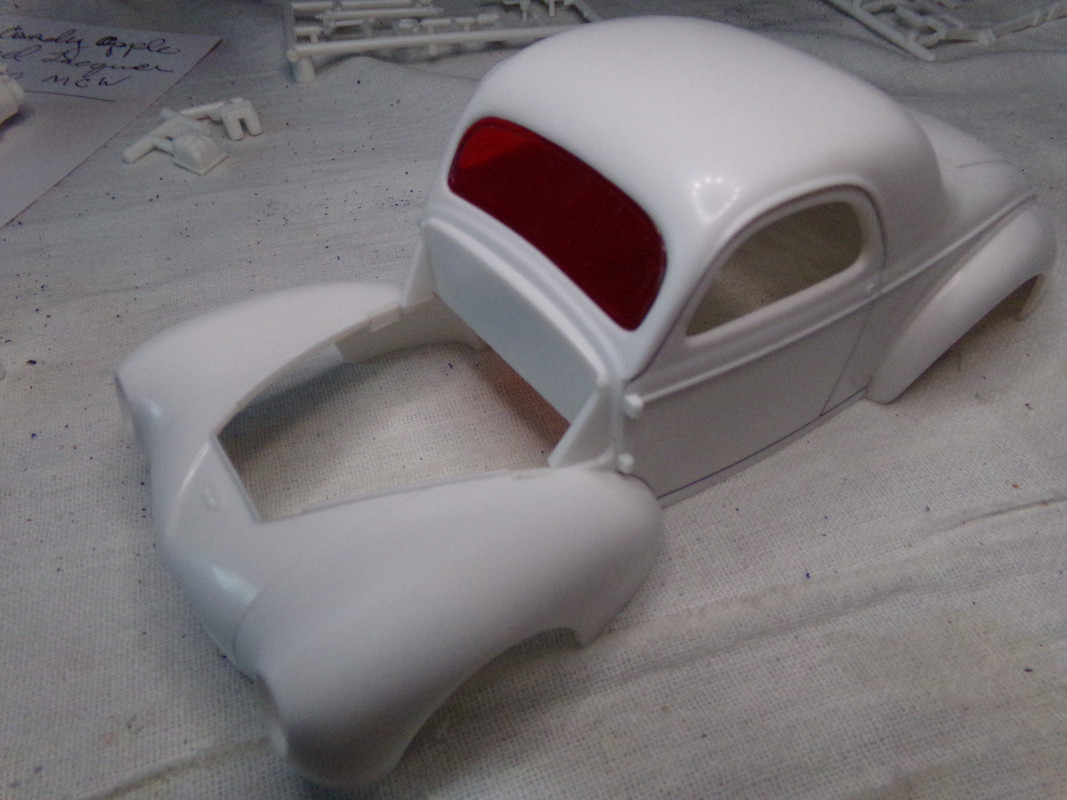
Thanks, All! I appreciate your comments! Thanks to a video sent by another modeler, I got a couple of things taken care of that didn't appear in later issues of this kit. I wouldn't have found the extra plastic on the inside of the A pillars on both sides. I removed both slivers of extra plastic with my X-acto knife and then sanded it out. Now the windshield glass will fit flush and stay in place I probably won't use the red glass and will probably cut my own using clear acetate since its essentially flat. Unfortunately, the trim built into the red glass will probably not be present and I probably will just not have any chrome trim on the windshield. I also wouldn't have found the mold line on the nose of the hood between the two trim pieces on each side of the hood. I did find the mold lines that seem to run from the midline trim the back fender to the edge of the trunk. And I always take the clips off the hood that clip into the slots on each side of the hood. This time I even filled the slots with a bit of plastic to prevent the slot from ghosting out from under the hood when closed. I also always sand down the fat front fenders to eliminate the crown on these fenders. Yost indicated that there were mold lines on the tops of these fenders. I don't know if there were or not but they are gone now because I sanded out the tops of the fenders. There is also a mold line on the hood between the scope opening and the cowl. I sanded that out too. I also deepened the door and trunk lines by back-scribing with my knife and even added some gray panel line accent color to see if that would work. So I think that everything is taken care of. I don't have before photos but here are a few photos of the finished corrections. Thanks for looking!    |
|
garydavis-Rest In Peace
Full Member
  
Member since: March 2023
RIP- September 2023
Posts: 440 
|
Post by garydavis-Rest In Peace on Sept 16, 2023 10:09:22 GMT -5
You're doing some fine work here JR.
|
|
modelcarjr
Full Member
   July '24 Showcased Build Awarded
Member since: March 2023
Posts: 634
Mar 3, 2023 13:07:26 GMT -5
Mar 3, 2023 13:07:26 GMT -5
|
Post by modelcarjr on Sept 16, 2023 16:35:25 GMT -5
Thanks, Gary! I appreciate your comment! I had a window today where the humidity got down to 50% so I primered the body and all the other white plastic pieces. I am using a new primer called NOW which I am not real high on but its $7.49 for a 9 oz can made by Krylon and sold by O'Reilly's. I'll probably rub it out a bit and wash it before I paint again. I have time as its gonna rain anytime now as I type this. I haven't figured out what color yet but here are my choices from what I have on hand: Tamiya - Italian Red, Maroon, Orange, Yellow, or Metallic Orange or Candy Lime Green (either over gold). Dupli-Color - Black, White, Dark Toreador Metallic or Bright Aqua Metallic. I'm leaning toward Italian Red because it would be quick and easy. But I also like Candy Lime Green, if I could pull it off. I wish I had a medium blue or a Light Blue Metallic but its not in inventory at the moment. Let me know what you think. Thanks for looking!  |
|
garydavis-Rest In Peace
Full Member
  
Member since: March 2023
RIP- September 2023
Posts: 440 
|
Post by garydavis-Rest In Peace on Sept 16, 2023 17:30:31 GMT -5
Italian Red sounds good, but so does the candy lime green.
|
|
modelcarjr
Full Member
   July '24 Showcased Build Awarded
Member since: March 2023
Posts: 634
Mar 3, 2023 13:07:26 GMT -5
Mar 3, 2023 13:07:26 GMT -5
|
Post by modelcarjr on Sept 17, 2023 10:30:47 GMT -5
Thanks, Gary! I still haven't decided. Here are my two iterations of the street rod kit. One in Aqua Sign Painters lettering enamel shot through an airbrush with white interior. I frenched the headlights and taillights and it took first place in Street Rod. The other is Tamiya Orange and Dupli-Color Gloss Black with orange interior. I think I built it around Halloween. It also took a first in Street Rod.  |
|
|
|
Post by 406 Silverado on Sept 17, 2023 10:35:28 GMT -5
Great progress so far JR!! You've definitely answered my question in regard to if this is the older version or newer release. I've built the older version a couple of times and man .....those kits are dang near impossible to build.
Your blue version with the headlights & tail lights frenched in pictured in the last post is a VERY beautiful ride.
Current build progress is coming along nicely as well.
|
|
garydavis-Rest In Peace
Full Member
  
Member since: March 2023
RIP- September 2023
Posts: 440 
|
Post by garydavis-Rest In Peace on Sept 17, 2023 10:50:30 GMT -5
Both of those cars look GREAT, and they deserve what they won...for sure. I'm looking forward to what you do with this one, for sure.
|
|
modelcarjr
Full Member
   July '24 Showcased Build Awarded
Member since: March 2023
Posts: 634
Mar 3, 2023 13:07:26 GMT -5
Mar 3, 2023 13:07:26 GMT -5
|
Post by modelcarjr on Sept 17, 2023 18:06:42 GMT -5
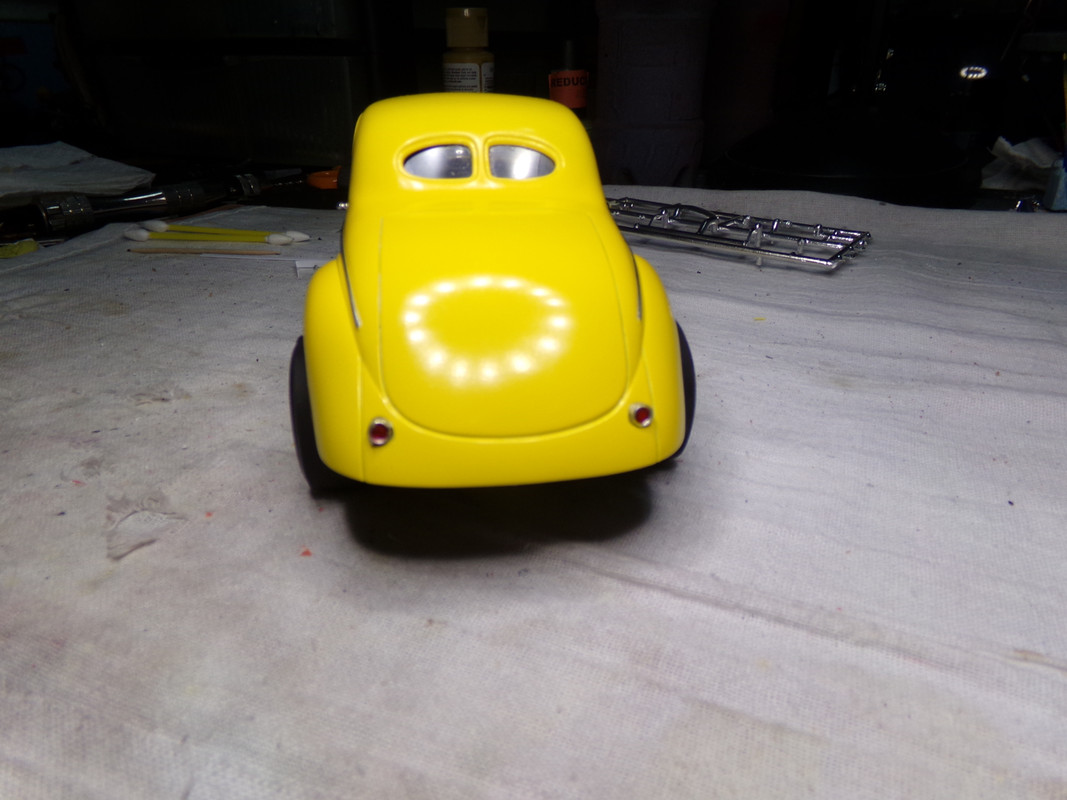
Thanks Joe and Gary! I appreciate your comments! Y'all might be surprised but I took some suggestions from a modeler on another site: I thought about the taillights and here was my solution. I took the bezels from the tree, sanded the chrome and some of the rim of the bezel and then glued them to a piece of 1/8" plastic tube. I drill out the holes in the body, and wallered (technical term) them out a bit. Then I stuck the plastic tube in each hole, straightened them so that they are pointing back and level and glued them in place. After paint, I'll foil them before adding the taillight lenses. Now they won't be pointing to the sky. I painted the body Bright Yellow. I don't have anything that is this bright and there are plenty of these yellow gassers on the internet. The paint, Tamiya Yellow came out great as the weather has been great today at about 90 degrees with 40% humidity. Two coats of paint over Tamiya white primer and two coats of Krylon Clear Lacquer. It won't need much rubbing out. So maybe I'll find some decals for it. But I might get some more bodies painted while the weather is nice. Thanks for looking!    |
|
|
|
Post by deafpanzer on Sept 17, 2023 20:35:29 GMT -5
The paint sure made your build POP out! It will be an eye catcher.
|
|
|
|
Post by kyledehart5 on Sept 18, 2023 4:21:03 GMT -5
Yellow can be tough! That’s a really great result and a good color for a gasser. Great work on the other builds too. Those are real sharp.
|
|
modelcarjr
Full Member
   July '24 Showcased Build Awarded
Member since: March 2023
Posts: 634
Mar 3, 2023 13:07:26 GMT -5
Mar 3, 2023 13:07:26 GMT -5
|
Post by modelcarjr on Sept 23, 2023 21:54:49 GMT -5
Thanks, Andy and Kyle! I appreciate your comments! Rubbed out the body and added foil including on the taillight bezels. I'll work on the engine next. Thanks for looking! 😎    |
|
garydavis-Rest In Peace
Full Member
  
Member since: March 2023
RIP- September 2023
Posts: 440 
|
Post by garydavis-Rest In Peace on Sept 24, 2023 0:13:27 GMT -5
Yep...I'm like'in that.
|
|
handiabled
Administrator      Apr '23 Showcased Build Awarded
Member since: February 2023
Posts: 4,427 
MSC Staff
|
Post by handiabled on Sept 24, 2023 1:37:01 GMT -5
Stunning paint job! Tail lights turned out perfectly
|
|
modelcarjr
Full Member
   July '24 Showcased Build Awarded
Member since: March 2023
Posts: 634
Mar 3, 2023 13:07:26 GMT -5
Mar 3, 2023 13:07:26 GMT -5
|
Post by modelcarjr on Sept 25, 2023 10:27:22 GMT -5
Thanks, both of you for your comments! Built the engine and added spark plug wires. Also added Tamiya Smoke to the blower. Noticed that there is a "flying pulley" spinning all on its own. I guess those are injectors on top of the blower. Maybe I should add a fuel log and fuel line as if I know anything about these engines but I don't. So this will probably be the extent of the detail for the engine. Thanks for looking! 😎   |
|
handiabled
Administrator      Apr '23 Showcased Build Awarded
Member since: February 2023
Posts: 4,427 
MSC Staff
|
Post by handiabled on Sept 25, 2023 10:37:41 GMT -5
The engine looks great!
|
|
buddho
Forum Moderator     
Member since: February 2019
Posts: 1,287 
MSC Staff
|
Post by buddho on Sept 25, 2023 11:24:54 GMT -5
Thanks, Gary! I still haven't decided. Here are my two iterations of the street rod kit. One in Aqua Sign Painters lettering enamel shot through an airbrush with white interior. I frenched the headlights and taillights and it took first place in Street Rod. The other is Tamiya Orange and Dupli-Color Gloss Black with orange interior. I think I built it around Halloween. It also took a first in Street Rod.  Gorgeous! |
|
buddho
Forum Moderator     
Member since: February 2019
Posts: 1,287 
MSC Staff
|
Post by buddho on Sept 25, 2023 11:25:48 GMT -5
The finish and engine look fantastic!
|
|
garydavis-Rest In Peace
Full Member
  
Member since: March 2023
RIP- September 2023
Posts: 440 
|
Post by garydavis-Rest In Peace on Sept 25, 2023 12:58:36 GMT -5
That engine looks great, JR. Slap'in that into that great looking body, and it's "MILLER TIME".
|
|
|
|
Post by kyledehart5 on Sept 25, 2023 16:00:06 GMT -5
Great work on the engine! Going to look really sweet down in there.
|
|
modelcarjr
Full Member
   July '24 Showcased Build Awarded
Member since: March 2023
Posts: 634
Mar 3, 2023 13:07:26 GMT -5
Mar 3, 2023 13:07:26 GMT -5
|
Post by modelcarjr on Sept 28, 2023 21:01:13 GMT -5
Thanks, All! Chassis is done and engine is in. I put the body and interior on as a mock-up to make sure everything is square. I think the back end will sit down a little more and the front end will come up. Still have to install the radiator which should lift the front end a bit. I originally had the headers installed backwards so I reversed them and everything fits much better now. Thanks for looking! 😎   |
|
|
|
Post by kyledehart5 on Sept 29, 2023 1:58:17 GMT -5
Going to look outstanding when it’s all said and done. What a great color yellow is for one of these gassers
|
|
buddho
Forum Moderator     
Member since: February 2019
Posts: 1,287 
MSC Staff
|
Post by buddho on Sept 29, 2023 4:47:11 GMT -5
That yellow is gorgeous!
|
|
modelcarjr
Full Member
   July '24 Showcased Build Awarded
Member since: March 2023
Posts: 634
Mar 3, 2023 13:07:26 GMT -5
Mar 3, 2023 13:07:26 GMT -5
|
Post by modelcarjr on Oct 1, 2023 6:37:05 GMT -5
Thanks, All! I appreciate your comments! This one is done except for decals. I don't have any decent decals for the Strip so I'll have to buy some. So I'll be back with this one once I have purchased and applied decals. Thanks for looking!     |
|
handiabled
Administrator      Apr '23 Showcased Build Awarded
Member since: February 2023
Posts: 4,427 
MSC Staff
|
Post by handiabled on Oct 1, 2023 6:50:21 GMT -5
I love the paint and stance of this!
|
|