modelcarjr
Full Member

Member since: March 2023
Posts: 385
Mar 3, 2023 13:07:26 GMT -5
Mar 3, 2023 13:07:26 GMT -5
|
Post by modelcarjr on Nov 29, 2023 21:19:45 GMT -5
|
|
|
|
Post by kyledehart5 on Nov 30, 2023 2:44:24 GMT -5
Very nice work! Love the vinyl roof. This is a good car to add one to.
|
|
406 Silverado
Global Administrator 
Member since: November 2011
Posts: 8,409
Member is Online
MSC Staff
|
Post by 406 Silverado on Nov 30, 2023 5:53:31 GMT -5
I just saw this one yesterday on your Caddy thread JR and boy are you ever off to a great start on this. I dunno how you get that BMF to stick so dang well to the lettering but you are straigtht up THE MAN for your ability to do that. Looking swell so far bud.
|
|
|
|
Post by tcoat on Nov 30, 2023 7:30:00 GMT -5
Looking good. Ever try the Tamiya extra thin method for doing a vinyl top? Just glue on a couple of strips of styrene, brush a liberal amount of extra thin on, let it set a minute then stipple with an old brush. One all is dry give a very light touch with a fine sanding stick to take off any peaks and you have a very nice scale vinyl look. This works really well for tops with compound curves that make tape tricky and there is zero chance of it drying out and peeling over time. .jpg.e55a510f60d79177869d3acc39b495e9.jpg) |
|
handiabled
Community Relations Moderator 
Member since: February 2023
Posts: 2,437 
MSC Staff
|
Post by handiabled on Nov 30, 2023 9:38:22 GMT -5
Another one to bookmark! Looks great so far with the addition of the vinyl roof
|
|
|
|
Post by kyledehart5 on Nov 30, 2023 11:38:30 GMT -5
Looking good. Ever try the Tamiya extra thin method for doing a vinyl top? Just glue on a couple of strips of styrene, brush a liberal amount of extra thin on, let it set a minute then stipple with an old brush. One all is dry give a very light touch with a fine sanding stick to take off any peaks and you have a very nice scale vinyl look. This works really well for tops with compound curves that make tape tricky and there is zero chance of it drying out and peeling over time. fascinating. I have never seen or considered this before. My one and only vinyl top I’ve tried I used the intentional orange peel method. Which achieved a nice scale vinyl look in my opinion. Going to try this on a simple curbside or rebuilder sometime. |
|
modelcarjr
Full Member
Member since: March 2023
Posts: 385
Mar 3, 2023 13:07:26 GMT -5
Mar 3, 2023 13:07:26 GMT -5
|
Post by modelcarjr on Nov 30, 2023 23:41:48 GMT -5
Thanks, Kyle, Joe and tcoat! I appreciate your comments! I guess I'll have to try the method with Tamiya extra thin but I haven't heard of it before. Is it a glue? I guess I have to shop for it and see what it is. Anyway, I had a tip on another forum that my seams were too far inboard. So in the future, I'll have to improve on that.
|
|
|
|
Post by kyledehart5 on Dec 1, 2023 4:32:25 GMT -5
Thanks, Kyle, Joe and tcoat! I appreciate your comments! I guess I'll have to try the method with Tamiya extra thin but I haven't heard of it before. Is it a glue? I guess I have to shop for it and see what it is. Anyway, I had a tip on another forum that my seams were too far inboard. So in the future, I'll have to improve on that. Yes indeed. It is a styrene cement. It is wonderful stuff. Very thin, as the name implies. You can, for instance, hold two halves of an engine block together and just touch the brush to the joint and it will wick in and cement the halves together. They have thick version as well, but I most often find myself reaching for the extra thin. Alternatively, they say that Tamiya airbrush cleaner is the identical stuff and cheaper. I will be buying some of that when I run low on TET to try it out. Personally, I think your seams look good. It's pretty hard in scale to decide where those should go. Perhaps your vinyl top was installed in the aftermarket and therefore the seams are in a different spot? Unless you're doing a very specific car, I can't see why it would matter much. Great work on this one so far. |
|
|
|
Post by tcoat on Dec 1, 2023 8:04:56 GMT -5
Ya the seems could stand to be a bit further out but they are not a gamebreaker where they are. Thought I had pics of the process but I guess not. Here is a slightly better look.  |
|
Joe Rix
Forum Moderator 
Member since: January 2023
Posts: 1,457
MSC Staff
|
Post by Joe Rix on Dec 1, 2023 8:14:15 GMT -5
Impressive paint work and vinyl roof. I like the car you've picked to build.
|
|
modelcarjr
Full Member
Member since: March 2023
Posts: 385
Mar 3, 2023 13:07:26 GMT -5
Mar 3, 2023 13:07:26 GMT -5
|
Post by modelcarjr on Dec 1, 2023 22:19:32 GMT -5
Thanks, Kyle, tcoat and Joe. I don't know what I was thinking last night. I have some Tamiya extra thin cement! I use it sometimes for engine blocks and engine building but I normally just use my medium extreme power super glue for everything but clear parts or delicate chrome parts. I don't like stuff to come apart.
|
|
modelcarjr
Full Member
Member since: March 2023
Posts: 385
Mar 3, 2023 13:07:26 GMT -5
Mar 3, 2023 13:07:26 GMT -5
|
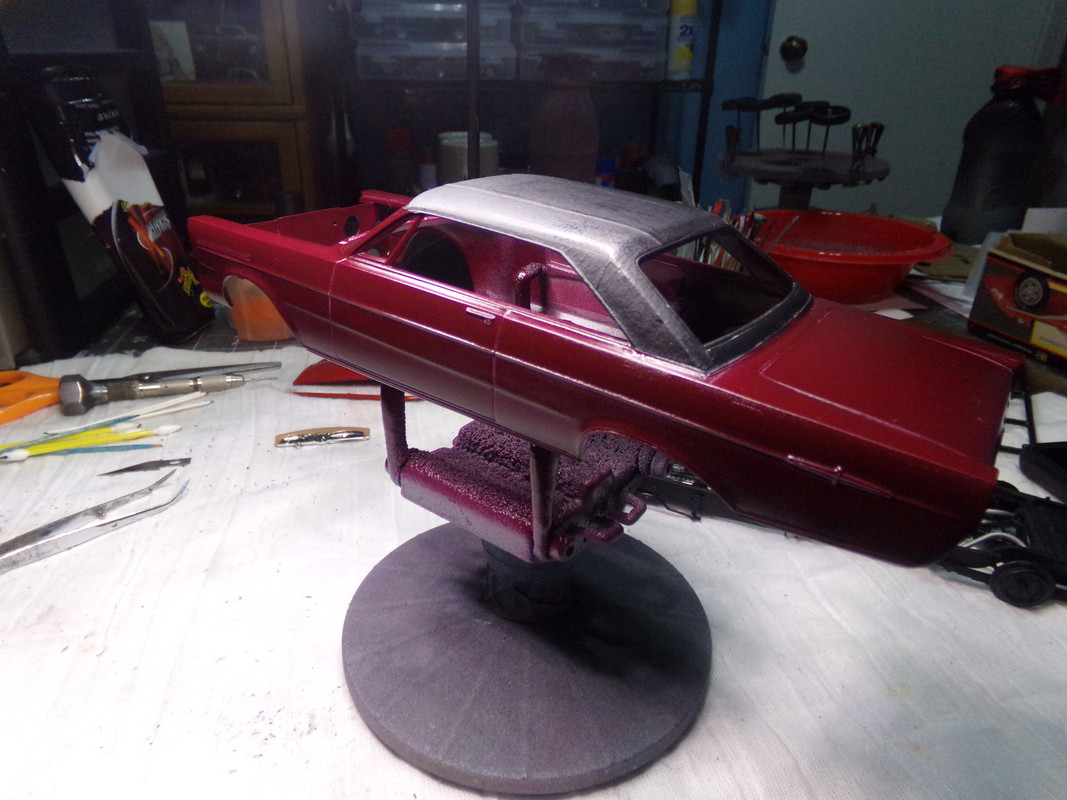
Post by modelcarjr on Dec 5, 2023 19:10:44 GMT -5
I started rubbing out the body and noticed that I was exposing too many edges and the overall appearance of the paint was a bit fuzzy or grayish. Maybe it was too humid when I applied the clear and it blushed. Maybe I didn't get enough paint on it either. So I needed to give it another coat of paint and clear. But first, I had to make a french fry tray hat to cover the vinyl top. You remember the french fry trays that they used to use at the A&W Root Beer stands and other car hop drive-ins. You can't find them today and neither the Sonic drive-ins or the Dairy Queens use them today. I built one but it is probably smaller than an actual french fry tray but it will serve the purpose. Today, when the humidity was below 40% ( I haven't seen that in a long time) I gave it another wet coat of paint, removed the paint from the chrome foiled letters, and then gave it two coats of clear. I also added a couple of passes of clear to the top after removing my french fry try hat for the top. Now, I thin I can work with this body to rub it out properly and get some foil on it. And now I have a hat for the next model that has a vinyl top or a different color on the top! Thanks for looking! 😎     |
|
|
|
Post by tcoat on Dec 5, 2023 19:33:57 GMT -5
What a great masking method. I have a whole pack of those things around here someplace.
|
|
|
|
Post by kyledehart5 on Dec 5, 2023 20:47:44 GMT -5
I must agree. What a great idea!!
|
|
modelcarjr
Full Member
Member since: March 2023
Posts: 385
Mar 3, 2023 13:07:26 GMT -5
Mar 3, 2023 13:07:26 GMT -5
|
Post by modelcarjr on Dec 6, 2023 22:22:54 GMT -5
Thanks, Tcoat and Kyle! I appreciate your comments! This one is not working out. I have just finished three with on problems and I try to paint the same way every time. But it seems that about 1 in 4 just don't work out. The finish is just lumpy in places and the edges are still being exposed too easily. So this one is in the oven cleaner to be continued later. 😢  |
|
|
|
Post by tcoat on Dec 7, 2023 6:54:32 GMT -5
Thanks, Tcoat and Kyle! I appreciate your comments! This one is not working out. I have just finished three with on problems and I try to paint the same way every time. But it seems that about 1 in 4 just don't work out. The finish is just lumpy in places and the edges are still being exposed too easily. So this one is in the oven cleaner to be continued later. 😢 I have these issues every single time I try to use any red(ish) gloss paint. Hopefully one of the car painting guys can give some tips. |
|
|
|
Post by kyledehart5 on Dec 7, 2023 17:42:28 GMT -5
Thanks, Tcoat and Kyle! I appreciate your comments! This one is not working out. I have just finished three with on problems and I try to paint the same way every time. But it seems that about 1 in 4 just don't work out. The finish is just lumpy in places and the edges are still being exposed too easily. So this one is in the oven cleaner to be continued later. 😢 I have these issues every single time I try to use any red(ish) gloss paint. Hopefully one of the car painting guys can give some tips. I am sorry this happened. Happens to me every once in a while and into the purple pond it goes. I can’t say I’ve had any specific issues with red. I have built several Ferrari F1 cars and maybe one or two other reddish cars and 99% of the time I prime them with Mr hobby or tamiya pink primer. Gives the reds a nice pop and I fell like it helps the red to get a smooth coverage with the pink base. Could be a placebo but I will stick with it. |
|
modelcarjr
Full Member
Member since: March 2023
Posts: 385
Mar 3, 2023 13:07:26 GMT -5
Mar 3, 2023 13:07:26 GMT -5
|
Post by modelcarjr on Dec 20, 2023 21:09:59 GMT -5
Thanks, tcoat and Kyle! I appreciate your comments! Well, I normally don't have a problem removing paint and repainting but this one is testing me. I don't know what was wrong with that Tamiya Maroon paint (and I never have any luck with Maroon paint) but not only did it not go on well but it has been almost impossible to get off. I think I it in multiple oven cleaner baths for at least 10 days. Finally, I had to pick and sand off some of the paint. But I think I am close now. Its in primer and I have worked through a couple of rough spots. The Galaxie 500 XL scripts, especially on the right side have lost some definition. But I will this one a shot and this time I am going to use the last of a can of Dupli-Color Dark Toreador Metallic. I am also going to skip the vinyl top this time so that I can get this painted tomorrow before it starts raining through Christmas. Thanks for looking! 😎  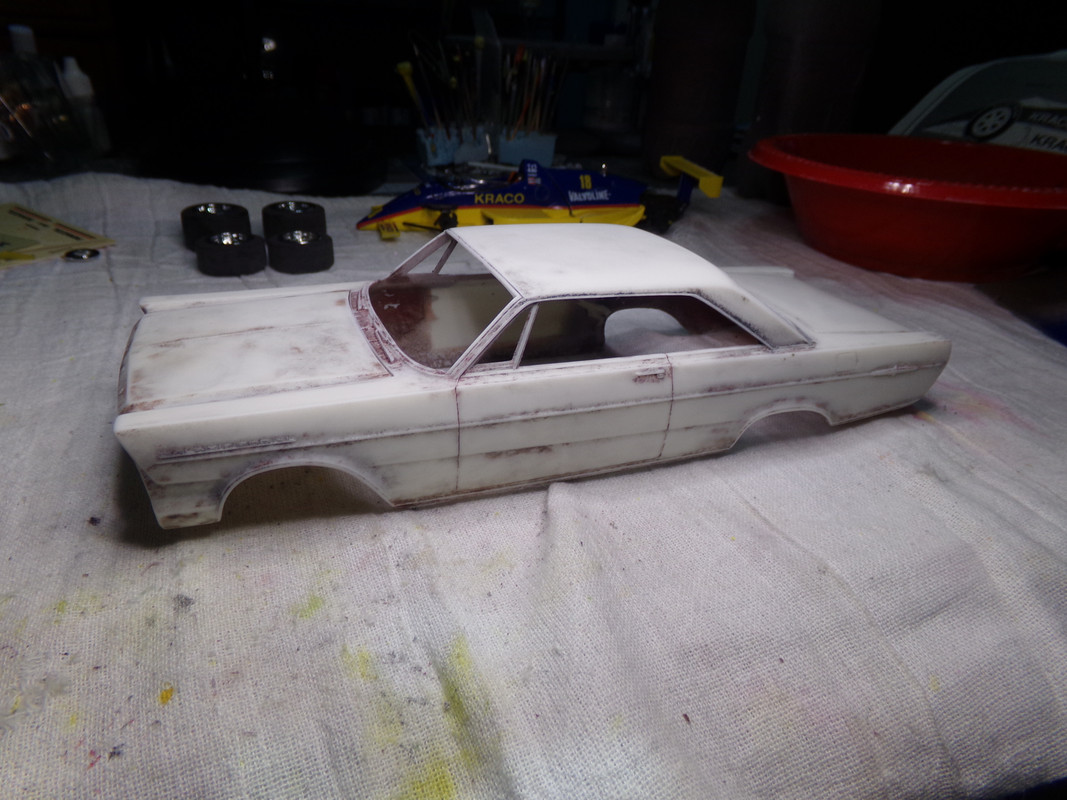   |
|
|
|
Post by kyledehart5 on Dec 20, 2023 23:06:19 GMT -5
Nice recovery on this one. That’s a lot of work!
|
|
modelcarjr
Full Member
Member since: March 2023
Posts: 385
Mar 3, 2023 13:07:26 GMT -5
Mar 3, 2023 13:07:26 GMT -5
|
Post by modelcarjr on Dec 21, 2023 19:16:46 GMT -5
Thanks, Kyle! I appreciate your comments! Well, in the beginning of the end, I think it turned out pretty well! Although the humidity didn't get below 60 today, I managed to get two coats of Dupli-Color Dark Toreador Metallic and two coats of Krylon Clear Lacquer on it today and it looks pretty good. I don't know what it is about this color but it always turns out nice. And I have had two 1st places and one 2nd place with cars painted this color in two different contests. The Galaxie 500 XL lettering on the right side didn't turn out too good, as I suspected, but the rest came through pretty well. The left side just needs a touch of lacquer thinner re-applied as the clear ran some of the paint over the lettering. So I will rub it out tomorrow and see where it goes from here. At least I have something to work on while its raining for the next few days. Thanks for looking! 😎     |
|
|
|
Post by kyledehart5 on Dec 21, 2023 19:55:42 GMT -5
Very nice!! I really like that color. It looks awesome on that car.
|
|
406 Silverado
Global Administrator
Member since: November 2011
Posts: 8,409
Member is Online
MSC Staff
|
Post by 406 Silverado on Dec 21, 2023 20:41:34 GMT -5
JR this is turning into a true masterpiece of a build and you're right about that color turning heads and I'm not surprised that you placed that well with that color. I painted up an El Camino a few years back using a color very similar to this for a friend of my son. Kid about fell out when I gave it to him.
Lookin' swell my friend.....real swell.
|
|
handiabled
Community Relations Moderator
Member since: February 2023
Posts: 2,437
MSC Staff
|
Post by handiabled on Dec 22, 2023 9:22:35 GMT -5
Great save on this! I like this candy color even more than the first one
|
|
modelcarjr
Full Member
Member since: March 2023
Posts: 385
Mar 3, 2023 13:07:26 GMT -5
Mar 3, 2023 13:07:26 GMT -5
|
Post by modelcarjr on Dec 22, 2023 21:28:21 GMT -5
Thanks, Kyle, Joe, and Handlabled! I appreciate your comments! I rubbed out the body today and finished the foil on the body. Its not perfect but it will have to do. I'll probably build this one box stock. But I have another one that I can build later! Thanks for looking! 😎     |
|
|
|
Post by kyledehart5 on Dec 22, 2023 21:57:07 GMT -5
Even better with the chrome! Great work.
|
|
406 Silverado
Global Administrator
Member since: November 2011
Posts: 8,409
Member is Online
MSC Staff
|
Post by 406 Silverado on Dec 23, 2023 8:33:28 GMT -5
WOW!!! That looks good right there JR. You do such clean work on your car bodies man.  |
|
modelcarjr
Full Member
Member since: March 2023
Posts: 385
Mar 3, 2023 13:07:26 GMT -5
Mar 3, 2023 13:07:26 GMT -5
|
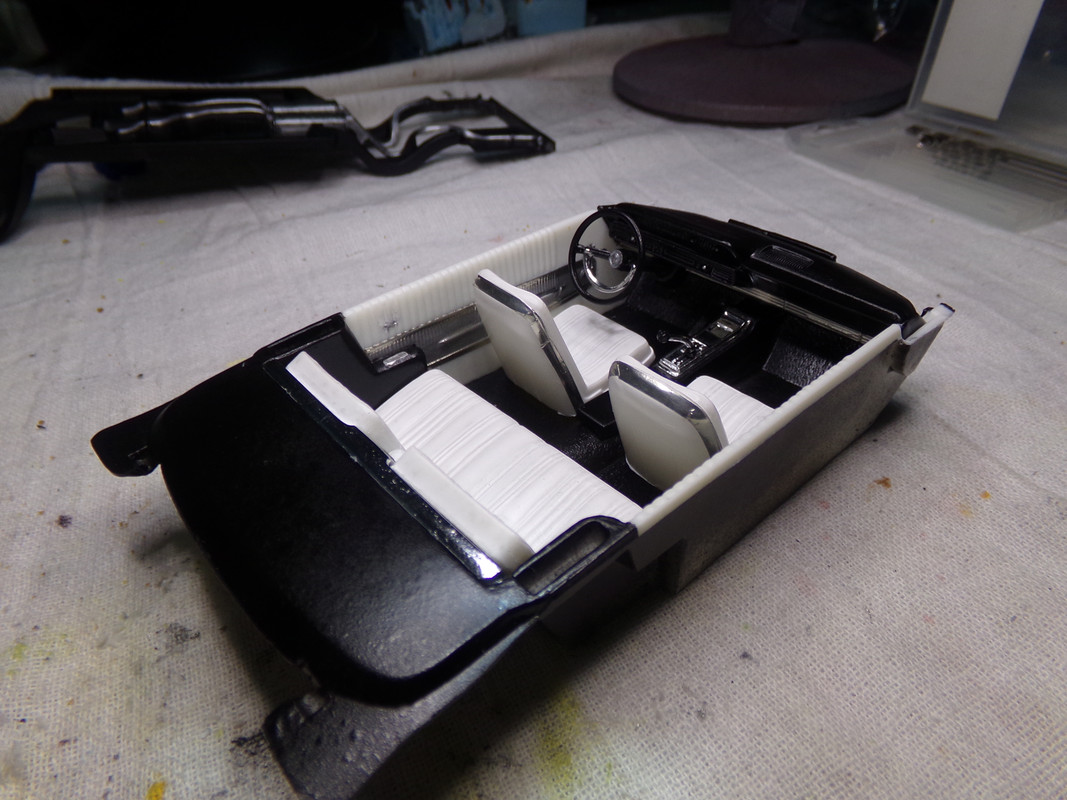
Post by modelcarjr on Dec 23, 2023 22:49:31 GMT -5
|
|
|
|
Post by kyledehart5 on Dec 23, 2023 23:08:08 GMT -5
Interior looks good. I really like the white. Nice looking engine and I still love the color. Great work so far.
|
|
modelcarjr
Full Member
Member since: March 2023
Posts: 385
Mar 3, 2023 13:07:26 GMT -5
Mar 3, 2023 13:07:26 GMT -5
|
Post by modelcarjr on Dec 24, 2023 20:56:40 GMT -5
Thanks Kyle! I appreciate your comment! The first two pictures are Before photos and the second two are After photos. Well, I had a bit of a set-back this morning. The windshield had developed a CA fog overnight, probably from gluing in the firewall. So I have taken it apart, rubbed out the windshield with cloths and Scratch-X and reinstalled it. I also finished the chassis and the front suspension is poseable, sloppy at best, but it works. Its back together now and tomorrow I'll add the bumpers, grill and taillights and call it good! Thanks for looking and Merry Christmas! 😎     |
|
|
|
Post by kyledehart5 on Dec 25, 2023 2:33:50 GMT -5
Nice progress! Good work getting that glass cleared up! Merry Christmas! looking forward to the final
|
|