cbaltrin
Full Member

Member since: January 2024
Posts: 240
Jan 20, 2024 17:00:59 GMT -5
Jan 20, 2024 17:00:59 GMT -5
|
Post by cbaltrin on Apr 18, 2024 21:40:27 GMT -5
This is looking great. Engine and interior look outstanding!  |
|
handiabled
Administrator  Apr '23 Showcased Build Awarded
Member since: February 2023
Posts: 3,764 
MSC Staff
|
Post by handiabled on May 5, 2024 7:13:10 GMT -5
|
|
eaglecash867
Full Member
Member since: July 2023
Posts: 306
Jul 1, 2023 5:18:34 GMT -5
Jul 1, 2023 5:18:34 GMT -5
|
Post by eaglecash867 on May 5, 2024 9:52:35 GMT -5
Thanks for the kind words, fellas.
Brent, no new updates yet. Overcame a major obstacle on my Boss 351 project so I've been putting all of my energy into finally getting that one done.
|
|
|
|
Post by 406 Silverado on May 7, 2024 4:54:53 GMT -5
Thanks for the kind words, fellas. Brent, no new updates yet. Overcame a major obstacle on my Boss 351 project so I've been putting all of my energy into finally getting that one done. Which by the way you're doing an excellent job with.  |
|
eaglecash867
Full Member
Member since: July 2023
Posts: 306
Jul 1, 2023 5:18:34 GMT -5
Jul 1, 2023 5:18:34 GMT -5
|
Post by eaglecash867 on Jun 2, 2024 9:05:10 GMT -5
|
|
lyle
Forum Moderator 
Member since: May 2013
On the sunny side of the dirt
Posts: 1,566
MSC Staff
|
Post by lyle on Jun 2, 2024 9:45:26 GMT -5
That is n amazing sub-assembly. Strapping looks perfect.The precision and neatness of the paint work is stunning to me.
|
|
brandonk
Full Member
Jan '24 Showcased Model Awarded
Member since: May 2023
Posts: 1,110
May 14, 2023 13:45:45 GMT -5
May 14, 2023 13:45:45 GMT -5
|
Post by brandonk on Jun 2, 2024 9:54:00 GMT -5
Wow, that looks stupendous!!
|
|
thug626
Senior Member

Member since: January 2013
Posts: 2,002
Jan 15, 2013 13:05:28 GMT -5
Jan 15, 2013 13:05:28 GMT -5
|
Post by thug626 on Jun 2, 2024 13:08:59 GMT -5
Your CP subassembly looks fantastic. Will the fuel tanks be visible in the end?
Cheers
Dave
|
|
eaglecash867
Full Member
Member since: July 2023
Posts: 306
Jul 1, 2023 5:18:34 GMT -5
Jul 1, 2023 5:18:34 GMT -5
|
Post by eaglecash867 on Jun 2, 2024 19:31:08 GMT -5
That is n amazing sub-assembly. Strapping looks perfect.The precision and neatness of the paint work is stunning to me. Thanks Lyle! Those Tamiya Masking Sticker Sheets I started using a few years ago work extremely well for all kinds of complex masking tasks. Infinitely re-positionable, and their adhesive doesn’t react with paint like tape sometimes does for some reason. Wow, that looks stupendous!! Thanks Brandon! Your CP subassembly looks fantastic. Will the fuel tanks be visible in the end? Cheers Dave Thanks Dave! I was almost kicking myself for going to the brain damage of painting the fuel tanks, but I looked ahead in the instructions, and it looks like there’s a separate belly panel. That could realistically be removed from the aircraft in real life, so I think that’s one of the areas I’ll open up. I have a little bag of 1mm magnets, so I might even make it so the panel can be stuck back on the belly. I’m working on the fuselage now, and there’s all kinds of crazy detail back there too…but I can’t imagine a real-world situation where the entire skin on the side of the aircraft would be removed in one, giant piece. That detail will be getting glued in for structural support, but I’m not going to waste time painting any of it |
|
thug626
Senior Member
Member since: January 2013
Posts: 2,002
Jan 15, 2013 13:05:28 GMT -5
Jan 15, 2013 13:05:28 GMT -5
|
Post by thug626 on Jun 2, 2024 19:47:35 GMT -5
Looking forward to seeing that! I painted the fuel tanks on my Ta-152. Thinking I was going to open that portion up. I considered it an exercise is detail painting.
Cheers
Dave
|
|
handiabled
Administrator
Apr '23 Showcased Build Awarded
Member since: February 2023
Posts: 3,764
MSC Staff
|
Post by handiabled on Jun 3, 2024 2:34:36 GMT -5
Fantastic progress on this! Great to see you back on it again but that sucks your fence went down because of the weather.
|
|
dean48ws
Full Member
July '24 Showcased Model Awarded
Member since: October 2023
Posts: 312
|
Post by dean48ws on Jun 3, 2024 2:57:50 GMT -5
This is just a master class in how to do stuff properly, you've knocked this out of the park!
|
|
TJ
Senior Member
June '23 Showcased Model Awarded
Member since: May 2023
Posts: 1,903
May 14, 2023 18:18:36 GMT -5
May 14, 2023 18:18:36 GMT -5
|
Post by TJ on Jun 3, 2024 3:11:58 GMT -5
Excellent progress on this. Painting looks fantastic
|
|
|
|
Post by 406 Silverado on Jun 3, 2024 4:26:05 GMT -5
There are a TON of details in this kit it looks like eagle. Some really eyepopping work going into bringing this one to life and I'm looking forward to seeing that belly panel opened up to see the fuel cell detail at a later stage of the build.  |
|
eaglecash867
Full Member
Member since: July 2023
Posts: 306
Jul 1, 2023 5:18:34 GMT -5
Jul 1, 2023 5:18:34 GMT -5
|
Post by eaglecash867 on Jun 28, 2024 19:44:16 GMT -5
|
|
handiabled
Administrator
Apr '23 Showcased Build Awarded
Member since: February 2023
Posts: 3,764
MSC Staff
|
Post by handiabled on Jun 29, 2024 3:14:16 GMT -5
Looks to be really coming together now! Strange the about the ammo drum fitment but nice you caught it before the assembly stage.
|
|
eaglecash867
Full Member
Member since: July 2023
Posts: 306
Jul 1, 2023 5:18:34 GMT -5
Jul 1, 2023 5:18:34 GMT -5
|
Post by eaglecash867 on Aug 4, 2024 17:29:21 GMT -5
Finally back to making progress on this one. The first set of sanding belts I got were from Alpha Abrasives and they were WAY too coarse, so I had to go on another search. I found that if I ordered directly from Micro Finishes, I could get a full range of 1/4" wide sanding belts, from 1500 to 8000 grit. They worked perfectly, so I got the leading edges of the wings nice and smooth and seam free with those. I shrunk down some little chunks of 1/8" heat shrink tubing to get them small enough to fit snugly over the gun barrels before doing the sanding. It protected them from accidental slips, and I'm leaving the heat shrink on them until the painting/finishing is all done. It also helps that the tubing is white, so I can easily see them out of the corner of my eye and not inadvertently break off a gun barrel. So, got the wing permanently mated with the fuselage. Looks like there really aren't any good options for putting magnets on the belly panel like I wanted to, but it doesn't need those anyway because it fits nice and tight into its recess on the bottom of the wing. Got a strange misalignment issue with it though...it keeps wanting to twist clockwise, so it leaves a gap on one side. I'll get that part figured out later. Building the engine mount was something that made me glad I had a full range of micro drill bits. The smaller piece that attaches between the middle of the firewall and the bottom corners of the larger engine mount piece had pegs at all 3 corners, but there were no corresponding holes in the tubing of the larger piece like the instruction manual shows. So, I drilled the holes where they needed to be and it worked out. Kind of a silly oversight on ZMs part though. The little pipe that connects between the firewall and the top of the engine cowl didn't fit between the ammo boxes, so I had to open up that space a little with a #11 blade. Another silly oversight on the part of ZM...there's no physical way that pipe could have gone where it needed to go without my modifying the ammo boxes. So, here are the results. Kind of a nerve-racking experience getting the engine onto the engine mount...kept thinking something was going to break while I was doing it. Heh...the sides of the fuselage inside the gun bays are still bare plastic, which is a testament to my complete lack of experience with WW2 aircraft. I think I can mask around stuff in those bays and get them painted though.    |
|
|
|
Post by kyledehart5 on Aug 5, 2024 0:02:36 GMT -5
Looks like you’re making some progress excellent headway with this big beastie. All that detail in the engine looks awesome. And that was a really good idea on the heat shrink to protect the gun barrels. I like that.
|
|
handiabled
Administrator
Apr '23 Showcased Build Awarded
Member since: February 2023
Posts: 3,764
MSC Staff
|
Post by handiabled on Aug 6, 2024 1:50:45 GMT -5
Great work mounting the engine. It is really strange mounting holes were the wrong diameter of deleted altogether. With the wings mounted it's really taking shape now!
|
|
eaglecash867
Full Member
Member since: July 2023
Posts: 306
Jul 1, 2023 5:18:34 GMT -5
Jul 1, 2023 5:18:34 GMT -5
|
Post by eaglecash867 on Aug 6, 2024 18:33:21 GMT -5
Thanks for the comments Kyle and Brent! Moving on to dry-fitting all of the stuff that closes the engine in and MAN are there a bunch of issues with this kit! Had to drill out each and every mounting hole for the oil cooler ring AND shave off each and every little block thingy they had to the side of each of those holes, otherwise there was no way in hell the oil cooler ring was going to mount to the engine. Once I got that done, pretty much everything lined up, But there is this strange gap all the way around the back of the engine cowls, and at the front of the gun cover. I thought maybe the engine wasn't mounted correctly, but there is no gap whatsoever where the supercharger covers go between the oil cooler ring and the leading edges of the wing roots. This kit is really turning out to be a big disappointment. I think the only way forward on this is to just leave the whole engine compartment opened up, with no covers on it...which is fine, just not sure how realistic that is because I don't know what parts could be completely removed in real life.   |
|
|
|
Post by kyledehart5 on Aug 6, 2024 22:47:31 GMT -5
Man, every time I see one of these ZM kits I’m astonished at the great details. But also they seem to have a fair few issues so great work on this one so far. I think it’ll look really cool all the way opened up anyways.
|
|
|
|
eaglecash867
Full Member
Member since: July 2023
Posts: 306
Jul 1, 2023 5:18:34 GMT -5
Jul 1, 2023 5:18:34 GMT -5
|
Post by eaglecash867 on Aug 8, 2024 8:31:06 GMT -5
Man, every time I see one of these ZM kits I’m astonished at the great details. But also they seem to have a fair few issues so great work on this one so far. I think it’ll look really cool all the way opened up anyways. Thanks, Kyle! I agree, it'll look cool all opened up, just gotta figure out how to close it all up temporarily so all of the camo pattern stuff matches up with the rest of it. With all the detail in the engine compartment, it would have been a shame to close it up anyway. Is it possible to open or delete select panels so the gap isn't viewable? Thanks, Brent. Took another look at it last night, and it looks like the only gap it really has is between the front and rear panels on top of the engine/gun bay. I did a big forehead smack last night when I realized the "poor fit" around the backs of the engine doors were because it was designed that way...that's where the exhaust pipes are. LOL!  That rear access panel for the guns is what's hanging it up, so I think I can display it with that folded back onto the windscreen like I've seen in photos of the real deal. Should be able to figure something out, maybe with some micro-diameter stainless steel rod to hold it in place. Just not sure how the side panels that hinge on that would hang. I'm thinking they just let them hang down naturally on the sides of the fuselage...I'll have to see if I can find more photos. If I do that though, nobody will ever know that there's a gap. |
|
|
|
Post by 406 Silverado on Aug 20, 2024 4:48:05 GMT -5
Man, every time I see one of these ZM kits I’m astonished at the great details. But also they seem to have a fair few issues so great work on this one so far. I think it’ll look really cool all the way opened up anyways. Thanks, Kyle! I agree, it'll look cool all opened up, just gotta figure out how to close it all up temporarily so all of the camo pattern stuff matches up with the rest of it. With all the detail in the engine compartment, it would have been a shame to close it up anyway. Is it possible to open or delete select panels so the gap isn't viewable? Thanks, Brent. Took another look at it last night, and it looks like the only gap it really has is between the front and rear panels on top of the engine/gun bay. I did a big forehead smack last night when I realized the "poor fit" around the backs of the engine doors were because it was designed that way...that's where the exhaust pipes are. LOL! That rear access panel for the guns is what's hanging it up, so I think I can display it with that folded back onto the windscreen like I've seen in photos of the real deal. Should be able to figure something out, maybe with some micro-diameter stainless steel rod to hold it in place. Just not sure how the side panels that hinge on that would hang. I'm thinking they just let them hang down naturally on the sides of the fuselage...I'll have to see if I can find more photos. If I do that though, nobody will ever know that there's a gap. I've had this happen to me with that "AHA" moment eagle. I think sometimes we can get so enthralled in a build that we get a sort of tunnel vision only to come back to it later and see things for what they really are with a fresh look at it. This is coming along verrrry nicely so far bud. |
|
|
|
Post by tcoat on Aug 20, 2024 7:01:09 GMT -5
Man, every time I see one of these ZM kits I’m astonished at the great details. But also they seem to have a fair few issues so great work on this one so far. I think it’ll look really cool all the way opened up anyways. Thanks, Kyle! I agree, it'll look cool all opened up, just gotta figure out how to close it all up temporarily so all of the camo pattern stuff matches up with the rest of it. With all the detail in the engine compartment, it would have been a shame to close it up anyway. Is it possible to open or delete select panels so the gap isn't viewable? Thanks, Brent. Took another look at it last night, and it looks like the only gap it really has is between the front and rear panels on top of the engine/gun bay. I did a big forehead smack last night when I realized the "poor fit" around the backs of the engine doors were because it was designed that way...that's where the exhaust pipes are. LOL! That rear access panel for the guns is what's hanging it up, so I think I can display it with that folded back onto the windscreen like I've seen in photos of the real deal. Should be able to figure something out, maybe with some micro-diameter stainless steel rod to hold it in place. Just not sure how the side panels that hinge on that would hang. I'm thinking they just let them hang down naturally on the sides of the fuselage...I'll have to see if I can find more photos. If I do that though, nobody will ever know that there's a gap. 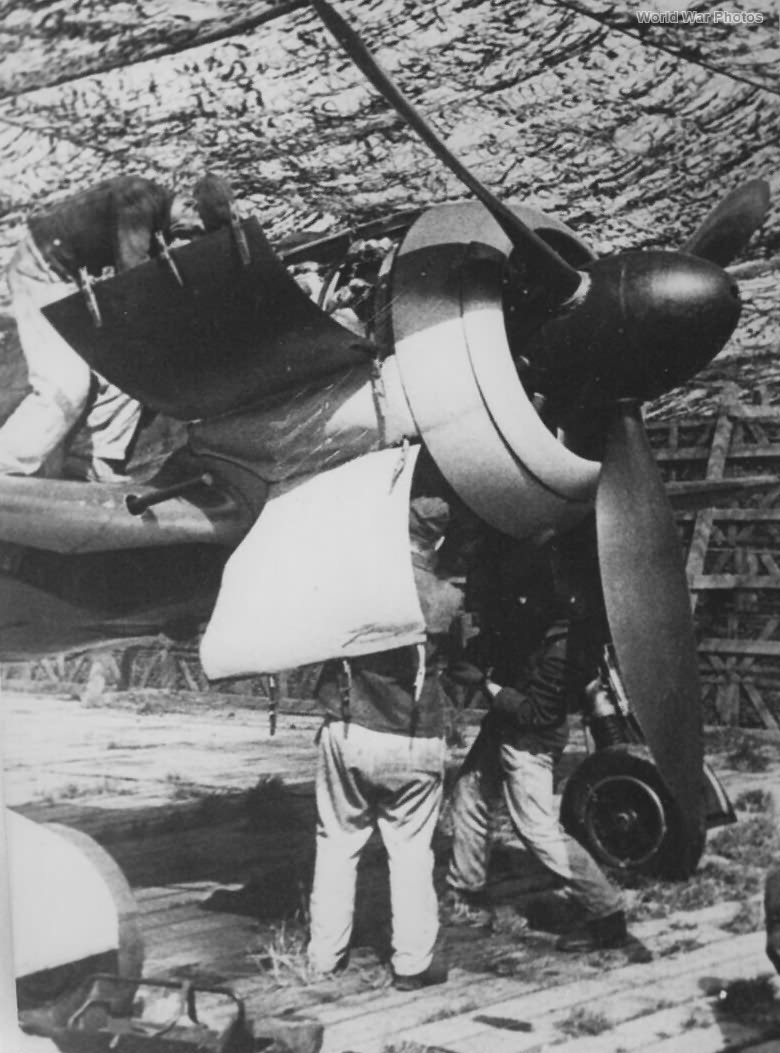 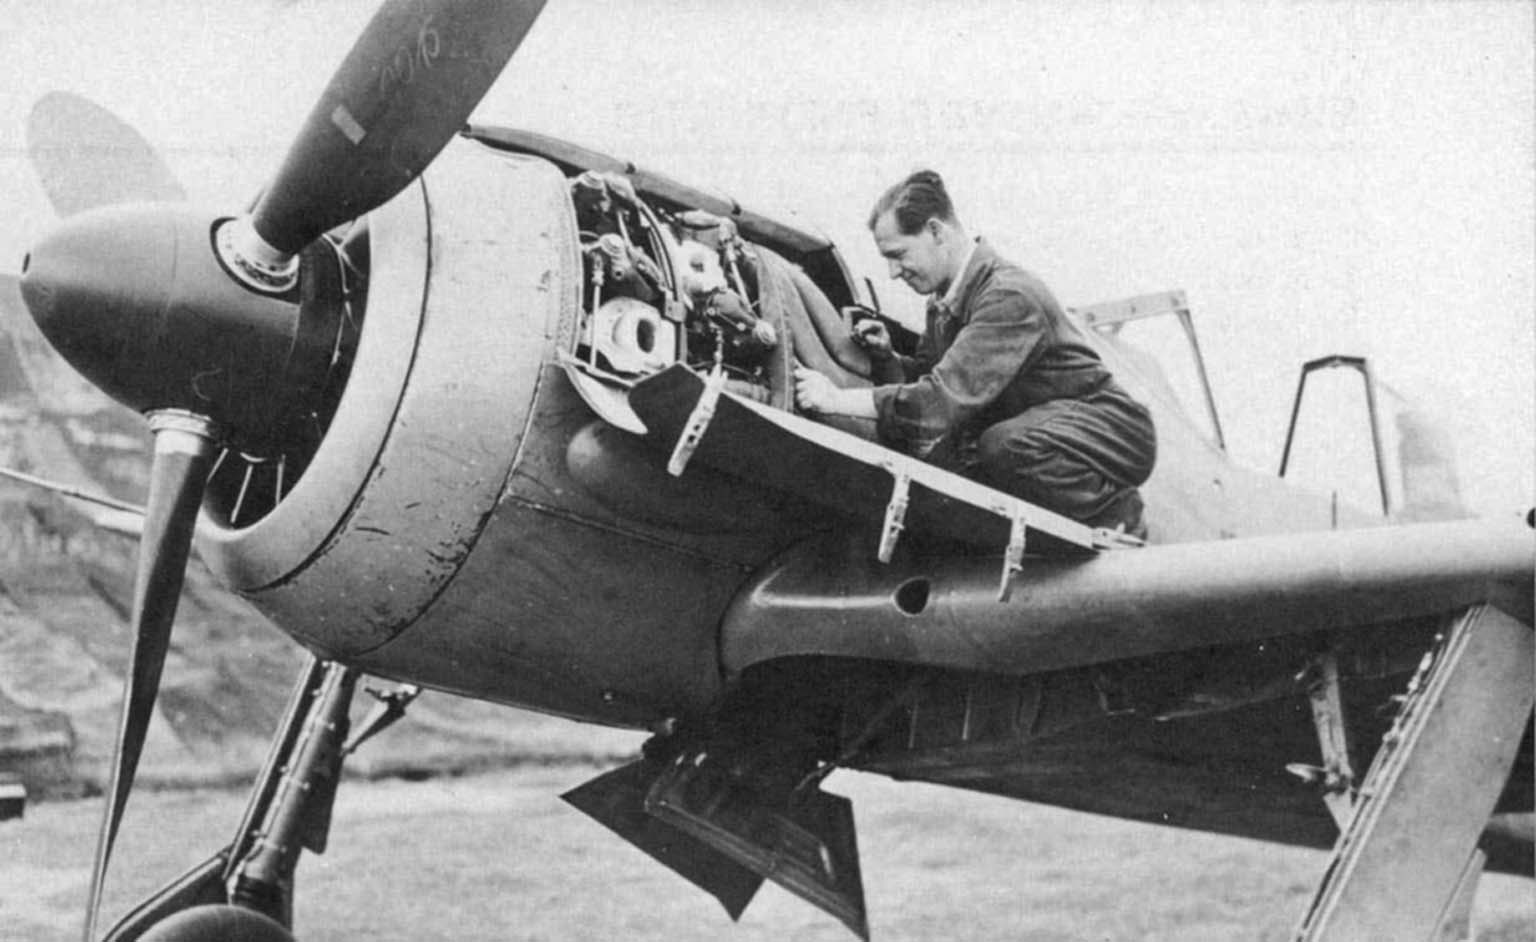  |
|
eaglecash867
Full Member
Member since: July 2023
Posts: 306
Jul 1, 2023 5:18:34 GMT -5
Jul 1, 2023 5:18:34 GMT -5
|
Post by eaglecash867 on Sept 4, 2024 17:02:38 GMT -5
I've had this happen to me with that "AHA" moment eagle. I think sometimes we can get so enthralled in a build that we get a sort of tunnel vision only to come back to it later and see things for what they really are with a fresh look at it. This is coming along verrrry nicely so far bud. Thanks Joe! I seem to be having those forehead-smack moments on almost every build lately. LOL. tcoat , thanks for those excellent photos of the cowls opened up! Just ordered a couple of sets of 1/32 Luftwaffe cowl latches to replace the ones on the kit parts...don't want them defying gravity by sticking straight out when they should be hanging down. A little more progress with getting things closed up. Had a more detailed description...but it got eaten twice by some kind of glitch with how I was logged into the forum, so I ran out of time and patience for dealing with it. LOL   |
|
|
|
Post by kyledehart5 on Sept 4, 2024 21:41:55 GMT -5
Looking really great!
|
|
handiabled
Administrator
Apr '23 Showcased Build Awarded
Member since: February 2023
Posts: 3,764
MSC Staff
|
Post by handiabled on Sept 7, 2024 6:36:58 GMT -5
I missed this update. Opened up this is going to look fantastic!
|
|
keavdog
Senior Member
May '24 Showcased Build Awarded
Member since: April 2023
OPEN WHEEL GROUP BUILD MODERATOR
Posts: 2,176
Apr 2, 2023 21:25:25 GMT -5
Apr 2, 2023 21:25:25 GMT -5
|
Post by keavdog on Sept 10, 2024 0:22:58 GMT -5
Oh boy this is looking really nice.
|
|
|
|
Post by 406 Silverado on Sept 10, 2024 4:32:22 GMT -5
Looks like this one is continuing to come along nicely eagle. Good call on the latches and I'm looking forward to seeing what is next.
|
|


