hasenpfeffer
MSC Consultant      March 2024 Showcased Model Awarded
Member since: January 2013
What the...?
Posts: 510
Member is Online
MSC Staff
|
Post by hasenpfeffer on Feb 29, 2024 10:55:06 GMT -5
On the next! This is the Eduard A-3 Overtrees boxing. I'm not sure what is really meant by the "4guns wings". The wings only have cutouts for 2 cannons, which is correct for a lot of A-3s. Maybe they mean the 2 wing cannons + the 2 cowling MGs and oh yeah, you're lucky we threw the wings into this kit for ya? I have some Eagle Cal markings and HGW seatbelts and a set of Quinta Studios (seems pretty popular here, LOL) 3D decals for the instrument panels, etc., in the cockpit.

It could be this kit w/o all the good stuff, like PE, decals, masks... Really, looking at the A-3 OT, A-5 PP, A-7 OT and A-8 OT they all seem to have the exact same sprues minus the fuselage parts and maybe the wings.

Getting started. I had purchased the Quinta decals for the A-3 Tamiya kit, which I was doing mostly OOB thinking it would probably work for this one. Nope. I had to wait for a new set for this one. The biggest difference being that the Eduard kit has you mount the gun sight on the upper dash, so there is a hole cut out in the decal for that specifically.

waiting...

There's a lot more going on in the Eduard kit vs the Tamiya kit. To be expected.
I suppose the "easy to thread..." statement is pretty subjective. I didn't find it too easy, I suppose for the simple ones it wasn't terrible, but the overlap areas through a buckle (2 belts) was pretty tough to get. I think in the future I will join the belts and then thread them through the buckles where required instead of doing each one separately.

But like Joe said, they're pretty darn cool when you get them done. If you have the ability, they are well worth it.

I was surprised that the exhaust detail is pretty lacking. Especially since the MGs and cannons have nice relief at the muzzles. I started hollowing them out.

I replaced the plastic cannons with brass tube. Well, just because.

And finally, some dry fitting. The wheel bays have way more detail than the Tamiya kit. Kinda cool. The fuselage to wing root joins look like they're gonna be pretty good. The best, in fact, that I have encountered in my limited experience with aircraft.


I have the correct set of Quinta decals for the CP now, so finishing that up will be next.
|
|
lyle
Forum Moderator     
Member since: May 2013
On the sunny side of the dirt
Posts: 1,648 
MSC Staff
|
Post by lyle on Feb 29, 2024 11:14:19 GMT -5
very nice to this point!
|
|
|
|
Post by kyledehart5 on Feb 29, 2024 16:13:41 GMT -5
Sweet!! sign me up to watch.
|
|
TJ
Senior Member
    June '23 Showcased Model Awarded
Member since: May 2023
Posts: 2,178
May 14, 2023 18:18:36 GMT -5
May 14, 2023 18:18:36 GMT -5
|
Post by TJ on Mar 1, 2024 13:47:29 GMT -5
 I'm in
|
|
|
|
Post by 406 Silverado on Mar 2, 2024 13:17:40 GMT -5
Oh MAN!!! I've totally missed this one!!  Great start on this and will be bookmarking this beauty!! GREAT work on those seat belts btw.  |
|
handiabled
Administrator      Apr '23 Showcased Build Awarded
Member since: February 2023
Posts: 4,427 
MSC Staff
|
Post by handiabled on Mar 3, 2024 7:16:16 GMT -5
Bookmarked! Great start to this one!
|
|
hasenpfeffer
MSC Consultant      March 2024 Showcased Model Awarded
Member since: January 2013
What the...?
Posts: 510
Member is Online
MSC Staff
|
Post by hasenpfeffer on Mar 7, 2024 17:38:11 GMT -5
Okay... so I ran into a little bit of an issue. Pretty sure it was my fault for the most part. In preparation for the Quinta decals I had (guessed) readied part C69. In reality, part C70 was to be used for the main dash. I did not see the part number in the middle of the instructions, literally, until I was posting this. I suppose my eyes just didn't want to see it. In any case, the next mistake I made was positioning the decal at the bottom of the part. This was problematic because it is then hidden behind the side panels on either side of the pilot. So, I shimmed it higher thinking that would resolve the problem. Which it did, until I started dry fitting the cockpit into the fuselage with the other parts to be glued during this step. The main firewall no longer fit flush as it should. The shimmed dash was now interfering with the firewall.


In any case. I had to Dremel about the top half of that dash as well as the sides until they were flush with the decal. It seemed to do the trick, and I'm lucky that 190 dashes are so damn hard to see. 

I don't know if using the correct part (C70) completely solves the issue as the decal extends beyond the top of the part. I guess I won't know for sure until I get to the A7 if it is basically the same. Anyway, it all looks pretty good in the end. The fitting of the upper dash, the firewall, the cockpit and the "engine" between the fuselage halves isn't without its challenges. Especially the upper dash as it doesn't really have great locating features for the size and positioning and fidgety-ness of the part.
Here we are with the fuselage halves finally joined together.

Next is working on the seams here and on the wings.
|
|
|
|
Post by deafpanzer on Mar 7, 2024 21:32:19 GMT -5
DAMN! Those seat belts really look great!!!
|
|
|
|
Post by 406 Silverado on Mar 7, 2024 22:06:28 GMT -5
Despite your troubles along the way, you worked some good magic on this to set things straight. I've not built one of these new tool 190's as of yet but I can remember fit issues with the firewall and fuselage on the ones from the 06-07 time frame.
|
|
|
|
Post by 406 Silverado on Mar 7, 2024 22:07:17 GMT -5
DAMN! Those seat belts really look great!!! You really need to give these seat belts a shot Andy. They really are "all that". |
|
|
|
Post by kyledehart5 on Mar 7, 2024 22:26:34 GMT -5
Wonderful work!!
|
|
TJ
Senior Member
    June '23 Showcased Model Awarded
Member since: May 2023
Posts: 2,178
May 14, 2023 18:18:36 GMT -5
May 14, 2023 18:18:36 GMT -5
|
Post by TJ on Mar 8, 2024 5:38:06 GMT -5
Nice MacGyver on fixing the issue
|
|
handiabled
Administrator      Apr '23 Showcased Build Awarded
Member since: February 2023
Posts: 4,427 
MSC Staff
|
Post by handiabled on Mar 8, 2024 10:02:57 GMT -5
Despite the problems your office looks wonderful! Glad you could get the fit correct
|
|
hasenpfeffer
MSC Consultant      March 2024 Showcased Model Awarded
Member since: January 2013
What the...?
Posts: 510
Member is Online
MSC Staff
|
Post by hasenpfeffer on Mar 18, 2024 17:01:42 GMT -5
Well, it's been so long I didn't even remember where I left off on this thread. Like many of us, work seems to be kicking my ass right now too. I haven't been able to participate as much as I would like. But we do what we gotta do.
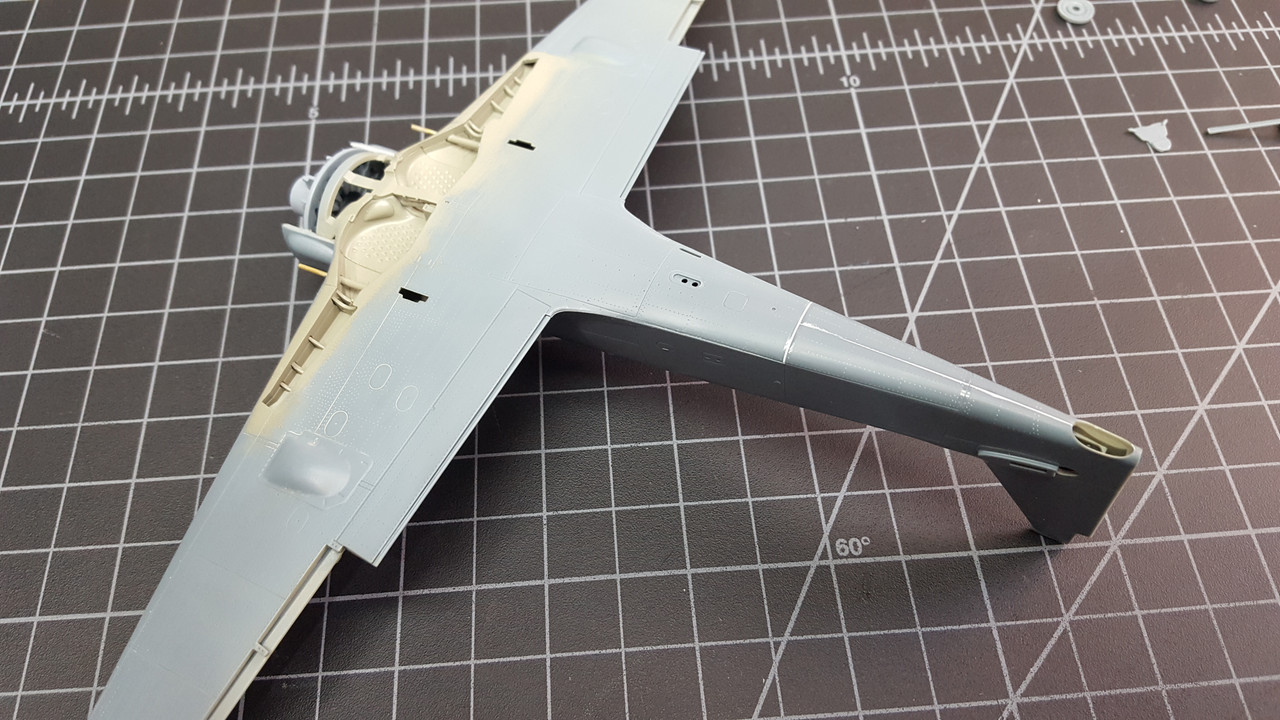
I guess it was a couple weekends ago that I was getting the wings fixed to the fuselage. Of course, they didn't fit as exact as the dry fitting... I had to make a couple shims. Two at the top of the gun bay access doors where they meet the fuselage and one at the rear of the wing root section on the bottom. I just cut sections of evergreen that closed the gap.
If you look hard enough you can see a little strip of white evergreen just above the gun access hinges.


Wings attached and working on the seam lines. I didn't do the greatest job at the front end (where it matters!). But it's ok and will hopefully not be too noticeable.


I think I got the ghost seams on the wing leading edges and the top and bottom of the fuselage halves pretty well squared away. Took putty and a few go arounds with the primer. Which, was next.


Then, on to some inverted type marble pre-shading. It seems to work pretty well, but I want to try a light primer with darkened panel lines sometime.


Finally got the RLM76 on and the yellow panel and rudder. I ran out of compressed CO2, so I'll be getting the tank swapped this week so I can continue. I'm hoping to have it all painted up by the end of next weekend.


Now I'm all caught up on posting where I'm at, and so are you. 
|
|
M1Carbine
Senior Member
    November '23 Showcased Model Awarded
Member since: November 2012
Posts: 1,730
Nov 16, 2012 2:49:11 GMT -5
Nov 16, 2012 2:49:11 GMT -5
|
Post by M1Carbine on Mar 18, 2024 20:18:19 GMT -5
Dave - Awesome butcher bird.
-Bob
|
|
buddho
Forum Moderator     
Member since: February 2019
Posts: 1,287 
MSC Staff
|
Post by buddho on Mar 18, 2024 20:54:09 GMT -5
Wow...what a gorgeous build! That cockpit is fantabulous.🤓
|
|
|
|
Post by kyledehart5 on Mar 19, 2024 0:43:30 GMT -5
Great update!! Looking very nice indeed.
|
|
|
|
Post by 406 Silverado on Mar 19, 2024 4:54:51 GMT -5
These things just look so evil in that marble pattern that you've done here Dave. I've done this method and the light primer with the darkened panel lines and for me.....I prefer the marble pattern as a base. That's just me though as I love the color modulation that bleeds through the color coat. Looking swell buddy.  |
|
handiabled
Administrator      Apr '23 Showcased Build Awarded
Member since: February 2023
Posts: 4,427 
MSC Staff
|
Post by handiabled on Mar 19, 2024 8:36:21 GMT -5
Great job handling the seams! The color modulation looks great so far. I'm looking forward to the mottle and splinter you put on this one
|
|
|
|
Post by dupes on Mar 19, 2024 9:51:20 GMT -5
Looks like you got the cowl all closed up nicely. That's the biggest issue with this line of kits, if I remember correctly.
|
|
hasenpfeffer
MSC Consultant      March 2024 Showcased Model Awarded
Member since: January 2013
What the...?
Posts: 510
Member is Online
MSC Staff
|
Post by hasenpfeffer on Mar 19, 2024 18:19:33 GMT -5
Great job handling the seams! The color modulation looks great so far. I'm looking forward to the mottle and splinter you put on this one Well, don't get too excited... it's gonna be pretty similar to the last one. LOL  Looks like you got the cowl all closed up nicely. That's the biggest issue with this line of kits, if I remember correctly. It went together pretty nicely. The bottom section (yellow) fit perfectly. Around the wings and everything. The top piece is a little proud at the rear. But nothing I'm going to complain about. *edit - I meant to mention that the front nose piece also fit perfectly. Happy happy happy! Joy joy joy! (if you get the reference) |
|
|
|
Post by deafpanzer on Mar 20, 2024 7:56:16 GMT -5
Looking real good!!! Pre-shading job will pay it off BIG time!
|
|
hasenpfeffer
MSC Consultant      March 2024 Showcased Model Awarded
Member since: January 2013
What the...?
Posts: 510
Member is Online
MSC Staff
|
Post by hasenpfeffer on Mar 25, 2024 16:36:42 GMT -5
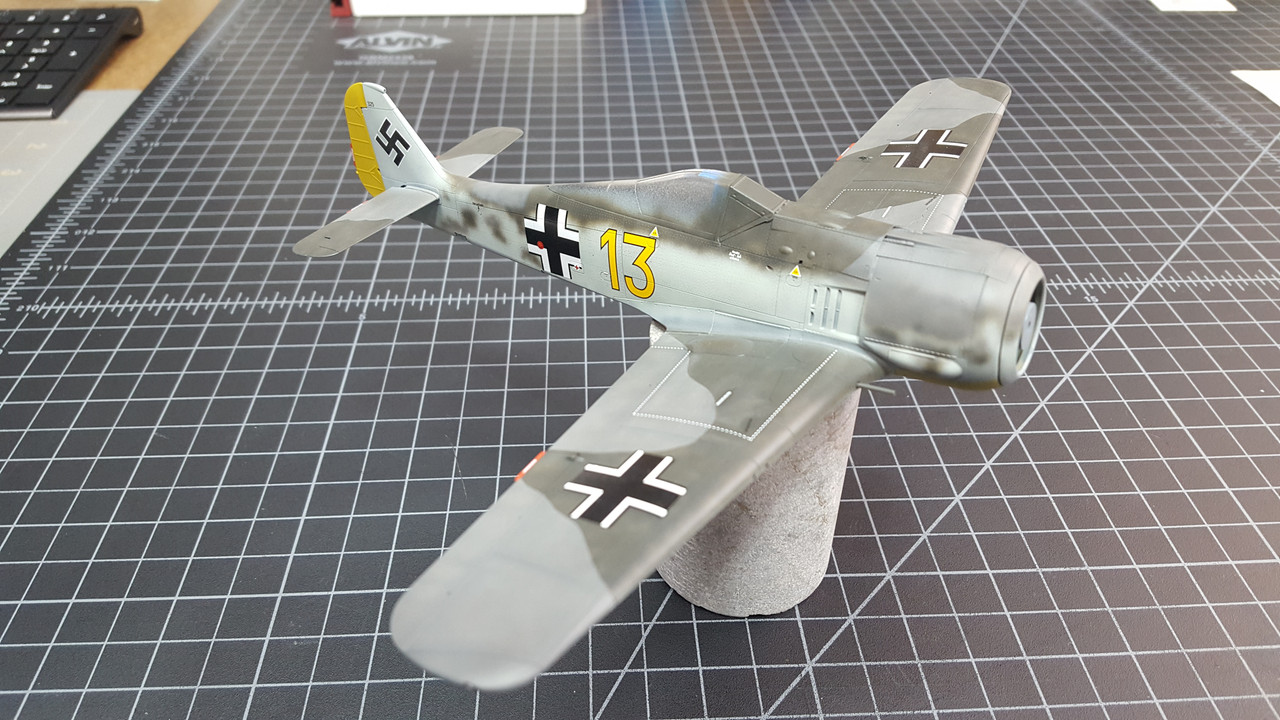
Main painting and markings are done! This time I used all AK Real Colors, RLM 76 (Version 1), RLM 74 and RLM 75. The RLM 76 v1 is slightly more "green" than the v2 I used on the JG1 bird. The RLM 74 is markedly darker than the MRP version. I like the variation though. The AK RCs gave me a lot more spatter than the MRP paints. This could be a factor of thinning, but I think if I went any more it would be very tough to not have it spider webbing all over the place. I'm thinking of softening the demarcation line from 74 to 75 on the cowl. What do you think? It looks a little harsh given everything else on the fuselage is soft.
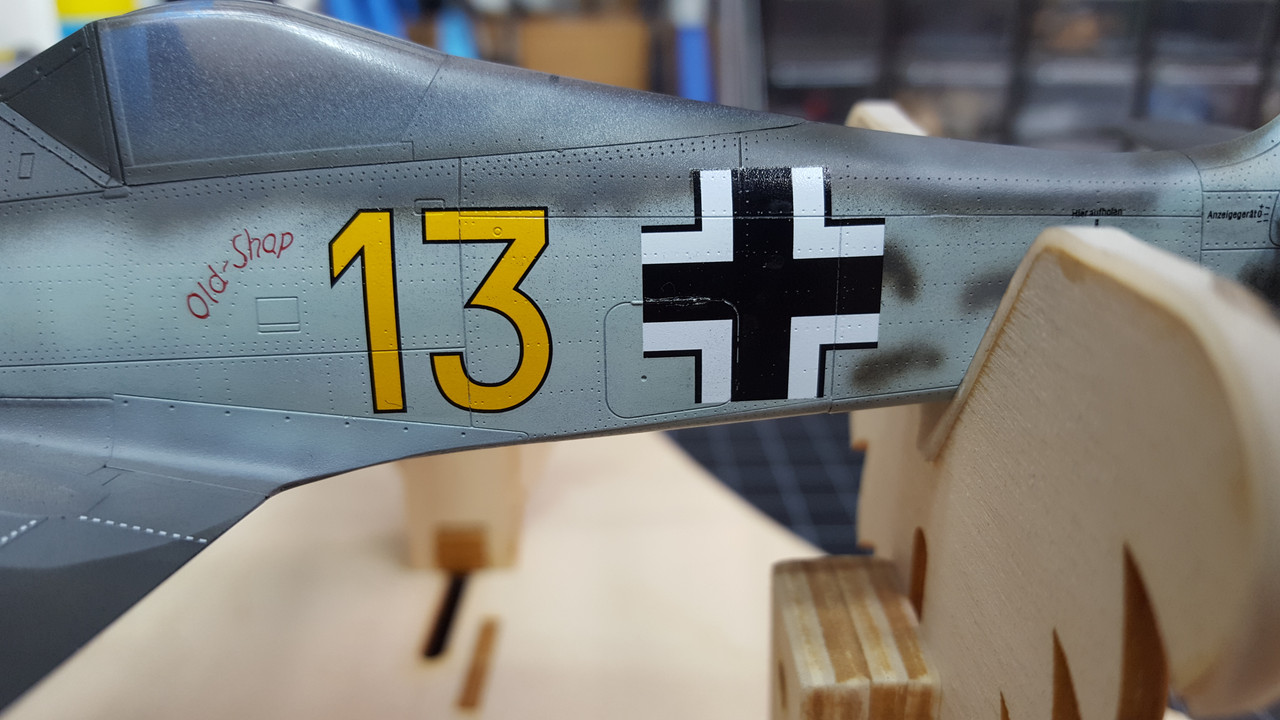
This one is Yellow 13 from 3.JG2 flown by Ofw. Josef Heinzeiller. "Schnauzl" Again, the decals are from EagleCals. And again, the decals are pretty thick, although some seem better than others. The wing balkenkreuz are really thick and resistant to settling down like we like it. If they didn't have the outside black outline I'd probably paint hem instead. The walk area lines are pretty darn frustrating too, but that is because they are so narrow. It was a bugger getting them into something that resembles a straight line.
I'm looking forward to getting into the weathering and such.

You can see the pre-shading fairly well in this shot. It's still more dramatic in person.


Hoping to get some good bench-time over the long weekend.  Thanks for stopping in. Thanks for stopping in.
|
|
|
|
Post by 406 Silverado on Mar 25, 2024 16:51:27 GMT -5
This is one sharp scheme that you’ve pulled off Dave. I haven’t used any paints outside of Model Master or Vallejo but have heard some good things about AK Real Color lineup. I’m a fan of softening that line up a bit on the cowl but other than that this is PERFECT!!
|
|
|
|
Post by kyledehart5 on Mar 25, 2024 17:35:16 GMT -5
Really sharp looking paint work and livery on this one. I really like how this is looking.
|
|
TJ
Senior Member
    June '23 Showcased Model Awarded
Member since: May 2023
Posts: 2,178
May 14, 2023 18:18:36 GMT -5
May 14, 2023 18:18:36 GMT -5
|
Post by TJ on Mar 26, 2024 4:55:45 GMT -5
Great scheme and the paintwork is top notch
|
|
handiabled
Administrator      Apr '23 Showcased Build Awarded
Member since: February 2023
Posts: 4,427 
MSC Staff
|
Post by handiabled on Mar 26, 2024 9:07:39 GMT -5
The AK colors look great! You once again did an excellent splinter/mottle scheme on this. I agree with Joe I would soften the line a little.
|
|
hasenpfeffer
MSC Consultant      March 2024 Showcased Model Awarded
Member since: January 2013
What the...?
Posts: 510
Member is Online
MSC Staff
|
Post by hasenpfeffer on Apr 5, 2024 16:45:49 GMT -5
Hey guys, what's your best advice for stubborn decals? Besides painting, lol, since they are already on. I've given up on Solvaset as I've put around 20 coats of it on with maybe 50% success. You can see on this side that maybe 80% of the rivets are showing (decal settled into the rivets.)  On this side only maybe 10%.  Wings - I'll just say, disappointing at best. What's the strongest stuff you guys have used, or what is your secret technique when this is the situation? |
|
stikpusher
Forum Moderator      May '23 Showcased Model Awarded
Member since: April 2023
Living The Dream
Posts: 4,139 
MSC Staff
|
Post by stikpusher on Apr 5, 2024 21:38:59 GMT -5
Strongest stuff is lacquer thinner, applied quite sparingly... used in minute amounts in precise locations... don't try it here unless you practice on a test mule first to get a feel for it with this particular type of decal...
|
|
jeaton01
Full Member
   Sept '23 Showcased Model Awarded
Member since: October 2013
Posts: 1,290 
|
Post by jeaton01 on Apr 6, 2024 1:20:19 GMT -5
If all else fails, heat. Walthers stuff is pretty strong and Gunze Mr Mark Softer is pretty hot too.
|
|


 I'm in


 Thanks for stopping in.


