modelcarjr
Full Member
 July '24 Showcased Build Awarded
Member since: March 2023
Posts: 519
Mar 3, 2023 13:07:26 GMT -5
Mar 3, 2023 13:07:26 GMT -5
|
Post by modelcarjr on May 7, 2024 17:58:13 GMT -5
I am starting this one that I picked up over the weekend at the Houston IPMS show. I am not a big Mustang guy but I thought I would build this one because it is a new tool from Revell and I have heard a lot of good things about the kit. I have also been watching the WIP by eagelcash867. A couple of things struck me as I perused the instructions. First, i think the rear rocker or valance should be black and not body color (white according to these build instructions). Secondly, I don't know a lot but I do know that you can't extend a color with a decal. In this case, the hood is partially painted black and THEN a decal is suppose to extend the color and include a pinstripe around the edges. I don't think it will work because there will be a seam and and it is very hard to match paint exactly to a decal so that it looks seamless. So I am going to do this backward and paint the black first, tape it off and paint the body color around the edges, in this case Grabber Blue, and then add only the pinstripe from the decal. Hope this works. Second, I would like opinions about removing the circle thingys (pin injector marks) on the interior roof. There are six on this roof and I normally ignore them because you would have to have a pen light and a magnifying glass to see them once everything is built. What would you do? Finally, I would like to share my good fortune at the Houston IPMS show. I took 8 places 1 gold, 4 silver and 3 bronze. Can you guess which one won the gold? So there are about 3 things that everyone can opine on! Thanks for looking!    |
|
lyle
Forum Moderator 
Member since: May 2013
On the sunny side of the dirt
Posts: 1,559 
MSC Staff
|
Post by lyle on May 7, 2024 18:16:06 GMT -5
Cool. I did a 70 for the wife
|
|
eaglecash867
Full Member
Member since: July 2023
Posts: 302
Jul 1, 2023 5:18:34 GMT -5
Jul 1, 2023 5:18:34 GMT -5
|
Post by eaglecash867 on May 7, 2024 19:05:45 GMT -5
Those pin marks on the headliner bugged me, so I tried my go-to method of filling them with CA, using a black Sharpie as a leveling indicator, and then sanding the CA smooth. It worked OK, definitely got rid of the pin marks, but I just couldn't get the headliner smooth and scratch-free and keep the original ribbing consistent. Ended up with 2 more kits for spare parts, so I took another shot at it, and that one went even worse. So, ultimately I just followed your same reasoning about needing an endoscope (pen light and magnifying glass) in order for it to even be seen and left it alone on the final body. To tell you the truth, with the flat black I used on the headliner, those pin marks are barely noticeable...even looking directly at them before the interior went in.
The hood gave me a lot of trouble getting right, but what I found that worked really well in the end was to do the body color first. Then the stripe decal. Then a clearcoat to protect the decal for the next step. Then some good, old fashioned Testors square bottle gloss black enamel to fill in the black area. I did the black without masking the rest of the hood, and then used foam swabs dampened with mineral spirits to clean up the overspray. The Testors enamel filled in the step of the stripe decal edge pretty well. It can still be seen if you look hard enough, but it's barely visible now. Gave the black area a good polishing with Novus afterward to get it nice and smooth and shiny. I know the stripes on the real deal were more of a semi-matt black, but I just didn't want to open that can of worms. LOL. On the underside of the hood, I ended up using a chunk of Bare Metal Foil to mask off the areas I wanted to keep the body color, and then used Testors square bottle flat black, which again allowed me to clean up any little errors with mineral spirits.
You're right about the rear valance not being body color. It should be the same color as the stripe package the car has on it.
Overall, this was a really nice kit...just has a couple of things that Revell didn't think through all that well. I'm sure you'll like it. Can't wait to see your WIP!
|
|
|
|
Post by 406 Silverado on May 7, 2024 20:00:03 GMT -5
I am starting this one that I picked up over the weekend at the Houston IPMS show. I am not a big Mustang guy but I thought I would build this one because it is a new tool from Revell and I have heard a lot of good things about the kit. I have also been watching the WIP by eagelcash867. A couple of things struck me as I perused the instructions. First, i think the rear rocker or valance should be black and not body color (white according to these build instructions). Secondly, I don't know a lot but I do know that you can't extend a color with a decal. In this case, the hood is partially painted black and THEN a decal is suppose to extend the color and include a pinstripe around the edges. I don't think it will work because there will be a seam and and it is very hard to match paint exactly to a decal so that it looks seamless. So I am going to do this backward and paint the black first, tape it off and paint the body color around the edges, in this case Grabber Blue, and then add only the pinstripe from the decal. Hope this works. Second, I would like opinions about removing the circle thingys (pin injector marks) on the interior roof. There are six on this roof and I normally ignore them because you would have to have a pen light and a magnifying glass to see them once everything is built. What would you do? Finally, I would like to share my good fortune at the Houston IPMS show. I took 8 places 1 gold, 4 silver and 3 bronze. Can you guess which one won the gold? So there are about 3 things that everyone can opine on! Thanks for looking! I like your idea about painting the black first and then adding the decal pinstriping. I'll be watching and learning along the way on that JR. As for the injector pin marks I'm currently sanding the edges of the marks flush with the body and then filling the impressions with either putty or super glue and coming back over them with my DSPIAE rotary sanding tool : DSPIAE Sanding Tool . Makes the whole process A LOT easier. A BIG congratulations goes out to you on the wins Paul. I'm guessing the bronze Chevy won gold?? |
|
handiabled
Administrator 
Member since: February 2023
Posts: 3,681
MSC Staff
|
Post by handiabled on May 8, 2024 2:26:05 GMT -5
I'll be watching with interest!
Congrats on the wins! You have had so many impressive builds leave your bench that I would be hard pressed to guess which one won what
|
|
mrversatile
Full Member
July '23 Showcased Build Awarded
Member since: January 2013
Posts: 659
Jan 20, 2013 10:52:24 GMT -5
Jan 20, 2013 10:52:24 GMT -5
|
Post by mrversatile on May 8, 2024 5:54:22 GMT -5
I ignored the ejector pin marks on the headliner for the same reason, however, don't ignore those on the underside of the hood. The black poses an issue for all that build this kit. I chose to use the decal and a mask created from the template because I thought it would be too risky to attempt to paint the matt black with so little room between the pinstripe. I then sanded the edge of the black, applied the decal, then hand brushed some vallejo satin clear over the decal. Not noticeable without a magnifier.
|
|
|
|
Post by tcoat on May 8, 2024 6:41:14 GMT -5
For the roof injector marks I would just knock off any raised part (if any) and fill the rest with white glue to just blur the lines of the circle. It doesn't necessary eliminate them but does blend them in enough that once under paint they are very hard to spot. Massive marks right into the texture of the wings.  Lightly sanded to remove high spots and filled with Testers clear cement (fancy white glue) still visible but mostly flush. A bit hard to see but look closely at the space between the struts on both sides.  Under paint the marks are 90% gone but most of the rib texture remains.  |
|
modelcarjr
Full Member
July '24 Showcased Build Awarded
Member since: March 2023
Posts: 519
Mar 3, 2023 13:07:26 GMT -5
Mar 3, 2023 13:07:26 GMT -5
|
Post by modelcarjr on May 9, 2024 14:52:23 GMT -5
I have made a little progress on this build although the weather is awful right now. Humidity barely below 60 percent late in the afternoon and I don't like to paint above 50%. But I taped off the hood and painted it. I used a template from a copy of the hood decal. I taped it on the hood and outlined it. Then I remembered that the 3mm Tamiya tape I have is the approximate width needed. So I removed the template softened the pencil line and put the Tamiya tape on. It followed the template lines approximately so I am happy with it. Painted with Krylon Semi-Gloss black because as I viewed the instructions it called for Black Silk Matte which is Semi-Gloss to me. Also looking at several photos on the internet the hood doesn't look like a flat or matte finish to me. So I will have to rub it out but I wait and do that when the blue is on. An ounce of paint is on its way. I also sanded out the interior top with my oscillating sander and it looks good to me. One other correction I made to the body was to cut in a panel line from the bottom of the front of the door through the rocker. If you have a crinkled front fender, normally you wouldn't cut through the rocker to get it off. If its a rear fender - tough luck- lots of repair work! Another hint on the contest entries: The predominant exteriors are, 3 MCW, 2 Tamiya, 2 Dupli-Color, and 1 Krylon.     |
|
modelcarjr
Full Member
July '24 Showcased Build Awarded
Member since: March 2023
Posts: 519
Mar 3, 2023 13:07:26 GMT -5
Mar 3, 2023 13:07:26 GMT -5
|
Post by modelcarjr on May 9, 2024 21:14:48 GMT -5
I have just rubbed out the black on the hood again and re-painted it black primer based on a comment on another website and after doing some research I found that people who are restoring 71 Boss Mustangs use SEM hot rod black which is sort of flat but shiny. So I am going to buff up the black primer and call it good enough. I will also use it on the bottom of the body. Thanks for looking!
|
|
|
|
Post by 406 Silverado on May 10, 2024 6:02:54 GMT -5
I have made a little progress on this build although the weather is awful right now. Humidity barely below 60 percent late in the afternoon and I don't like to paint above 50%. But I taped off the hood and painted it. I used a template from a copy of the hood decal. I taped it on the hood and outlined it. Then I remembered that the 3mm Tamiya tape I have is the approximate width needed. So I removed the template softened the pencil line and put the Tamiya tape on. It followed the template lines approximately so I am happy with it. Painted with Krylon Semi-Gloss black because as I viewed the instructions it called for Black Silk Matte which is Semi-Gloss to me. Also looking at several photos on the internet the hood doesn't look like a flat or matte finish to me. So I will have to rub it out but I wait and do that when the blue is on. An ounce of paint is on its way. I also sanded out the interior top with my oscillating sander and it looks good to me. One other correction I made to the body was to cut in a panel line from the bottom of the front of the door through the rocker. If you have a crinkled front fender, normally you wouldn't cut through the rocker to get it off. If its a rear fender - tough luck- lots of repair work! Another hint on the contest entries: The predominant exteriors are, 3 MCW, 2 Tamiya, 2 Dupli-Color, and 1 Krylon. LOL!!! You're such a tease JR.......but you're definitely keeping it fun. Some good work going on in here man.  |
|
modelcarjr
Full Member
July '24 Showcased Build Awarded
Member since: March 2023
Posts: 519
Mar 3, 2023 13:07:26 GMT -5
Mar 3, 2023 13:07:26 GMT -5
|
Post by modelcarjr on May 10, 2024 21:14:09 GMT -5
Thanks, Joe. I appreciate your comment! Making slow progress on this on and had a setback. First, I repainted the hood with black primer and got a nice sheen with a polishing cloth. I don't have any Ford engine blue and Krylon used to make a Global Blue that was very close but I am out of it and Krylon doesn't make it anymore. So I mixed up my own with some Testors light blue and dark blue and painted it with a brush. Looks OK to me so I'll let it dry a couple of days before handling it. Testors enamel is always sticky it seems. Then I ran into problems. I had ordered some touch-up paint from e-bay and it came today. 1 oz. of paint for $8. It wasn't thinned so I called the number on the package to find out if I could thin it using lacquer. They told me it was a formula that included a clear in the paint and they couldn't guarantee a good result by thinning it. It was not recommended for the 1oz. paints and was only intended to be used for scratches on 1/1 cars applied with a brush in the bottle. So I tried it anyway. The hood edges looked fine and the mirrors painted fine as well using my airbrush. So I painted the body and started noticing popcorn popping up. Paint became very rough and dry looking. I had already finished all the black as well, but into the oven cleaner it went. I have a can of Tamiya Light Blue which I probably should have used in the first place as it looks like Grabber Blue to me. Its only slightly lighter and I don't think I could pick it out the Grabber Blue from the Tamiya Light blue in a line up. I took it and re-painted the edges of the hood and the mirrors right over the touch-up paint I had already airbrushed on. It looks good to me and hours later it is still looking good. So once the body is out of the oven cleaner, it will get the Tamiya Light Blue. Thanks for looking! 😎    |
|
modelcarjr
Full Member
July '24 Showcased Build Awarded
Member since: March 2023
Posts: 519
Mar 3, 2023 13:07:26 GMT -5
Mar 3, 2023 13:07:26 GMT -5
|
Post by modelcarjr on May 12, 2024 22:39:12 GMT -5
Working on the interior and completed the seats and one door panel. The base colors are black on the floor and back and dullcoted gunmetal for a gray interior. Highlighted with silver and burnt iron (shaken, not stirred). I have an old bottle of Model Master metalizer that I used because its thin and dries quickly and makes a good black for the interior with a brush. Its a shame that its not made anymore. I also finished removing the paint from the body. Three times through the oven cleaner, each time scrubbing what I could get off and then back in the oven cleaner. About 12 hours for each application and its finally almost ready to repaint. Two more steps in the process. Sand out with 400 grit sandpaper, a toothpick and the backside of a No 11 blade. Then wash it thoroughly. Then do it again. Now I am ready to repaint, but unfortunately, its been raining today and should rain again tomorrow. I may have to wait a couple days. Here are the pics. Thanks for looking! 😎     |
|
|
|
Post by kyledehart5 on May 13, 2024 23:14:30 GMT -5
Sorry you had to strip this. But the interior is looking awesome! Look forward to round 2 on the paint!
|
|
|
|
Post by 406 Silverado on May 14, 2024 4:53:22 GMT -5
Jeez JR.......hate the luck on the paint brother. I'm sure that most of us have been where you are with that but in typical JR fashion, you're making it through the problem. Will be watching for the recovery efforts on this.  |
|
modelcarjr
Full Member
July '24 Showcased Build Awarded
Member since: March 2023
Posts: 519
Mar 3, 2023 13:07:26 GMT -5
Mar 3, 2023 13:07:26 GMT -5
|
Post by modelcarjr on May 14, 2024 7:05:38 GMT -5
Thanks, Kyle and Joe! I appreciate your comments! I might be able to re-paint today if since it has stopped raining! I finished the interior. The decals went on well although you can't see them much in the photos. I thinned down the turn signal lever with my knife and it looks OK to me. Some have said its too big but at least it is there. I didn't apply the Hurst decals on the shifter as you can't see them anyway, A nice exercise in black, gray and silver. Thanks for looking! 😎   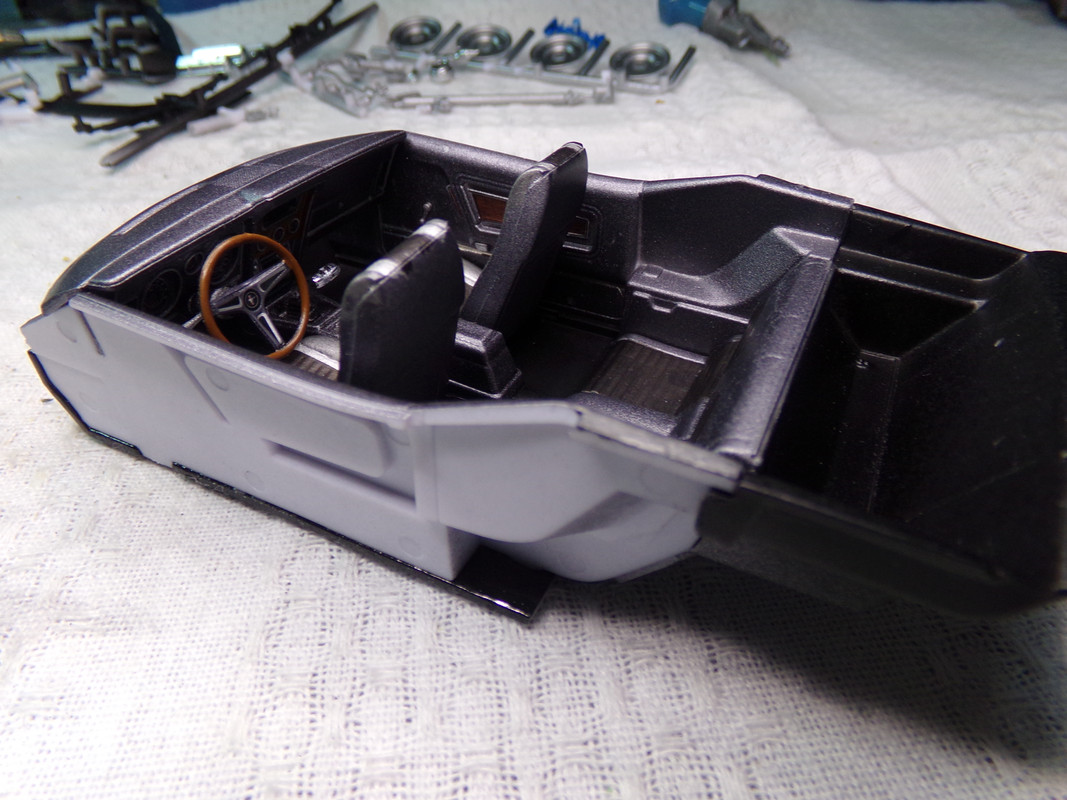 |
|
modelcarjr
Full Member
July '24 Showcased Build Awarded
Member since: March 2023
Posts: 519
Mar 3, 2023 13:07:26 GMT -5
Mar 3, 2023 13:07:26 GMT -5
|
Post by modelcarjr on May 14, 2024 18:06:16 GMT -5
I repainted the body today. I got started about noon, when the humidity was about 60%, and painted the black primer on the sides, interior, cowl area. After a couple of hours i taped it off and painted the blue (I'm going to call it Grabber Blue although it is Tamiya Light Blue). The weather was perfect about 3 PM with about 40% humidity. Two coats of paint and 1 wet coat of Krylon clear lacquer. I'll polish it out tomorrow. I'm also working on the engine. I have the flying valve covers installed to go with the flying alternator and power steering, I think. LOL! Thanks for looking! 😎  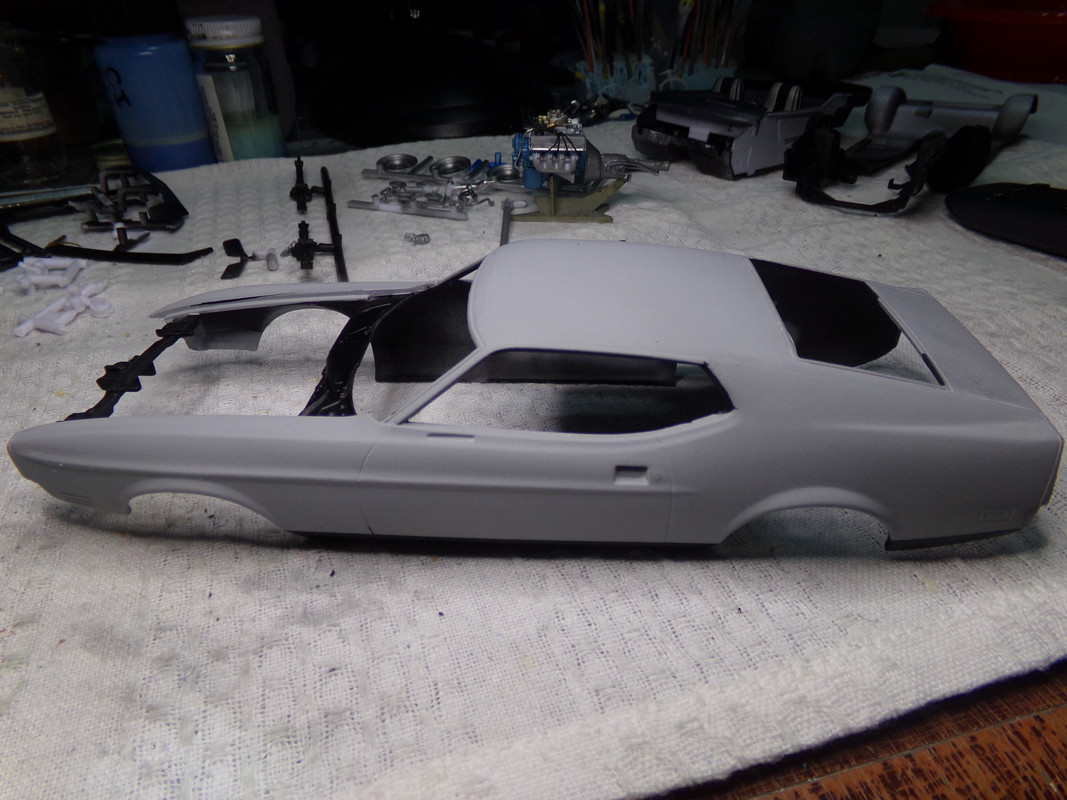     |
|
|
|
Post by 406 Silverado on May 15, 2024 4:59:18 GMT -5
As "Hannibal" used to say on the A-Team, "I love it when a plan comes together." (I know.....I'm dating myself) A GREAT recovery on the paint and you've picked those details out very well on the interior JR. I hear what you're saying about skipping out on some details that won't be seen. I mean......it's great that Revell included those items in the boxing as it has a cool factor to it but in all practicality, they won't be visible. Great start on that engine as well.
|
|
TJ
Senior Member
 June '23 Showcased Model Awarded
Member since: May 2023
Posts: 1,862
May 14, 2023 18:18:36 GMT -5
May 14, 2023 18:18:36 GMT -5
|
Post by TJ on May 15, 2024 5:45:45 GMT -5
That blue is fantastic. Looks Grabber to me
|
|
modelcarjr
Full Member
July '24 Showcased Build Awarded
Member since: March 2023
Posts: 519
Mar 3, 2023 13:07:26 GMT -5
Mar 3, 2023 13:07:26 GMT -5
|
Post by modelcarjr on May 15, 2024 19:01:38 GMT -5
Thanks, Joe and TJ! I appreciate your comments! I rubbed out the body today. The first photo shows the paint in my mag light but the other photos are out of the light to show the color a little better. its really darker than light blue and I think matches Grabber Blue pretty well. I am going to try the add the pin stripes by themselves cutting them away from the larger decals. If I am not successful, it will still be OK because in this scale the pinstripes will be hard to see anyway. Thanks for looking! 😎     |
|
jeaton01
Full Member
Sept '23 Showcased Model Awarded
Member since: October 2013
Posts: 1,171
Member is Online
|
Post by jeaton01 on May 15, 2024 19:10:05 GMT -5
If you could find some Model Master Black Chrome I think it would be exactly what you want for the hood. I use it on airplane propellers.
|
|
keavdog
Senior Member
Member since: April 2023
OPEN WHEEL GROUP BUILD MODERATOR
Posts: 2,131
Apr 2, 2023 21:25:25 GMT -5
Apr 2, 2023 21:25:25 GMT -5
|
Post by keavdog on May 15, 2024 20:09:06 GMT -5
Looking good in grabber blue!
|
|
handiabled
Administrator
Member since: February 2023
Posts: 3,681
MSC Staff
|
Post by handiabled on May 16, 2024 2:13:27 GMT -5
That is a great looking paint job! The engine and interior details look terrific!
|
|
|
|
Post by 406 Silverado on May 16, 2024 4:38:49 GMT -5
You sure get some good results from your sanding and polishing sessions JR. That paint job looks immaculate.  |
|
|
|
Post by dupes on May 16, 2024 10:42:22 GMT -5
This build is looking great. I picked one of these kits up because of you guys in the forum building/finishing it already. Hahaha. What a lineup! The yellow guy in the middle definitely stands out. |
|
modelcarjr
Full Member
July '24 Showcased Build Awarded
Member since: March 2023
Posts: 519
Mar 3, 2023 13:07:26 GMT -5
Mar 3, 2023 13:07:26 GMT -5
|
Post by modelcarjr on May 16, 2024 22:32:13 GMT -5
Thanks, everyone, for the very nice comments! John, I think I am going with what I have for the black. Joe, the paint job isn't perfect but it doesn't have any obvious nits or nats in the paint. It also is not a show car, 2 part clear, finish that seems to be all the rage nowadays.
The gold winner was the only one primarily painted with Krylon on the exterior. Specifically, the 37 Ford Pickup with the Krylon Italian Olive paint was the gold winner in Light Truck by different judges than Street Rod, Street Machine, or Street Stock. The Houston IPMS used a point system with comments for each model this year (feedback to the modeler). The 68 Chevelle and 66 Suburban had flat finishes according to the feedback. The 41 Willys received a 3 out of 5 for finish with no comment. As has always been the case, judging is still a subjective opinion that is based on each judge's preference of how they would like a model to be built. I am not complaining, it can't be fixed, so I just enjoy the contests each year!
|
|
modelcarjr
Full Member
July '24 Showcased Build Awarded
Member since: March 2023
Posts: 519
Mar 3, 2023 13:07:26 GMT -5
Mar 3, 2023 13:07:26 GMT -5
|
Post by modelcarjr on May 20, 2024 8:35:42 GMT -5
Its been a couple of day since I have posted anything but I have been making good progress on the build. The body is foiled, windows and interior are in. I finished the wheels and tires and the tire decals are included in the kit. The engine and chassis are complete and the engine has been detailed with plug wires, a fuel line and heater hoses. Its very tight and I hope I can still get the air cleaner installed properly with the heat riser tube. I must say a word about the chassis. It is very simple but tight assembly and everything fits beautifully. The approach to the rear shocks and stabilizer bar attachment to the rear axle is very simple but much better than historically kits have been. The steering linkage is a solid connection and the tailpipes fit the exhaust manifolds and run the length if the chassis with positive pin placements. Very nicely done, Revell! Now its time to get this one on all fours and finish! Thanks for looking! 😎 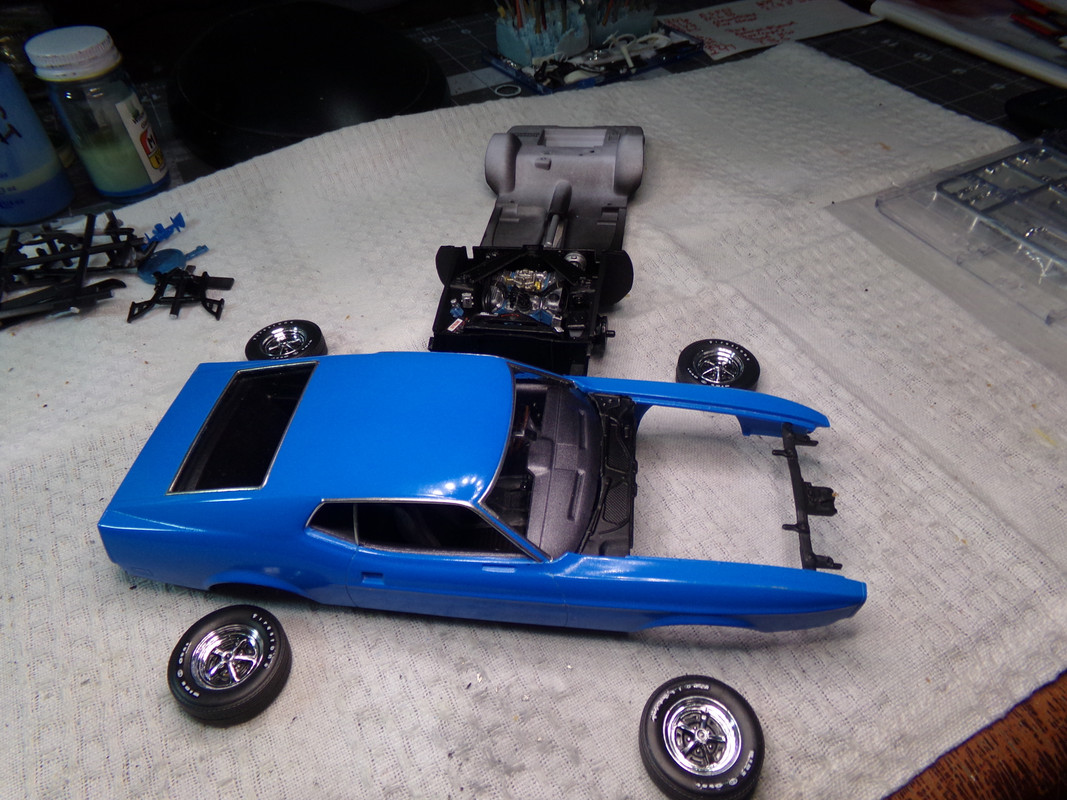    |
|
|
|
Post by 406 Silverado on May 20, 2024 10:10:55 GMT -5
Thanks, everyone, for the very nice comments! John, I think I am going with what I have for the black. Joe, the paint job isn't perfect but it doesn't have any obvious nits or nats in the paint. It also is not a show car, 2 part clear, finish that seems to be all the rage nowadays. The gold winner was the only one primarily painted with Krylon on the exterior. Specifically, the 37 Ford Pickup with the Krylon Italian Olive paint was the gold winner in Light Truck by different judges than Street Rod, Street Machine, or Street Stock. The Houston IPMS used a point system with comments for each model this year (feedback to the modeler). The 68 Chevelle and 66 Suburban had flat finishes according to the feedback. The 41 Willys received a 3 out of 5 for finish with no comment. As has always been the case, judging is still a subjective opinion that is based on each judge's preference of how they would like a model to be built. I am not complaining, it can't be fixed, so I just enjoy the contests each year! It's been a long time since I've been to the Model Mania show and didn't know that you were going to be there at it. That was the first show in 2015 that I went to after I got back into the hobby this time around and I had a blast. Congratulations again on the win JR!! |
|
|
|
Post by kyledehart5 on May 20, 2024 14:34:14 GMT -5
Lovely progress. That color looks even better now that she’s all foiled up. Good to hear more excellent things about this kit.
|
|
|
|
Post by Medicman71 on May 20, 2024 15:02:27 GMT -5
Very nice!! Love the color!
|
|
modelcarjr
Full Member
July '24 Showcased Build Awarded
Member since: March 2023
Posts: 519
Mar 3, 2023 13:07:26 GMT -5
Mar 3, 2023 13:07:26 GMT -5
|
Post by modelcarjr on May 23, 2024 12:01:45 GMT -5
Thanks, Joe, Kyle and Mike! I appreciate your comments! Joe, there is another show in Clear Lake coming up on July 27th. Its on Nasa Road 1 in a park next to the Space Center. There is a building in the part that the HAMS club uses for the show. Hopefully, I'll be there! This one is done! the only problem I had was with the rear taillight panel and the rear roll pan. Somehow I managed to knock out the taillight panel with the body on but nothing done in front so it was relatively easy to pull the body off and reattach the rear taillight panel. Then the next time I tried to get the roll pan on, I knocked out the rear taillight panel again with the front complete. So I had to remove the front grill, chin spoiler and bumper to repair the taillight panel. Then, the third time, I knocked out the rear window and had to undo everything again. Finally, I got smart and attached everything in back first and then I completed the front! I had to cut off the top of the roll pan license plate surround in order to get the roll pan to marry up to the bottom of the taillight panel. then everything was flush and the bumper covers the top of the roll pan anyway. I applied most of the decals but of most importance was the pinstripe on the hood and the body sides. All are there and I cut them off the larger decal and applied them so that I didn't have to try to blend a decal with black paint. The main black area is paint. Only the pinstripe is a decal. I think they worked out well with a straight edge and a sharp No 11 bladed knife. Final photos in the "Under Glass" section. Thanks for looking and I hope everyone has a happy Memorial day weekend! 😎  |
|