TJ
Senior Member
    June '23 Showcased Model Awarded
Member since: May 2023
Posts: 2,155
May 14, 2023 18:18:36 GMT -5
May 14, 2023 18:18:36 GMT -5
|
Post by TJ on Aug 27, 2024 18:48:20 GMT -5
I'm all caught up with the updates. Great job on the paint fixes. The decals look fantastic
|
|
handiabled
Administrator      Apr '23 Showcased Build Awarded
Member since: February 2023
Posts: 4,381 
MSC Staff
|
Post by handiabled on Aug 28, 2024 1:47:14 GMT -5
The decals look to be going on great! The stencil/data markings should keep you busy for a little while
|
|
jkim
Full Member
  
Member since: October 2023
Posts: 116
Oct 19, 2023 12:36:27 GMT -5
Oct 19, 2023 12:36:27 GMT -5
|
Post by jkim on Aug 29, 2024 12:54:23 GMT -5
|
|
|
|
Post by keavdog on Aug 29, 2024 13:11:05 GMT -5
Looks awesome. Can't wait for the canopy masks to come off - my favorite part.
|
|
|
|
Post by kyledehart5 on Aug 29, 2024 15:42:07 GMT -5
Oh, that just looks so nice. Beautiful decal work.
|
|
jkim
Full Member
  
Member since: October 2023
Posts: 116
Oct 19, 2023 12:36:27 GMT -5
Oct 19, 2023 12:36:27 GMT -5
|
Post by jkim on Aug 29, 2024 23:43:44 GMT -5
Thanks guys! After the decals, I sealed everything with a coat of Alclad Aqua Gloss. I then mixed up two shades of gray for the panel wash. Here is the painted bottom before the panel wash.  I used a light gray for the wash on the bottom.  The light gray wash has been completed on the aircraft bottom white surfaces.     Next was the top and sides. I used a slightly darker gray here. Before wash...  After wash...  After completing this rear portion, I decided to finish the wash on the top sides with the lighter gray. Before...  After...  There are lots of angles and overhangs on this aircraft so I have to make sure I treat the entire model with the wash, especially taking extra care to wipe off any unnatural looking smudges.  |
|
jkim
Full Member
  
Member since: October 2023
Posts: 116
Oct 19, 2023 12:36:27 GMT -5
Oct 19, 2023 12:36:27 GMT -5
|
Post by jkim on Aug 30, 2024 0:23:38 GMT -5
I noticed that some spider-webbing has occurred on the canopy frame on the starboard side. Sometimes this happens when my clear coat, thinned with Mr Leveling Thinner, seeps into the underlying paint and causes this effect. It's not too noticeable but enough to push me to try a delicate repair.  First I have to mask off the bottom edge of the canopy and the pilots' names. The tape has been de-tacked with my fingertips to help prevent the underlying decals from getting lifted off when I remove the tape.  Black is then carefully sprayed on the affected areas.  Tape is CAREFULLY removed and that issue has been resolved.  |
|
handiabled
Administrator      Apr '23 Showcased Build Awarded
Member since: February 2023
Posts: 4,381 
MSC Staff
|
Post by handiabled on Aug 30, 2024 1:37:01 GMT -5
I really like the subtle washes. Just enough to highlight the fine fuselage detail. Fantastic fix on the canopy John!
|
|
|
|
themongoose
Full Member
   June '24 & Oct '24 MoM Winner
Member since: April 2023
Model of the Month Winner-June 2024
Posts: 622
Apr 1, 2023 21:17:56 GMT -5
Apr 1, 2023 21:17:56 GMT -5
|
Post by themongoose on Aug 31, 2024 7:20:52 GMT -5
I like the level of weathering on this one. Super nice build for sure and the cleaner look of a new jet shows it off! Interesting note on why the spider webbing occurs in the paint. I hadn’t thought about that. Glad you threw that out there 👍
|
|
buddho
Forum Moderator     
Member since: February 2019
Posts: 1,287 
MSC Staff
|
Post by buddho on Aug 31, 2024 7:54:29 GMT -5
Super gorgeous build here... wowsa.
|
|
jkim
Full Member
  
Member since: October 2023
Posts: 116
Oct 19, 2023 12:36:27 GMT -5
Oct 19, 2023 12:36:27 GMT -5
|
Post by jkim on Aug 31, 2024 11:02:35 GMT -5
|
|
406 Silverado
Global Administrator     
Member since: November 2011
Posts: 10,200
Member is Online
MSC Staff
|
Post by 406 Silverado on Aug 31, 2024 12:07:42 GMT -5
I've missed these last few updates between being out of town and a birthday celebration pretty much all week long. lol That pastel wash that you do really does the trick and is one that I will definitely be adopting John ( jkim). I've gotta hand it to you bub........you sure know your way around model building. |
|
jkim
Full Member
  
Member since: October 2023
Posts: 116
Oct 19, 2023 12:36:27 GMT -5
Oct 19, 2023 12:36:27 GMT -5
|
Post by jkim on Aug 31, 2024 14:19:07 GMT -5
|
|
|
|
Post by Steve Zuleski on Aug 31, 2024 14:37:42 GMT -5
The landing gear and wheel bays look so real from the pin washes, wow! I can only imagine the weathering steps coming soon. Top of the line work, John, very impressive detailed paint work.
|
|
|
|
Post by keavdog on Aug 31, 2024 14:45:32 GMT -5
Those gear look just fantastic.
|
|
themongoose
Full Member
   June '24 & Oct '24 MoM Winner
Member since: April 2023
Model of the Month Winner-June 2024
Posts: 622
Apr 1, 2023 21:17:56 GMT -5
Apr 1, 2023 21:17:56 GMT -5
|
Post by themongoose on Aug 31, 2024 15:00:17 GMT -5
Dang those bays are just lovely. The demarcation lines between top and bottom colors looks so crisp. Can’t even tell there was tape there, No edge build up. looks terrific!
|
|
jkim
Full Member
  
Member since: October 2023
Posts: 116
Oct 19, 2023 12:36:27 GMT -5
Oct 19, 2023 12:36:27 GMT -5
|
Post by jkim on Aug 31, 2024 21:37:47 GMT -5
Thanks guys! Appreciate the comments! Dang those bays are just lovely. The demarcation lines between top and bottom colors looks so crisp. Can’t even tell there was tape there, No edge build up. looks terrific! And just to clarify, the demarcation between the Gull Gray and Insignia White was formed with thin rolls of Blu Tack putty. Slowly moving along with this build while I think about the next weathering steps, I've glued the hybrid Eduard/kit exhaust tubes into the openings of the rear fuselage.  I have two sets of painted exhaust nozzles and they stay in place pretty well without glue so consider them infinitely customizable, open or closed, left or right. Here is the standard port closed, starboard open configuration that you often see on parked Tomcats.   I've started the postshade process on the stabs. Highly thinned mixture of black/brown run over the panel lines and edges and also streaked across the stabs in the direction of the airflow.   Moving on to the wings, I've started playing with a new technique, at least for me. Sometimes, the postshade spray comes out too heavy and I resort to using Micromesh to rub away the excess. I started treating all of the post-shade spray patterns and found that this helps to break the post-shade from looking too "airbrushy", if that makes sense.   Here's an over-exaggerated example of this technique. You can see the initial post-shade is just too heavy and obviously airbrushed.  Micromesh gets rid of some but not all of the post-shade. It tones down the effect and also removes some of the uniformity of the spray pattern.  So using this new-found technique, I am going to start applying post-shade to the bottom and then using Micromesh to blend in the effect.  |
|
|
|
Post by kyledehart5 on Aug 31, 2024 23:19:20 GMT -5
This such an incredible build. That gear looks amazing. The nozzles are awesome too. And I love the subtle weathering approach. Really enjoying this.
|
|
jkim
Full Member
  
Member since: October 2023
Posts: 116
Oct 19, 2023 12:36:27 GMT -5
Oct 19, 2023 12:36:27 GMT -5
|
Post by jkim on Sept 1, 2024 17:49:14 GMT -5
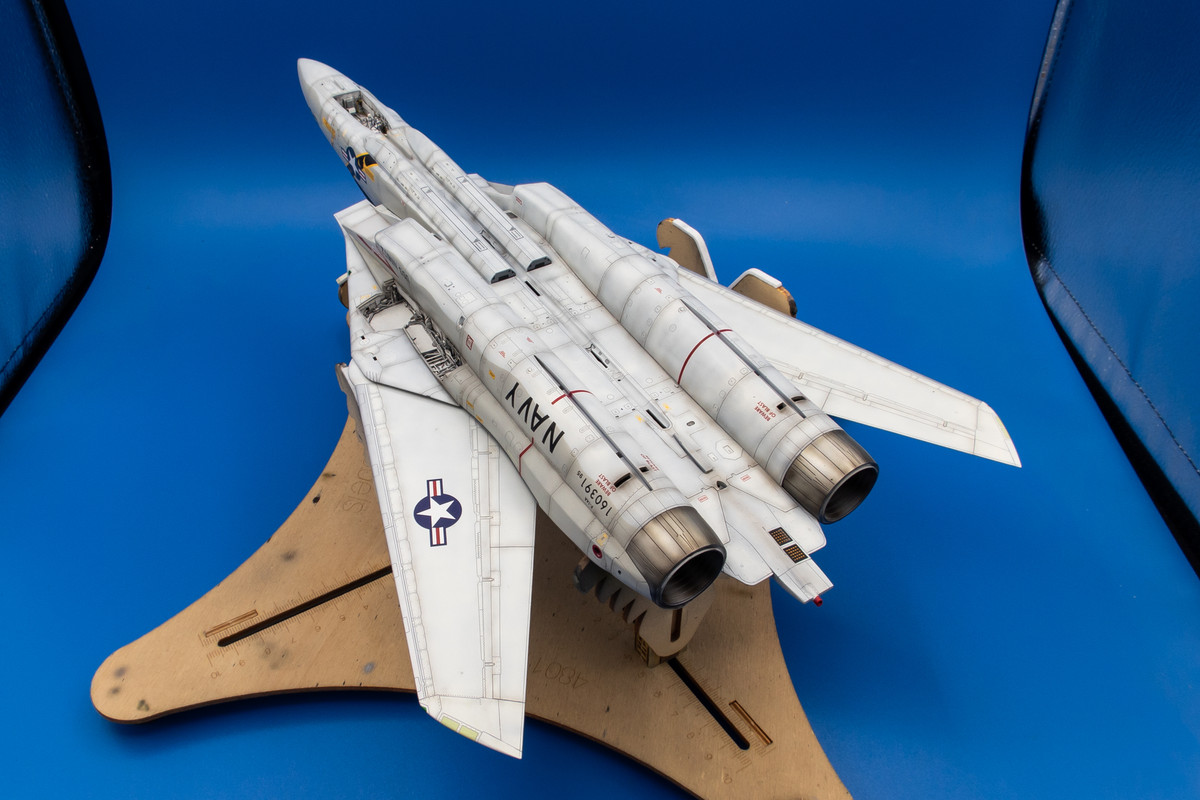
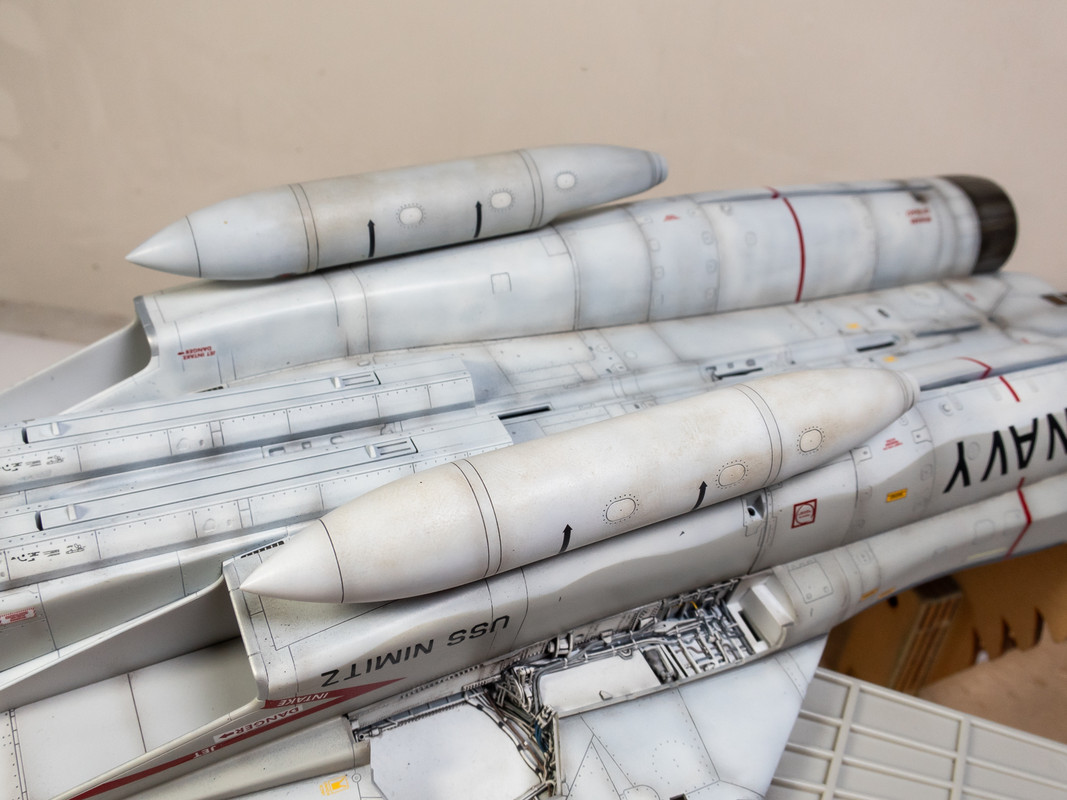
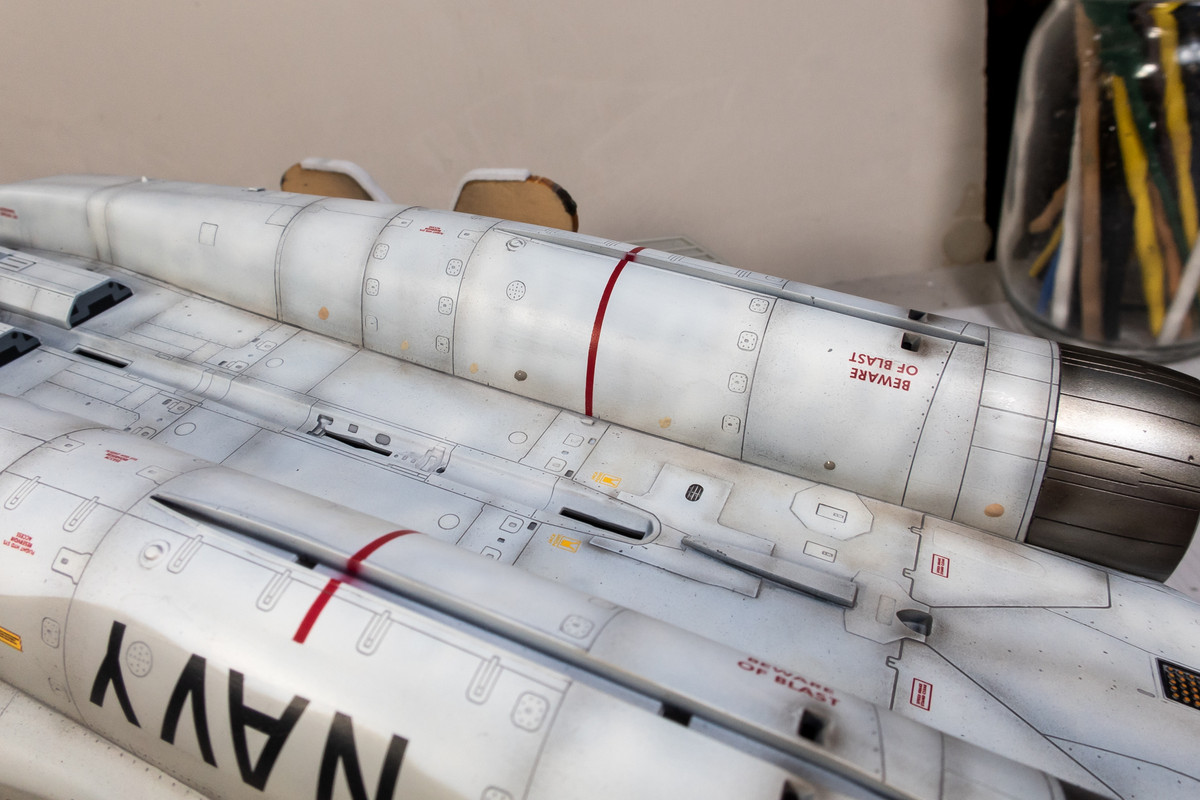
Thanks Kyle! I appreciate the positive vibes! The post-shading of the bottom is complete. I still need to go over some of the patterns and pare them down using Micromesh.     Now I'm going to step into some unknown waters and try some staining with oil paints. Lots of guys do this but I'm not one of them so I'm just experimenting with something new. The drop tanks, which I assume were re-usable and maybe exhibited considerable wear, are good candidates for the initial test.   I moved on to the fuselage bottoms. Here is a section that has been treated with the post-shade but not with oils.  Small dots of oil paints in various colors are placed on the model. VERY little is needed, especially on this white background.  Using a soft paint brush, the dots of oils are spread and blended into the model surface. A dry cotton swab is used to remove really heavy concentrations of oil paints. Mineral spirits can be used to remove even further. I like this technique because of the ability to remove it.  The other side has been similarly treated with oil staining.  I'll let this sit and re-visit it again to see how I like it. This is a new technique for me and I need some time to process the results! |
|
|
|
Post by keavdog on Sept 1, 2024 18:20:23 GMT -5
Looks great - I think I've seen that referred to as dot filter.
|
|
406 Silverado
Global Administrator     
Member since: November 2011
Posts: 10,200
Member is Online
MSC Staff
|
Post by 406 Silverado on Sept 1, 2024 18:22:59 GMT -5
Continuing to blow minds one update at a time John.  |
|
handiabled
Administrator      Apr '23 Showcased Build Awarded
Member since: February 2023
Posts: 4,381 
MSC Staff
|
Post by handiabled on Sept 2, 2024 2:17:58 GMT -5
The addition of oils to the weathering looks wonderful! I love micromesh!
|
|
|
|
Post by kyledehart5 on Sept 2, 2024 3:32:49 GMT -5
Incredible work.
|
|
TJ
Senior Member
    June '23 Showcased Model Awarded
Member since: May 2023
Posts: 2,155
May 14, 2023 18:18:36 GMT -5
May 14, 2023 18:18:36 GMT -5
|
Post by TJ on Sept 2, 2024 4:31:00 GMT -5
Your step by step pics on everything you do really helps the rest of us understand your thought process at that time. I've personally used a lot of your techniques throughout the years of following your builds.
Thanks
|
|
jkim
Full Member
  
Member since: October 2023
Posts: 116
Oct 19, 2023 12:36:27 GMT -5
Oct 19, 2023 12:36:27 GMT -5
|
Post by jkim on Sept 2, 2024 11:17:50 GMT -5
Thanks guys! Just trying to pass along things that I've been learning along the way. The weathering work with oils on the bottom has been progressing. At some point, I'm going to have to flip it over and start work on the top!    |
|
|
|
Post by kyledehart5 on Sept 2, 2024 19:25:14 GMT -5
Really been enjoying this beautiful WIP thread. That’s looking really great.
|
|
jkim
Full Member
  
Member since: October 2023
Posts: 116
Oct 19, 2023 12:36:27 GMT -5
Oct 19, 2023 12:36:27 GMT -5
|
Post by jkim on Sept 4, 2024 19:22:02 GMT -5
|
|
|
|
Post by kyledehart5 on Sept 5, 2024 3:48:20 GMT -5
Vey convincing work there. I love this subtle weathering approach.
|
|
TJ
Senior Member
    June '23 Showcased Model Awarded
Member since: May 2023
Posts: 2,155
May 14, 2023 18:18:36 GMT -5
May 14, 2023 18:18:36 GMT -5
|
Post by TJ on Sept 5, 2024 4:21:53 GMT -5
The weathering looks great. They were pretty well taken care of during this time period so your approach is very realistic
|
|