panzerjager.
Full Member
  
Member since: June 2012
Posts: 204
Jun 5, 2012 21:56:23 GMT -5
Jun 5, 2012 21:56:23 GMT -5
|
Post by panzerjager. on Aug 25, 2012 15:01:22 GMT -5
I "oficially" start my new proyect. It's AFV Club 35S57 kit, with interior parts and clear top hull and turret. Of course, I will paint the clear parts, the interior will be showed by the breaking of some armoured plates, with the turret blown. The kit seems to be not a beauty, according to modeler Scott Fraser. He opinate the this kit is a wreck, you will see why. This is Gino Quintiliani Review in Armorama. S.Fraser reply and I quote: "The suspension is very poorly executed, such that amyone wanting to build this into an accurate model of a T-34, ANY T-34, must replace the roadwheels. They are wrong, for this or any other T-34.....we have a tank without wheels, and a tank without wheels is a wreck."More critics from S FraserAnd more...Mistakes with the filtersOf course I found all these links after I buy the kit, but...my model will be a wreck anyway ;D A couple od website (Links provided by a MSC member) legion-afv.narod.ru/T-34-76.html Hundreds of pics from museums and wrecks pblinov.narod.ru/photo.htmThe first duty I do was to replace a couple of the suspension spring by other made of ...0.6mm? copper wire. To obtain the same distance from one spiral to each other, I wrap 2 wires around a KS brass tube, 2 mm in diameter. Then, one of the wires was discarted  The black one is provided by AFV Club; I think the copper one is more accurate, because the wire diameter and less spirals  Another detail I want to show is a burnt rubber-covered wheel. The kit provides 4 double wheels of this type, with the "rubber" part in hard styrene, not vinil (thanks Lord!) 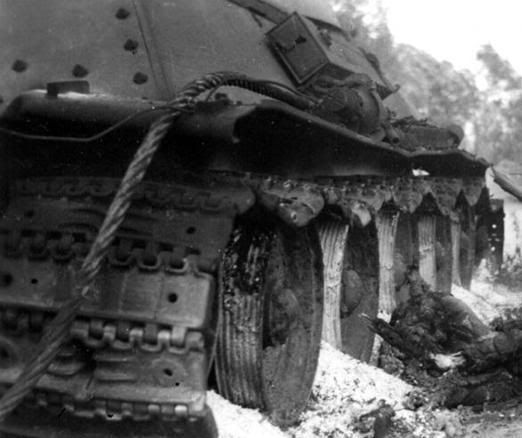 So, to make the "grooves" od the bare wheel, I improvise a tool: a surgery # 11 blade screwed to a piece of MDF. I added 0,5 mm styrene sheet to make the different separated slots.  I was nor satisfied with the result, so I take my motor tools, safety glasses and I modified the blade tip  Well, still not satisfied, but is not bad considering it will be partially covered with rests of rubber and ashes. I finally make the slots a bit larger using an X-Acto saw  Next step will be stydy the thickness of the armoured plates and compare it with the kit. Of course, suggestions are wellcomed Darío |
|
Deleted
Member since: January 1970
Posts: 0
Nov 24, 2024 7:08:53 GMT -5
Nov 24, 2024 7:08:53 GMT -5
|
Post by Deleted on Aug 25, 2012 15:11:35 GMT -5
Off to a nice start Dario, fantastic detailing  I never worry too much about small errors in a kit, if it looks good once it's detailed and painted up, it'll do for me  |
|
|
|
Post by TRM on Aug 25, 2012 15:14:40 GMT -5
First off Dario...count me in!! Looking like you are off to your usual above the standard building!!!
Secondly, I think the response time for Mr. Reid to check out a newly posted T34 is about 38 seconds..not a warning, just a heads up. As for technical basis on this beast...I feel there is no other!
3rd and last if anyone was wondering....the critics and those, ummm...individual that would critique like that, well I could say a whole bunch of stuff including (Please add several derogatory remarks and colorful expletives in this space), but I won't Instead I will say that this is one of THE top reasons why MSC was started. If there is one thing I have learned is that most anything is possible and I am thinking that even Mr. Reid would agree that the T-34/76 is one of the prime examples of this. I lost count of the variants and configurations of this beast and that was just between the Russians and Germans...let not even start on the rest of the world that has or had them! LOL!!!
Count me IN on this!! (Not to mention I have a 34/76 going myself right now...hee hee)!!
Carry on!!! ;D
|
|
|
|
Post by spud on Aug 25, 2012 17:47:23 GMT -5
if you are worried about the gap between the springs i think you have a spring loose ;D they look the same to me, but i like how you make the springs very interesting
and i agree with T those guys are just nit pickers and can make a great kit sound like a dogs dinner
|
|
|
|
Post by TRM on Aug 25, 2012 17:51:57 GMT -5
After taking a look at my suspension and putting the wheels on temporarily, it's funny someone would actually say something as these are barely visible when together! Just odd! Still like the springs though, they do look cool and you will be seeing yours in the end result they will look even better!!  |
|
multicam
Senior Member
   
Member since: January 2012
Nate
Posts: 2,039
Jan 10, 2012 14:35:41 GMT -5
Jan 10, 2012 14:35:41 GMT -5
|
Post by multicam on Aug 25, 2012 20:07:35 GMT -5
Nice improvisation on the wheels there, Dario! This'll be fun to watch:)
|
|
legend
Full Member
  
Member since: November 2011
Posts: 577
Nov 30, 2011 13:49:32 GMT -5
Nov 30, 2011 13:49:32 GMT -5
|
Post by legend on Aug 26, 2012 1:57:24 GMT -5
I'm in here! might pick up some pointers for my t34
Bill
|
|
panzerjager.
Full Member
  
Member since: June 2012
Posts: 204
Jun 5, 2012 21:56:23 GMT -5
Jun 5, 2012 21:56:23 GMT -5
|
Post by panzerjager. on Aug 28, 2012 18:23:42 GMT -5
Thanks, guys!
I got a great doubt about my project...the interior is a beauty, so many well molded parts...I don't want to make they look to much burnt. It is possible to build the turret blown by a big explosion (I don't know...artillery hit?) but with no a big fire?
The fuel was diesel, not easy to produce a fire, like gasoline, I'm right?
I want to show the tank turretless and with part of a side plate removed by explosion/s, but I don't want it look in a plane burnt/oxide/blackened color.
Thanks again
Darío
|
|
|
|
Post by TRM on Aug 28, 2012 18:31:02 GMT -5
I suppose anything is possible Dario. I like the blown off turret idea, would certainly take care of the burnt interior turret parts!!! I could surmise a bad projectile ripping through the turret and a kill shot somewhere else?  I am sure there will be a few takes on this one soon!  |
|
panzerjager.
Full Member
  
Member since: June 2012
Posts: 204
Jun 5, 2012 21:56:23 GMT -5
Jun 5, 2012 21:56:23 GMT -5
|
Post by panzerjager. on Aug 29, 2012 22:23:25 GMT -5
Thanks guys! Well, I work in the main gun ammo racks. I suppose the ammo exploded (may be some, maybe all), so the racks must be empty I found these pics; the second one shows a different type of racks (perhaps from a T-34/85?)   The kit provides these parts:  As you can see, they look to thick, so...let's work I take a tin sheet, more malleable than aluminium or brass. The first task is smooth it with a digital tool: my thumbnail   I cut some pieces, 2,5 cm x 1 cm (1" x .4")  I take one of the kit part an sand the rises molded.. I stick the part to a piece of styrene sheet with double sided tape  Then I position the tin piece over it ant with the help of a toothpick (or a fingernail or a dentist tool...whatever you thinks works better) I copy the shape. Note I made 2 cuts in the rear part, to help molding the butt  I cut the tin with an X-Acto blade (actually...Maped blade)  And the first part is done. They look distorted, but the right shape can be obtained again using the plastic part. Anyway, in a destroyed vehicle they will look worst  Now the question Now the question (Oh, you think I would show you my method for free? ;D ) If you look again the first pic, I draw some red lines pointing to....what? Metal strapping? Or remains of rubber/leather pads? Thanks Darío |
|
|
|
Post by 406 Silverado on Aug 30, 2012 10:32:21 GMT -5
Awesome work so far and the foil method is what I'll be doing as well. It's quick and easy. Those strips are padding in the form of either leather of fabric strapping type material., Very easy to replicate.
|
|
|
|
Post by TRM on Aug 30, 2012 18:35:00 GMT -5
Nice job Dario and a great little technique!!!
|
|
Deleted
Member since: January 1970
Posts: 0
Nov 24, 2024 7:08:53 GMT -5
Nov 24, 2024 7:08:53 GMT -5
|
Post by Deleted on Aug 30, 2012 22:21:16 GMT -5
Model building at it's finest, well done!
|
|
panzerjager.
Full Member
  
Member since: June 2012
Posts: 204
Jun 5, 2012 21:56:23 GMT -5
Jun 5, 2012 21:56:23 GMT -5
|
Post by panzerjager. on Sept 4, 2012 19:55:25 GMT -5
Thanks, fellas! To justify the presence of the port side shell brackets, I suppose they was empty when the ammo in the boxes located at the floor exploded  (there are 8 ammo boxes with... 3 rounds each?) Let me show you the updates: I cut the side armour and the inner plate (where the starboard ammo brackets was located), leaving just the suspension springs  Here you can see the remains of the ammo boxes.  I apply a coat of green, then hairspray laque and then a coat of white. It doesn't looks as I want, but I think is not bad. It still need some burnt effect, pipes and wires The weathering was simple: * acrilic applied with sponge * oils washes (diluted in white spirit) * oil mapping * Tamiya Flat Black airbushed very diluted I will add some pigments later  Firewall, deformed and broken. At the left you can see an MG ammo rack, build out of styrene sheet  Remains of the ammo boxes, with a coat of satin black   That's all for now; as always, opinions are wellcomed Darío |
|
Deleted
Member since: January 1970
Posts: 0
Nov 24, 2024 7:08:53 GMT -5
Nov 24, 2024 7:08:53 GMT -5
|
Post by Deleted on Sept 4, 2012 22:47:36 GMT -5
Nice work in there, thanks for explaining how you did the weathering!
|
|
|
|
Post by robbo on Sept 5, 2012 5:23:37 GMT -5
Very good work Dario  |
|
|
|
Post by spud on Sept 5, 2012 7:01:18 GMT -5
Very cool dario
|
|
panzerjager.
Full Member
  
Member since: June 2012
Posts: 204
Jun 5, 2012 21:56:23 GMT -5
Jun 5, 2012 21:56:23 GMT -5
|
Post by panzerjager. on Sept 18, 2012 21:57:30 GMT -5
Thanks guys! More updates: the blue pipes are for the compressed air to the diesel fuel. The rest of the wires are...wires 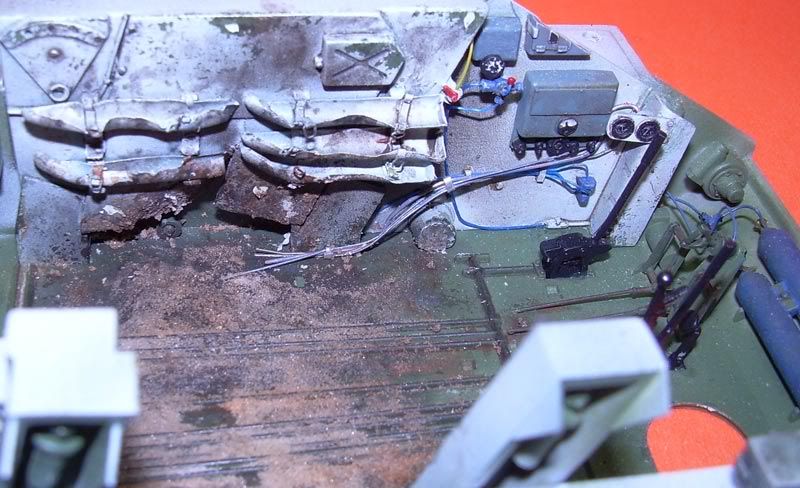 Engine and transmision parts with a coat of...a crazy mix of Molak aluminium (enamel) and Tamiya Black (acrilic). Then a coat of hairspray and another coat of the crazy mix, but with more black. It doesn't work well, when I scrapped with a hard brush and warm water, the metal color peel off very easily, leaving the bare plastic. Anyway, the washes will help to blend the colors 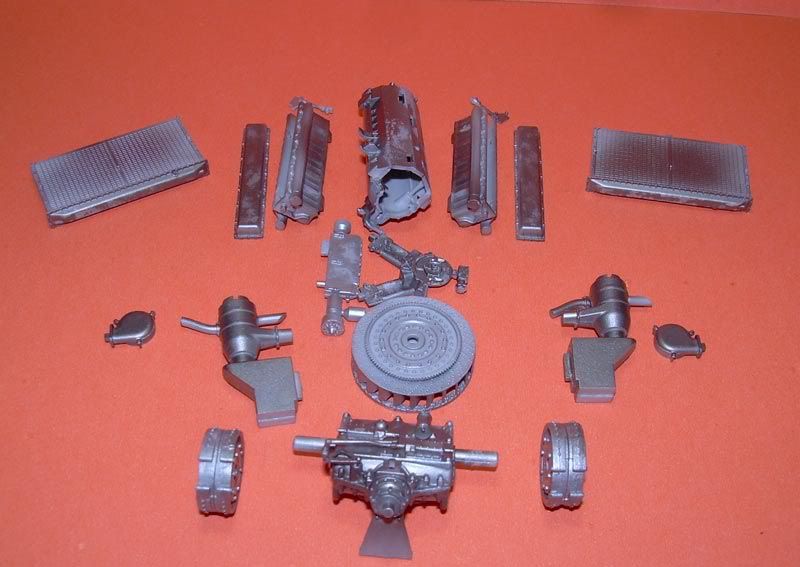 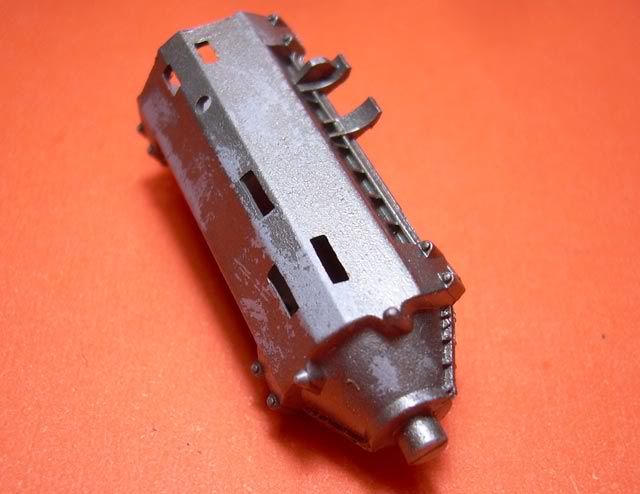 ALmost all parts painted and weathered with hairspray, brush and sponge. Then oil washes (black and raw umber). It still need a lot of pipes and wires 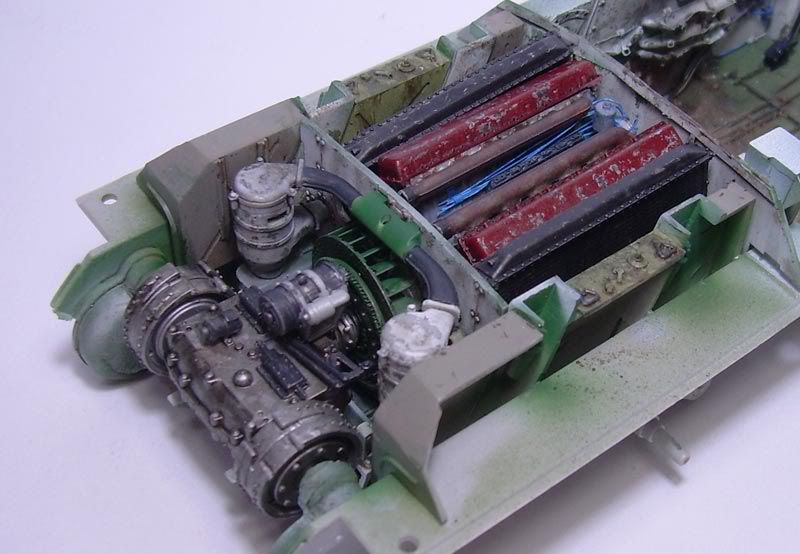 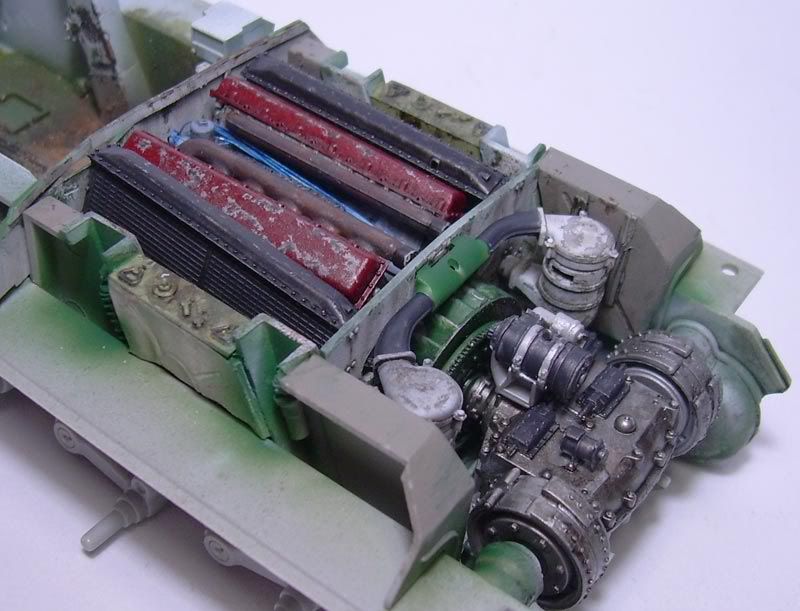 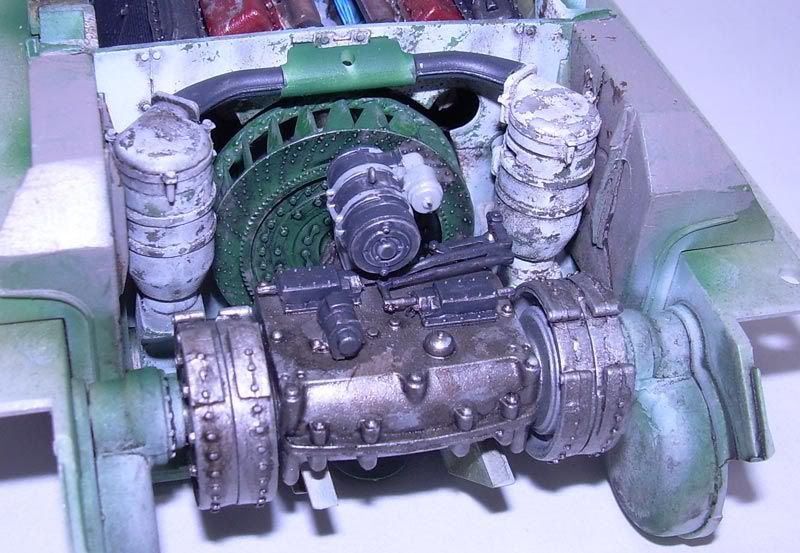 Regards Darío |
|
noname
Full Member
   March 2012 / April 2013 MoM Winner
Member since: January 2012
I like building models
Posts: 726
Jan 29, 2012 9:24:03 GMT -5
Jan 29, 2012 9:24:03 GMT -5
|
Post by noname on Sept 19, 2012 7:15:49 GMT -5
This is a nicely detailed kit and I can see you are adding some nicely done further additions. With a detailed kit like this, you really do want to show off the inside.
I also have a T-34/76 in the makings although it is a 1941 Cast Turret version. The T-34 is one of those popular tanks I suppose everyone will do at one point or another.
|
|
|
|
Post by 406 Silverado on Sept 23, 2012 12:09:15 GMT -5
Some mighty fine painting and weathering Dario. This is gonna be a great wreck when done. Can't wait.
|
|
|
|
Post by spud on Sept 23, 2012 12:42:25 GMT -5
Fantastic Dario
|
|
panzerjager.
Full Member
  
Member since: June 2012
Posts: 204
Jun 5, 2012 21:56:23 GMT -5
Jun 5, 2012 21:56:23 GMT -5
|
Post by panzerjager. on Sept 28, 2012 22:47:05 GMT -5
Thanks, guys, glad you like it! Well, let me show you the advances I had the "great" idea of leave the rear plate opened..  That implies a lot of work: bolt heads must be removed, holes must be drilled, and so...a lot of details appear after each step. The first 2 pics show the rear plate and the details I must add or remove   Next pic shows: spare fuel/oil tanks notches filled; bolt heads removed, holes drilled, exhaust pipes and armours glued (stupid me...I forget to make the holes where the pipes go through the rear plate)  The inside: some ejector pin marks and exhaust covers pins holes filled  The upper blue arrow points to the perforated plate that must be removed (it's too short and thick) The 2 black rectangles mark the location of the exhaust pipes  Using my amazing skill for drawing with Paint  , I draw in red the perforated plates that I must add  The remain of the engine and transmission are almost ready; I added some fuel (yellow) and oil (orange) pipes    That's all for now Regards Darío |
|
panzerjager.
Full Member
  
Member since: June 2012
Posts: 204
Jun 5, 2012 21:56:23 GMT -5
Jun 5, 2012 21:56:23 GMT -5
|
Post by panzerjager. on Oct 17, 2012 22:45:34 GMT -5
Guys, something is wrong with this model...I work on it 2 hours each day, but it looks always the same !  Or, perhaps I'm too ansious to see it finished  Well, some advances: Real plate, with the holes for the exhaust pipes and the nuts for the armored covers  The main gun, WIP  Turret parts, also WIP  The copper wires will be used to make the rods for... opening the hatches?  The actual rods:  Instrument panel painted and a MG ammo stowage, built out of styrene sheet  Radios, exploded ammo boxes and some ammo  Some details added in the rear part: a pipe with wires and the exhaust pipes elongated (I consider the provided parts are too short)  I removed another part of the firewall  A tentative layout of the blowed parts (turret and engine cover) Perhaps the turret will be layed upside down, I still don't know  Hope you like it Darío |
|
|
|
Post by bullardino on Oct 18, 2012 2:01:30 GMT -5
I really like it  I have a soft spot for T-34s, and this one is going to be a very nice wreck of it  |
|
|
|
Post by 406 Silverado on Oct 28, 2012 8:25:22 GMT -5
Very impressive so far.
Can't wait to get back to mine.
|
|
panzerjager.
Full Member
  
Member since: June 2012
Posts: 204
Jun 5, 2012 21:56:23 GMT -5
Jun 5, 2012 21:56:23 GMT -5
|
Post by panzerjager. on Nov 10, 2012 19:46:30 GMT -5
Glad you like it! Some little advances: I made the MG Magazine racks, out of styrene sheet  Racks in place  First paint chipping, with a light green   Then I added more paint chipping with a dark brown, followed by a dark green filter, a pinwash with black and another wash for the rainmarks, all using oils diluted in white spirit I still don't know how the elemnts will be displayed   I'm waiting Luckymodel receive AFV Club tracks; the vinil tracks are horrible  D |
|
madairbrush
Full Member
   November 2012 MoM Winner
Member since: May 2012
Cheers!! Matt
Posts: 488
May 30, 2012 14:22:05 GMT -5
May 30, 2012 14:22:05 GMT -5
|
Post by madairbrush on Nov 11, 2012 2:13:35 GMT -5
Looks great. I used the AFV Club tracks for my M51 Super Sherman. These tracks are horrible, too. Very tiny parts, which can easy break when you cut off. And as I painted them, the plastic seems very soft. Maybe a chemical reaction of txhe thinner.
|
|
legend
Full Member
  
Member since: November 2011
Posts: 577
Nov 30, 2011 13:49:32 GMT -5
Nov 30, 2011 13:49:32 GMT -5
|
Post by legend on Nov 14, 2012 12:08:23 GMT -5
Looking good! Really good
Bill
|
|
panzerjager.
Full Member
  
Member since: June 2012
Posts: 204
Jun 5, 2012 21:56:23 GMT -5
Jun 5, 2012 21:56:23 GMT -5
|
Post by panzerjager. on Dec 1, 2012 21:03:11 GMT -5
Thanks, guys, glad you like it. I treated a little the AFV Club plastic track set (not the vinil tracks provided with the kit) with a light coat of Tamiya XF-57, followed by a wash of acrylic artist paint and some paint diluted in White Spirit; a graphit 6B pencil was used to mark the parts where the roadwheels touch the tracks :  The tracks are not glued yet, the high contrast of different pigment colors will be smoothed once the tank is glued to the terrain:    Critics, suggestions, opinions are wellcomed Darío |
|
|
|
Post by tonylee-Rest In Peace on Dec 1, 2012 21:20:43 GMT -5
Dang Dario you're knocking this one out of the park fellow.  Beautiful Tony |
|




 That implies a lot of work: bolt heads must be removed, holes must be drilled, and so...a lot of details appear after each step.


