venom1
Full Member

Member since: October 2012
Posts: 1,369
Oct 10, 2012 2:40:03 GMT -5
Oct 10, 2012 2:40:03 GMT -5
|
Post by venom1 on Jan 6, 2013 2:07:21 GMT -5
Hi guys, I have had a bit of a poke around on the forum, but was unable to find anything in relation to photographing models. Are there any threads on this topic around here at all? If not, maybe we should start one?  Basically, I am wanting to know how you guys photograph your models for posting on the site. Some of you have some great quality photos with no clutter lying around which makes it a pleasure to look at, and somewhat more professional looking than me with my model desk covered in crap! ;D  I would like to know things such as: What settings do you use on your camera? What lighting do you use? Do you use a backdrop to photograph? If so, what? Whatever other points you feel are relevant to taking good photos. If there is already a thread that deals with this stuff, can someone please point me in the right direction? Otherwise, do we want to make this the post where we place all model photography related information? Cheers blokes! Sam  |
|
|
|
Post by bullardino on Jan 6, 2013 4:51:29 GMT -5
As I said in my Ya thread, I use a cube softbox I got from evilbay.
The background is made of some black carboard (I also have white and beige ones).
The lights are two bedside lamps with a clamp to fix them on a table.
I also use a tripod to keep my camera still. All the settings are manual, adjusted to make the subject stand out. I tend to use low F settings when I shoot small pieces, and high Fs when I have to take a picture of large dios, to enhance depth.
I forgot to tell that I use delayed shoot settings, to prevent hand shaking blur as most pictures require a long time (1/6 or even more).
|
|
|
|
Post by wouter on Jan 6, 2013 5:48:46 GMT -5
I use plain paper as background and four daylight bulbs. As with Luigi and many others I use a Tripod and take photos with a 10 sec delay (so the camera is completely still)
on my Canon I use the M setting and use high F's as well (so the model is completely in focus). I also play with the shutterspeed to let more light enter the camera so the photos are bright enough and I don't need to alter much in Photoshop Elements. And all photos in RAW, much more workeable
Cheers
|
|
venom1
Full Member
Member since: October 2012
Posts: 1,369
Oct 10, 2012 2:40:03 GMT -5
Oct 10, 2012 2:40:03 GMT -5
|
Post by venom1 on Jan 6, 2013 5:55:01 GMT -5
Hey Luigi and Wouts, thanks for the prompt reply, looks like we're off to a good start! You will need to excuse my ignorance here but I am a complete noob when it comes to photography. What exactly is an "F setting"? What does it do and how does changing it effect the picture? Also, why the long exposure time when taking the picture? What does this achieve that a short one doesn't? Does it just let more light in to make the picture brighter as Wouts implies? Sorry for the questions, I am sure I will have more as time goes by!! Cheers, Sam |
|
|
|
Post by deafpanzer on Jan 6, 2013 11:06:29 GMT -5
I am glad you started this thread. Improving my photo taking sessions is one of my goals this year. Planning to get one of those white photo tent that several members here use. I checked eBay and there are many items listed... local photo shop wants $99 for a set. Ouch!
|
|
|
|
Post by bullardino on Jan 7, 2013 9:58:37 GMT -5
You will need to excuse my ignorance here but I am a complete noob when it comes to photography. What exactly is an "F setting"? What does it do and how does changing it effect the picture? The F setting is the aperture of the diaphragm. Do you know how a camera works? To make it simple, the light coming from the lenses passes through a diaphragm and hits the sensor. The more you open a diaphragm the more the light passes. This means less depth of focus. A low F means a lot of aperture, a high F a very little of it. This means that if you have to take a picture of a small detail, a low F setting helps you to keep in focus only the detail you want to show. If you have a large diorama, instead, keeping a high F helps to keep everithing in focus. Yes, exactly so. Long times allow you to take pictures with less light. But this means also you will have to keep the camera steady with a tripod and by delaying the shoot with a timer. What we have just said implies one thing. That the couple F and T are strictly related. A higher F needs longer T, a lower F needs shorter T. Just put a model in front of the camera in manual mode and start playing with F and T to understand the relationship between them  |
|
venom1
Full Member
Member since: October 2012
Posts: 1,369
Oct 10, 2012 2:40:03 GMT -5
Oct 10, 2012 2:40:03 GMT -5
|
Post by venom1 on Jan 7, 2013 19:22:33 GMT -5
Thanks Luigi, that is a big help! I will have to set up my camera and start playing around with the settings as you suggest. Lots to learn, but I'm glad I have somewhere to start! Feel free to chime in with your experience lads, don't let Luigi and Wouts do all the work!  ;D Cheers, Sam |
|
thenylongag
Full Member
Sept2013 MoM Winner
Member since: June 2012
Yes, we have 'NO' bananas
Posts: 304
Jun 7, 2012 11:20:57 GMT -5
Jun 7, 2012 11:20:57 GMT -5
|
Post by thenylongag on Jan 8, 2013 11:35:02 GMT -5
My camera is a Canon Rebel XTI DSLR, this is a few years old so doesn't have any video capabilities, it has 10 MP.
I do use a tripod when photographing finished pieces with similar settings that the guys have mentioned, but most of my 'in progress' shots are hand held with the camera set in AV, which is aperture priority. An easy way to remember the difference between the different F stops is, if you change the setting to a fraction, this is how big the hole in the diaphragm is when you press the shutter, e.g. F4 means the diaphragm opens to 1/4 of its total area, so lots of light, F22 means only 1/22ND of the total area is exposed, not much light, so you must balance this with a slower or faster shutter speed.
My room isn't dark but the lighting isn't ideal so my ISO is set high, in old fashion terms this is the sensitivity of the film, 100 is not very sensitive, my camera only goes to 1600 but some of the newer ones go as high as 6400, this makes the image sensor very sensitive to light.
My settings in AV are usually :
ISO 1600
F4.5
The camera then sets the shutter to about 1/50 - 1/200 depending how much additional light comes in through the window, i normally have overhead fluorescent light only.
I have the light metering level set to average center weight
White balance to Auto.
and some times the exposure 1/3 above center.
This sounds complicated but the beauty of digital is you can play with the settings and get instant results. Experimentation is the key. A good exercise is to put the camera on totally automatic and look at the settings that it chooses for the shot, then go into manual and set everything the same then start to adjust the F stop, Shutter speed, ISO, metering levels & White balance and look at the difference, some times the differences are very small but sometimes they can be very surprising.
Last summer i did a class at the local collage in Basic DSLR Photography, 4 evenings of class room, 4 Saturday mornings of practical. Excellent fun, i learned a tremendous amount in a short time and now i really can get the best out of my camera by following a few simple rules, i highly recommend doing one.
Gag
|
|
|
|
Post by spud on Jan 8, 2013 12:16:29 GMT -5
I use Manual Settings on my Canon 5D MK II Every one will have there own way of shooting,
try use ISO 100-400 where possible Good lighting is a must.
If you dont have a flash then iso 1600 is where you are looking to go.
but my Settings are
iso 320
1/60 sec shutter speed
f/8
Auto White Balance works best for me
AEB Exposure compensation varies a stop up or down.
I use a flash also.
dont drop your f/stop below f/8 or some parts of you model will be out of focus this is fine in some cases tough.
I use a Large Sheet of Light Grey Card got from the Art store, you can get Graduated card also and this looks really good in pics.
A good tip also is to Shoot your first pic in Auto look at the settings it used in the info and set your camera up like that and play around with settings similar
|
|
venom1
Full Member
Member since: October 2012
Posts: 1,369
Oct 10, 2012 2:40:03 GMT -5
Oct 10, 2012 2:40:03 GMT -5
|
Post by venom1 on Jan 8, 2013 18:47:02 GMT -5
Wow, thanks Gag and Spud! That is some really helpful info right there! Some really good explanations of what things mean too. Looks like setting it to auto then matching the settings and playing around is the way to go. Looks like I have a really good starting point, so thanks so much guys! Hopefully my photos that I post from now on will start to look a little better each time! Cheers, Sam |
|
|
|
Post by spud on Jan 8, 2013 19:51:20 GMT -5
practice makes perfect Sam |
|
danb
Reviews member  March 2013 MoM Winner
Member since: November 2011
Posts: 2,808
Nov 17, 2011 9:22:52 GMT -5
Nov 17, 2011 9:22:52 GMT -5
|
Post by danb on Jan 12, 2013 4:24:05 GMT -5
Hey Sam i thought i would post up some pics of my DIY lightbox and set up the lightbox was made from white craft card 2 windows were made in the sides these were cut in for use of lighting to the side these were covered over by tracing paper to diffuse the lighting the lights can be used at the front also both ways give different results i use grey and white backgrounds. Lighting: i have 2 120W flood lights and a desk lamp these all have tracing paper diffusers. Camera: Canon 1100d +tripod Settings: Aperature priority, custom white balance , iso 100-400 also i take pics in darkness so you dont get other light sources interfering with your pics there is no set settings that are the best you just gotta point and shoot  Hope this helps you buddy. Pics of my set up 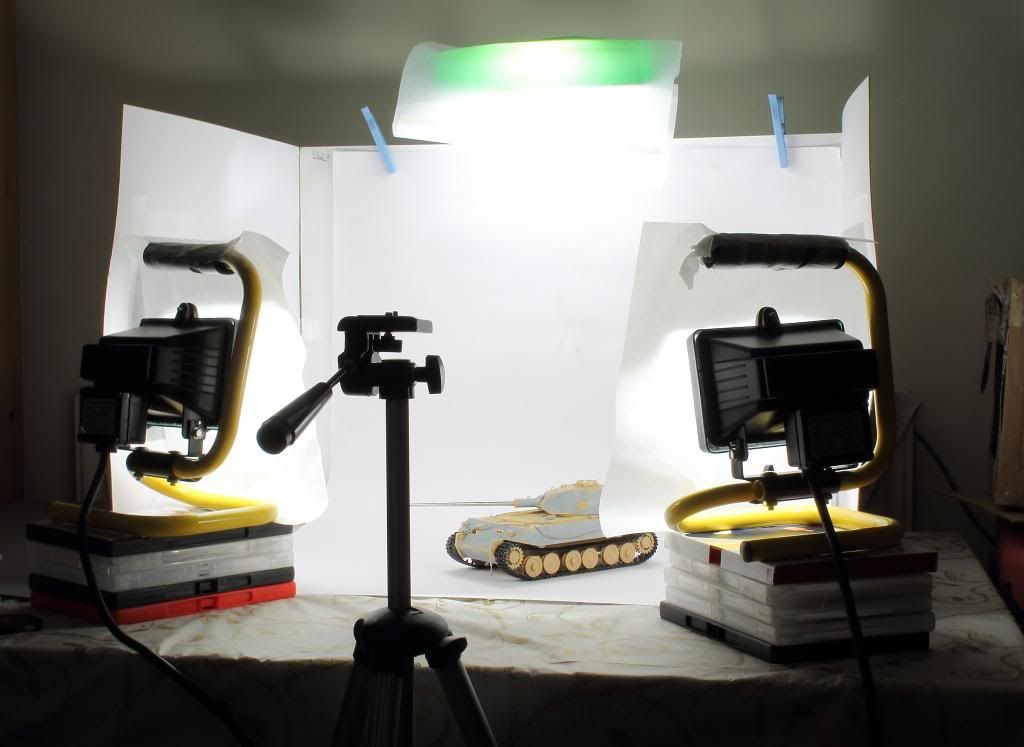  With the new set up im really pleased with the results of my photos now   Dan B |
|
|
|
Post by wouter on Jan 12, 2013 4:41:18 GMT -5
nice setup Dan, lovely custom made box...pitty I don't have the space for a permanent one, otherwise I would be trying that
See that you even used DVD or Playstation 2 boxes for the lighting ;D
Cheers
|
|
venom1
Full Member
Member since: October 2012
Posts: 1,369
Oct 10, 2012 2:40:03 GMT -5
Oct 10, 2012 2:40:03 GMT -5
|
Post by venom1 on Jan 12, 2013 10:14:06 GMT -5
Dan - thanks for that mate, that is a nice setup you have there! I may have to look at trying to cobble something similar together for myself. Great results too! Thanks for taking the time to sort out some photos of your setup, as they say, a picture speaks a thousand words, and yours are a big help! AmonTwo - thanks for your input, it's nice to see an additional perspective with equally impressive results! Natural light definitely adds a realism to the build that is not quite captured with artificial light! And it's good to know I don't have to go out and spend a bajillion dollars on a you-beaut flash camera! Thanks guys! Cheers, Sam |
|
|
|
Post by spud on Jan 12, 2013 10:16:51 GMT -5
nice setup Dan
|
|
|
|
Post by Mence on Jan 23, 2013 4:45:27 GMT -5
Mine is a cheap 'point and press' typically using the Macro setting taken against a black paper / card background.
Not very technical I know but you what you can with what you have...
|
|


 ;D
;D