paulh.
Senior Member
   
Member since: November 2011
build, fail, learn, succeed - ENJOY
Posts: 2,389
Nov 15, 2011 15:54:51 GMT -5
Nov 15, 2011 15:54:51 GMT -5
|
Post by paulh. on May 13, 2012 4:26:33 GMT -5
As my venerable, if somewhat inaccurateT-62A by Tamiya nears finishing I've decided to pull this one out of the stash; 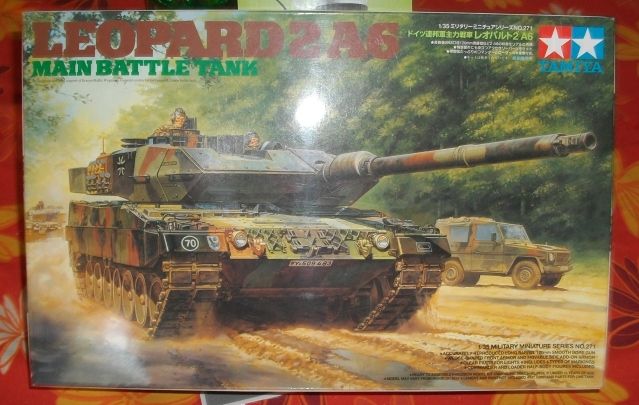 This going to be a straightforward out of box build- and more of a WiP than Blog- as I invariably forgt to take pictures at key stage  No AM or other add-ons (planned for the moment at least) with a more accurate rendition of NATO 3-tone than the 1A4 and by way of a change I'm considering a factory fresh finish(again -for the moment  ). Planning to get some pics up later on today. TTFN P ;D |
|
|
|
Post by 406 Silverado on May 13, 2012 7:43:42 GMT -5
Look forward to this Paul. What scale is it ?
|
|
|
|
Post by TRM on May 13, 2012 7:58:29 GMT -5
Count me in Paul!!!  |
|
martyncrowther.
Full Member
  
Member since: December 2011
Not Jaymes
Posts: 699
Dec 27, 2011 14:40:09 GMT -5
Dec 27, 2011 14:40:09 GMT -5
|
Post by martyncrowther. on May 13, 2012 9:31:51 GMT -5
Interesting choice Paul this should be most interesting!
|
|
paulh.
Senior Member
   
Member since: November 2011
build, fail, learn, succeed - ENJOY
Posts: 2,389
Nov 15, 2011 15:54:51 GMT -5
Nov 15, 2011 15:54:51 GMT -5
|
Post by paulh. on May 13, 2012 10:01:24 GMT -5
Nice to have you guys along. Rob -she's 1/35 and after a couple of hours this morinig I've realised its about as small as my eyes can cope with- I'veseroiusly struggled getting things into focus with towv hooks and the like- a bit worrying tbh.  I going to have to organise a visit to the optometrist later this week I think  P |
|
|
|
Post by robbo on May 13, 2012 10:07:31 GMT -5
Nice choice Paul, I love a factory finish too mate
|
|
|
|
Post by wbill76 on May 13, 2012 11:10:38 GMT -5
Sounds like a fun project Paul! Sometimes the OOB projects can be the most rewarding, look forward to seeing what you do with this one.
|
|
jackh.
Full Member
  
Member since: December 2011
Posts: 1,195
Dec 15, 2011 2:51:27 GMT -5
Dec 15, 2011 2:51:27 GMT -5
|
Post by jackh. on May 13, 2012 11:15:07 GMT -5
I'm in Paul.
|
|
paulh.
Senior Member
   
Member since: November 2011
build, fail, learn, succeed - ENJOY
Posts: 2,389
Nov 15, 2011 15:54:51 GMT -5
Nov 15, 2011 15:54:51 GMT -5
|
Post by paulh. on May 13, 2012 13:17:26 GMT -5
Cheers guys- great to have you all along!
P
|
|
|
|
Post by armorguy on May 13, 2012 14:01:22 GMT -5
A nice clean finish why not ? Something different for a change !
|
|
paulh.
Senior Member
   
Member since: November 2011
build, fail, learn, succeed - ENJOY
Posts: 2,389
Nov 15, 2011 15:54:51 GMT -5
Nov 15, 2011 15:54:51 GMT -5
|
Post by paulh. on May 14, 2012 15:52:49 GMT -5
For those expecting the ubiquitous sprue shot….. sorry to disappoint too keen and got stuck straight in  What you get in the box; 4 Sprues of –as always- wonderfully engineered and crisply moulded green styrene, including 2 fully duplicated sprues carrying running gear and other bits an pieces many of which are destined for the spares box. Additionally, you get both the L44 and L55 Rheinmetal 120mm so you’ve got options already! There are also 2 useful alignment jigs provided for the suspension arms to help ensure things dry true- similar to the one found in the Italeri Ia4 kit. A very useful inclusion that looks like it may be helpful for other non-Leo builds, though I’m not sure why it’s needed given Tamiya’s reputation for engineering & fit(?) Acetate for sights and periscopes Clear sprue with light lenses and crew goggles ¾ length commander & loader as well as the fully length commander form the original A5 molding String for tow hawsers- that is probably going to be replaced with some brass picture wire Horrible vinyl mesh that is meant for the turret baskets- I can never get on with this stuff so that’s probably up for a change as well -so much for out of box! Tamiya’s own vinyl band tracks- as with everything else – a good rendition of the real deal from what I can gauge. Build; After somewhat less than 2 hours: Running gear is in place, courtesy of the ubiquitous polycaps, and the rear hull plate is also completed. Attachment of this was a dream. The fit was so good that it virtually clipped into place and was held there by the tension of the plastic itself whilst I applied some Tamiya extra-thin. I’ve decided to leave off most add ons i.e. tools, lights etc until much later given my thumbs and current eye-sight! So there you have it- Tub sub-assembly complete(for now) 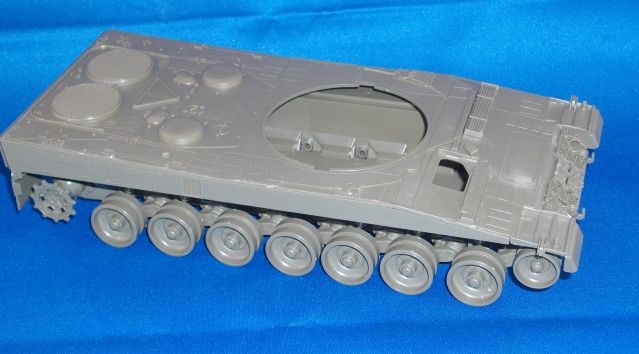 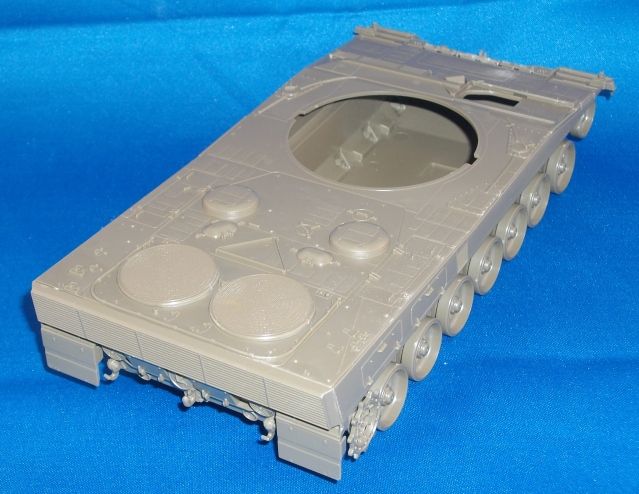 Hull top- couldn’t help myself with this tried a quick dry fix on the tub- oh boy I almost wet myself with delight- virtually clicked into place.!!! Why do other manufacturers over-engineer kits?? I know its each to their own and I will on occasion dig into something a bit more complicated myself but this has been a joyous reminder of why I do this –it’s to relax! Mini-rant over- back on track ;D Bases for lights, tow hooks, Glacis gausers, spare track and Fan covers… oooohhhhh 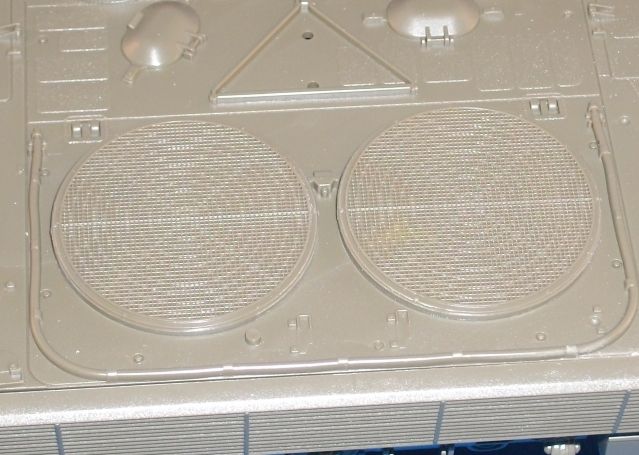 This should give you an idea of the quality of what’s on offer here; The Fan covers consist of a frame with a number of radial arms over which a fine mesh sits. Tamiya have managed this brilliantly in my humble opinion without reverting to either oversimplifying or resorting to PE. Picture below is a comparrison of the comparrable item from the ESCI 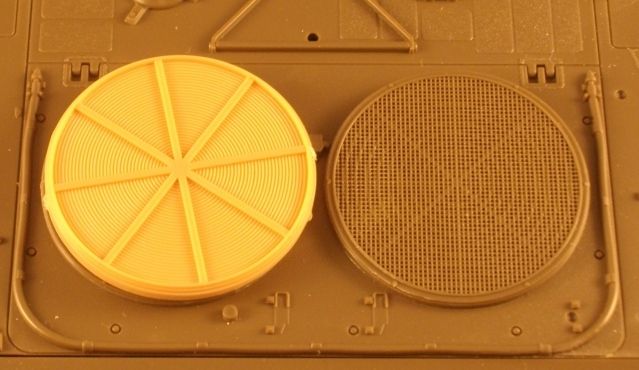 Clever design and moulding really gives the sense of the radial arms being below a mesh- I’m not sure that the pic does it justice tbh – but its there. So thats where I'm up to. ACW P |
|
rm6239.
Full Member
  
Member since: November 2011
Ross Moore
Posts: 252
Nov 19, 2011 5:04:13 GMT -5
Nov 19, 2011 5:04:13 GMT -5
|
Post by rm6239. on May 15, 2012 5:03:12 GMT -5
Paul, always had a soft spot for the Leopards so will be sitting in for this build mate.
cheers
Rossco
|
|
paulh.
Senior Member
   
Member since: November 2011
build, fail, learn, succeed - ENJOY
Posts: 2,389
Nov 15, 2011 15:54:51 GMT -5
Nov 15, 2011 15:54:51 GMT -5
|
Post by paulh. on May 15, 2012 13:31:39 GMT -5
Hi rossco, nice to have you along .
Hopefuly an update of some sort later tonight.
|
|
paulh.
Senior Member
   
Member since: November 2011
build, fail, learn, succeed - ENJOY
Posts: 2,389
Nov 15, 2011 15:54:51 GMT -5
Nov 15, 2011 15:54:51 GMT -5
|
Post by paulh. on May 15, 2012 15:27:11 GMT -5
Calm down..... Calm down.....Calm down....  Now onwards to the whole point of a tank: the big shooting thing in the big turn around thinggy . Unfortunately not much tonight - only time for some glue on the shooty thing and a dry fit of some of the turret panels. The L55 barrel goes together very cleanly- a very nice result for a two-piece moulding -what these guys would do with slide moulding....  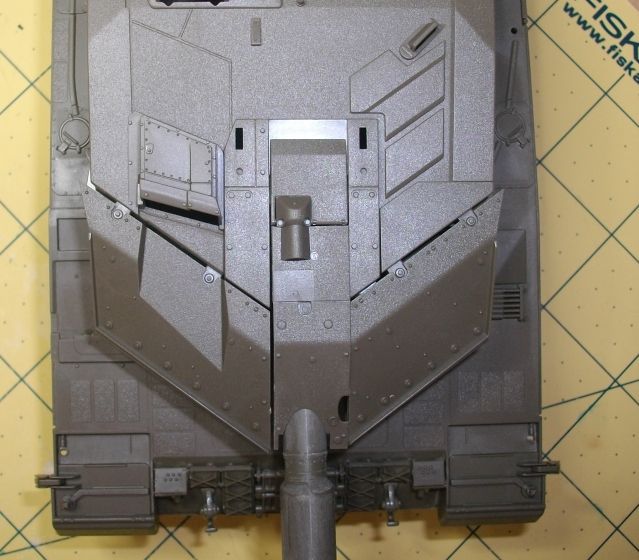 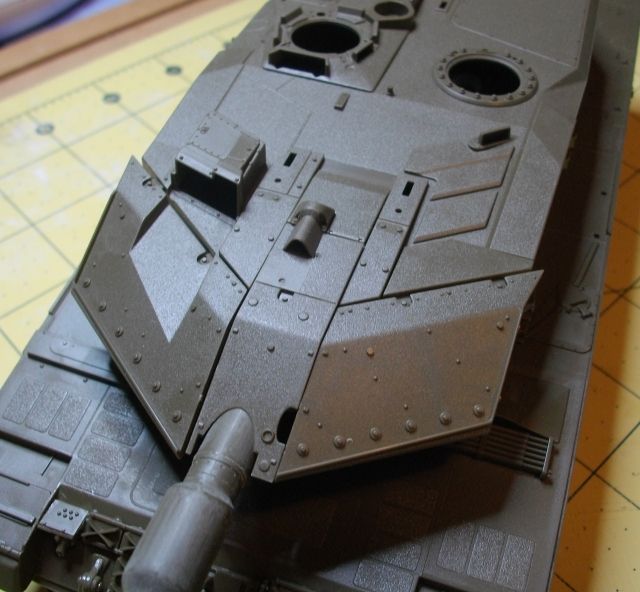 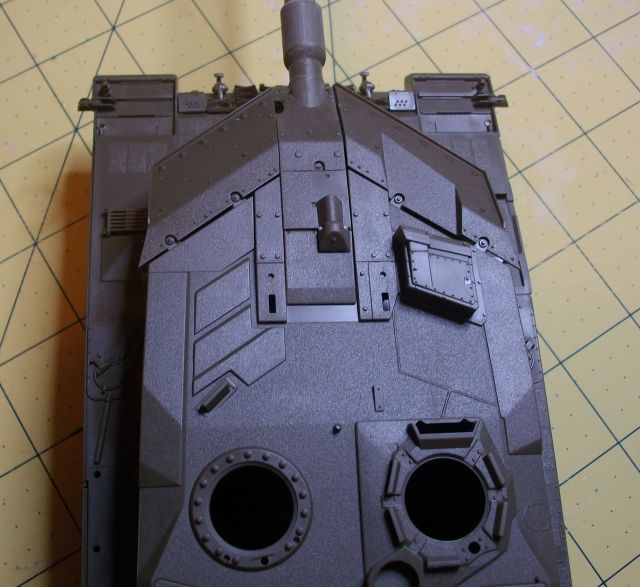 The gaps between the "cheek-armour" and turret propper are meant to be there so mental note to self: no filler  ;D Probably nothing new until the weekend now - so jackwagon...will you be ok...?  ;D  Laters peeps. P |
|
|
|
Post by spud on May 15, 2012 15:28:28 GMT -5
that is one big ass Turret
|
|
paulh.
Senior Member
   
Member since: November 2011
build, fail, learn, succeed - ENJOY
Posts: 2,389
Nov 15, 2011 15:54:51 GMT -5
Nov 15, 2011 15:54:51 GMT -5
|
Post by paulh. on May 15, 2012 15:37:21 GMT -5
Spud- you aint wrong my friend- and there's still stuff to add to it  jackwagon- its virtually the same kit  The A6 kit contains an extra sprue with the L-55 barrel and some additional bits. TTFN P |
|
jackh.
Full Member
  
Member since: December 2011
Posts: 1,195
Dec 15, 2011 2:51:27 GMT -5
Dec 15, 2011 2:51:27 GMT -5
|
Post by jackh. on May 15, 2012 15:51:27 GMT -5
Nice progress Paul, sounds like a "drop some glue in the box shake it and voila you have a Leo 2" ((LOL)). Looking good mate.
|
|
paulh.
Senior Member
   
Member since: November 2011
build, fail, learn, succeed - ENJOY
Posts: 2,389
Nov 15, 2011 15:54:51 GMT -5
Nov 15, 2011 15:54:51 GMT -5
|
Post by paulh. on May 15, 2012 16:25:28 GMT -5
LOL - one of these days jack I might try that with a Tamiya kit-
But seriously it is a true beaut- highly recommended!
P
|
|
danb.
Reviews member     March 2013 MoM Winner
Member since: November 2011
Posts: 2,808
Nov 17, 2011 9:22:52 GMT -5
Nov 17, 2011 9:22:52 GMT -5
|
Post by danb. on May 15, 2012 16:42:14 GMT -5
Nice work so far mate like what Spud said that turret is mahooooosive i do like a Leopard more please!!!!
Dan B
|
|
|
|
Post by wbill76 on May 15, 2012 19:19:18 GMT -5
Nice clean work so far Paul, looks like this one is coming together almost painlessly...the best kind of build!
|
|
paulh.
Senior Member
   
Member since: November 2011
build, fail, learn, succeed - ENJOY
Posts: 2,389
Nov 15, 2011 15:54:51 GMT -5
Nov 15, 2011 15:54:51 GMT -5
|
Post by paulh. on May 17, 2012 16:51:15 GMT -5
Cheers guys  Hopefully some bench time tomorrow/Saturday and some updates P |
|
martyncrowther.
Full Member
  
Member since: December 2011
Not Jaymes
Posts: 699
Dec 27, 2011 14:40:09 GMT -5
Dec 27, 2011 14:40:09 GMT -5
|
Post by martyncrowther. on May 18, 2012 10:07:39 GMT -5
Very nice work Paul  |
|
paulh.
Senior Member
   
Member since: November 2011
build, fail, learn, succeed - ENJOY
Posts: 2,389
Nov 15, 2011 15:54:51 GMT -5
Nov 15, 2011 15:54:51 GMT -5
|
Post by paulh. on May 24, 2012 8:48:24 GMT -5
Nice to see you on board here Eth, would agree with the fun statement- I really enjoy putting together any Tamiya kit tbh- hell I could even imagine myself building something from pre-1950 out a Tamiya box
I'm not sure this'll be up to the standard of the last of your Leo's I saw (2A6M IIRC) but hopefully it'll turn out half-decent.
TTFN
P
|
|
WigWag Workshop
Reviews member    
Member since: May 2012
"Keep The Glue On The Styrene"
Posts: 720
May 22, 2012 7:25:45 GMT -5
May 22, 2012 7:25:45 GMT -5
|
Post by WigWag Workshop on Jun 25, 2012 8:34:07 GMT -5
Looking Great! Will be watching for updates
-Steven
|
|
paulh.
Senior Member
   
Member since: November 2011
build, fail, learn, succeed - ENJOY
Posts: 2,389
Nov 15, 2011 15:54:51 GMT -5
Nov 15, 2011 15:54:51 GMT -5
|
Post by paulh. on Jun 25, 2012 10:06:14 GMT -5
I better get my finger out on this one I think!
P
|
|
paulh.
Senior Member
   
Member since: November 2011
build, fail, learn, succeed - ENJOY
Posts: 2,389
Nov 15, 2011 15:54:51 GMT -5
Nov 15, 2011 15:54:51 GMT -5
|
Post by paulh. on Jun 25, 2012 16:29:33 GMT -5
No pressure there then....
|
|
paulh.
Senior Member
   
Member since: November 2011
build, fail, learn, succeed - ENJOY
Posts: 2,389
Nov 15, 2011 15:54:51 GMT -5
Nov 15, 2011 15:54:51 GMT -5
|
Post by paulh. on Oct 14, 2012 15:44:40 GMT -5
An update of sorts: build almost complete 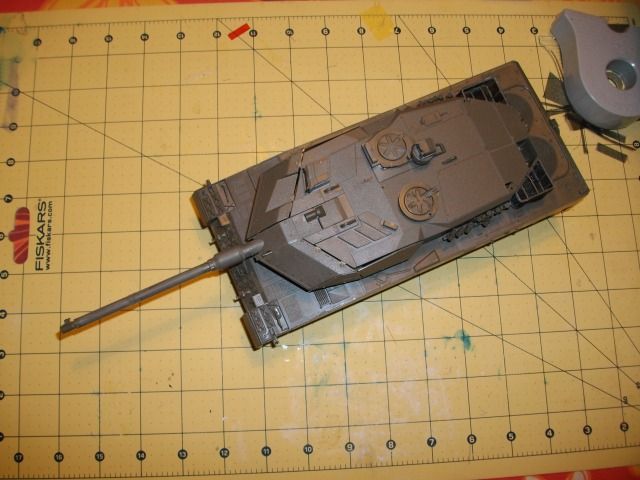 Paint time fast approaching  P |
|
paulh.
Senior Member
   
Member since: November 2011
build, fail, learn, succeed - ENJOY
Posts: 2,389
Nov 15, 2011 15:54:51 GMT -5
Nov 15, 2011 15:54:51 GMT -5
|
Post by paulh. on Oct 14, 2012 16:02:14 GMT -5
LoL ;D - yeah something like that...  Planning (!) a clean 3- tone with minimal weathering. P |
|
|
|
Post by wbill76 on Oct 14, 2012 16:55:20 GMT -5
Looking good paul, now on to paint!
|
|
paulh.
Senior Member
   
Member since: November 2011
build, fail, learn, succeed - ENJOY
Posts: 2,389
Nov 15, 2011 15:54:51 GMT -5
Nov 15, 2011 15:54:51 GMT -5
|
Post by paulh. on Jan 25, 2013 2:30:59 GMT -5
Yikes- just seen when I last updated this one- Sorry jackwagon
Well , just when you thought it was safe to go back in the water....
I have been (very ) slowly picking away at this on All Major sub-assemblies are now complete only the stuff likely to be bashed by my clumsy fingers still to be attached.
Whilt this was generally a breeze, the one thing that really caused me a problem was the turret stowage baskets.
The nylon mesh Tamiya give you is rearly cut straight in my experiencece and when you try to cut it to shape it just unravels. Additionally, while Mr T provides a template in the instructions there are fiddly little notches and angles that just make this unravelling all the more likely. After a bit of thought I came at it in the following way: The base was cut oversize and then secured with CA. Once safely cured I then cut the side mesh. One end - that would but up against the turret side -was secured with CA and then, slowly, as it cured I worked my way around with spots of CA finishing again on the "turret-side" of the basket. As I didn't have enough length in the mesh( due to an earleir failed attempt) this came up a little short on the "inside". However this is out of sight and therefore isn't a problem me.
the optics, periscopes etc have al been painted with Tamiya Clear Red to represent the laser-protection layer seen. Masked with liquid mask and ready to start painting soon(ish) -well less than 6 months anyway.
Some pictures later- promise!
TTFN
P
|
|