|
|
Post by Tojo72 on Dec 11, 2012 11:06:08 GMT -5
Nice detailing on that Jaymes
|
|
|
|
Post by wbill76 on Dec 11, 2012 20:45:55 GMT -5
December is the best time for model building Martyn, I can see why it was hard to wait until January to get going on this one!
|
|
martyncrowther.
Full Member
  
Member since: December 2011
Not Jaymes
Posts: 699
Dec 27, 2011 14:40:09 GMT -5
Dec 27, 2011 14:40:09 GMT -5
|
Post by martyncrowther. on Dec 12, 2012 8:34:26 GMT -5
Thanks Bill  |
|
Jaymes Crowther.
Full Member
  
Member since: November 2011
I've rekindled my passion for Israeli armour wahooo....
Posts: 206
Nov 16, 2011 6:21:11 GMT -5
Nov 16, 2011 6:21:11 GMT -5
|
Post by Jaymes Crowther. on Dec 17, 2012 10:39:02 GMT -5
Prof disaster? I've got it so it could end up in one! Spud do it mate you'll not regret it. Gary Thanks its nice to do something 1/35th Tojo72 Thanks sir! Dicky I agree I've got it easy as Mence is a fine builder although I doubt he'll admit that! Bill Wrong twin but thank you  ~well I spent an hour or so getting the tracks finished and added some paint..Well primer I thought it would be easier as the running gear is all added before I paint it.  I'm going to get on with the front fenders and finish up the hull before I fit the anti-slip. Oh What joy.. comments welcome. Jaymes
|
|
Deleted
Member since: January 1970
Posts: 0
Dec 2, 2024 3:02:35 GMT -5
Dec 2, 2024 3:02:35 GMT -5
|
Post by Deleted on Dec 17, 2012 12:19:49 GMT -5
Good going .  |
|
jackh.
Full Member
  
Member since: December 2011
Posts: 1,195
Dec 15, 2011 2:51:27 GMT -5
Dec 15, 2011 2:51:27 GMT -5
|
Post by jackh. on Dec 17, 2012 16:48:25 GMT -5
Nice work Jaymes, good to see this moving again.
|
|
|
|
Post by wbill76 on Dec 17, 2012 21:25:58 GMT -5
Sorry about that Not Martyn! ;D Am sure you'll handle the anti-slip with flying colors.
|
|
|
|
Post by wouter on Dec 18, 2012 0:31:30 GMT -5
aha, can't hurt to see the Merkava continue...nice resin buckets mate, chain is a nice addition
Cheers
|
|
|
|
Post by 406 Silverado on Dec 18, 2012 7:38:01 GMT -5
Nice work on the running parts Jaymes. Good that te tracks got done first
|
|
Deleted
Member since: January 1970
Posts: 0
Dec 2, 2024 3:02:35 GMT -5
Dec 2, 2024 3:02:35 GMT -5
|
Post by Deleted on Dec 18, 2012 7:55:22 GMT -5
This is coming on nicely fella! It's the sort of build that makes you want to go out and buy one of the beggers:-D
|
|
Jaymes Crowther.
Full Member
  
Member since: November 2011
I've rekindled my passion for Israeli armour wahooo....
Posts: 206
Nov 16, 2011 6:21:11 GMT -5
Nov 16, 2011 6:21:11 GMT -5
|
Post by Jaymes Crowther. on Mar 9, 2013 13:58:42 GMT -5
MMMMMMM Anti-Slip!...... Yer right! Well I've managed to get going on the last few details on the hull and the bit I have been looking forward to getting on with the Anti-slip so I can get to start painting the tank. I am using a method a friend of mine put on Facebook. The idea of using the Tamiya Diorama texture paint. Well this is the plan to use the Light Sand Grit effect. ![]() i1358.photobucket.com/alb i1358.photobucket.com/albums/q765/Gronk6981/Merkava%203D/P1010238_zps7dd629e8.jpg[/IMG] Using my Desert Eagle Merkava 3D book which I feel has a weak spot with showing you where the Anti Slip goes around the turret and the rear of the tank. Still on wards I started to stipple on the texture paint all over the hull trying not to loose the detail. It doesn't matter if it does because this stuff dries tacky so you can scrap and work it off the detail. I have worked out that its going to take three coats to get the effect I want which I will be happy with. 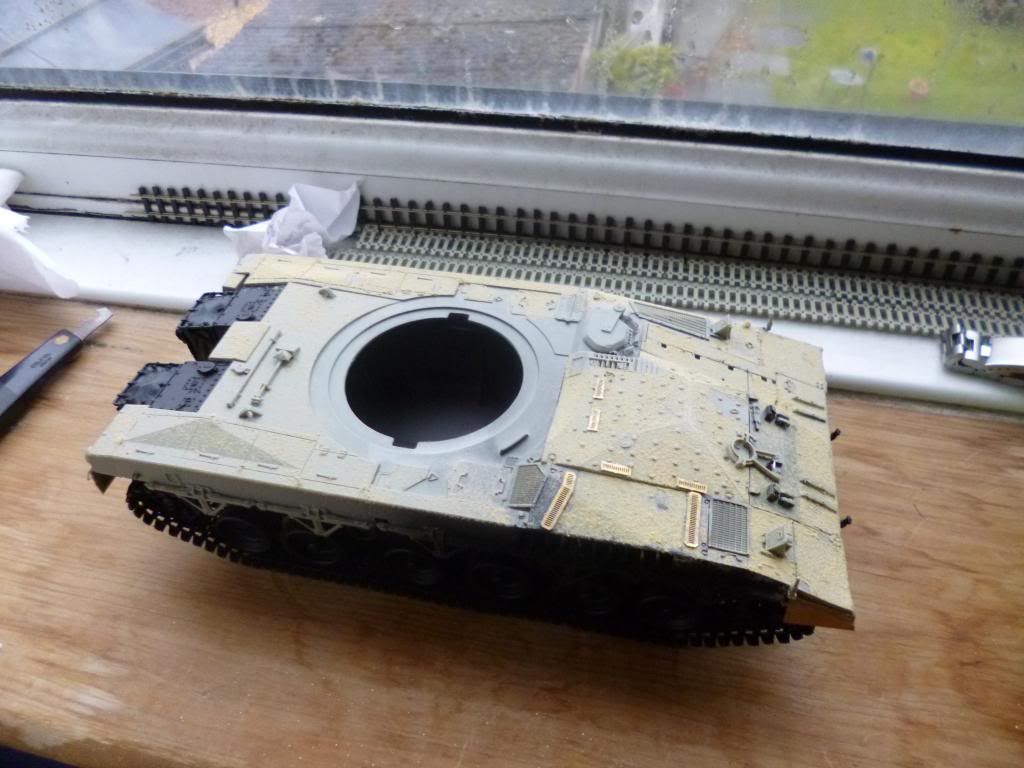 So far I've managed to get two coats on the most part of it and this is where I am currently at with the Anti slip.. 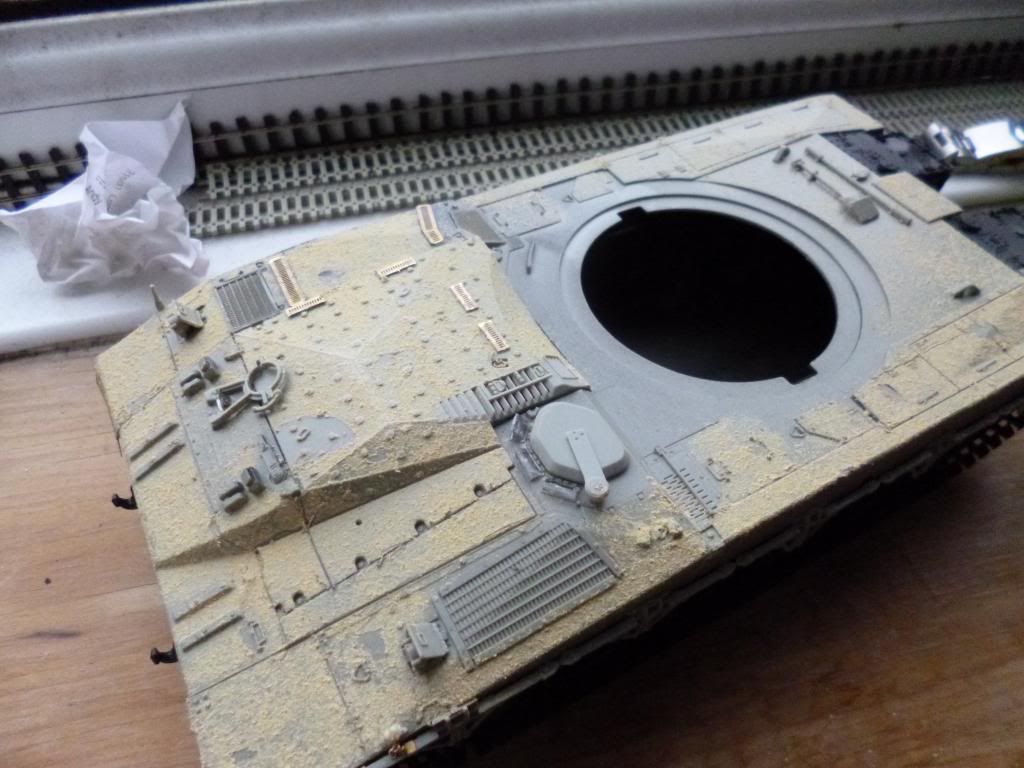 It looks a bit rough and the stowage lockers need re scribing which is nothing really. I'll get the last coat on tomorrow hopefully if not Monday then I will get going on the turret. Also I have scraped bits off judging from photo's the anti slip wares off quite easily.. 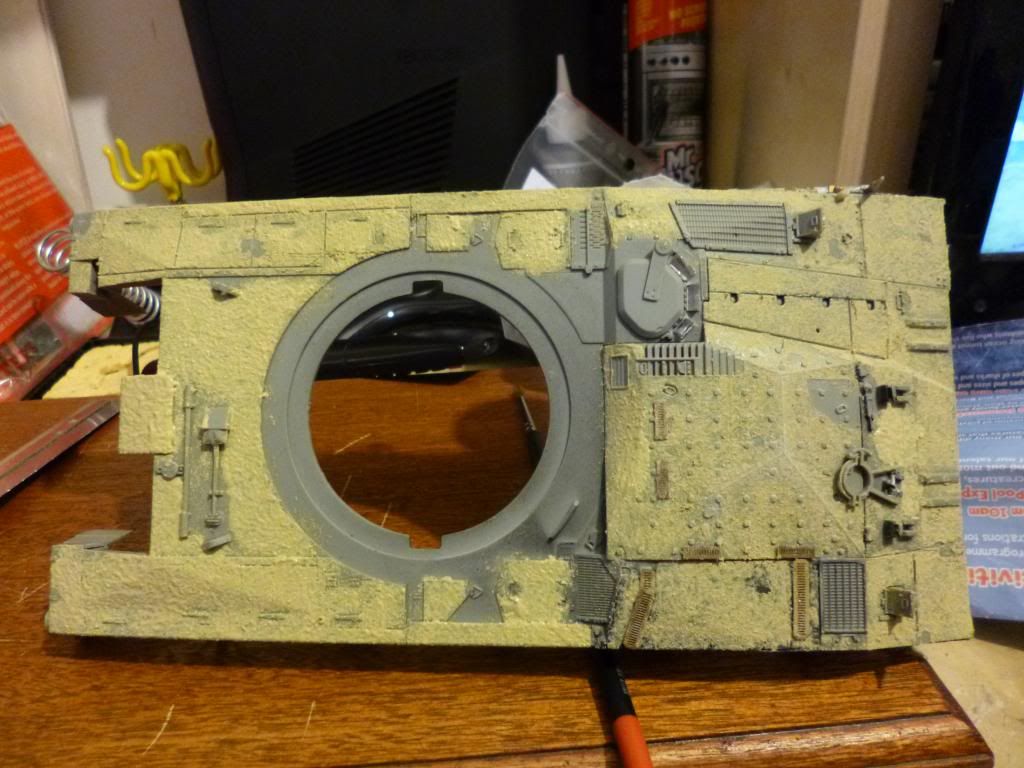 Comments welcome Jaymes |
|
|
|
Post by Leon on Mar 9, 2013 14:16:38 GMT -5
jaymes that looks sweet.Anti slip looks cool.  |
|
|
|
Post by rbaer on Mar 9, 2013 15:48:17 GMT -5
I've stumbled upon this and will follow.....closely. Prof, that sux about losing your modeling space. I went through the same thing a few years back, the scars are about gone now.....
Maybe I'll get motivated to do the Acad/Legends/Friul MkIII I have in the stash. Maybe. As soon as I finish the MkII I started about 3 years ago.
Man, I need to thin the stash, it's giving me a complex.
|
|
|
|
Post by wbill76 on Mar 9, 2013 20:09:03 GMT -5
Nice work on the anti-slip, good to see this one moving along once more!
|
|
|
|
Post by bbd468 on Mar 13, 2013 11:27:00 GMT -5
Hiya Jaymes, Great to see ya goin at this Meng Merk...note pad at the ready buddy! Nice job on the Anti slip...cant be easy. Lookin sharp brotha!  Gary |
|
Jaymes Crowther.
Full Member
  
Member since: November 2011
I've rekindled my passion for Israeli armour wahooo....
Posts: 206
Nov 16, 2011 6:21:11 GMT -5
Nov 16, 2011 6:21:11 GMT -5
|
Post by Jaymes Crowther. on Jan 1, 2014 17:30:52 GMT -5
It seems only seems last year I posted on this build.. Joke over ;-) Construction is now complete on this beast. It has been somewhat of a slog with the build. It has some really overly engineered in places such as the turret machine guns, sights and the way the turret goes together in general. I’ve added some homemade improvements and some bits from the Legend update set the plan is to have the Merkava going to the maintenance depot with a female instructor at the commander's station hence the open commanders hatch. I’m aiming to pick some primer up tomorrow then some paint will be applied on Friday. 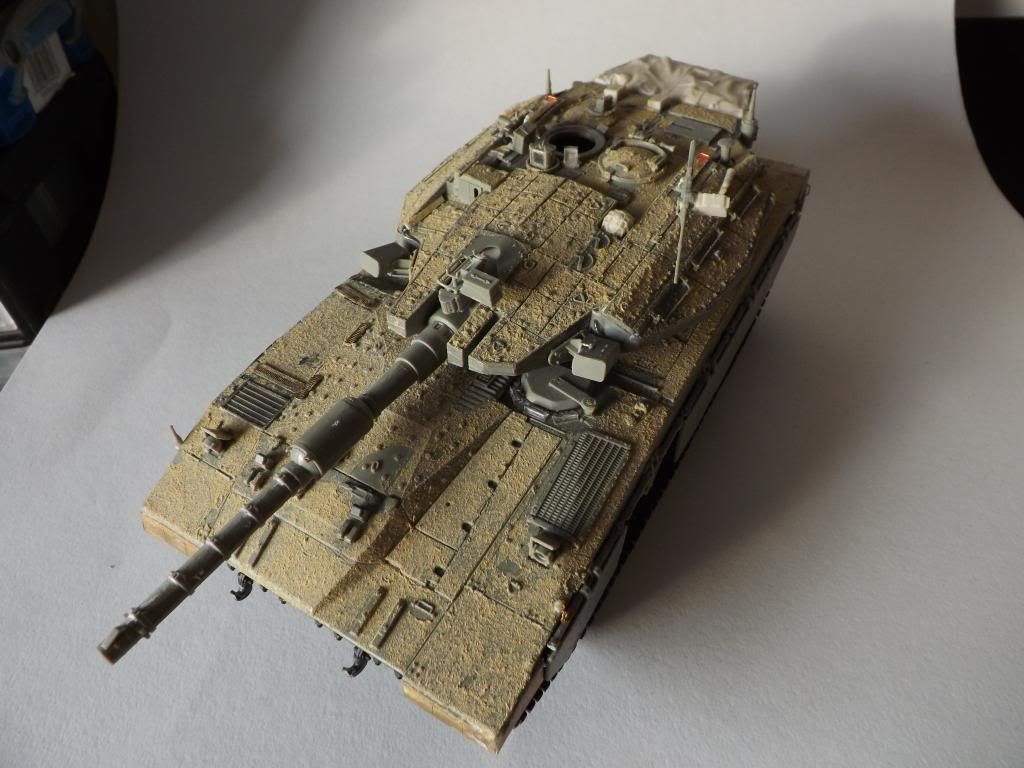  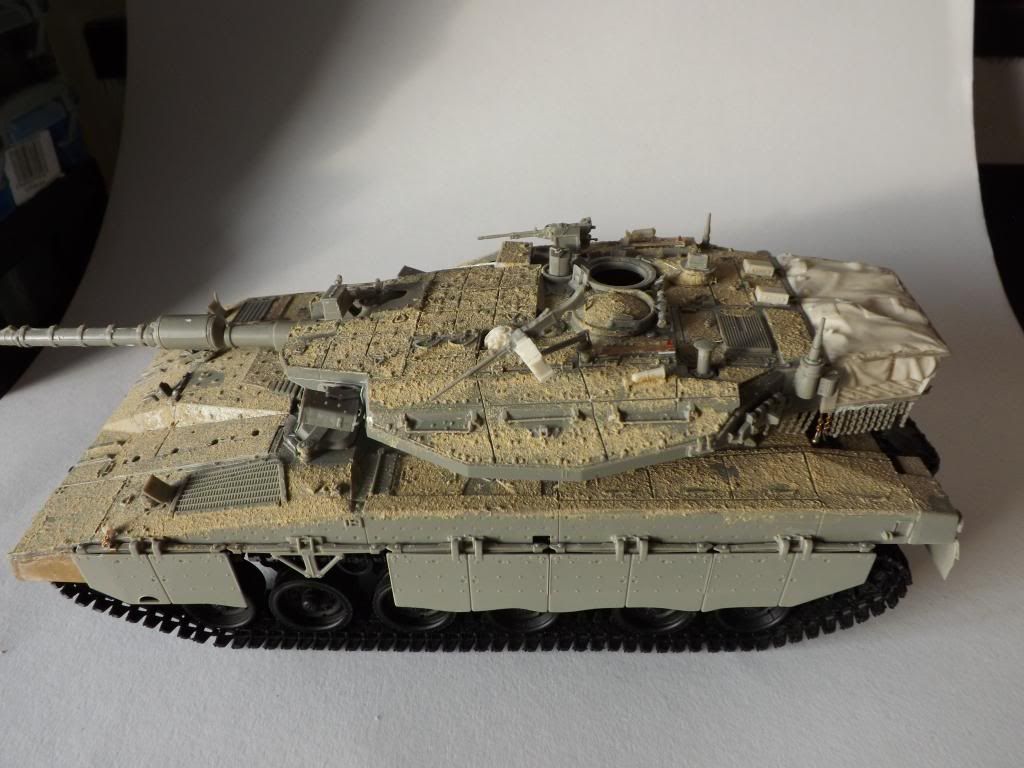 As seen above the missing side skirt is so that maintenance can be done to the running gear of this beast. 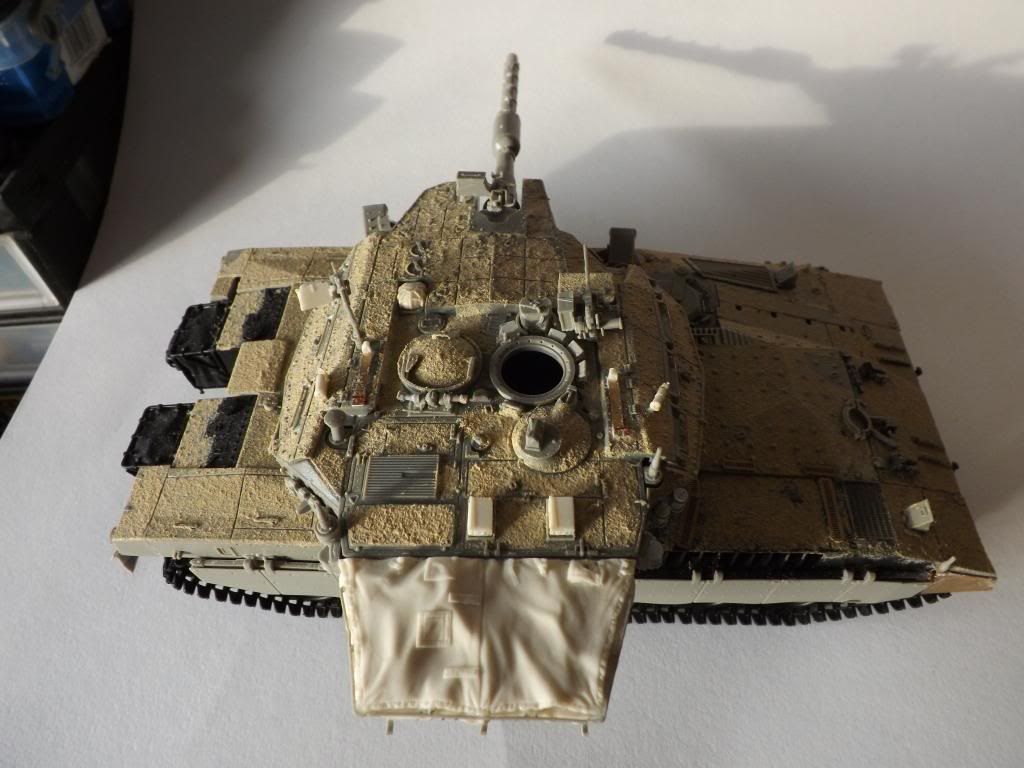 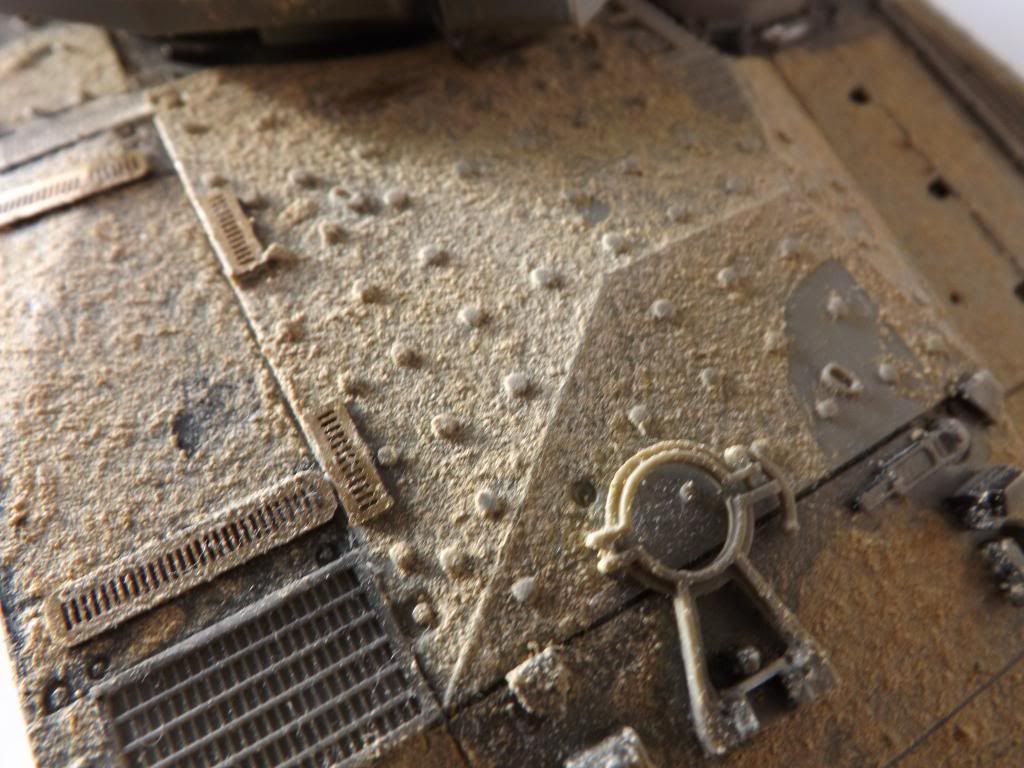 close of up the anti slip which was Tamiya's diorama pot Sand texture.. 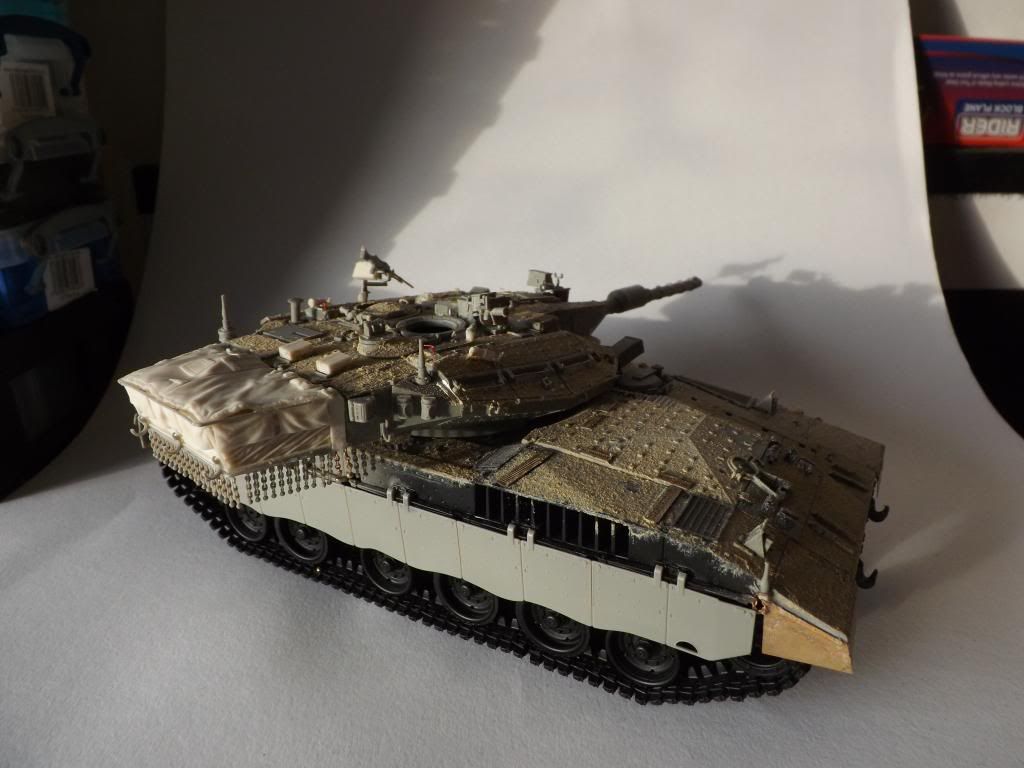 if you look at the resin basket I've had to add two pieces of ball and chain where mixing the plastic ball and chain and the resin turret has left a gap. I've managed to come up with a good technique with making ball and chain which will be revealed in my next build...comments are welcome it feels weird being building 1/35th again after a long absence it has got my juices flowing for 1/35th and Israeli subjects. Next update we will see some primer on the remaining aspects of the kit. Comments niggles or moans welcome Jaymes |
|
|
|
Post by bbd468 on Jan 1, 2014 18:27:44 GMT -5
Hiya Jaymes, the Merk looks mighty fine fella! Great to see this headed for paint soon. Keep it comin buddy!  |
|
|
|
Post by Leon on Jan 1, 2014 18:44:46 GMT -5
Awesome work on the anti-slip and added detail bits Jaymes  .Looking forward to primer and paint.  |
|
|
|
Post by deafpanzer on Jan 1, 2014 20:35:25 GMT -5
Good having you back! Love the rough texture... guys were telling me that Merkava had the roughest surface out of most modern armors.
Looking forward to next update...
|
|
Jaymes Crowther.
Full Member
  
Member since: November 2011
I've rekindled my passion for Israeli armour wahooo....
Posts: 206
Nov 16, 2011 6:21:11 GMT -5
Nov 16, 2011 6:21:11 GMT -5
|
Post by Jaymes Crowther. on Jan 1, 2014 23:16:54 GMT -5
Alreet Neems! Great to hear from you. Yes the set is fine for the Merkava Baz although there are some physical differences the set just covers generic items I must admit Its got some great details. One thing to watch if you use the resin stowage basket your gona have to add your own ball and chain bits to the basket because the plastic ones don't allow for the two missing ball and chain on the mount of the stowage bin so you have to make four ball and chains, two for each side. I'll post a pic tomorrow if what I wrote makes no ferkin sense ha. I had clocked you have plans for this bird with a D9? I've got the D9 on me cards once I finish this beauty. Thanks for stopping by mate. Gary thanks mate. Its good to have some momentum with this shelf queen... Leon I must admit sometimes I prefer the painting stage to the building stage, its not often it happens but I think this is one of those moments. Andy cheers mate yer its fugly anti slip compared to NATO forces. I've also seen where the anti-slip has worn off! Some really great modelling possibility. Here's a cruel close up of a Merk IV 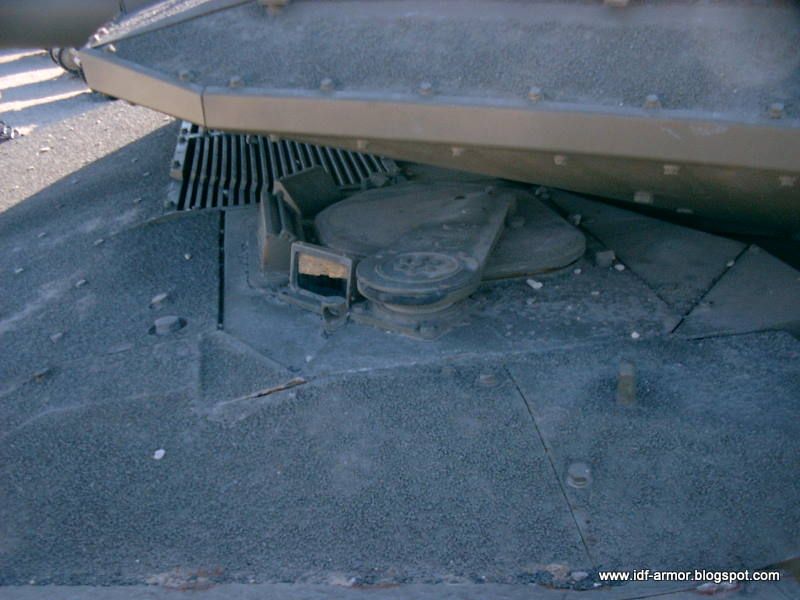 Some more photo's tomorrow hopefully of some primer... Jim |
|
Deleted
Member since: January 1970
Posts: 0
Dec 2, 2024 3:02:35 GMT -5
Dec 2, 2024 3:02:35 GMT -5
|
Post by Deleted on Jan 2, 2014 5:37:29 GMT -5
Hi Jaymes,
Just catching up with this and it looks like an awesome kit. That anti slip adds to it big time.
mack
|
|
|
|
Post by rbaer on Jan 3, 2014 11:16:24 GMT -5
Looking good! I admit to being intensely curious about your ball and chain technique. I'm to the point where if one of the AM companies would market a "pre-fab" set I'd be all over it, more than once.
|
|
heico
Full Member
  
Member since: November 2013
Posts: 246 
|
Post by heico on Jan 3, 2014 13:34:37 GMT -5
Somehow i've missed this one. Im curious about how it looks like with the colour on.
|
|
Jaymes Crowther.
Full Member
  
Member since: November 2011
I've rekindled my passion for Israeli armour wahooo....
Posts: 206
Nov 16, 2011 6:21:11 GMT -5
Nov 16, 2011 6:21:11 GMT -5
|
Post by Jaymes Crowther. on Jan 3, 2014 17:27:14 GMT -5
Hi Mack thanks mate. It does doesn't it? It certainly brings the build together. Hey Russ Its simple once you get to it. it involves a piece wood. 0.6mm, some thin wire and the legend ball and chain set. Thanks Heico. You can see it now. Update time: primer has been applied to the remaining area's 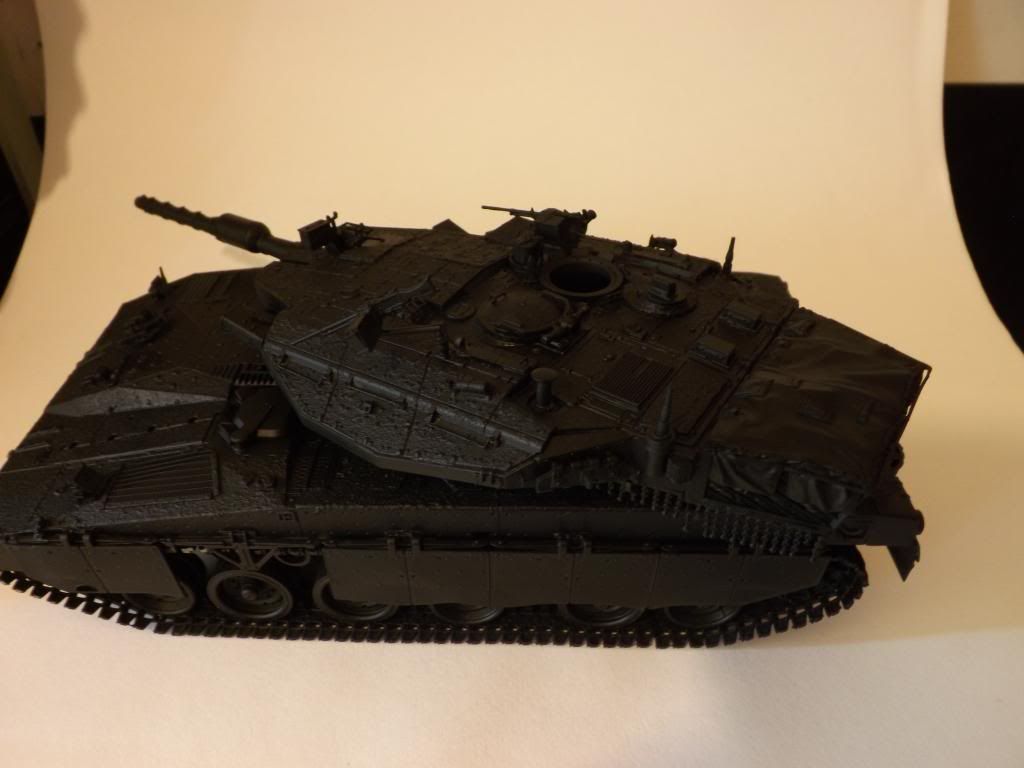 Then this morning I applied some paint. Still drying I apologise for the quality of my photos I need to source some new lamps and daylight bulbs. 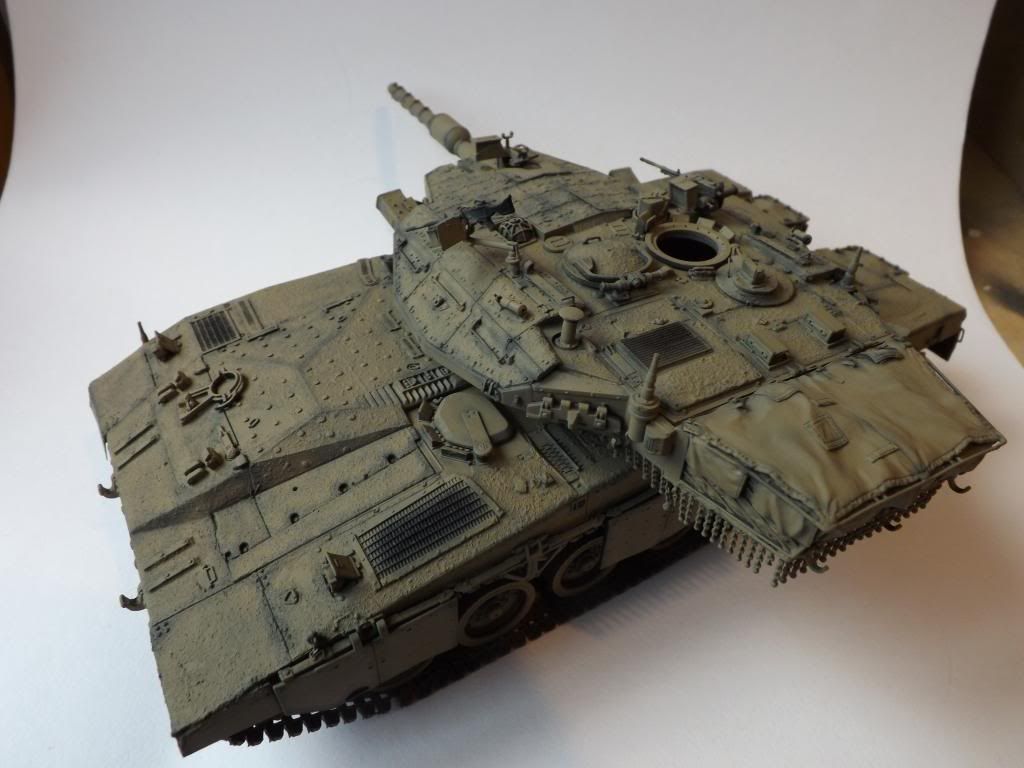   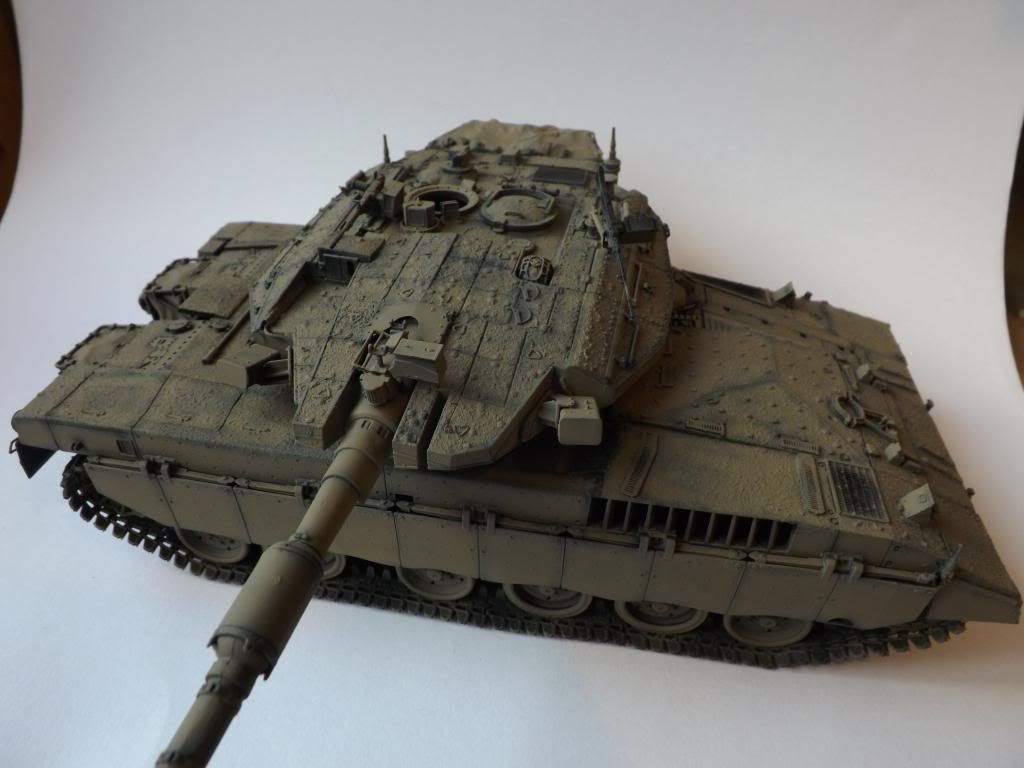 Comments are welcome Jim |
|
Jaymes Crowther.
Full Member
  
Member since: November 2011
I've rekindled my passion for Israeli armour wahooo....
Posts: 206
Nov 16, 2011 6:21:11 GMT -5
Nov 16, 2011 6:21:11 GMT -5
|
Post by Jaymes Crowther. on Jan 3, 2014 17:42:48 GMT -5
Lol Thanks jackwagon. we crossed posts somehow. Should find them cheap in the UK.
Jaymes
|
|
Deleted
Member since: January 1970
Posts: 0
Dec 2, 2024 3:02:35 GMT -5
Dec 2, 2024 3:02:35 GMT -5
|
Post by Deleted on Jan 4, 2014 4:12:34 GMT -5
nice paint work so far like the pre shade is working well
|
|
heico
Full Member
  
Member since: November 2013
Posts: 246 
|
Post by heico on Jan 4, 2014 5:29:40 GMT -5
If you put color on this tank it immediately shows what a kick-ass-machine it is! What color did you use?
|
|
Jaymes Crowther.
Full Member
  
Member since: November 2011
I've rekindled my passion for Israeli armour wahooo....
Posts: 206
Nov 16, 2011 6:21:11 GMT -5
Nov 16, 2011 6:21:11 GMT -5
|
Post by Jaymes Crowther. on Jan 4, 2014 14:21:14 GMT -5
Thanks Pete Its worked a lot better than I planned It will darken once I add filters.
Heico, its a beast right? Its Humbrol 84 the closest match for anything from 1980 to modern day IDF vehicles.
jackwagon we have the same thinking I wanted to detail paint instantly but sadly I can't because its enamel it takes at least a day to dry fully and was still tacky when I went to bed. Its always good to leave it a couple of days because the colour darkens as it drys which is great as I was worried it was too light but its getting there. BTW have you tried the Lifecolour IDF set yet? I'll get detail painting in the morning and some pictures.
Jim(NM)
|
|
Deleted
Member since: January 1970
Posts: 0
Dec 2, 2024 3:02:35 GMT -5
Dec 2, 2024 3:02:35 GMT -5
|
Post by Deleted on Jan 5, 2014 6:10:47 GMT -5
That looks firkin outstanding, simples. great start to the paint process!
|
|
|
|
Post by wbill76 on Jan 5, 2014 12:34:03 GMT -5
That looks awesome under paint Jaymes, love the look of the contrasts and especially the tarp covered bustle bin.
|
|