afvfan
Senior Member
   
Member since: December 2012
Bob
Posts: 1,772
Dec 10, 2012 17:32:38 GMT -5
Dec 10, 2012 17:32:38 GMT -5
|
Post by afvfan on Dec 16, 2012 19:54:36 GMT -5
This was the Porsche entry for the Tiger I project. A total of five prototypes were built, but only one is known to have reached combat status. The base Dragon kit is pretty well done. In addition to it, I've added Eduard PE zim and am in process of finishing up the Voyager PE set. There's still a bit of work before she'll be ready for paint. I don't quite know what finish I'll be doing to it. I have pretty much decided not to do the actual "003" combat veteran (if for nothing else than to just avoid the rivet counters).     Comments are, as always, welcome. |
|
|
|
Post by spud on Dec 16, 2012 20:05:40 GMT -5
No Rivet counters here  Fine looking Tigy and nice bit o Bling to go with it  |
|
|
|
Post by wbill76 on Dec 16, 2012 20:20:00 GMT -5
Ooooo, very nice set up on this one. Looking forward to more.
|
|
|
|
Post by TRM on Dec 16, 2012 20:38:51 GMT -5
LOL..no one to pick on you for what you want to build...your choice!!  This is smokin' BTW!! Love all the shinny stuff....heck, even like the Zimm (and I am not a fan of it) Well done!!! |
|
|
|
Post by deafpanzer on Dec 16, 2012 20:43:02 GMT -5
Great job on the brass Zimm!!! Am always learning something... didn't know they applied Zimm on a protocol model for combat.
Looking forward to see how it comes out!
|
|
|
|
Post by eastrock on Dec 16, 2012 21:07:27 GMT -5
lotsa Bling, I'm with the Guys and I agree with T, build what you want Man  Happy Holidays!!! |
|
afvfan
Senior Member
   
Member since: December 2012
Bob
Posts: 1,772
Dec 10, 2012 17:32:38 GMT -5
Dec 10, 2012 17:32:38 GMT -5
|
Post by afvfan on Dec 16, 2012 21:24:54 GMT -5
Thanks for all the positive comments. The main things yet to be installed are the ends of the fenders. and cleaning rod tube. This one has taken a while to get to this point. All that PE has gotten me cross-eyed on more than a couple occasions  I'll update this as things move on, but I've also got 4 other kits on the bench, so it may be a bit. I did want to get a few pics of this out before the primer went on. Spud - there may not be any counters here, but you know they're out there!  T - the PE zim wasn't my first choice, but I didn't want to do it by hand this time and couldn't afford the good stuff. I think it'll look alright once the paint is on.... other than maybe the mismatched escape hatch door. I had to rob that out of the parts bin to replace the pistol port. DEAF - (am I speaking loud enough  ) As far as I know only the one tank that made it into combat got the zim. Another of the 5 prototypes was rumored to have been upgraded to the same specs, but there's no record of it going out to fight. |
|
Deleted
Member since: January 1970
Posts: 0
Nov 26, 2024 9:08:55 GMT -5
Nov 26, 2024 9:08:55 GMT -5
|
Post by Deleted on Dec 16, 2012 22:57:25 GMT -5
Rivet counters , i havent been here long but from what i've seen so far them people dont get any backing here . And man that zim is really looking cool  |
|
afvfan
Senior Member
   
Member since: December 2012
Bob
Posts: 1,772
Dec 10, 2012 17:32:38 GMT -5
Dec 10, 2012 17:32:38 GMT -5
|
Post by afvfan on Dec 17, 2012 16:42:00 GMT -5
It's refreshing to come to a place where the counters aren't lurking around every corner, as on some sites. I've always been pretty interpretive in my work and have had many lively "discussions" about various paint schemes and other modifications that I've done.
Dicky - thanks for the PM. I addressed it and hope I have the issue sorted.
|
|
|
|
Post by deafpanzer on Dec 17, 2012 17:11:15 GMT -5
LOL! Trust me no matter how loud you shout I will never be able to HEAR you at all. This is something I am always grateful of... can't hear anybody hollering or screaming especially crying babies which I was told they can be so annoying. LOL
Now this explains why I often see Edurdo Zimm set on eBay for Tiger I (P) and always made me wonder about this. I have same Dragon kit in stash... of course don't expect me to build it soon as I have about 60 kits and I build only four or five a year if I am lucky.
|
|
|
|
Post by bbd468 on Dec 17, 2012 19:59:58 GMT -5
Wow!!! That a sweet build there fella! That would hurt my feelin' to have to paint over that! ;D Nice job!  Gary |
|
afvfan
Senior Member
   
Member since: December 2012
Bob
Posts: 1,772
Dec 10, 2012 17:32:38 GMT -5
Dec 10, 2012 17:32:38 GMT -5
|
Post by afvfan on Dec 17, 2012 20:59:49 GMT -5
The PE zim is a little thick, but isn't to bad to work with. The only thing I wish I had thought of was doing damaged areas before I mounted it. I'm afraid the vibration of a dremel is going to knock off a bunch of the little bits if I tried to do any now.
Thanks Gary. I guess I could just paint the plastic areas a nice patinaed bronze, slap the decals on, and call it the steampunk version. ;D
|
|
danb.
Reviews member     March 2013 MoM Winner
Member since: November 2011
Posts: 2,808
Nov 17, 2011 9:22:52 GMT -5
Nov 17, 2011 9:22:52 GMT -5
|
Post by danb. on Dec 18, 2012 3:15:49 GMT -5
Really liking the Tiger prototype buddy have been studying these beasts lately for my upcoming build in 2013 of a Hintern VK45 thats if Santa turns up trumps!!  great use of Pe that Zimm looks awesome cant wait to see it in paint. DanB |
|
|
|
Post by 406 Silverado on Dec 18, 2012 7:33:17 GMT -5
Man that is a ton of metal on that baby. Add some fruils and she weighs as much as the real thing...........lol
Superb work there Bob, PE zimm....wow
|
|
afvfan
Senior Member
   
Member since: December 2012
Bob
Posts: 1,772
Dec 10, 2012 17:32:38 GMT -5
Dec 10, 2012 17:32:38 GMT -5
|
Post by afvfan on Dec 18, 2012 13:12:55 GMT -5
I can't wait either, because that'll mean the build will be done! This thing has had entirely too much bench time already.
Thanks Rob. Wish I could afford the Fruils. I may go with an aftermarket set of individual links, but the molding on the kit tracks is good enough to make them work in a pinch. If nothing else, I'll follow the basic armor premise that if you can't make it look right, add more mud! ;D
|
|
afvfan
Senior Member
   
Member since: December 2012
Bob
Posts: 1,772
Dec 10, 2012 17:32:38 GMT -5
Dec 10, 2012 17:32:38 GMT -5
|
Post by afvfan on Dec 19, 2012 0:26:03 GMT -5
Here's a minor update.... I got the fender ends mounted..... 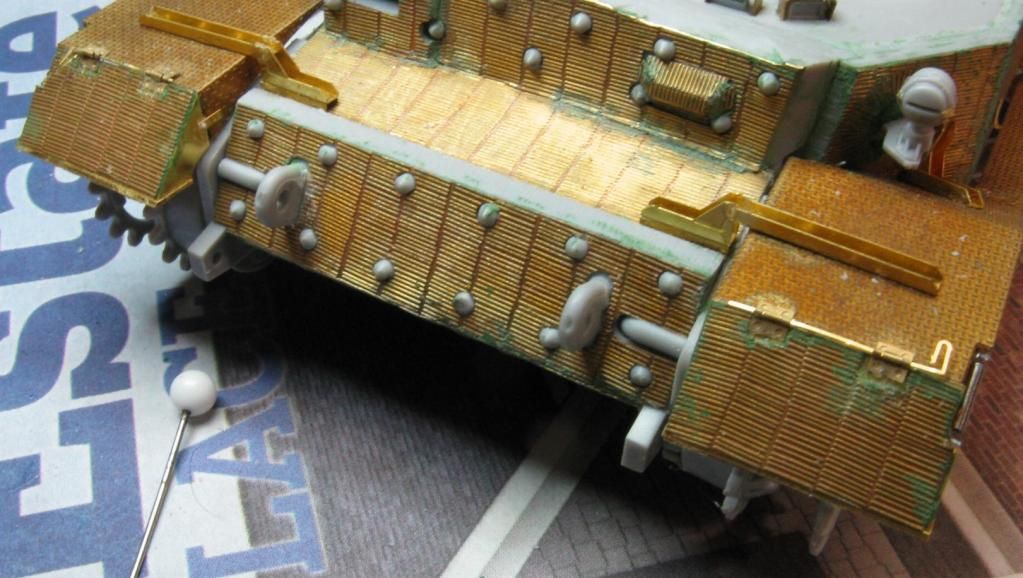 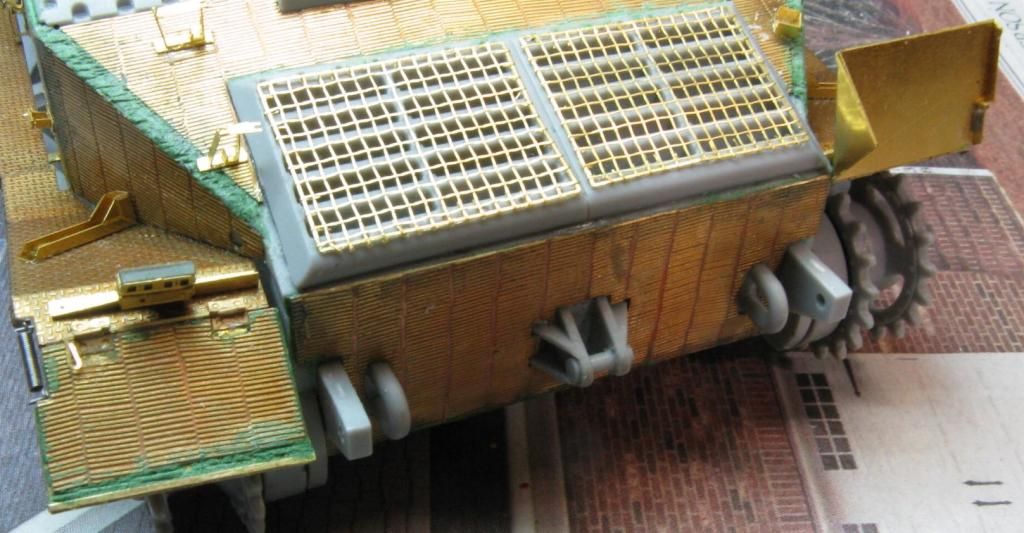  .....and yes, they do work! They're spring loaded (3rd pic) You can see one of the rear ones in the 2nd picture above flipped up. The mounting pins can be pulled if you want to take them off altogether, too. I also got most of the 30 bolt heads put on the fender brackets. The pic below is a bunch of them with the tip of a #11 blade for comparison 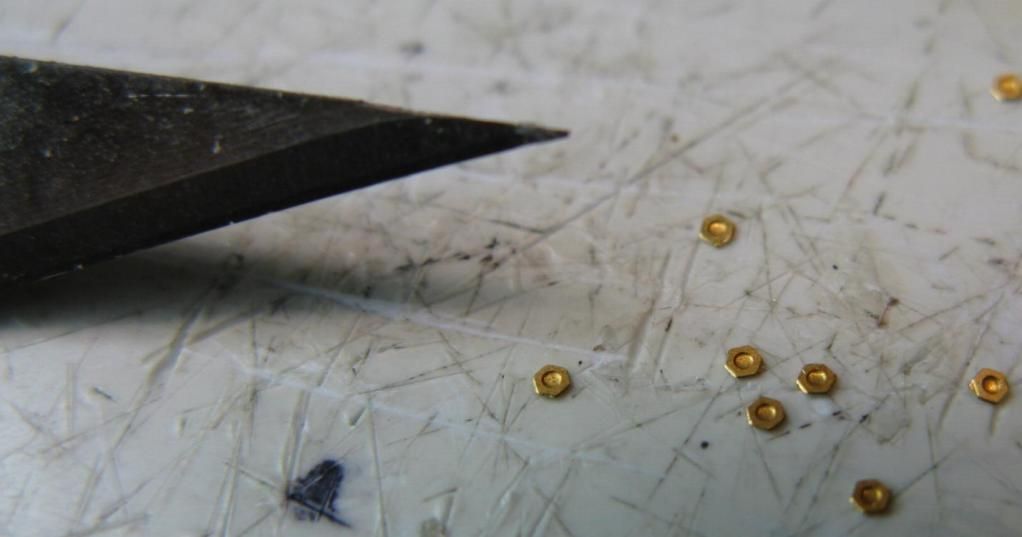 And here's a few in place. 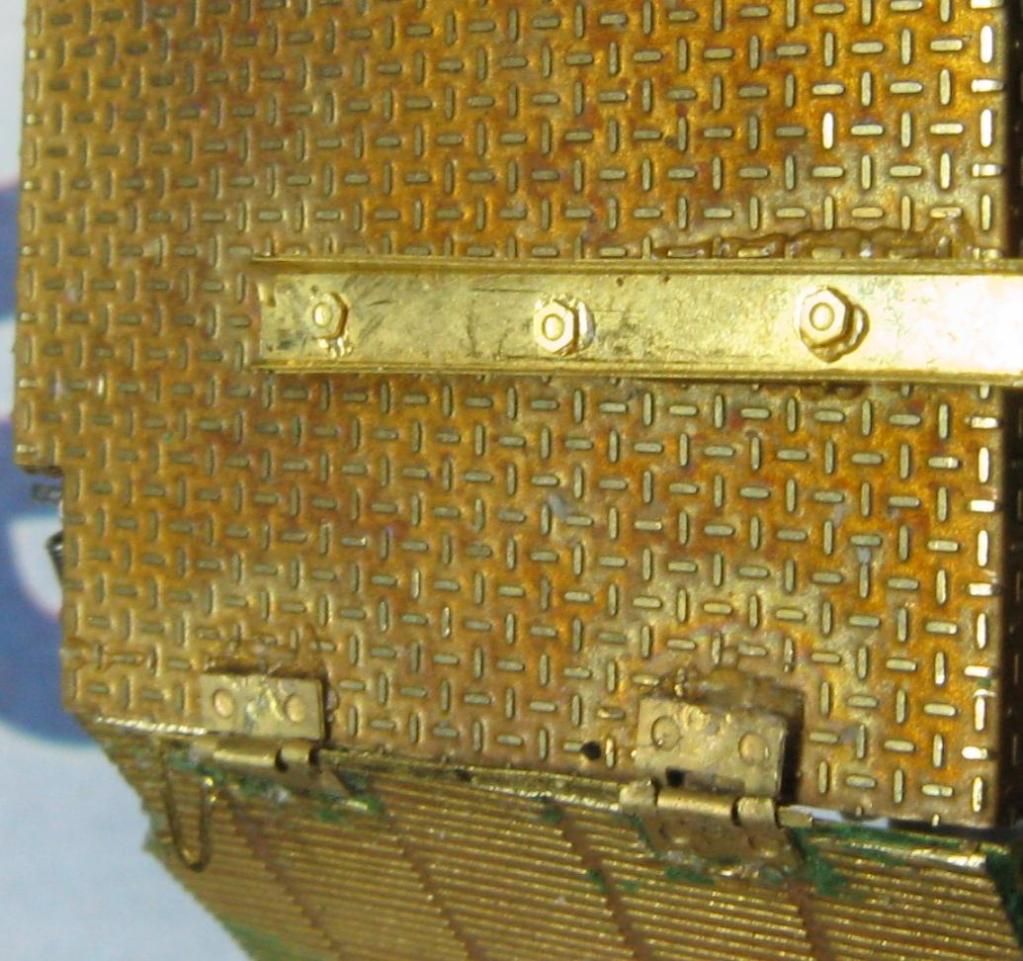 I got a little sloppy on the inside one and will have to do a little clean up there, along with some others. Tommorrow I plan on finishing these and then go back to work on my Stug III (in the background of a couple of the early pics) to give my eyes a rest. |
|
|
|
Post by deafpanzer on Dec 19, 2012 0:39:45 GMT -5
I am telling you now how much I am enjoying this thread! Please warn me first so I can put my sunglasses before I can look at all of those shiny brass.    Keep it coming! |
|
afvfan
Senior Member
   
Member since: December 2012
Bob
Posts: 1,772
Dec 10, 2012 17:32:38 GMT -5
Dec 10, 2012 17:32:38 GMT -5
|
Post by afvfan on Dec 19, 2012 0:54:51 GMT -5
I am telling you now how much I am enjoying this thread! Please warn me first so I can put my sunglasses before I can look at all of those shiny brass.    Keep it coming! Just wait 'til I buff it out!!   Seriously, though, I'm going to have to stop soon. It's getting to the point that I can't take a picture without glare getting in the way! ;D |
|
|
|
Post by wbill76 on Dec 19, 2012 12:33:48 GMT -5
Nice work on those fenders...creating workable spring-loaded in 1/35 is quite the accomplishment!
|
|
afvfan
Senior Member
   
Member since: December 2012
Bob
Posts: 1,772
Dec 10, 2012 17:32:38 GMT -5
Dec 10, 2012 17:32:38 GMT -5
|
Post by afvfan on Dec 20, 2012 4:10:22 GMT -5
Thanks for the comments Wbill and Dicky. Sadly, after all that work, I think I'm going to have to end up gluing them in place.  I got to thinking about it and came to the conclusion that every time they're moved it would probably remove some paint allowing the brass to show through. Oh well.....on with the show.... I've got the build phase as complete as it needs to be to be ready for the first coat of primer. That'll happen tomorrow or Friday. I set the commander in place just to get an idea of how he'll look. 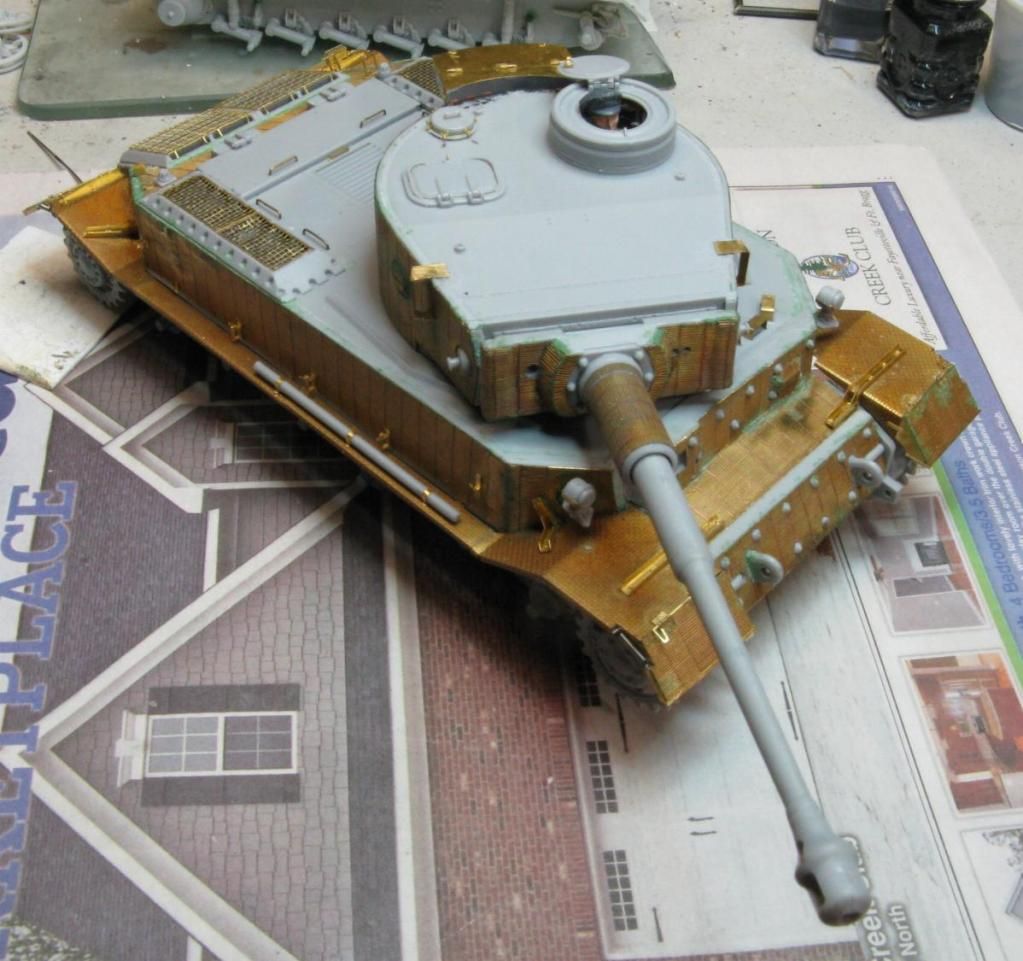   I also thought this might be a good time to review the build so far detailing the problems encountered: THE KIT Dragon #6210 Sd.Kfz.181 - Overall, this is a pretty standard Dragon quality kit. There were some very minor fit issues and the usual vagarities in the instructions. The main faults I ran into were: 1)the front sprocket housings have no locator marks or clear pictures of how they fit. The mounting pin is off center and you are stuck guessing as to which part og the rotation arc is correct. And 2) the turret used is the 2 pistol port model used on the protoype VK4501s. The actual tank that was combat fitted had the next generation turret with the escape hatch. THE ZIMMERIT Eduard #35 790 - There were a few fit issues. First, the holes where the lights mount don't line up with the corresponding areas of the plastic hull. Filling is required to straighten it out. Second, the sections for the rear fender ends are cut too small, and the piece that covers the rear deck is too narrow in width. Again, filler is needed. Third, and this just may have been a conflict with the Voyager parts, the cutout areas for the hinges on the fender ends were too small and had to be opened up to accept the hinges. THE PHOTO ETCH Voyager #37057 - There were 4 main frets, a couple smaller ones, and a few sundry pieces in the kit. This was my first experience with Voyager's stuff and I must say, they do a good job making you work. Instructions are pretty typical, using basic pictographs, like all of the other PE makers I've used. Some of the items, like the tool and cable brackets are overly complicated. I've worked with a couple other companies products that were much simpler to deal with for the same results (unless you're going to be looking with a magnifier). I was also disappointed that, in all the pieces they give you, the periscope covers and smoke cannister mounts aren't included. I had to fabricate those out of left over frets that I had saved. There is also a nice inside rim on the storage bin cover that won't allow the lid to be closed. You need to leave this off unless you plan on displaying with the bin open. Lastly, (and this is more of a helpful hint than a problem) there are parts, like the fender sections and front fender braces, that really need to be soldered instead of glued (sadly a skill I lack). Each fender is 4 pieces (not counting the ends) and the braces are 2. Soldering would give them strength that gluing just doesn't have. Hope this helps someone on a future build. |
|
|
|
Post by deafpanzer on Dec 20, 2012 9:25:37 GMT -5
GREAT report on those three sets!!! I spot a sneaky commander... nice plan! It will be a sad day to see it primed but I could use a nice break from my sunglasses...
|
|
afvfan
Senior Member
   
Member since: December 2012
Bob
Posts: 1,772
Dec 10, 2012 17:32:38 GMT -5
Dec 10, 2012 17:32:38 GMT -5
|
Post by afvfan on Dec 20, 2012 12:17:12 GMT -5
Thanks Andy. I found I had to go in and edit the "KIT" portion. I realized that I had forgot to mention the front sprocket mounting issue.
|
|
|
|
Post by wing_nut on Dec 20, 2012 18:01:55 GMT -5
WOW nice work with the brass zim. Can't wait to see it painted.
|
|
|
|
Post by 406 Silverado on Dec 20, 2012 18:58:01 GMT -5
Still can't get over all that PE. Very nice work Bob. Really is a shame to paint this, but then again she will be a looker with paint.
|
|
|
|
Post by Leon on Dec 20, 2012 20:12:52 GMT -5
Awesome job ,looks great
|
|
|
|
Post by bbd468 on Dec 20, 2012 20:15:56 GMT -5
Bob, what else can i say....Its just a BAD A$$ build fella!  Gary |
|
afvfan
Senior Member
   
Member since: December 2012
Bob
Posts: 1,772
Dec 10, 2012 17:32:38 GMT -5
Dec 10, 2012 17:32:38 GMT -5
|
Post by afvfan on Dec 20, 2012 22:15:05 GMT -5
Thanks everyone! Well, the bling is gone.  Got the primer on today. I need to wait until it dries a bit so I can redo some of the harder to get to areas. I'll get some pictures up when it dries enough to be handled. Andy, you mentioned the "sneaky" commander. I always see people (and I've done it too) mounting the figure standing half way out of the hatch waiting to be picked off by any lurking sniper. My guy had the realization that the Russians didn't get the memo that the Wehrmacht was invincible and is just practicing a little self preservation. ;D |
|
|
|
Post by wouter on Dec 20, 2012 23:57:36 GMT -5
Nice to see a Porsche Tiggy, don't see that often  Nice and tidy build mate and luckily there ain't too many rivets on a Tiger ey?  ;D Great work, looking forward to the paint Cheers |
|
afvfan
Senior Member
   
Member since: December 2012
Bob
Posts: 1,772
Dec 10, 2012 17:32:38 GMT -5
Dec 10, 2012 17:32:38 GMT -5
|
Post by afvfan on Dec 22, 2012 16:41:45 GMT -5
Thanks Wouter! Here's a cople shots with the primer on it. 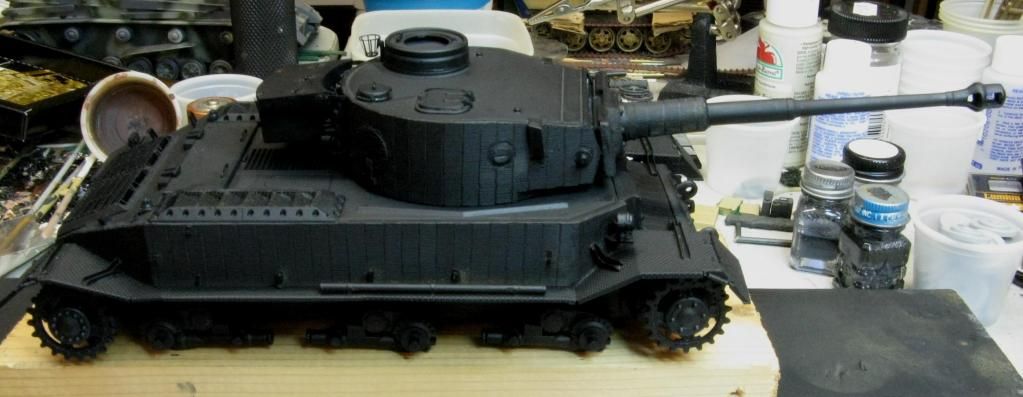 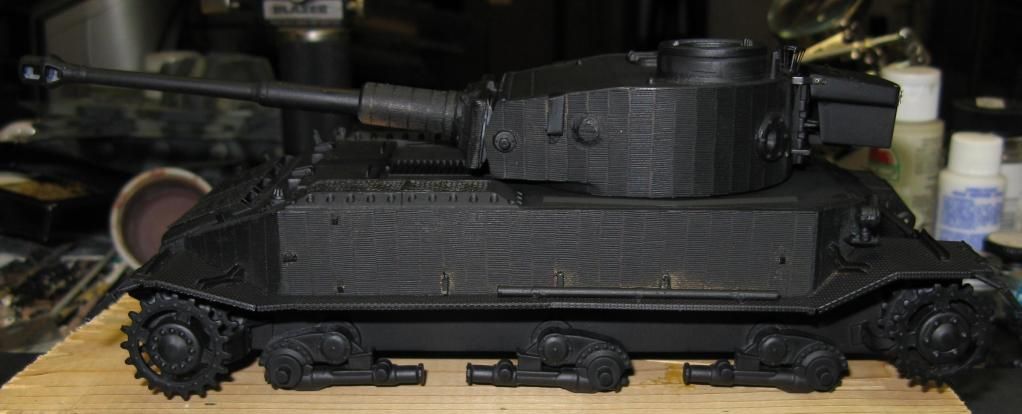 and finally.... (sorry, couldn't resist it)  After these were taken I went back and completed the coverage in the hard to get areas. Now I'm trying to decide if I want to add a red primer before the actual base coat. |
|
|
|
Post by deafpanzer on Dec 22, 2012 16:46:19 GMT -5
NOOOOOO!!!! You had to paint all over the brass!!!! I am feeling so suicidal right now... nah, it really looks great! I am surprised that Zimm still looks visible after primed. I have three brass Zimm sets that I have been thinking about selling on eBay but now I have changed my mind and try it one day.
Dig the Batman touch! LOL
|
|