|
|
Post by eastrock on Nov 4, 2012 12:05:01 GMT -5
|
|
|
|
Post by wbill76 on Nov 4, 2012 15:52:12 GMT -5
Sounds like as good an excuse as any to start a build up ER, go for it!  |
|
brembo--Rest In Peace
Full Member
  
Member since: September 2012
RIP--04 October 2019
Posts: 264
Sept 7, 2012 4:35:14 GMT -5
Sept 7, 2012 4:35:14 GMT -5
|
Post by brembo--Rest In Peace on Nov 4, 2012 15:58:07 GMT -5
i have a few LAV's in various stages of gestation from still in box thru to built but not yet painted (you'll eventually get to see those 2..but thats another story ;D)....i think from memory that AFV club did a complete set of LAV wheels and tyres as an upgrade part, so maybe this would be a good way to solve the wheel issue. any way look forward to seing how this one turns out  |
|
|
|
Post by wing_nut on Nov 4, 2012 19:47:22 GMT -5
Not your run of the mill build ER. Should be interesting.
|
|
|
|
Post by TRM on Nov 4, 2012 19:52:15 GMT -5
Count me in ER!!! Might be modern (lol....Dicky is rolling his eyes right now ;D ) but always up for a good build!!  |
|
|
|
Post by eastrock on Nov 4, 2012 20:40:40 GMT -5
I blame Nemo for this build lol  especially I saw the WRAP 2 Bill, yup a very sound excuse but I'm building blind just like doing test shot without the instruction Brembo, I'll try check it locally or find someone who cast me a set here looking forward with your LAV or maybe following your tread because some of the parts I don't know where to glue it  Wings, definitely not into modern that's why I'm havin some runs in with the challenger  T, I may used some extra eyes here with no definite instruction and as mention by the builder this was reviewed by Cookie Sewell in July FSM 1991, which I can't find any PDF copy  Cheers!! ER |
|
|
|
Post by eastrock on Nov 5, 2012 11:15:55 GMT -5
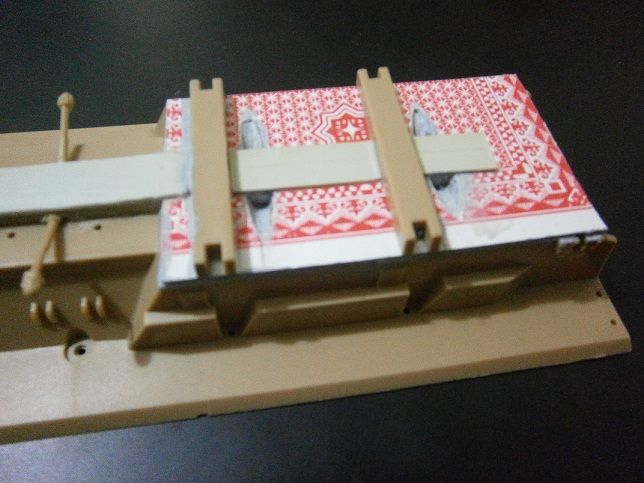
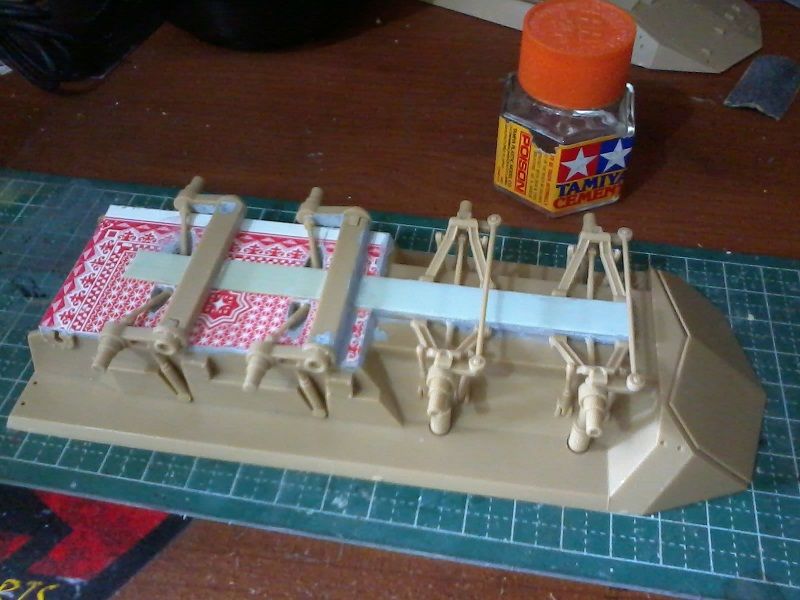
bit update: major surgery on the suspension, done. the styrene I used is from a plastic playing cards that is much cheaper than styrene and some scrap styrene, still a lot to do puttying and sanding to make more seamless, and for the upper hull I'll try my luck on the weld beads with use of styrene strips and cement.  Cheers!! ER |
|
|
|
Post by wbill76 on Nov 5, 2012 12:05:25 GMT -5
Neat trick with the playing card! I hear you about flying blind, you're doing a good job though regardless.  |
|
|
|
Post by eastrock on Nov 5, 2012 12:17:02 GMT -5
Thanks for checking Bill, got no instruction just relying on Armorama and the net for visual reference.
|
|
|
|
Post by armorguy on Nov 5, 2012 15:36:19 GMT -5
Yep great work indeed, that card looks weird on the model for now but also effective so why not !
|
|
Deleted
Member since: January 1970
Posts: 0
Dec 2, 2024 3:11:37 GMT -5
Dec 2, 2024 3:11:37 GMT -5
|
Post by Deleted on Nov 5, 2012 15:45:04 GMT -5
Nothing I like more than watching an old kit being made into something good  Great start ER  |
|
brembo--Rest In Peace
Full Member
  
Member since: September 2012
RIP--04 October 2019
Posts: 264
Sept 7, 2012 4:35:14 GMT -5
Sept 7, 2012 4:35:14 GMT -5
|
Post by brembo--Rest In Peace on Nov 5, 2012 16:01:17 GMT -5
i have one of these earlier series LAV's (trumpeter) as an unpainted/finished build. its not a command variant so the top wil lbe differant but the underside is probably the same.
i can take some pics for you if you think they will be useful....
i dont plan to restart these LAV's for a while
|
|
|
|
Post by eastrock on Nov 5, 2012 22:57:58 GMT -5
Nemo even my eyes close, the directions still points to you lol Big G yup the card looks weird but its made of plastic, it will be covered when primer is applied. Steve thanks for checking  Brembo Brembo please do, it would help a lot Thanks!!! Cheers!! ER
|
|
brembo--Rest In Peace
Full Member
  
Member since: September 2012
RIP--04 October 2019
Posts: 264
Sept 7, 2012 4:35:14 GMT -5
Sept 7, 2012 4:35:14 GMT -5
|
Post by brembo--Rest In Peace on Nov 6, 2012 5:14:34 GMT -5
roger that ER, will do tomorrow for you and post them here.
i also have the original instructions for the trumpeter ASLAV-25 kit
( trumpeter kit #00392). your more than welcome to them.
|
|
|
|
Post by 406 Silverado on Nov 6, 2012 8:22:11 GMT -5
Off to a good start there ER. Some of those ESCI kits can be real dogs. Don't matter what plastic you use, as long as it does the job eh.
|
|
WigWag Workshop
Reviews member    
Member since: May 2012
"Keep The Glue On The Styrene"
Posts: 720
May 22, 2012 7:25:45 GMT -5
May 22, 2012 7:25:45 GMT -5
|
Post by WigWag Workshop on Nov 6, 2012 10:25:01 GMT -5
Looking forward to updates! Off to a great start!
-Steven
|
|
|
|
Post by eastrock on Nov 6, 2012 12:48:49 GMT -5
Once again Thanks BremboBoss thanks for dropping by, yup it will be covered by primer ;D Steven Thanks for checking you can put your inputs on the LAV also  already finish the major scratch work on the suspension, 1st filling applied, will set it aside for a day for another coat of filling until its leveled and until it become a solid piece.  |
|
brembo--Rest In Peace
Full Member
  
Member since: September 2012
RIP--04 October 2019
Posts: 264
Sept 7, 2012 4:35:14 GMT -5
Sept 7, 2012 4:35:14 GMT -5
|
Post by brembo--Rest In Peace on Nov 6, 2012 22:37:55 GMT -5
ok, here are some pics of my un painted/ (mostly)assembled LAV-25 by Trumpeter.... this kit also incorporates the wider rim/tyre combo used on the aussie series 2 LAV's.  models 12 002 models 12 002 by Brembo2012, on Flickr underside view: you will notice that i have made some mods to the steering in order to get the front 4 wheels into a 'steering' attitude. in the kit the wheels are only made to face forward, so i had to persuade them to turn   models 12 003 models 12 003 by Brembo2012, on Flickr left side view showing general layout; note this kit came with a turret, which i have taken for another project so now it has the remotely operated M2 station instead.  models 12 004 models 12 004 by Brembo2012, on Flickr overhead view: shows top hatches etc..  models 12 005 models 12 005 by Brembo2012, on Flickr Right side view: shows more turn on the front steering pair of wheels  models 12 006 models 12 006 by Brembo2012, on Flickr Rear view: with spare wheel mount on a swingable A arm assembly and rear doors  models 12 007 models 12 007 by Brembo2012, on Flickr front view: with front winch guide and engine hatch hope fully this helps a bit.... failing that PM an adress and i can send you the trumpeter instructions.  |
|
|
|
Post by eastrock on Nov 6, 2012 23:05:06 GMT -5
Cool Thanks for sharing Brembo, this helps a lot, I guess I can't do anymore improvement on the suspension it got a huge difference from trumpeter and ESCI if I got the skills of Dicky I can do that with a blink of an eye lol
I notice the grab handles the back is position a bit higher, and I have check online, DEF Models offers sagged wheels.
|
|
|
|
Post by eastrock on Nov 7, 2012 21:44:21 GMT -5
Thanks for the offer Carlos, Dicky as of late I'm still puttying the suspension and trying my hand on the different weld beads. will post as soon as I can.
Cheers!!
ER
|
|
|
|
Post by deafpanzer on Nov 7, 2012 23:05:00 GMT -5
Very nice work on those LAVs!
|
|
|
|
Post by bbd468 on Nov 8, 2012 12:11:34 GMT -5
ER, your tha man for tha job for sure. YOU GOT THIS MAN!!!   Gary |
|
|
|
Post by eastrock on Nov 12, 2012 0:12:52 GMT -5
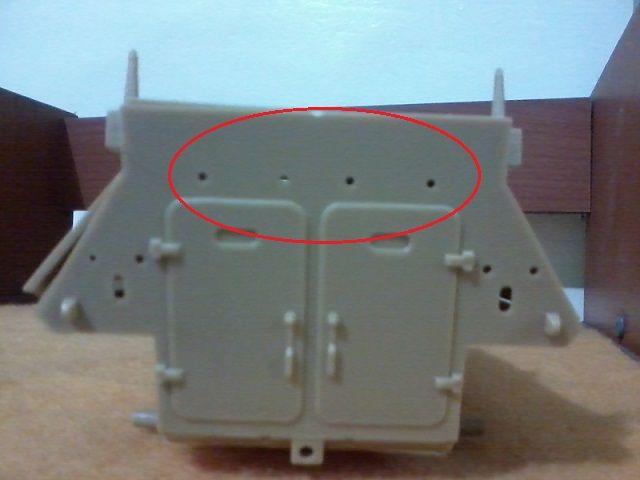
Sorry for the late update, here's the 2nd phase of the suspension work of the ESCI don't expect a detailed kit like the trumpeter, and have more patience a lot of scraping flashes, mold seam, sanding are needed this took me almost 2 days but still need a lot of filler and repair and its far from finish, Thanks to Brembo with WIP shots, the tie rods should be glued on the bottom with the guide pins.  and here's the an AM parts from trumpeter and see the different between the ESCI wheels. but surgery need to fit the wheels to the kit.  Should I extend the rear doors? What do you think guys?  Thanks for checking!!! ER |
|
brembo--Rest In Peace
Full Member
  
Member since: September 2012
RIP--04 October 2019
Posts: 264
Sept 7, 2012 4:35:14 GMT -5
Sept 7, 2012 4:35:14 GMT -5
|
Post by brembo--Rest In Peace on Nov 12, 2012 13:48:00 GMT -5
hmmm...
i measured the doors on the trumpeter kit for you.
the dimensions are;
30mm ht
20mm wd
see how yours measure up?
dont forget as a command variant yours has an extended roof hieght compared to the standard APC version so you should have some extra clearance betwen the top of door and the roof of the interior.
|
|
|
|
Post by wbill76 on Nov 12, 2012 18:47:23 GMT -5
You're whipping this one into shape ER, keep it up!  |
|
|
|
Post by eastrock on Nov 12, 2012 21:10:04 GMT -5
Thanks Brembo and Nemo, its 5mm shorter on the height will have to extend the door and re-work on the hinges and handles seems like a lot of work is in order for discussion only from PrimePortal  Hey Bill, thanks for dropping by much appreciated. Cheers! ER |
|
brembo--Rest In Peace
Full Member
  
Member since: September 2012
RIP--04 October 2019
Posts: 264
Sept 7, 2012 4:35:14 GMT -5
Sept 7, 2012 4:35:14 GMT -5
|
Post by brembo--Rest In Peace on Nov 12, 2012 21:28:54 GMT -5
those doors in the pic look bigger than standard ?.....or maybe its an optical illusion...  |
|
|
|
Post by eastrock on Nov 12, 2012 21:38:20 GMT -5
I would try to extend the height to 5mm and extend the grab handles about 2mm to 3mm from the door, btw Brembo can you take a closer pic of the rear the trumpeter LAV, if its ok?
|
|
brembo--Rest In Peace
Full Member
  
Member since: September 2012
RIP--04 October 2019
Posts: 264
Sept 7, 2012 4:35:14 GMT -5
Sept 7, 2012 4:35:14 GMT -5
|
Post by brembo--Rest In Peace on Nov 13, 2012 0:35:36 GMT -5
no problemo..... ;D  LAV25 REAR 001 LAV25 REAR 001 by Brembo2012, on Flickr That door is deffo bigger, see how it has 3 hinges instead of the standard 2. also the door finishes well beyond the standard roof line and extends well up into the hieght addition. i'd say if you want to make it like this one you need to take your cues direct from the photgraph and adjust the door size to be taller. width is changed too!....there seems to be no centre bar on this, just 2 doors....one is possibly wider than the other. she's a hybrid version! |
|
|
|
Post by eastrock on Nov 13, 2012 2:50:07 GMT -5
Thanks Brembo, I guess I'll be re-scribing a new doors for the rear, i'll post some pic later, apply putty filler at moment, appreciate your help.
Cheers!!
|
|