Jaymes Crowther.
Full Member
  
Member since: November 2011
I've rekindled my passion for Israeli armour wahooo....
Posts: 206
Nov 16, 2011 6:21:11 GMT -5
Nov 16, 2011 6:21:11 GMT -5
|
Post by Jaymes Crowther. on Oct 28, 2012 11:06:07 GMT -5
hi Brem? nice work i like it so far. the M51 is one of my favourite tanks...I´ll give you some advice the tank crew are far too modern for the M51 they are about 1983 onwards. If you want some help with suitable tankers I will happily help you with photos and links.
Jaymes
|
|
|
|
Post by eastrock on Oct 28, 2012 11:34:30 GMT -5
looks great!!! looking forward with the weathering  |
|
brembo--Rest In Peace
Full Member
  
Member since: September 2012
RIP--04 October 2019
Posts: 264
Sept 7, 2012 4:35:14 GMT -5
Sept 7, 2012 4:35:14 GMT -5
|
Post by brembo--Rest In Peace on Oct 28, 2012 13:05:21 GMT -5
hi Brem? nice work i like it so far. the M51 is one of my favourite tanks...I´ll give you some advice the tank crew are far too modern for the M51 they are about 1983 onwards. If you want some help with suitable tankers I will happily help you with photos and links. Jaymes Thanks Jaymes....sure, more reference is always helpful. i 'm not that keen on the gumby stock kit commander with the pointing finger and US style hemet. (and i used the the half bust loader fig on my M1) i found the resin figures at the bottom of a box of stuff while lookin for some other stuff... ;D....im sure they will find a home on another tank. |
|
Deleted
Member since: January 1970
Posts: 0
Nov 25, 2024 16:37:14 GMT -5
Nov 25, 2024 16:37:14 GMT -5
|
Post by Deleted on Oct 28, 2012 13:09:44 GMT -5
Hi Brem, sorry matey I though I'd posted on this ! Great build fella, these super Shermans look so good and your making the best of her  Looking forward to the weathering  |
|
|
|
Post by 406 Silverado on Oct 28, 2012 13:39:06 GMT -5
Looking great so far.
|
|
brembo--Rest In Peace
Full Member
  
Member since: September 2012
RIP--04 October 2019
Posts: 264
Sept 7, 2012 4:35:14 GMT -5
Sept 7, 2012 4:35:14 GMT -5
|
Post by brembo--Rest In Peace on Oct 28, 2012 14:09:19 GMT -5
thanks Boss, nowhere near as good as yours but good enough to extend my meager talents a little further  ;D
|
|
bigjohn
Reviews member    
Member since: December 2011
John Hale
Posts: 3,438
Dec 21, 2011 2:17:45 GMT -5
Dec 21, 2011 2:17:45 GMT -5
|
Post by bigjohn on Oct 28, 2012 15:03:28 GMT -5
Looks pretty awesome to me!
|
|
madairbrush
Full Member
   November 2012 MoM Winner
Member since: May 2012
Cheers!! Matt
Posts: 488
May 30, 2012 14:22:05 GMT -5
May 30, 2012 14:22:05 GMT -5
|
Post by madairbrush on Oct 29, 2012 5:00:34 GMT -5
Nice to see a undestroyed Shermie. Great work on this one!!
|
|
|
|
Post by wing_nut on Oct 29, 2012 11:22:49 GMT -5
Oh baby that's looking nice.
|
|
brembo--Rest In Peace
Full Member
  
Member since: September 2012
RIP--04 October 2019
Posts: 264
Sept 7, 2012 4:35:14 GMT -5
Sept 7, 2012 4:35:14 GMT -5
|
Post by brembo--Rest In Peace on Oct 29, 2012 15:05:46 GMT -5
Nice to see a undestroyed Shermie. Great work on this one!! LOL...;D ;D ;D ;D ;D ;D ;D ;D.....yeah, and its not rusty  |
|
Deleted
Member since: January 1970
Posts: 0
Nov 25, 2024 16:37:14 GMT -5
Nov 25, 2024 16:37:14 GMT -5
|
Post by Deleted on Oct 29, 2012 15:10:03 GMT -5
looks fab! very neat work too
|
|
brembo--Rest In Peace
Full Member
  
Member since: September 2012
RIP--04 October 2019
Posts: 264
Sept 7, 2012 4:35:14 GMT -5
Sept 7, 2012 4:35:14 GMT -5
|
Post by brembo--Rest In Peace on Oct 29, 2012 15:19:04 GMT -5
latest update: initial washes going on; before pic, with materials ready for use 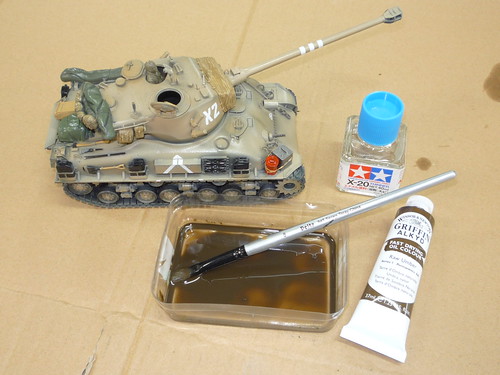 models 10 001 models 10 001 by Brembo2012, on Flickr and after pic, with heavy-ish raw umber oil wash applied... 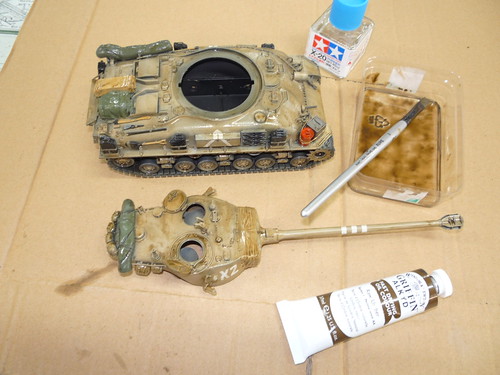 models 10 002 models 10 002 by Brembo2012, on Flickr from here , i head back with the clean thinners and start knocking it back where i want to reduce the wash effect... more fun later today!  |
|
|
|
Post by wbill76 on Oct 29, 2012 16:39:43 GMT -5
Washes look good, always the fun part when it's time to start bringing out the details and making the necessary adjustments along the way.
|
|
|
|
Post by eastrock on Oct 29, 2012 22:58:39 GMT -5
details popping up, brembo looks great!!!
|
|
madairbrush
Full Member
   November 2012 MoM Winner
Member since: May 2012
Cheers!! Matt
Posts: 488
May 30, 2012 14:22:05 GMT -5
May 30, 2012 14:22:05 GMT -5
|
Post by madairbrush on Oct 30, 2012 6:39:57 GMT -5
|
|
brembo--Rest In Peace
Full Member
  
Member since: September 2012
RIP--04 October 2019
Posts: 264
Sept 7, 2012 4:35:14 GMT -5
Sept 7, 2012 4:35:14 GMT -5
|
Post by brembo--Rest In Peace on Oct 30, 2012 14:34:34 GMT -5
LOL.....yep, maybe a little bit of rust....  |
|
|
|
Post by 406 Silverado on Oct 30, 2012 16:34:53 GMT -5
The wash really brings out the details and adds depth to the Model, very nice mate.
|
|
brembo--Rest In Peace
Full Member
  
Member since: September 2012
RIP--04 October 2019
Posts: 264
Sept 7, 2012 4:35:14 GMT -5
Sept 7, 2012 4:35:14 GMT -5
|
Post by brembo--Rest In Peace on Oct 31, 2012 1:00:44 GMT -5
Latest update: 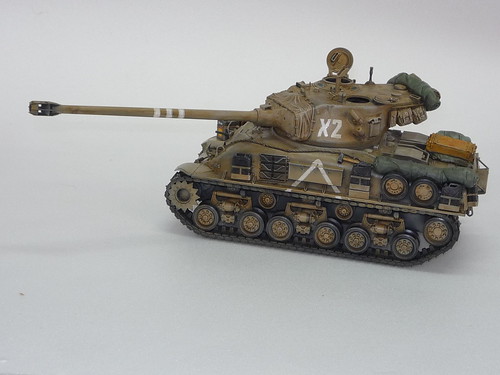 models 11 002 models 11 002 by Brembo2012, on Flickr Since i completed the initial washes ive been knocking back some of the areas where i want a more subtle look with a combination of clean washes and lighter filters using humbrol enamels 121(pale stone) & 148 (Radome) as the filter base. 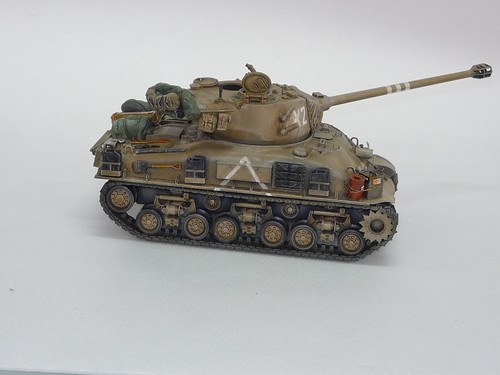 models 11 003 models 11 003 by Brembo2012, on Flickr There's still a pigment layer to be added in terms of the final weathering but as far as the wet stuff goes this is just about it.... i did take this oppurtunity to block in the cupola glass using GW 'ultra marine blue' as the base followed up with a coat of Tamiya clear green enamel. 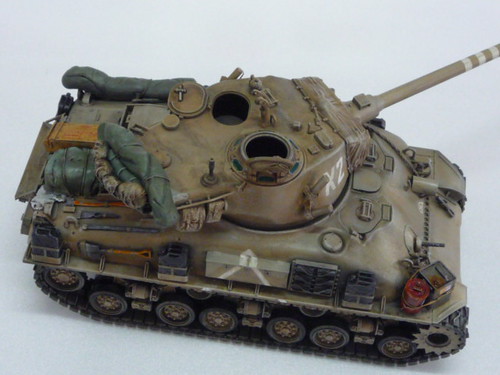 models 11 004 models 11 004 by Brembo2012, on Flickr i also added some dry brush layers, once again with humbrol 71 (oak), around the turret, chassis, suspension and also on the stowage. although i did come back with additional black washes and tidy up the boogies and especially the rubber road wheels and also the J -cans. 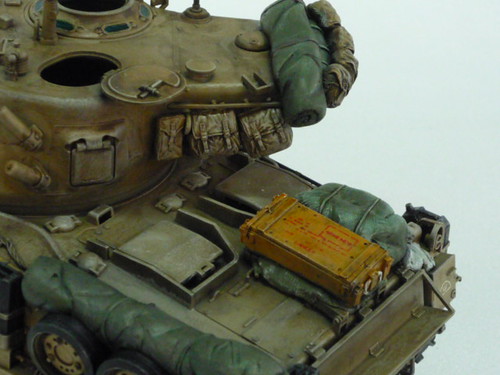 models 11 006 models 11 006 by Brembo2012, on Flickr The lighter filters are evident on the raised vent covers on the rear deck. It was also time to start on detailing up the stowage, so things like the ammo crate got some additional washes and some dry rub stencilling and all the tarps and packs got a combination of drybrushing, washes and blending. 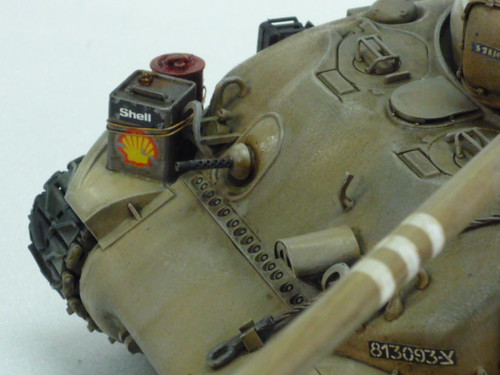 models 11 005 models 11 005 by Brembo2012, on Flickr The oil cans also came in for some attention....and so, this model is now brought to you by "SHELL".... ;D......cue product logo placement  i'm now awaiting my royalty cheque.....  but to be more serious i wanted to make these pieces a little more interesting so i dipped into the decal spares and then added a bit of chipping and a few oil drips for extra visual impact. Some of the highlight filters are also visible here...  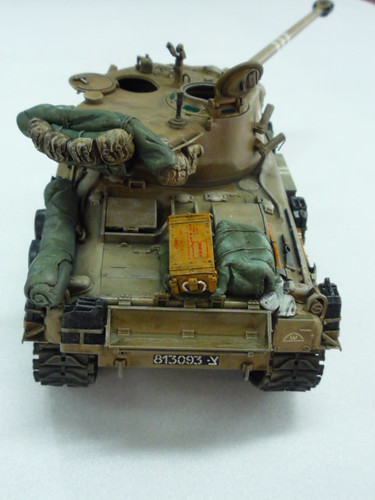 models 11 007 models 11 007 by Brembo2012, on Flickr and a rear shot.....now, does that stowage make her 'ass look big' ;D ;D  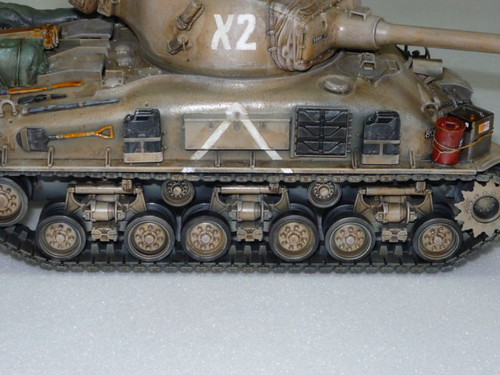 models 11 008 models 11 008 by Brembo2012, on Flickr i had to go back in and revitalise some of the white decal markings which seemed to take on the raw umber wash a little to enthusiastically! a steady hand and some GW 'skull white' with a point brush was all it took to carefully block back in some of the whiteness. this shot also shows the effect of the drybrush and subsequent black rewash quite well...the detail is all there to be brought out. 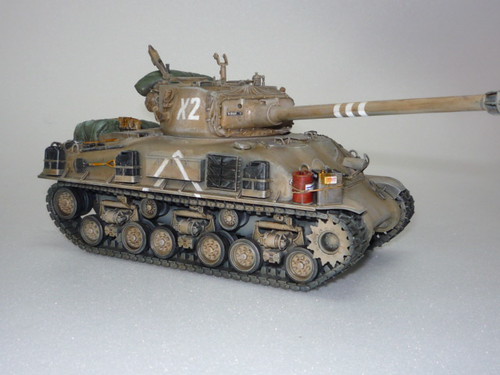 models 11 009 models 11 009 by Brembo2012, on Flickr so where to next ? well pigments to do, then maybe a little bit of rust, got the tracks to take care off yet, and then theres the crew....(currently on the way) i also have additional gear for the back deck and the parcel tray, and the M2 .50 cal.....so still a bit to do yet! |
|
|
|
Post by bullardino on Oct 31, 2012 4:19:30 GMT -5
"Fat bottomed girls, you make the rockin' world go round"  That M51 rocks, lots of great details and nice weathering  |
|
bigjohn
Reviews member    
Member since: December 2011
John Hale
Posts: 3,438
Dec 21, 2011 2:17:45 GMT -5
Dec 21, 2011 2:17:45 GMT -5
|
Post by bigjohn on Oct 31, 2012 5:20:40 GMT -5
Good Tast in music Luigi!!
The M51 is looking sweet, Keep it going!!
|
|
brembo--Rest In Peace
Full Member
  
Member since: September 2012
RIP--04 October 2019
Posts: 264
Sept 7, 2012 4:35:14 GMT -5
Sept 7, 2012 4:35:14 GMT -5
|
Post by brembo--Rest In Peace on Oct 31, 2012 5:43:44 GMT -5
Thanks John and Luigi! Fat bottomed girl?.....yes, or maybe 'Killer Queen"  |
|
|
|
Post by eastrock on Oct 31, 2012 6:00:58 GMT -5
Keep it coming brem, your update looks awesome :-)
|
|
|
|
Post by bbd468 on Oct 31, 2012 10:15:54 GMT -5
Splendid build man! Love what you got goin' there.  Gary |
|
brembo--Rest In Peace
Full Member
  
Member since: September 2012
RIP--04 October 2019
Posts: 264
Sept 7, 2012 4:35:14 GMT -5
Sept 7, 2012 4:35:14 GMT -5
|
Post by brembo--Rest In Peace on Oct 31, 2012 13:34:31 GMT -5
Thanks Gary & ER! you know they say that after a while an artist starts to resemble his work......that can't be true....can it    ;D 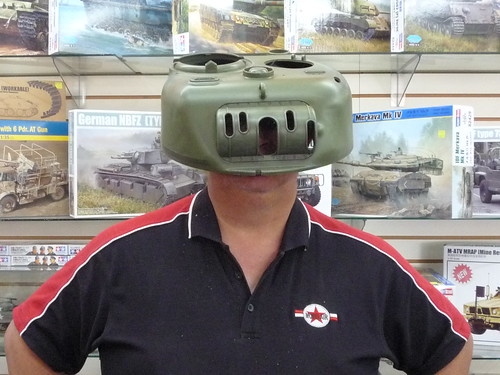 facebook promo 010 facebook promo 010 by Brembo2012, on Flickr |
|
|
|
Post by wbill76 on Oct 31, 2012 15:00:25 GMT -5
Layering effects are giving it a nice look, pigments ought to top it off just right! Nice hat too btw! ;D
|
|
brembo--Rest In Peace
Full Member
  
Member since: September 2012
RIP--04 October 2019
Posts: 264
Sept 7, 2012 4:35:14 GMT -5
Sept 7, 2012 4:35:14 GMT -5
|
Post by brembo--Rest In Peace on Nov 1, 2012 23:19:10 GMT -5
Thanks Dicky....it is a great kit to build, which is half the battle won. ;D
|
|
|
|
Post by eastrock on Nov 2, 2012 1:22:22 GMT -5
You resemble the green vader my the force
be with you! lol
|
|
|
|
Post by wing_nut on Nov 2, 2012 21:36:29 GMT -5
Beautiful work on that one. Tough to make a single color vehicle look that good.
|
|
Deleted
Member since: January 1970
Posts: 0
Nov 25, 2024 16:37:14 GMT -5
Nov 25, 2024 16:37:14 GMT -5
|
Post by Deleted on Nov 4, 2012 8:58:36 GMT -5
superb work I particularly like the attention to the stowage very effective
|
|
brembo--Rest In Peace
Full Member
  
Member since: September 2012
RIP--04 October 2019
Posts: 264
Sept 7, 2012 4:35:14 GMT -5
Sept 7, 2012 4:35:14 GMT -5
|
Post by brembo--Rest In Peace on Nov 4, 2012 17:00:49 GMT -5
latest update: onto the tracks!....  this is the 'before weathering' shot... 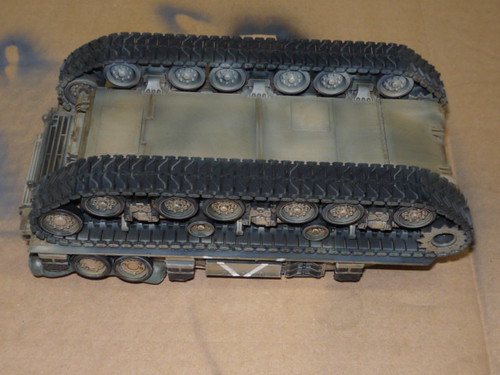 models 11 001 models 11 001 by Brembo2012, on Flickr First off, the tracks recieved a coat of acrylic tamiya XF59 desert yellow. The trick here was to use a thinned down solution, roughly 50/50 ratio( alot thinner than usual) and to use a very fine mist setting on the gun with a good air ratio. 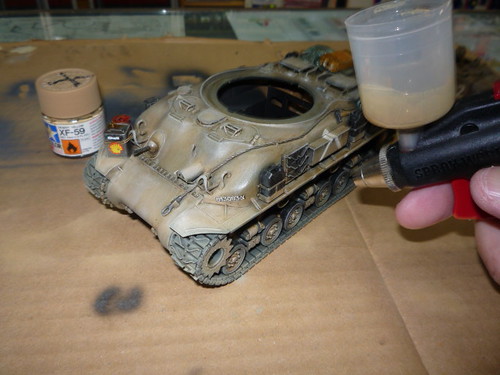 models 11 002 models 11 002 by Brembo2012, on Flickr So a light coat is the intention and the fine spray also helps to keep overspray well under control, which in turn allows fulll freehand airbrushing. In some places i used a handheld card mask but most of it was free hand. 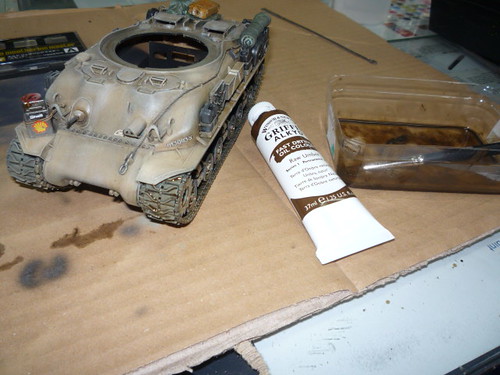 models 11 003 models 11 003 by Brembo2012, on Flickr After the base airbrush colour was applied the first of the washes was added, in this case raw umber oil mixed with enamel thinners and this was applied generously, in fact i had to up the paint ratio to darken the wash a bit more...it needed a bit more oooomph for the tracks ;D 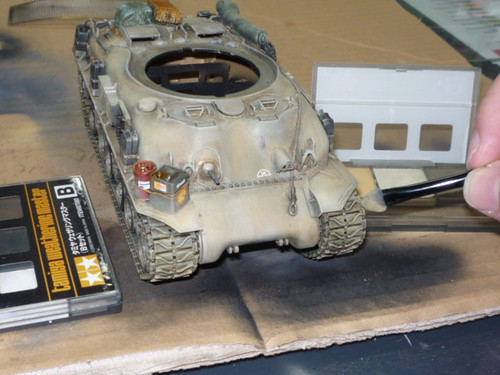 models 11 009 models 11 009 by Brembo2012, on Flickr This was then left to air dry for about 3 hours. From here the first layer of pigments was added using Tamiya weathering set A, which has 2 examples of sand. i started with the darker colour first and then added a second layer of the lighter pigment as high light. The double ended brush in the Tamiya set is quite handy, one end is a sponge which i used for initial application, the other end a fine brush which i used to dust off the excess. i also used some of set B which has some black soot and some dark rust! 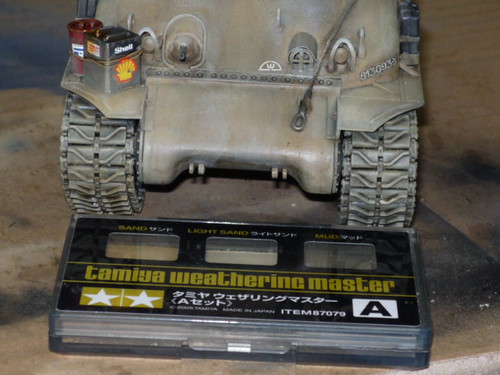 models 11 011 models 11 011 by Brembo2012, on Flickr so the finalised pigment layer sits on the tracks, awaiting the next process, but thats as far as i got for today!....more to come...stay tuned and thanks for visiting  |
|