redleg12
Full Member
  
Member since: August 2012
www.redleg2scale.com
Posts: 401
Aug 28, 2012 18:59:10 GMT -5
Aug 28, 2012 18:59:10 GMT -5
|
Post by redleg12 on Jul 28, 2013 19:01:34 GMT -5
Well I have continued to fill the ammo bunker. I have cast about 100 rounds with about 60 powder cans. Also finished casting the needed 105mm crates and smaller crates for fuses. 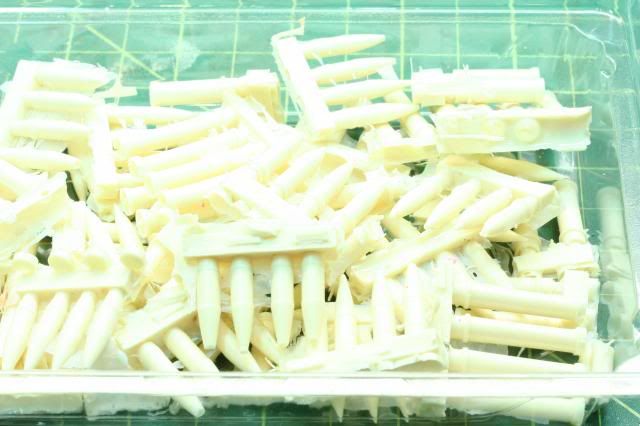 Next will be to remove all the casting plugs, clean up the pieces and send them to the spray booth. I have added the support crates and used Verlinden PSP plated for the floor. 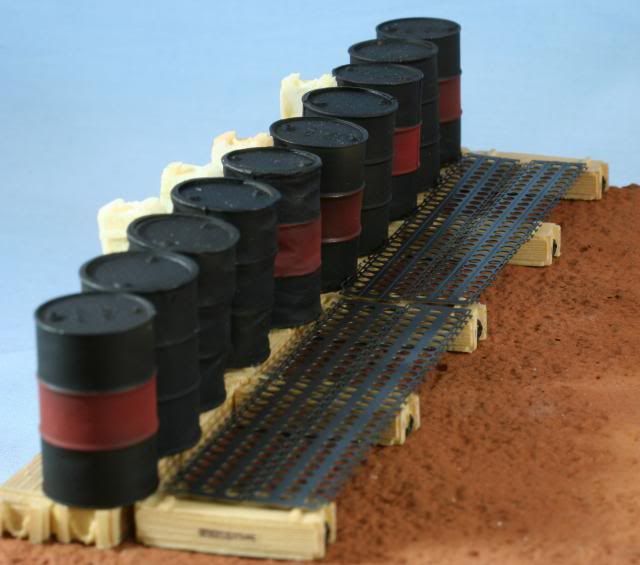 I have to finish painting and decals the 105mm crates to add the as roof support columns. As for the howitzer, I completed some weathering with MIG Vietnam Earth. Added a couple of helmets and completed the communication stand as well 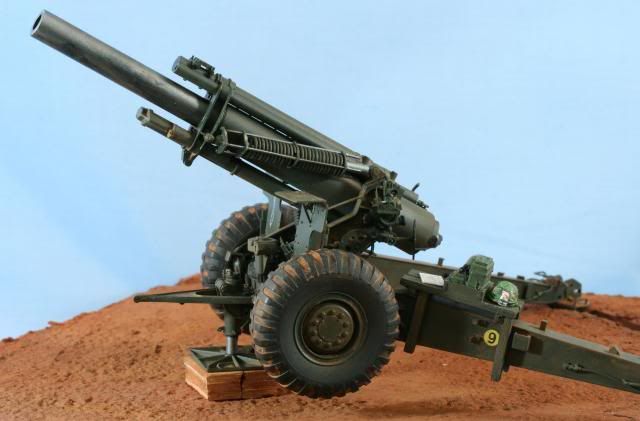 Back view 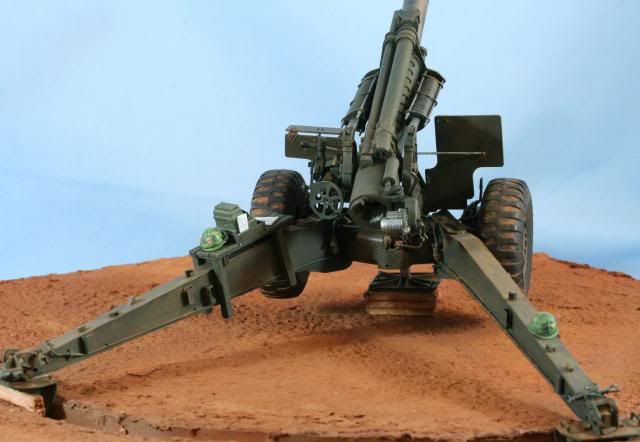 Front view 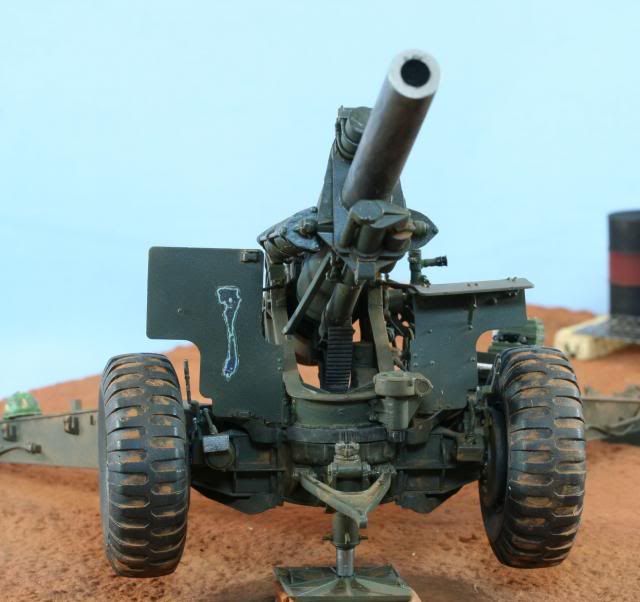 Here is a close up of the communication stand, TA-312, record of fire and helmet with a pack of Marlboro! 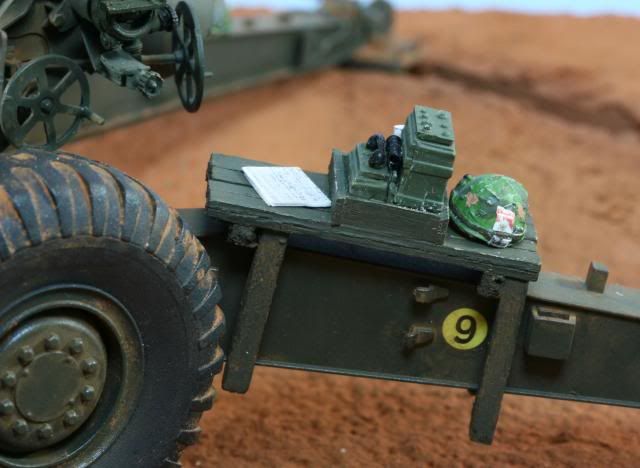 That’s it for now, time to start creating all the other toys, ramming staff, swab bucket, lanyard, aiming posts, collimator, etc, etc. As always if you have any comments, please feel free to drop in. Rounds Complete!! |
|
|
|
Post by wbill76 on Jul 28, 2013 20:12:27 GMT -5
Nice progress Mike, good to see you're getting in some bench time to keep this fire mission moving forward.  |
|
redleg12
Full Member
  
Member since: August 2012
www.redleg2scale.com
Posts: 401
Aug 28, 2012 18:59:10 GMT -5
Aug 28, 2012 18:59:10 GMT -5
|
Post by redleg12 on Jul 29, 2013 5:42:30 GMT -5
Bill - Thanks, busy summer and finding bench time is a blessing. Thanks again for the peek.
Rounds Complete!!
|
|
|
|
Post by bbd468 on Jul 29, 2013 11:24:34 GMT -5
Man, that is looking fantastic Mike! A fine piece of artillery right there! The accessories are fine as well.....Very nice!  |
|
redleg12
Full Member
  
Member since: August 2012
www.redleg2scale.com
Posts: 401
Aug 28, 2012 18:59:10 GMT -5
Aug 28, 2012 18:59:10 GMT -5
|
Post by redleg12 on Jul 29, 2013 20:10:33 GMT -5
bbd - Thanks for the comments, I love my details
Dicky - Thanks, as for figures....first I totally suck at figure..someday I will be better but... Next there really is not too many proper figures for US artillery. Master Box came out with a good set for WWII but there really is not a good set for VN era. There is some older Hobby Fan figures which were designed to go with the M102 in VN but they can be difficult to find. There is a ton of German artillery figures but very little for US where whole eras that do not exist.
Lastly if you are wondering what is the difference....artilleryman do not wear any web gear or equipment when working on the weapon...just a brain bucket....you don't want anything loose, straps etc which can get caught on a gun, especially while humping a 95 lb projectile!
Thanks for stopping by
Rounds Complete!!
|
|
|
|
Post by deafpanzer on Jul 29, 2013 20:26:57 GMT -5
Another great update! Never ever get tired of looking at your work... great details. Learned from you earlier about wearing no web gear or equipment... trust me you will find me half naked most of times if I was in the artillery.
|
|
|
|
Post by fightnjoe on Jul 29, 2013 21:53:50 GMT -5
jawdropping. you really know your stuff.
joe
|
|
sturmbird
Full Member
  
Member since: June 2012
Posts: 1,406
Jun 21, 2012 13:51:45 GMT -5
Jun 21, 2012 13:51:45 GMT -5
|
Post by sturmbird on Jul 30, 2013 0:26:54 GMT -5
bbd - Thanks for the comments, I love my details Dicky - Thanks, as for figures....first I totally suck at figure..someday I will be better but... Next there really is not too many proper figures for US artillery. Master Box came out with a good set for WWII but there really is not a good set for VN era. There is some older Hobby Fan figures which were designed to go with the M102 in VN but they can be difficult to find. There is a ton of German artillery figures but very little for US where whole eras that do not exist. Lastly if you are wondering what is the difference....artilleryman do not wear any web gear or equipment when working on the weapon...just a brain bucket....you don't want anything loose, straps etc which can get caught on a gun, especially while humping a 95 lb projectile! Thanks for stopping by Rounds Complete!! keep in mind that humping a 98lb.projo is only part of the equation. The round gets a little slippery when it's wet, and you can't put that fancy pair of black leather gloves on they issued you! There's always the danger of breaking your foot from dropping the round, and if the AG ain't good he might slam the breech door on your hand. I never liked to run the AG slot because of that worry alone, but I was the only guy Randy would trust when we swapped places (we didn't very often). Powder bags are kinda rough, and will rub your fore arm raw, but your tough and never think about whining. I cut 90% of my charges cause I like them tight. Worst thing in the world is for a string of charges to come apart during a zone sweep when your racing for a case of beer. In the daytime you work up a serious sweat, so you adjust for the heat. Tee shirts were the norm till you were left with just one, or Mom sent you some black pocket tee's from home. White was a rare sight, and even then they were a reddish tan color from the mud and dust. By the end of the second month your boots were a grey color, and most of the black was gone. Most guys didn't blouse their pants from the heat alone. It was common to see guys shooting in their shorts and helmet. Specially in the rain! Once the monsoons set in everything you owned was wet by the end of the second week. That was also ring worm season! Jungle rot was a bad thing to come down with, but was often the ticket outta there. I wasn't that lucky! The trails would get so hot in the summer time that they would put blisters on your hands. Gunners usually sat on a towl or a bunch of empty sand bags. Otherwise get blisters and a not so nice place! At night the gunner would often use a flashlight with a red lense, but everybody else was blind. I had a shake & bake pull out a flashlight at the beginning of a fire mission, and the gunner grabbed it away from him! A match light will blind you. Top has no sense of humor while you wait to get your night vision back! As late as the spring of 1968, it was not uncommon to see a guy wearing stateside uniforms in Vietnam. Even regular combat boots! Specially when it started raining! Plus they were warmer. Stateside stuff normally had rank and stuff sewn on it unless the guy had a brain. Some guys cut off the pants and made shorts out of them, but we couldn't. We only had two pairs of pants. Nothing like Alan Alda on MASH. gary |
|
sturmbird
Full Member
  
Member since: June 2012
Posts: 1,406
Jun 21, 2012 13:51:45 GMT -5
Jun 21, 2012 13:51:45 GMT -5
|
Post by sturmbird on Jul 30, 2013 0:28:59 GMT -5
Another great update! Never ever get tired of looking at your work... great details. Learned from you earlier about wearing no web gear or equipment... trust me you will find me half naked most of times if I was in the artillery. I've shot 88% naked more than once! gary |
|
redleg12
Full Member
  
Member since: August 2012
www.redleg2scale.com
Posts: 401
Aug 28, 2012 18:59:10 GMT -5
Aug 28, 2012 18:59:10 GMT -5
|
Post by redleg12 on Jul 30, 2013 5:43:15 GMT -5
Andy - Ahhh... naked artillery is the way to be. When the call "fire mission" comes you go however you are. Boots, shorts and a helmet are possible. Thanks for the peek.
Joe - Thanks, many years with the real deal make the modeling details easy. Always glad to have you stop by.
Gary - All I will say....jungle boots, shorts and a helmet... the 3 am fire mission uniform! Always great to have you add your memories.
Rounds Complete!!
|
|
|
|
Post by bullardino on Aug 6, 2013 9:22:58 GMT -5
All the details you're adding are really paying off, Mike  |
|
redleg12
Full Member
  
Member since: August 2012
www.redleg2scale.com
Posts: 401
Aug 28, 2012 18:59:10 GMT -5
Aug 28, 2012 18:59:10 GMT -5
|
Post by redleg12 on Sept 15, 2013 20:47:43 GMT -5
It has been a while. Let me get caught up. Lots of casting and scratch work. As you saw in my last update I was casting projectiles powder cans and other needed items. Also made custom decals for the ammunition crates, powder cans and projectiles. Sooo, first looking at the howitzer, the ramming staff is a .040 wood dowel cut 1 inch long and a punched disc from .020 styrene at .160 diameter. The swab is also .040 wood dowel 1 inch long. The swab is a ball of airplane tissue wrapped in the end. The swab is weathered with Tamiya Smoke. The end of the ramming staff is Alclad Steel. The pail is a Tamiya accessory kit and painted Alclad Steel. Inside the pail is half full using tinted clear furniture urethane which gives the clear oily water effect in the pail The lanyard is a scale 18” lanyard using shipbuilders string and small section of .040 styrene rod shaped for the end and 26 gauge SS wire used to create the lanyard end and hook  Next is the powder drum painted black and red and “partially buried”. Inside the drum are 5 powder increments that came with the kit as excess powder charges. To the left is a scale 2 meter aiming stake made with styrene rod and painted red and white, scratches with Alclad steel and aged with a mix of steel and rust pigment. 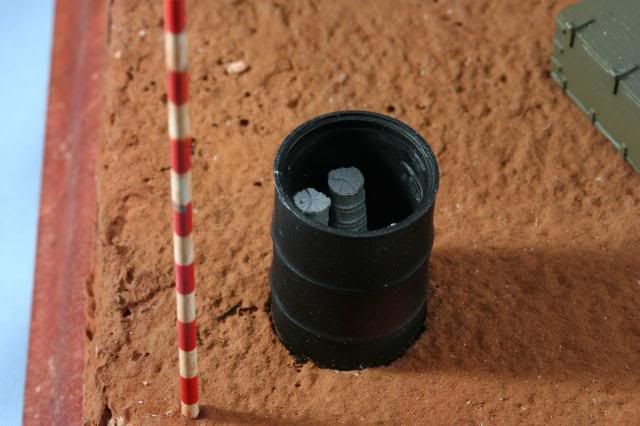 Next I made the walls for the ammunition enclosure using 1/32 inch plywood walls and the beams are .1 inch basswood. After making the back and side walls, here painted with black for some shading prior to painting using Marine Green. 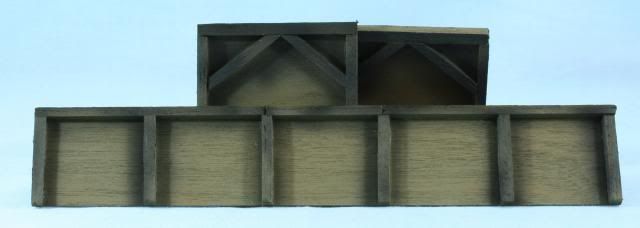 Next the walls were assembled. The roof supports of the 105mm crates, with custom decals. The shorter powder cans are for green bag charges and the taller for white bag charges. All the cans have a custom made decal. In the second bay of the storage shed is crates for fuses with custom made decals. The roof is made from resin planks covered with air-dry clay sand bags. The planks are painted to match the walls and the sand bags are painted Tamiya Drab Green. The section chest is from the resin parts box, the oil can from a Tamiya accessory set with a custom decal for “bore cleaner” 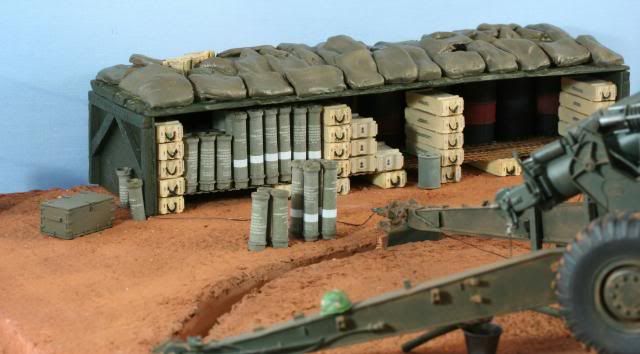 Next up the projectile, scratch colimeter, final assembly and weathering. Trying to finish up for Armorcon at the end of the month. As always if you have any comments, please feel free to drop in. Rounds Complete!! |
|
|
|
Post by bbd468 on Sept 15, 2013 20:58:53 GMT -5
Hiya Mike! Man, that stacked ammo looks awesome as does the inclosure! Great works fella.  |
|
|
|
Post by fightnjoe on Sept 15, 2013 21:03:14 GMT -5
wow. the amount of detail you put into your builds is out of this world.
watching and learning from this end.
joe
|
|
|
|
Post by bullardino on Sept 16, 2013 0:24:54 GMT -5
Amazing details, everything looks like it is going to fire in a moment  |
|
redleg12
Full Member
  
Member since: August 2012
www.redleg2scale.com
Posts: 401
Aug 28, 2012 18:59:10 GMT -5
Aug 28, 2012 18:59:10 GMT -5
|
Post by redleg12 on Sept 16, 2013 5:40:51 GMT -5
BBD - Thanks for stopping by and for the comments
Joe - Thanks, you know I love my little details
Luigi - Not yet.....still have to put in the projectiles in the model...then we are ready to fire! Thanks
Rounds Complete!!
|
|
|
|
Post by TRM on Sept 16, 2013 5:45:24 GMT -5
I had to play some big catch up on this Mike...Looking fantastic!! Dio is really comeing together!! Looking forward to seeing this ans you at ArmorCon!!
|
|
|
|
Post by 406 Silverado on Sept 16, 2013 9:49:10 GMT -5
Caught this on FB. This turned out great Mike. I like the stowage area. Hoping to see this at the Amorcon show in less than two weeks.
|
|
|
|
Post by wbill76 on Sept 16, 2013 16:14:06 GMT -5
Nice to see you getting in some bench time and keeping this one moving Mike, very nice work on the ammo details and all the other little bits as usual, lots of stuff to draw the eye!
|
|
|
|
Post by Leon on Sept 16, 2013 16:49:13 GMT -5
WOW  ,awesome work on the ammo bunker,crates,and powder cans Mike.Looking forward to the projectiles.   |
|
redleg12
Full Member
  
Member since: August 2012
www.redleg2scale.com
Posts: 401
Aug 28, 2012 18:59:10 GMT -5
Aug 28, 2012 18:59:10 GMT -5
|
Post by redleg12 on Sept 16, 2013 18:51:04 GMT -5
T - Thanks, I will be at the raffle booth. Stop by and chew the styrene fat!!
Rob - Looking forward to see you at Danbury...missed you brother!
Bill - It has been a tough year....hoping to get back into things in the coming months
Leon - Always a pleasure to have you stop by and thanks for the comments.
Rounds Complete!!
|
|
Deleted
Member since: January 1970
Posts: 0
Dec 4, 2024 4:35:29 GMT -5
Dec 4, 2024 4:35:29 GMT -5
|
Post by Deleted on Sept 16, 2013 18:54:20 GMT -5
Lookin great!
|
|
M1Carbine
Senior Member
    November '23 Showcased Model Awarded
Member since: November 2012
Posts: 1,739
Nov 16, 2012 2:49:11 GMT -5
Nov 16, 2012 2:49:11 GMT -5
|
Post by M1Carbine on Sept 16, 2013 19:36:09 GMT -5
Mike - holy Hannah, that looks absolutely spot on. Outstanding work buddy.
Bob
|
|
redleg12
Full Member
  
Member since: August 2012
www.redleg2scale.com
Posts: 401
Aug 28, 2012 18:59:10 GMT -5
Aug 28, 2012 18:59:10 GMT -5
|
Post by redleg12 on Sept 17, 2013 5:45:49 GMT -5
Bruce - Thanks for the peek
Bob - Thanks, for the comments and for stopping in
Rounds Complete!!
|
|
sturmbird
Full Member
  
Member since: June 2012
Posts: 1,406
Jun 21, 2012 13:51:45 GMT -5
Jun 21, 2012 13:51:45 GMT -5
|
Post by sturmbird on Sept 17, 2013 11:13:49 GMT -5
It has been a while. Let me get caught up. Lots of casting and scratch work. As you saw in my last update I was casting projectiles powder cans and other needed items. Also made custom decals for the ammunition crates, powder cans and projectiles. Sooo, first looking at the howitzer, the ramming staff is a .040 wood dowel cut 1 inch long and a punched disc from .020 styrene at .160 diameter. The swab is also .040 wood dowel 1 inch long. The swab is a ball of airplane tissue wrapped in the end. The swab is weathered with Tamiya Smoke. The end of the ramming staff is Alclad Steel. The pail is a Tamiya accessory kit and painted Alclad Steel. Inside the pail is half full using tinted clear furniture urethane which gives the clear oily water effect in the pail The lanyard is a scale 18” lanyard using shipbuilders string and small section of .040 styrene rod shaped for the end and 26 gauge SS wire used to create the lanyard end and hook  Next is the powder drum painted black and red and “partially buried”. Inside the drum are 5 powder increments that came with the kit as excess powder charges. To the left is a scale 2 meter aiming stake made with styrene rod and painted red and white, scratches with Alclad steel and aged with a mix of steel and rust pigment.  Next I made the walls for the ammunition enclosure using 1/32 inch plywood walls and the beams are .1 inch basswood. After making the back and side walls, here painted with black for some shading prior to painting using Marine Green.  Next the walls were assembled. The roof supports of the 105mm crates, with custom decals. The shorter powder cans are for green bag charges and the taller for white bag charges. All the cans have a custom made decal. In the second bay of the storage shed is crates for fuses with custom made decals. The roof is made from resin planks covered with air-dry clay sand bags. The planks are painted to match the walls and the sand bags are painted Tamiya Drab Green. The section chest is from the resin parts box, the oil can from a Tamiya accessory set with a custom decal for “bore cleaner”  Next up the projectile, scratch colimeter, final assembly and weathering. Trying to finish up for Armorcon at the end of the month. As always if you have any comments, please feel free to drop in. Rounds Complete!!
The rammer staff we used had a bell shaped end on it, and was painted black (could well have just been crud). Keep in mind that unless they are setting the gun for the first time, there wouldn't be a colimeter in the area. The squad that used it came out of division or battalion arty. Possession of the colimeter by the NVA would have been the last thing anybody would have wanted! The gun would be laid within ten minutes of when it was first set in the parapet, and ready to fire in about fifteen minutes of then. I would also add a couple jerry cans with non potable water written on them. Also add a 5.56 ammo can just under the trail behind the AG. That's what most used to hold their stash of primers in. We didn't use the powder barrel, but a lot of units did. Our left over stuff was just tossed to the side and picked up after the mission to be burnt.
gary |
|
sturmbird
Full Member
  
Member since: June 2012
Posts: 1,406
Jun 21, 2012 13:51:45 GMT -5
Jun 21, 2012 13:51:45 GMT -5
|
Post by sturmbird on Sept 17, 2013 11:19:35 GMT -5
forgot to tell you to be sure to tape a flashlight with a red and green lense on the aiming stakes. They are usually placed out about 150 feet to 250 feet. Seems like green was the closer of the two to the gunner. We actually did use black friction tape to hold the flashlights in place
gary
|
|
|
|
Post by dupes on Sept 17, 2013 12:39:31 GMT -5
Wow, Mike - this looks AWESOME!
|
|
redleg12
Full Member
  
Member since: August 2012
www.redleg2scale.com
Posts: 401
Aug 28, 2012 18:59:10 GMT -5
Aug 28, 2012 18:59:10 GMT -5
|
Post by redleg12 on Sept 18, 2013 6:00:00 GMT -5
Gary - as always thanks for the comments. This has been a compilation of different things I have seen in different photos. The flashlight on the aiming post is a good thought. It is too close to the weapon but you have to take some artistic license. Also the artistic license of the pail, most people would not understand the ammo can for the swab. Still have some ammo boxes coming for the primers, on near the weapon and a few in the shed. Jerry cans are also a thought...into the parts box. Thanks again
Marc - Thanks, great to hear from you.
Rounds Complete!!
|
|
|
|
Post by tonylee-Rest In Peace on Sept 18, 2013 9:43:28 GMT -5
Mike you've gone and done it now. For me it's your B E S T ever buddy.  GREAT work big guy Tony lee |
|
sturmbird
Full Member
  
Member since: June 2012
Posts: 1,406
Jun 21, 2012 13:51:45 GMT -5
Jun 21, 2012 13:51:45 GMT -5
|
Post by sturmbird on Sept 18, 2013 11:16:15 GMT -5
Gary - as always thanks for the comments. This has been a compilation of different things I have seen in different photos. The flashlight on the aiming post is a good thought. It is too close to the weapon but you have to take some artistic license. Also the artistic license of the pail, most people would not understand the ammo can for the swab. Still have some ammo boxes coming for the primers, on near the weapon and a few in the shed. Jerry cans are also a thought...into the parts box. Thanks again Marc - Thanks, great to hear from you. Rounds Complete!! I knew up front you didn't have room to place the aiming stakes out where they are actually used. But on the other hand, most folks don't know about the green and red lenses, let alone being attached to the aiming stakes. The gunner almost always kept one in his position with a red lens I might add. Reason for the red lens was purely night vision, and keep in mind mortal combat is a 24/7 event. Always remember the phrase "near,far,line" when looking thru the scope. For the swab, we simply rolled up two or three sand bags on the end of the shaft. Actually the good old canvas sandbag does a better job that the mil spec swab! The water bucket works just fine. We used the big fifty caliber ammo can or a bomb fuse container. The reason for the water cans is that more than once we found the water bucket had dried up on us! At the rear of the gun (where we placed the field telephone) we left the fuse wrench. You need it the radio guy would toss it to you. There was always a flashlight left with the fuse wrench to help you find the marks on a 565 fuse in the dark. Seeing the acorn on the end of the lanyard, reminded me of the great rat incident! <GGGGGGG> Randy looked at me as it was coming to play, and simply said to me that "we were on the way to jail." First Sargent was somewhat unimpressed! gary P.S. Tamiya comes out with a super obscure truck that everybody despised, and once again ignored the M37 and the M54 trucks! |
|