Whiterook
Full Member

Member since: March 2013
Posts: 837
Mar 13, 2013 15:29:19 GMT -5
Mar 13, 2013 15:29:19 GMT -5
|
Post by Whiterook on Mar 19, 2013 15:54:24 GMT -5
|
|
Whiterook
Full Member
Member since: March 2013
Posts: 837
Mar 13, 2013 15:29:19 GMT -5
Mar 13, 2013 15:29:19 GMT -5
|
Post by Whiterook on Mar 19, 2013 15:59:09 GMT -5
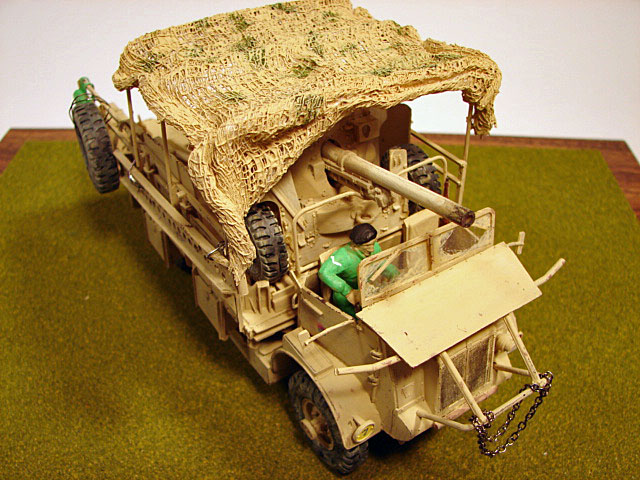
I wanted a rolled effect on the sides, and a wind-blown tattered effect on the edges. This stuff is great for 1/35 scale work, as the mesh is pretty darned perfect to my judgement. When I use this on my 15mm wargaming dioramas, I tend o double it up to give the illusion that the mesh isn't so big on that scale. Anyway, next came some paint....I used Folk Art "Desert Sand", making sure not to apply it too thickly, too quickly. I wanted to avoid filling the holes inbetween the cheesecloth "netting" with paint.....   It would get a little more paint soon, but a little paint really transformed it into something believable! |
|
Whiterook
Full Member
Member since: March 2013
Posts: 837
Mar 13, 2013 15:29:19 GMT -5
Mar 13, 2013 15:29:19 GMT -5
|
Post by Whiterook on Mar 19, 2013 16:08:53 GMT -5
|
|
Whiterook
Full Member
Member since: March 2013
Posts: 837
Mar 13, 2013 15:29:19 GMT -5
Mar 13, 2013 15:29:19 GMT -5
|
Post by Whiterook on Mar 19, 2013 16:13:04 GMT -5
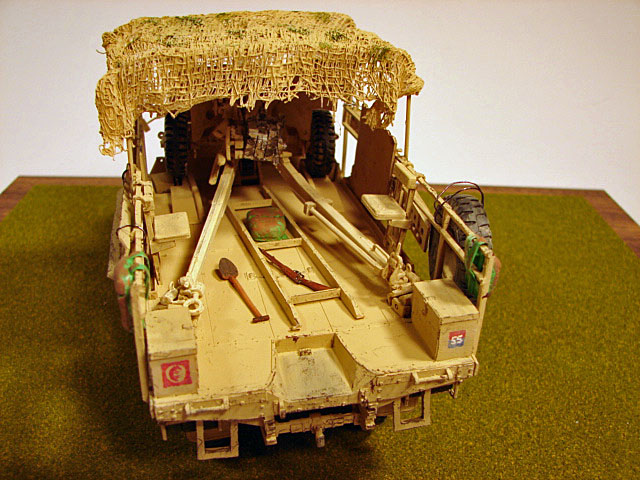
One place I decided to deviate way off course were the gun ramps. These ramps came with the kit solid, and they looked so fake it bothered the heck out of me. The ends have a nice U-shaped hook used to secure onto the back of the truck bed, but that's where the nice detail ended for these two parts. My solution to spice them up a bit was to drill traction holes in them! I used a pin vice, and drilled each hole in a pattern simulating ones perhaps done in the field, and not necessarily in the factory. I think it adds to the visual appeal tremendously!  |
|
|
|
Post by Leon on Mar 19, 2013 16:31:24 GMT -5
Awesome work on the netting and nice touch on the ramps.  |
|
Whiterook
Full Member
Member since: March 2013
Posts: 837
Mar 13, 2013 15:29:19 GMT -5
Mar 13, 2013 15:29:19 GMT -5
|
Post by Whiterook on Mar 19, 2013 17:03:36 GMT -5
Awesome work on the netting and nice touch on the ramps. Thanks....I like the end result much better than solid ramps. I appreciate all the interest in the build, and the great comments. |
|
Whiterook
Full Member
Member since: March 2013
Posts: 837
Mar 13, 2013 15:29:19 GMT -5
Mar 13, 2013 15:29:19 GMT -5
|
Post by Whiterook on Mar 19, 2013 17:10:32 GMT -5
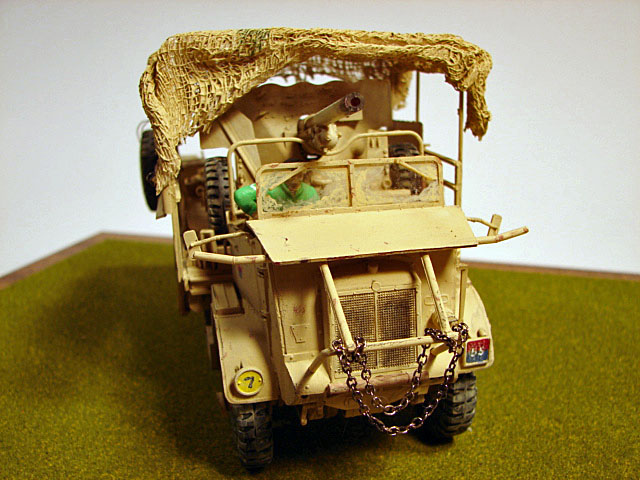
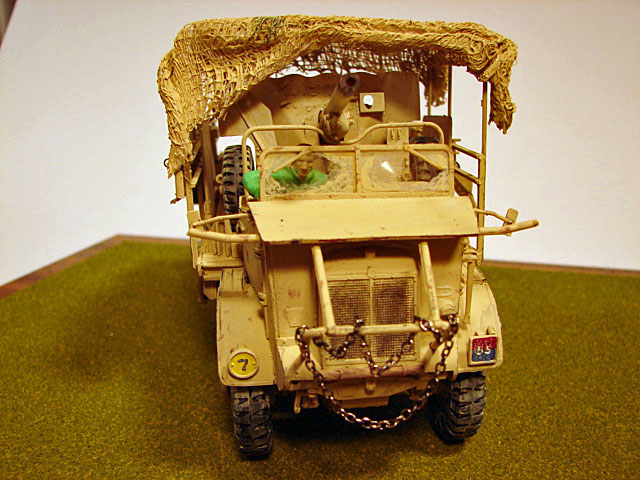
At this point in the build, this is where I had to figure out how to handle a couple issues. If you remember from earlier, I had mentioned two very important things were missing from the kit: The clear plastic windshield, and the decals! First issue...the windshield. I found some scrap clear plastic from out recycling bin to use as a windshield. Cutting it to size, I applied the clear plastic to the windshield frame to the cab, and allowing it to dry overnight, I then applied acrylic paint in the form of a very dusty and mud caked windshield, complete with wiper pattern.   I was also put the roll-bar like object you see in the rear of the cab...the round center is to accommodate the gun barrel when loaded aboard. |
|
Whiterook
Full Member
Member since: March 2013
Posts: 837
Mar 13, 2013 15:29:19 GMT -5
Mar 13, 2013 15:29:19 GMT -5
|
Post by Whiterook on Mar 19, 2013 17:19:30 GMT -5
|
|
Whiterook
Full Member
Member since: March 2013
Posts: 837
Mar 13, 2013 15:29:19 GMT -5
Mar 13, 2013 15:29:19 GMT -5
|
Post by Whiterook on Mar 19, 2013 17:24:51 GMT -5
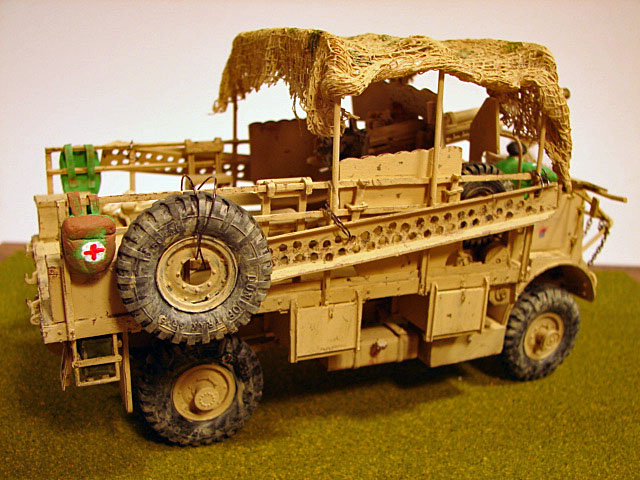
Next, I started to weather the model. Some strategic chips and dings were placed, but I opted to not go too overboard. Weathering was still a relatively new concept for me at th time I built this kit, and I was learning as I went. Not everything worked, and I had to backtrack and repaint, then try again, but I do remember I was getting the look that I had envisioned after some minor trial and error.  I also took time to paint some camouflage spots on the camo netting...it was too boring earlier, and I thought it added to the overall look, as well as offered nice contrast to the rest of the vehicle.  |
|
Whiterook
Full Member
Member since: March 2013
Posts: 837
Mar 13, 2013 15:29:19 GMT -5
Mar 13, 2013 15:29:19 GMT -5
|
Post by Whiterook on Mar 19, 2013 17:28:23 GMT -5
Nice work here on a venerable old kit of an interesting vehicle WR I can't say I'm familiar with Tomy other than as a toy manufacturer but despite a few easily remedied detail issues it certainly looks like a Portee to me  Thanks Dicky...it was the first and only Tomy kit I've worked on. I wouldn't classify them as high end, based on this kit, but I don't really know how good or bad their kits were overall. The kit kinda reminded me of Rodin kits. |
|
Whiterook
Full Member
Member since: March 2013
Posts: 837
Mar 13, 2013 15:29:19 GMT -5
Mar 13, 2013 15:29:19 GMT -5
|
Post by Whiterook on Mar 19, 2013 17:36:28 GMT -5
I then decided to try an experiment harkening back to my days as a sculptor...a LONG time ago! Field packs and a medic kit! I wanted to hang these on the railings for a more battle ready look. I used an air drying clay from a maker called Prang (who also make some very nice low-cost colored pencils, I've been told), and molded the rough shape I wanted. In truth, I was never really happy with the end result of these bags, but they are 'OK'. Anywhoo...the great stuff about air-drying clay (as opposed to the oven bake stuff, like Sculpy) is that it dries hard withing a few hours and then is totally workable to be scribed, or just painted directly! I use this stuff for many gaming projects for my 15mm miniatures; makes great obstacles, and for sculpting bombed out buildings! This one block of Prang clay is about 12' X 4" X 2" and costs well under $10 USD at the aforementioned Michael's Craft store....plus, I bought it with one of their weekly flyer coupons for 40% off! Now that's thinking outside of the box!!! This clay is wonderful, by the way. It comes in a sealed foil pouch-like container, which is moist inside...as long as you immediatly put ot in a zip-lock bag....I use a freezer bag, and try and get all the air you can out of it, you'll avoid trouble. You can also put an old wet facecloth in the bag to keep the "juices in"! So on the field bags, I was not necessarily looking for drop-dead detail and accuracy, as much as the suggestion of the objects...hence, you won't see a lot of folds in the canvas. I used some elementary sculpting tools to fashion the bags, which....yup....bought at Michael's Craft store, with a 40% off coupon!!!  Next, the straps...I used blue painter's tape, which I folded in half and then sliced a couple long strips....   Blue Painter's tape is another wonderful project resource to have close by in your modeling arsenal. It's fairly cheap, and has a myriad of uses....but the best is for making harness straps and seat belts for modeling! And when your wife wants you to paint the Kitchen, your ready to go!!!!!!! |
|
Whiterook
Full Member
Member since: March 2013
Posts: 837
Mar 13, 2013 15:29:19 GMT -5
Mar 13, 2013 15:29:19 GMT -5
|
Post by Whiterook on Mar 19, 2013 17:39:21 GMT -5
Then I used the blade of my craft knife to make slits in the tops of the bags, insert the "straps" in the slits, and gently mold the clay back around the straps. This was all allowed to air dry for several hours. Again, this stuff is brilliant, as it hardens up just like you threw it in a kiln. It actually works a lot better than the home-bake clays, like "Sculpey".  Next came a little superglue on the straps to ensure they don't pull out, especially when I go to attach them to the railings. Next, I painted the bags with Folk Art acrylics...Olive Green, including the straps. When you paint the tape, it actually makes it much easier to "shape" as you bend it arond things, or in nooks and crannies. Next came a cross for the Medics bag....     |
|
Whiterook
Full Member
Member since: March 2013
Posts: 837
Mar 13, 2013 15:29:19 GMT -5
Mar 13, 2013 15:29:19 GMT -5
|
Post by Whiterook on Mar 19, 2013 17:44:34 GMT -5
The bags were then glued to the side rails of the back bed....  Above is a good look at the drilled-out gun ramps. I was very happy with the end result on those!!!  Also note, the gun finally made it aboard!!!  The spare was wired onto the rail...meant to look tied on, but it could have been better...  |
|
Whiterook
Full Member
Member since: March 2013
Posts: 837
Mar 13, 2013 15:29:19 GMT -5
Mar 13, 2013 15:29:19 GMT -5
|
Post by Whiterook on Mar 19, 2013 17:51:07 GMT -5
|
|
Whiterook
Full Member
Member since: March 2013
Posts: 837
Mar 13, 2013 15:29:19 GMT -5
Mar 13, 2013 15:29:19 GMT -5
|
Post by Whiterook on Mar 19, 2013 17:54:37 GMT -5
|
|
Whiterook
Full Member
Member since: March 2013
Posts: 837
Mar 13, 2013 15:29:19 GMT -5
Mar 13, 2013 15:29:19 GMT -5
|
Post by Whiterook on Mar 19, 2013 17:57:47 GMT -5
|
|
Whiterook
Full Member
Member since: March 2013
Posts: 837
Mar 13, 2013 15:29:19 GMT -5
Mar 13, 2013 15:29:19 GMT -5
|
Post by Whiterook on Mar 19, 2013 17:59:21 GMT -5
|
|
|
|
Post by deafpanzer on Mar 19, 2013 18:03:15 GMT -5
Way too cool! Really great tip about using cheesecloth. Always wanted to try that one day.
|
|
|
|
Post by wbill76 on Mar 19, 2013 19:27:50 GMT -5
Nice walk-through Em, you definitely did the old kit up right! |
|
|
|
Post by wing_nut on Mar 20, 2013 16:48:38 GMT -5
Sharp work there. Nice work on the packs.
|
|
|
|
Post by tonylee on Mar 20, 2013 20:35:07 GMT -5
Dang WR that was a quicky. I bet that truck did the bunny hop when you fired that gun. Time for the next project Tony lee |
|
multicam
Senior Member

Member since: January 2012
Nate
Posts: 2,039
Jan 10, 2012 14:35:41 GMT -5
Jan 10, 2012 14:35:41 GMT -5
|
Post by multicam on Mar 20, 2013 21:38:16 GMT -5
Turned out really nice! Love the mesh tarp/net:)
|
|
Whiterook
Full Member
Member since: March 2013
Posts: 837
Mar 13, 2013 15:29:19 GMT -5
Mar 13, 2013 15:29:19 GMT -5
|
Post by Whiterook on Feb 2, 2019 20:55:20 GMT -5
I edited the thread to put in the final pictures. Unfortunately, I cannot find the original build pics, but if I do, I'll update the thread further. Thanks for you patience, and all the great comments!
|
|