wetsellery
Full Member

Member since: June 2013
Posts: 130 
|
Post by wetsellery on Jun 3, 2013 1:21:12 GMT -5
|
|
|
|
Post by Leon on Jun 3, 2013 1:50:04 GMT -5
WOW that is some awesome work Pascal  .Want to see some more.  |
|
|
|
Post by bullardino on Jun 3, 2013 2:12:47 GMT -5
I agree with Leon, this one looks awesome |
|
wetsellery
Full Member
Member since: June 2013
Posts: 130
|
Post by wetsellery on Jun 3, 2013 9:40:03 GMT -5
|
|
|
|
Post by bbd468 on Jun 3, 2013 9:55:06 GMT -5
Wow, this is cool and looks fun! Great upgrades fella.  |
|
Deleted
Member since: January 1970
Posts: 0
Nov 28, 2024 0:36:14 GMT -5
Nov 28, 2024 0:36:14 GMT -5
|
Post by Deleted on Jun 5, 2013 0:11:22 GMT -5
Looking good on this one! Keep it going!
|
|
|
|
Post by `Boots` on Jun 8, 2013 13:29:16 GMT -5
Thats terrific work...........look forward to more of this bud!
|
|
wetsellery
Full Member
Member since: June 2013
Posts: 130
|
Post by wetsellery on Jun 22, 2013 2:51:24 GMT -5
|
|
|
|
Post by Leon on Jun 22, 2013 3:18:14 GMT -5
Pascal,you are doing some amazing scratch work on this ,and it is looking really good.  |
|
wetsellery
Full Member
Member since: June 2013
Posts: 130
|
Post by wetsellery on Jul 7, 2013 18:29:13 GMT -5
The suspension "arms / bars" (what's the name of those things ?) are overscale : .jpg) .jpg) Made my one from a brass tube and rebuild the gearbox : .jpg) All my work is inspected by my cat : .jpg) .jpg) .jpg) Sincerely Pascal |
|
Deleted
Member since: January 1970
Posts: 0
Nov 28, 2024 0:36:14 GMT -5
Nov 28, 2024 0:36:14 GMT -5
|
Post by Deleted on Jul 7, 2013 19:01:15 GMT -5
Incredible work.
G
|
|
wetsellery
Full Member
Member since: June 2013
Posts: 130
|
Post by wetsellery on Jul 21, 2013 17:21:25 GMT -5
This is how HW made the exhaust pipes : .jpg) The first 2, made from sprue : .jpg) Four more : .jpg) This 333SP has no radiators, the inside of the sidepods will be visible. I removed the 4 metal tubes that hold the screws : .jpg) And modified the fueltank. Before : .jpg) After : .jpg) .jpg) Sincerely Pascal |
|
|
|
Post by wbill76 on Jul 22, 2013 20:00:59 GMT -5
Very nice adaptation work Pascal, exhaust pipes look light years better than what HW gave you. |
|
wetsellery
Full Member
Member since: June 2013
Posts: 130
|
Post by wetsellery on Aug 31, 2013 11:20:35 GMT -5
It took a lot of work (and patience) to build the rear suspension from brass tube and copper plate : .jpg) Fixed together with a soldering iron : .jpg) Dryfit with the wheels : .jpg) The construction is hold together by 2 brass tubes inside the gearbox. It will be glued after painting : .jpg) There still a lot of sanding work left on the headlight housings, and I have to find a way to make the headlight covers : .jpg) Sincerely Pascal |
|
|
|
Post by wbill76 on Sept 1, 2013 9:09:16 GMT -5
Nice job on the suspension unit Pascal, lots of metal work there but it looks great.
|
|
|
|
Post by Mence on Sept 3, 2013 13:53:59 GMT -5
Amazing work Pascal, a pleasure to follow.
|
|
wetsellery
Full Member
Member since: June 2013
Posts: 130
|
Post by wetsellery on Aug 3, 2014 8:19:45 GMT -5
It's been a while. The exhausts have given me a lot of headaches. But after much trial and error I found a method that works for me. I don't know how many times I build and rebuild the exhaust tubes, but here's some pics of the different versions. Electric wire : .jpg) Solder wire : .jpg) .jpg) Leftover plastic (sprues) from a 1/35 scale tank : .jpg) .jpg) I modified the engine in order to fit the exhaust tubes : .jpg) .jpg) And the finally I found the right method to make the exhaust, a mixture of sprue, solder wire and aluminium wire : .jpg) .jpg) .jpg) Let's compare it with a reference pic : .jpg) YES, were getting there !! Sincerely Pascal |
|
wetsellery
Full Member
Member since: June 2013
Posts: 130
|
Post by wetsellery on Aug 3, 2014 8:22:43 GMT -5
After a lot of hours of bending, cutting, sanding and dryfitting the left set of three inner pipes is ready : .jpg) .jpg) |
|
|
|
Post by Leon on Aug 3, 2014 11:28:55 GMT -5
Awesome work on the exhaust Pascal.Your doing an outstanding job so this. |
|
|
|
Post by deafpanzer on Aug 4, 2014 11:31:22 GMT -5
Looking pretty good!
|
|
wetsellery
Full Member
Member since: June 2013
Posts: 130
|
Post by wetsellery on Aug 17, 2014 7:57:02 GMT -5
The engine compartment has a big airscoop. I opened up the hole in the front and glued the inner part with CA which was covered with flour : .jpg) .jpg) The HW version looks like this : .jpg) The real one looks like this (this is not a picture of the car that won the race, but it has the same type of airscoop) : 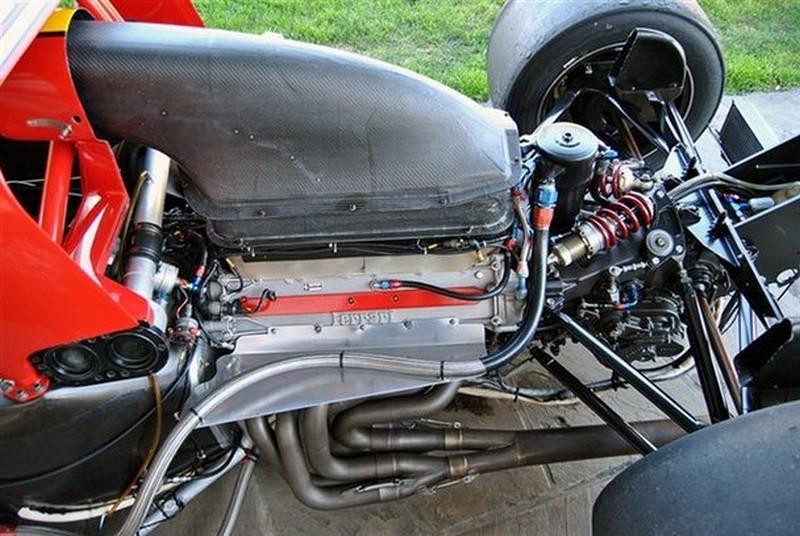 I used my dremel to cut a line that will hold the top horizontal frame : .jpg) Sincerely Pascal |
|
|
|
Post by deafpanzer on Aug 17, 2014 23:33:54 GMT -5
Huge improvement there!
|
|
wetsellery
Full Member
Member since: June 2013
Posts: 130
|
Post by wetsellery on Sept 1, 2014 16:18:07 GMT -5
Step 1 : .jpg) .jpg) |
|
wetsellery
Full Member
Member since: June 2013
Posts: 130
|
Post by wetsellery on Sept 15, 2014 11:04:06 GMT -5
Step 2 : .jpg) .jpg) |
|
|
|
Post by deafpanzer on Sept 15, 2014 11:56:17 GMT -5
Catching up... looking perfect!
|
|
wetsellery
Full Member
Member since: June 2013
Posts: 130
|
Post by wetsellery on Nov 1, 2014 10:51:01 GMT -5
More work on the big airscoop. I started by glueing the white plastic strip on the bottom of the airscoop (the silver paint is there to spot any gaps and cracks) : .jpg) Glued some plastic strip on the top of the engine to fill the gaps : .jpg) The airscoop now fits perfectly and without gaps on the engine : .jpg) The yellow strip will get roughly the same shape as the grey one : .jpg) I've added about 0,75 mm to the grey strip because it was to narrow : .jpg) Should look something like this : .jpg) Sincerely Pascal |
|
|
|
Post by deafpanzer on Nov 2, 2014 9:05:26 GMT -5
Awesome... glad you could fix it!
|
|
wetsellery
Full Member
Member since: June 2013
Posts: 130
|
Post by wetsellery on May 18, 2015 11:44:37 GMT -5
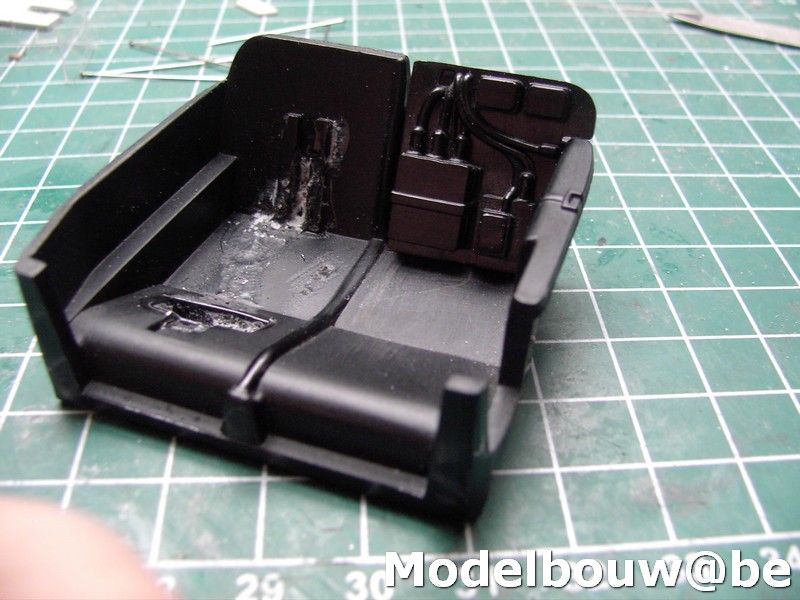
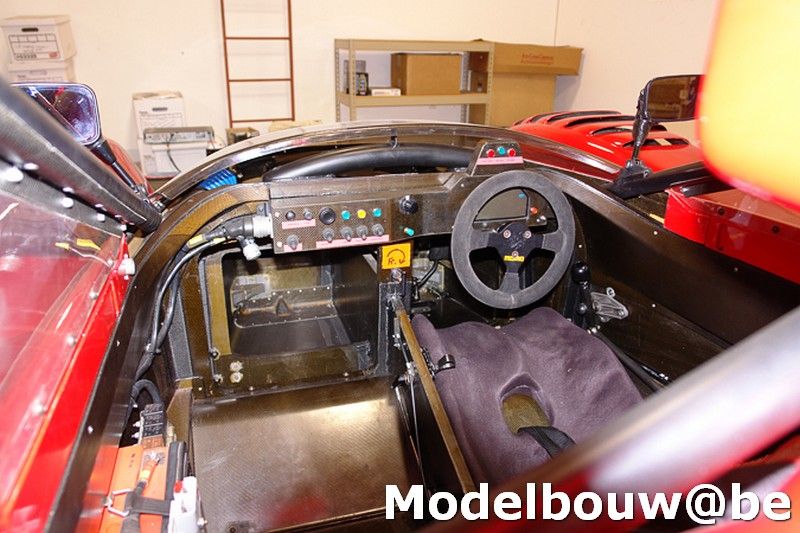
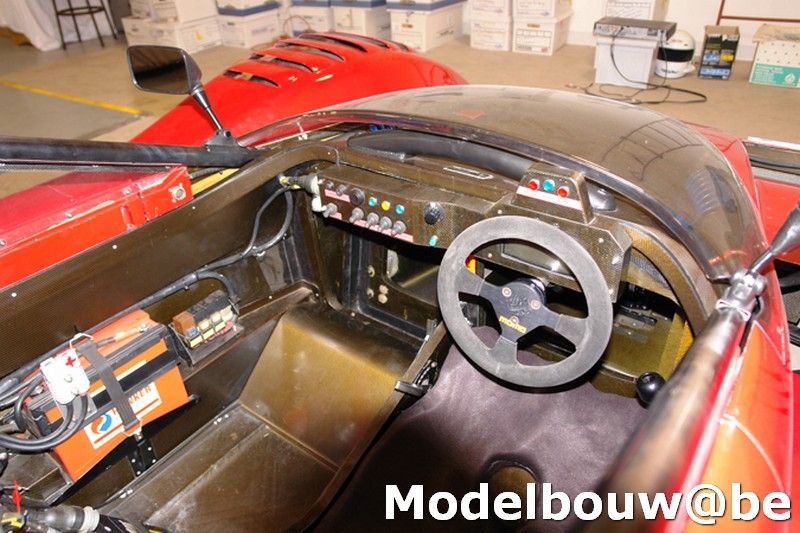
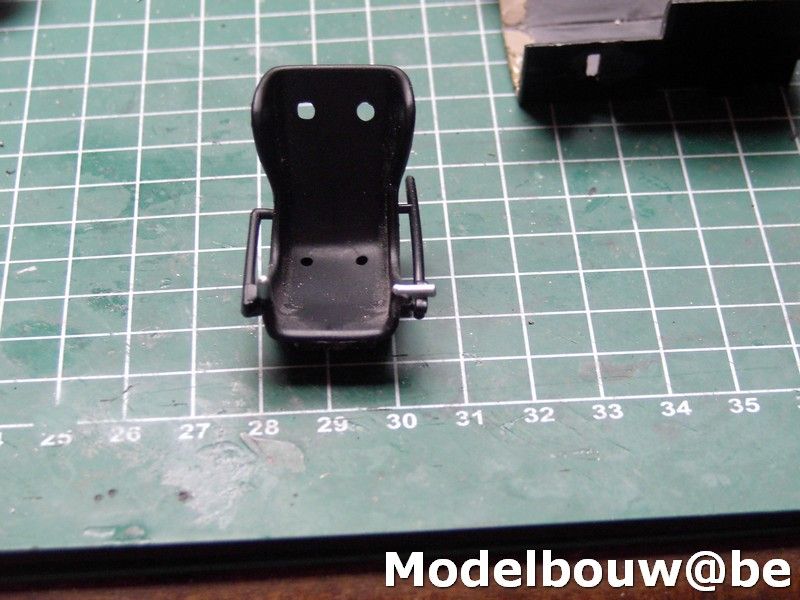
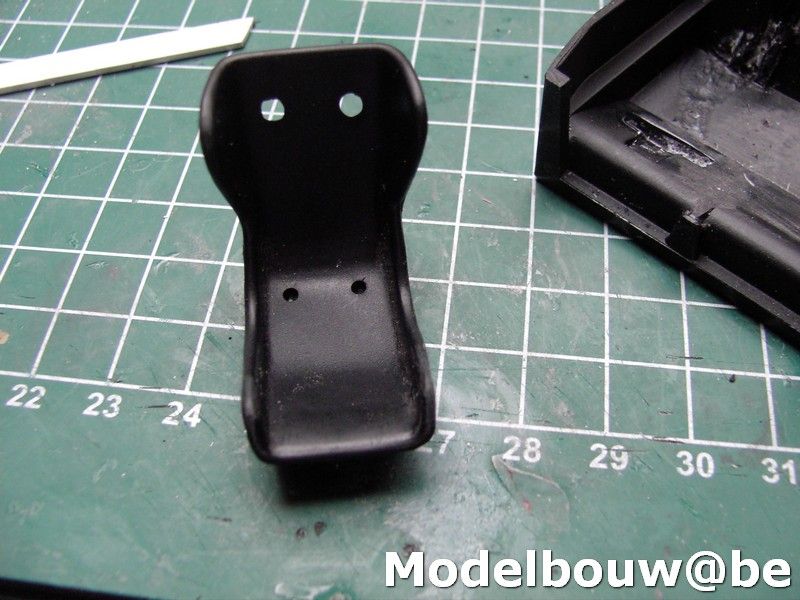
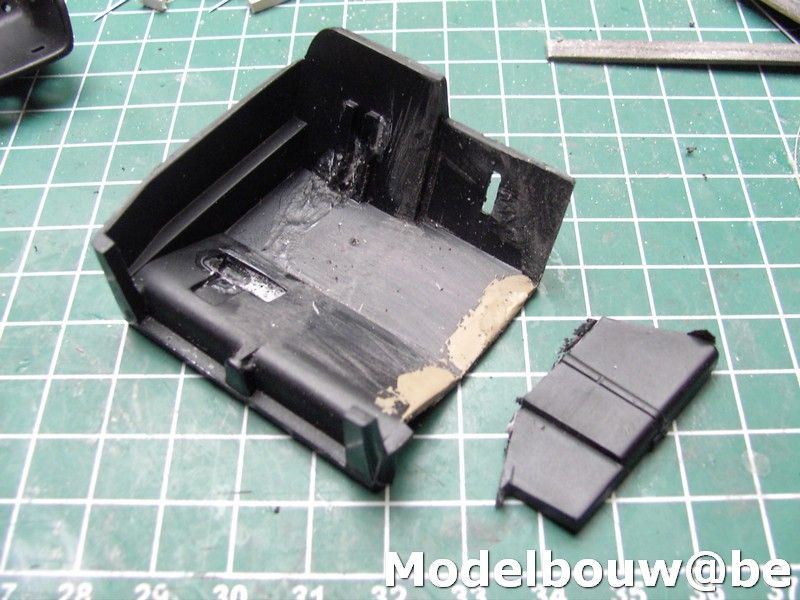
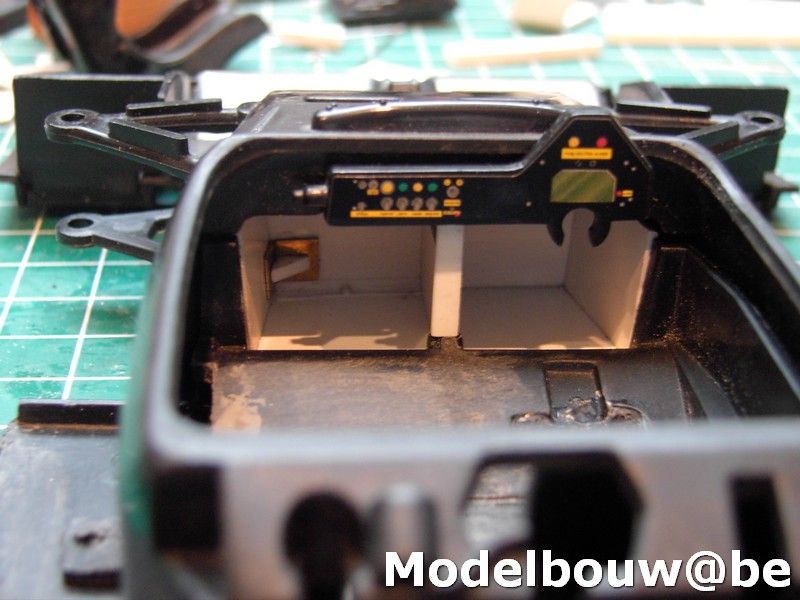
Update. Fuelpipe : first thing was to make the connector between the body and the pipe. I was a question of trial and error to find the right dimension and the postion of the holes : .jpg) The pipe was made from a knitting needle, the rings are drilled out pieces of sprue : .jpg) Dryfit : .jpg) Hotwheels has made the windows and the frame in one piece, these will be replaced : .jpg) Step 1 : Make an cutout in the body and and drill a hole for the brass tubes : .jpg) Step 2 : Cut the brass tubes to size and insert a piece of copper wire : .jpg) Step 3 : Glue pieces of plasticard to give the brass tubes the correct angle : .jpg) Step 4 : Dryfit : .jpg) This is the HW electronics panel : .jpg) It's not wide enough and I don't like the details. After a couple of hours of sanding, drilling and dryfitting, this is the result : .jpg) I mad new electronic connectors with pieces from a lighter : .jpg) It was cut in three and then was sanded to size and reassembled : .jpg) The sidewalls of the cockpit need further modification. I've done some work in the past, but the walls weren't high enough. Now they run all the way to the underside of the body : .jpg) These are the first pieces I made for the battery and its housing : .jpg) The goal is to acheive this :  Sincerely Pascal |
|
|
|
Post by deafpanzer on May 19, 2015 8:25:49 GMT -5
So many little additions! Looking great!
|
|
wetsellery
Full Member
Member since: June 2013
Posts: 130
|
Post by wetsellery on May 22, 2015 13:57:47 GMT -5
Thanks ! Today I spend about 3 hours making the bracket for the battery. The bracket is scratchbuild and has 7 parts (5 brass, 2 plasticard), it's 5 x 3,5 x 3 mm : .jpg) .jpg) .jpg) A coat of primer shows that there is a bit more sanding to do : .jpg) .jpg) .jpg) Sincerely Pascal |
|


.jpg)
.jpg)
.jpg)
.jpg)


.jpg)
.jpg)
.jpg)
.jpg)
.jpg)
.jpg)
.jpg)
.jpg)
.jpg)


 .Want to see some more.


.jpg)
.jpg)
.jpg)
.jpg)
.jpg)
.jpg)
.jpg)
.jpg)
.jpg)
.jpg)
.jpg)
.jpg)


.jpg)
.jpg)
.jpg)
.jpg)


