MOOSE.
Full Member
  
Member since: May 2013
"Imagination is more important than Knowledge"
Posts: 396 
|
Post by MOOSE. on Jul 9, 2013 9:28:38 GMT -5
My first fixed wing build. Had to take a mental break from the 1/12 Enzo build lol...Did this Tamiya 1/48 F51D Mustang Korean War build. How'd I do? I am preparing to build the Tamiya 1/32 P51D Mustang Pacific Theater soon and wanted to get my "feet wet" with the wingy. After priming and laying the Alclad Duraluminum on the entire plane I realized, through my continuing studies of the WW2 planes, that the P51D's wings were primed and painted silver and the fuselage was typically bare metal.That is a mistake, I now realize, and will be corrected on the 1/32 build to be more accurate. I did not "wash" it either but I do plan on washing the 1/32. Please leave opinions and feedback, positive or negative is welcome always, as it will help me further my experience. Thanks Mike 99.9% complete...Just have a few decals to add and minor touch ups 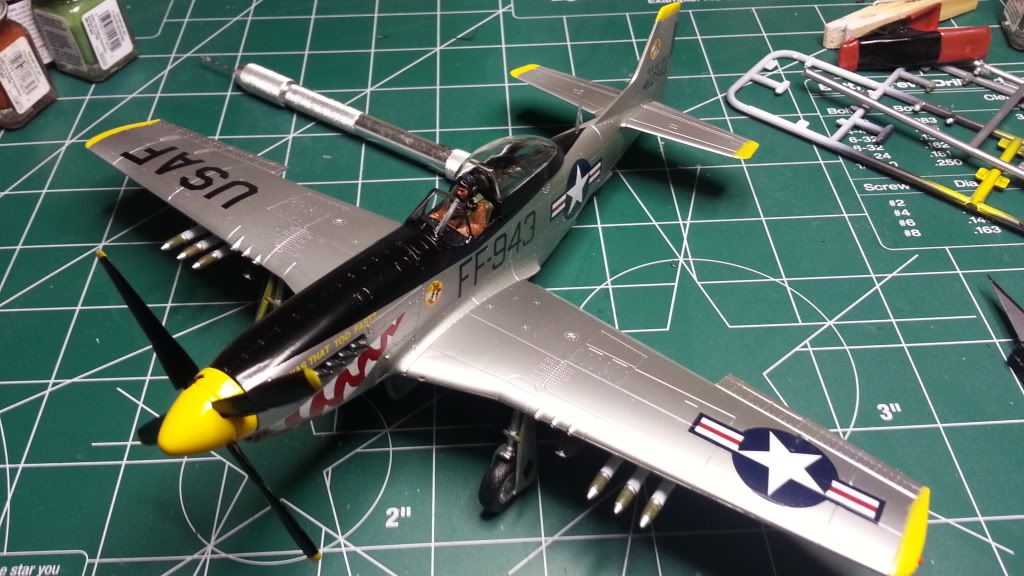  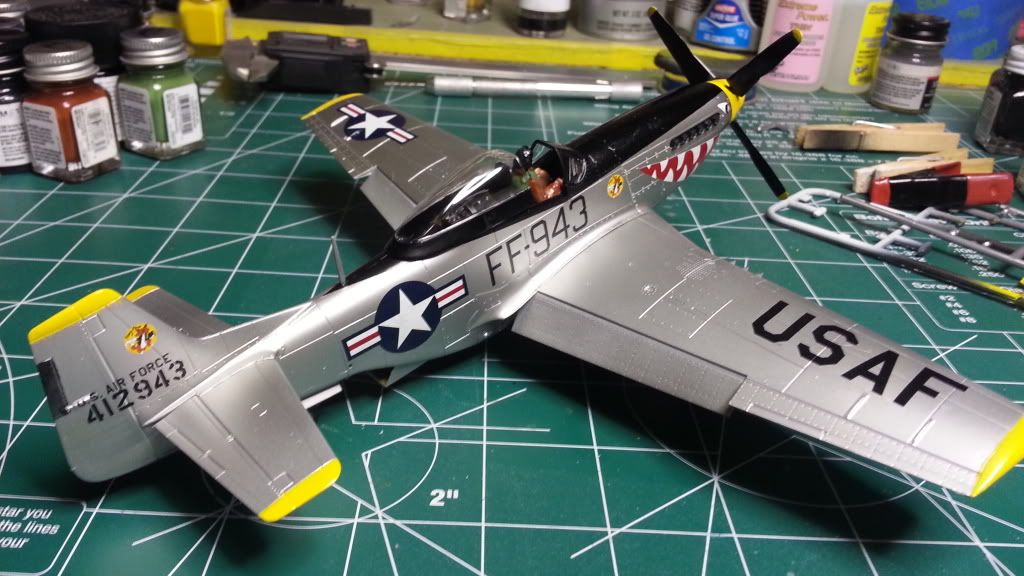 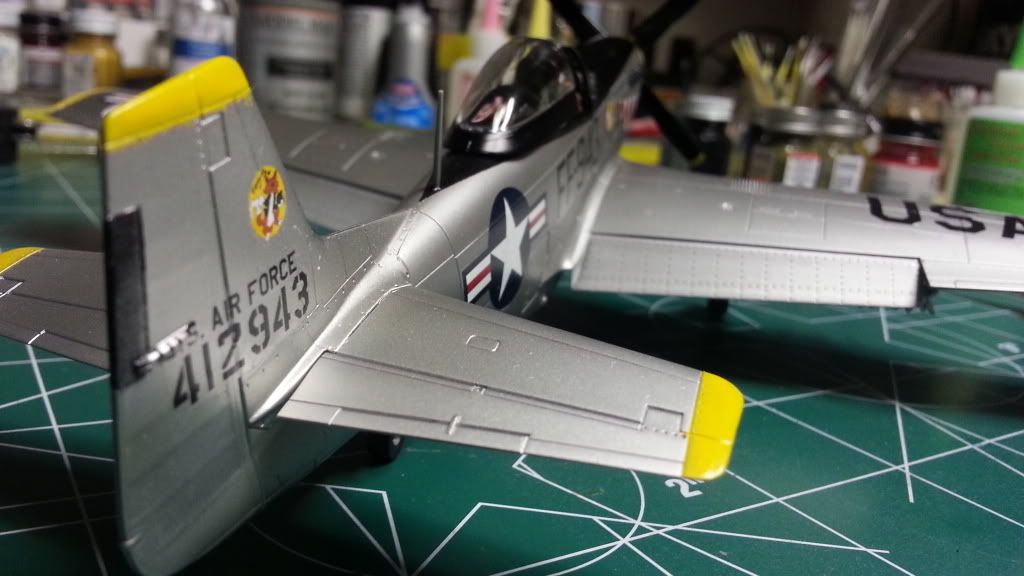  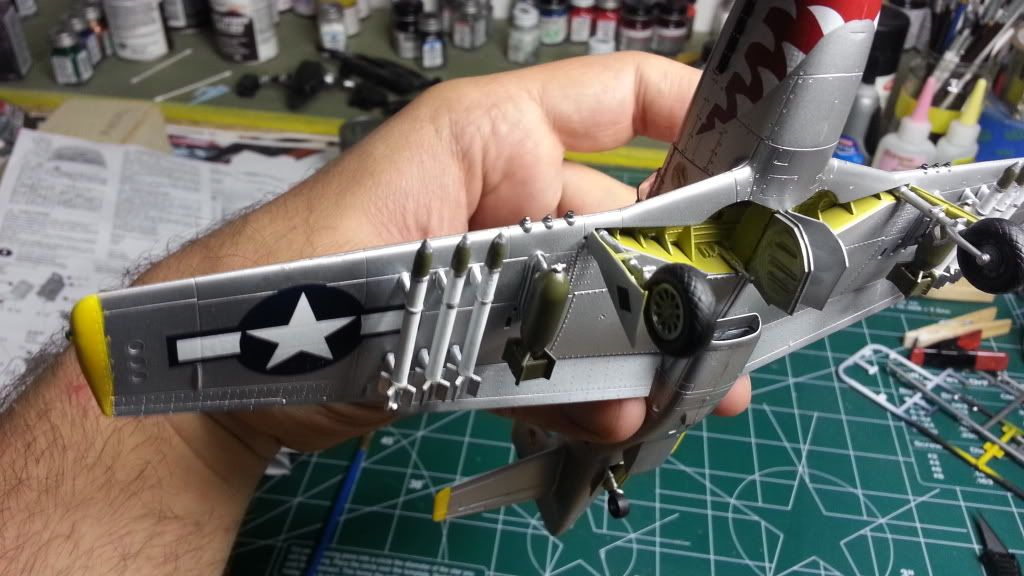 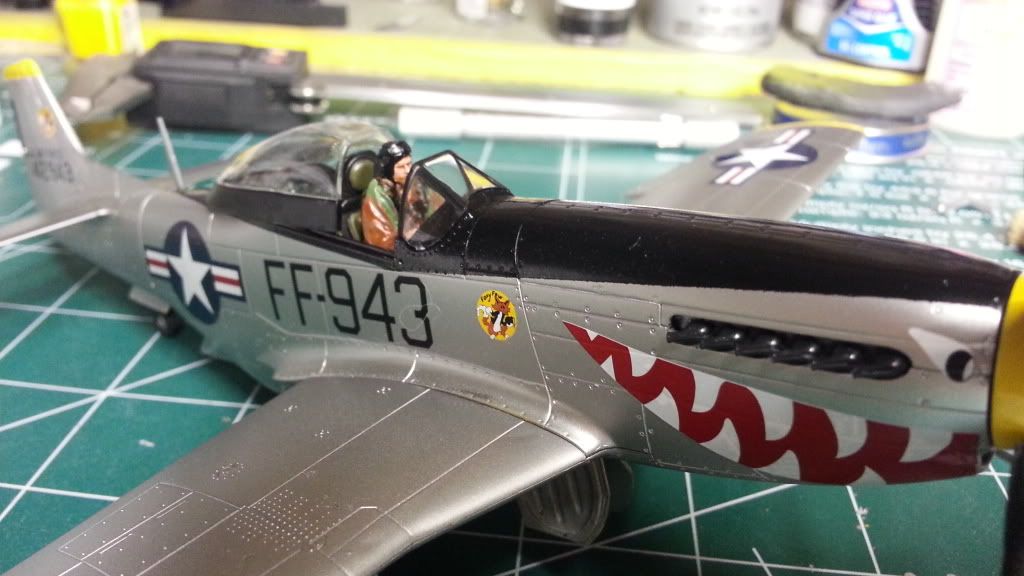 |
|
thug626
Senior Member
   
Member since: January 2013
Posts: 2,030
Jan 15, 2013 13:05:28 GMT -5
Jan 15, 2013 13:05:28 GMT -5
|
Post by thug626 on Jul 9, 2013 12:08:35 GMT -5
Hello Moose, Very nicely done! A clean build indeed. The shark mouth decal is very well done. Getting a decal to conform to a complex curve is no mean feat. As for the painting "error", quite often in this hobby we learn as we go. Not to mention, it's a Korean warbird. You don't see to many of these done up in post WWII colors. There were a some spots that caught my eye. First, was the anti-glare panel. Yours is gloss. These were painted in flat colors so as not to reflect the glare of the sun into the pilots eyes. The other, was the seam line on the underside. You got the underside of the nose filled. Its the seam line from the radiator scoop on back. The leading edge wing root fillet has a bit of a gap. I am sure that the instructions indicated that the exhaust stacks were to be painted black. This would work right off the assembly line. After a couple of engine run ups that paint would be burned off. Think about what your cars exhaust system looks line after a while (not the stainless steel type) I must commend you on taking on a metal finish as your first wingy thingy! It is an unforgiving medium. It will point out every wee detail to the naked eye. Then there is the unforgiving eye of the camera. You have presented a very clean, solid build. I, for one, am looking forward to seeing more of your builds. Build on!  Cheers Dave |
|
|
|
Post by wbill76 on Jul 9, 2013 17:22:23 GMT -5
Nice work on your first winged-subject there Mike. Looking forward to more when you tackle it's cousin!
|
|
Deleted
Member since: January 1970
Posts: 0
Nov 22, 2024 14:14:44 GMT -5
Nov 22, 2024 14:14:44 GMT -5
|
Post by Deleted on Jul 9, 2013 17:46:39 GMT -5
Hey Moose...Nice build fella,for a first wingy.I agree with Dave's observations re the wingroot etc,but it still looks the part.I don't get on with Alclads,cos I'm too heavy handed,but I have used the Gunze Mr Metals to reasonable effects,which you can see here.. modelerssocialclub.proboards.com/thread/4418/ceebees-occasional-fixed-wing-ramblingsYou are also correct about the fuselage being BM,and the wings being painted.If and when you start your PTO Pony,I MIGHT,(Stress the MIGHT!!!) drag my Tammy Mustang off the shelf!  (I have the Tuskegee markings in 1/32  |
|
|
|
Post by dupes on Jul 9, 2013 20:57:14 GMT -5
Dang, man - that's purdy! Your first winged build ever? For real?
|
|
MOOSE.
Full Member
  
Member since: May 2013
"Imagination is more important than Knowledge"
Posts: 396 
|
Post by MOOSE. on Jul 10, 2013 5:43:54 GMT -5
Thanks fellas... I greatly appreciate the feedback. So the anti glare, is that just going to be flat in front of the windscreen or is it flat the whole area that is black? Does anyone know of any websites that collect pictures of the old Mustangs? I'm having a hard time finding color pictures of them. Most photos I find are black and white. I have found a lot of color photos of newer, restored Mustangs. UT that are all shined up haha. The build instructions to depict it being semi-gloss black which is what I painted it. I do plan on filling out all the body seams and black washing the 1/32.
Thanks again for the input guys. Much appreciated as my 1/32 I wanna nail it. =)
|
|
MOOSE.
Full Member
  
Member since: May 2013
"Imagination is more important than Knowledge"
Posts: 396 
|
Post by MOOSE. on Jul 10, 2013 6:16:01 GMT -5
Dave...thanks for the tips. I've gotten use to the Alclads...I do want to experience other brands as well. I'll make the 1/32 exhaust look well used. As far as the decals, I use the Walthers Solvaset (which ironically enough my cat knocked over and spilled onto the remaining decals which is why I'm missing on "USAF" on the underside of the wing lol)Once that stuff gets on the decals, and their not on the plane...you're screwed haha
Chris B- That finish looks amazing! I do have an Alclad Bare aluminum that should depict the shiny aluminum well and the Duraluminum in which will be for the wings and such.Though, after looking at your plane, I may order some Mr. Metal and play with it a little. Thanks buddy.
Boo, Bill...as always thanks guys! I'm going to do a full blog on the 1/32 P51, I'm hopefully going to be finishing off the Enzo by the end of this month, then I'll be starting the other. I just did this one as a brak from the Enzo. That kit is fantastic but a little bit of a PITA haha.
Dupes-Thanks buddy and yeah, it's the first wing build for me. I figured I'd start small and gain some experience on one that was well cheaper in cost than the 1/32. Like the other fellas said, the planes and cars are all relative in a way. I've done a ton of cars in the past. Thanks man
|
|
|
|
Post by deafpanzer on Jul 10, 2013 9:07:59 GMT -5
First wingy build? I am very impressed. Great feedback from guys as I have learned a great deal as I yet have built one for decades.
|
|
thug626
Senior Member
   
Member since: January 2013
Posts: 2,030
Jan 15, 2013 13:05:28 GMT -5
Jan 15, 2013 13:05:28 GMT -5
|
Post by thug626 on Jul 10, 2013 11:11:11 GMT -5
Moose, You are most welcome. NMF is one of the finishes I have yet to try my hand at. I've got a Tamiya P-47 Bubble top is the stash that is crying out for it. As for the Alclads, it seems that folks either love it or not. I do not mean the following in a mean way but, I laughed my a$$ off when you said what happened with the Solvaset.  That sound like something that would happen at my bench but, not by a cat but, rather by me. I did that once with some Ambroid ProWeld. The only thing it got was splashed down the side of a Sherman.  Which fortunately was not painted.  I didn't touch it until it dried and, then sanded out the blemish. As for your decal.....all you can do is wave bye-bye.  Is there anything else you've posted that we haven't seen? I'm looking forward to the 1/32 beastie. Dave |
|
|
|
Post by fightnjoe on Jul 10, 2013 21:14:07 GMT -5
moose that is a sweet build. first wingy maybe but definitely show the skill of experience.
and if you can get chris to pull one out of his stash and work on it, well buddy, you can do miracles.
joe
|
|
MOOSE.
Full Member
  
Member since: May 2013
"Imagination is more important than Knowledge"
Posts: 396 
|
Post by MOOSE. on Jul 11, 2013 1:28:43 GMT -5
Haha... Thanks Joe... Come on Chris you can do it brother!
I do appreciate all the information and feedback guys. I may go back and correct a couple things that were pointed out
Mark... Get one buddy!
Chris, Dave, Panzer & Dicky... Much appreciated fellas. I just climbed back into this hole known as the Enzo lol..... I'll be posting some pics shortly. I'm getting anxious to get started on the 1/32. I've also been eyeballing Tamiyas new 1/32 Corsair =) haha. She's a bit steep at around $200usd yikes... Looks amazing though.
The wife and I are going to drive into Washington DC to catch a few museums and I plan on attending the Air & Space Museum... Any thing in particular any of you guys would want photos of? If so just let me know. Thanks again
|
|
|
|
Post by Leon on Jul 11, 2013 1:54:06 GMT -5
Mike,your first wingy is looking really sweet  .I'll be watching for your next one.  |
|
MOOSE.
Full Member
  
Member since: May 2013
"Imagination is more important than Knowledge"
Posts: 396 
|
Post by MOOSE. on Jul 14, 2013 3:12:17 GMT -5
Thanks fellas
Sent from my SCH-I605 using proboards
|
|
venom1
Full Member
  
Member since: October 2012
Posts: 1,369
Oct 10, 2012 2:40:03 GMT -5
Oct 10, 2012 2:40:03 GMT -5
|
Post by venom1 on Jul 14, 2013 6:10:02 GMT -5
Hi Mike, Great first attempt at a wingy, mate. Very impressed!  In answer to your question regarding the anti-glare panel, they were for the most part painted in Olive Drab, and extended the full length of the nose as yours has done. Having said that, I have seen some that are matt black and depending on the nose art, some that only extend half way down the nose. It really depends on the individual aircraft so check your references. I generally take restored warbirds with a grain of salt as far as colour schemes go. The vast majority of warbirds are painted gloss all over, as it is both easier to keep clean and lower on drag (hence fuel consumption). Try and go with written records, wartime photos, reputable books, that sort of thing.  Just another constructive suggestion, it appears in the photos that the front framing on the sliding canopy has not been painted? Should be an easy fix though, especially if the canopy is not permanently fixed with liquid cement or similar. Aside from that mate, a great effort, and I am very impressed that you would tackle a bare metal finish so early in your wingy building career!!  Look forward to the next effort!  Cheers, Sam  |
|
thug626
Senior Member
   
Member since: January 2013
Posts: 2,030
Jan 15, 2013 13:05:28 GMT -5
Jan 15, 2013 13:05:28 GMT -5
|
Post by thug626 on Jul 14, 2013 9:49:14 GMT -5
Hello Mike, Enjoy your time at the museum. That is one of my bucket list items!  I agree with Sam about using restored warbirds for references. Though I do like them for structural references....just watch out for the extra/modern antenna and whatnot. Dave |
|
Rick
Full Member
  
Member since: March 2013
what to build, what to build . . . Ok THAT one!
Posts: 854 
|
Post by Rick on Jul 28, 2013 17:51:01 GMT -5
Moose, I think you did a great job on your first wing thing. I've stayed away from metal finishes on purpose just cause they are unforgiving as had been already stated. Some great tips have been given already so I won't repeat. Just a big thumbs up!!
Rick
|
|
MOOSE.
Full Member
  
Member since: May 2013
"Imagination is more important than Knowledge"
Posts: 396 
|
Post by MOOSE. on Jul 28, 2013 19:12:39 GMT -5
Thanks Rick. Yeah the metal finishes can be a PITA haha... I had practiced, practiced, practiced with the alclads... I know there are many other brands and I will try them, but I've been satisfied with the alclad. Patience is the key to the metals... It took a few times to learn that but it actually helps
|
|