|
|
Post by wouter on Nov 18, 2013 9:42:26 GMT -5
I said it already at FB, this is great stuff Luigi. Did you solder the wires together?
Cheers
|
|
|
|
Post by bullardino on Nov 18, 2013 9:50:15 GMT -5
Thanks a lot my friend  No, they aren't soldered, it's just CA glue and a lot of patience |
|
|
|
Post by deafpanzer on Nov 18, 2013 9:51:48 GMT -5
Huge improvement there... now theres on way you will break it ever .  |
|
|
|
Post by bullardino on Nov 18, 2013 9:52:56 GMT -5
LOL, I deserve it  Thanks for the peek, mate |
|
|
|
Post by Deano on Nov 18, 2013 11:43:52 GMT -5
Excellent work Luigi, they really do look as if the have been soldered !
Deano
|
|
|
|
Post by bullardino on Nov 18, 2013 13:29:44 GMT -5
Thanks a lot Deano I hope not to spoil it adding the left part |
|
|
|
Post by rbaer on Nov 18, 2013 13:33:26 GMT -5
Very nicely done, Luigi.
|
|
Deleted
Member since: January 1970
Posts: 0
May 18, 2024 7:58:35 GMT -5
May 18, 2024 7:58:35 GMT -5
|
Post by Deleted on Nov 18, 2013 13:37:46 GMT -5
Very nice light guard Luigi bet it made a nice change from sorting out tracks!
|
|
|
|
Post by bullardino on Nov 18, 2013 13:47:24 GMT -5
Nice to see you here, Russ Pete, defo it's a nice variation. Unfortunately I did only one sprue of tracks, I still have 6 to go. Not to mention the second cleaning they will need... I'm going to bring the sprues in front of the TV tonight, so I'll clean and watch something interesting. |
|
ogrejohn
Full Member

Member since: June 2012
Go away or I shall taunt you a second time!
Posts: 1,259
Jun 1, 2012 17:33:59 GMT -5
Jun 1, 2012 17:33:59 GMT -5
|
Post by ogrejohn on Nov 18, 2013 16:45:20 GMT -5
The light guard looks perfect Luigi! Ugh, track link cleaning!  |
|
|
|
Post by bullardino on Nov 18, 2013 16:52:19 GMT -5
Thanks a lot, John As Bill says, trecks and wheels are the price we armor modellers pay |
|
Deleted
Member since: January 1970
Posts: 0
May 18, 2024 7:58:35 GMT -5
May 18, 2024 7:58:35 GMT -5
|
Post by Deleted on Nov 18, 2013 20:17:55 GMT -5
I don't know how you managed to get all them little parts to stay together Lui but the results look great . |
|
|
|
Post by bullardino on Nov 19, 2013 2:20:41 GMT -5
Neems, I'm just trying to follow the path you're tracing. I will definitely use more and more metal and white stuff in the future. I'm really glad you liked that little part, it's been fun to assemble it Carl, I think you know it perfectly, given all the microscopic parts you assemble in every single build you do. Yet it's a real pleasure to see you liked my small effort |
|
|
|
Post by bullardino on Nov 19, 2013 3:45:51 GMT -5
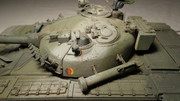
I am calling the light guard done. I think it's an improvement on the kit's part.  What do you think? |
|
Deleted
Member since: January 1970
Posts: 0
May 18, 2024 7:58:35 GMT -5
May 18, 2024 7:58:35 GMT -5
|
Post by Deleted on Nov 19, 2013 6:51:16 GMT -5
Hands of a Surgeon and nerves of steel! 
|
|
|
|
Post by bullardino on Nov 19, 2013 6:54:28 GMT -5
Thanks a lot, looks like you appreciated, Bruce |
|
Deleted
Member since: January 1970
Posts: 0
May 18, 2024 7:58:35 GMT -5
May 18, 2024 7:58:35 GMT -5
|
Post by Deleted on Nov 19, 2013 7:08:45 GMT -5
Do you use a jig to align the parts or all by hand?
|
|
|
|
Post by bullardino on Nov 19, 2013 7:19:49 GMT -5
I did it all by hand. I sketched the shape on paper, then bent the wire with nose pliers trying to follow the shape as closely as I could. I started from the right half, the one with two rods on the ceiling as it had identical sides.
The initial result had the wrong stance, so I corrected it bending the back legs and cutting them at the correct length. Then I shaped the smaller left side and glued it to the right one.
|
|
|
|
Post by ceresvesta on Nov 19, 2013 9:21:53 GMT -5
Awesome job on the light guard Luigi. It really improve the build. Niiiiiiice, if I may say.
Phil.
|
|
|
|
Post by bullardino on Nov 19, 2013 10:15:35 GMT -5
Too kind, Phil |
|
|
|
Post by deafpanzer on Nov 19, 2013 10:27:43 GMT -5
WOW! I would have lost my patience doing this! It looks SUPERB!
|
|
|
|
Post by bullardino on Nov 19, 2013 10:40:26 GMT -5
LOL, it didn't take that much patience, my friend But thanks a lot |
|
|
|
Post by wbill76 on Nov 19, 2013 19:01:38 GMT -5
Nerves of steel to bend that light guard into shape, very nice Lui!
|
|
iking
Full Member
Member since: November 2012
Posts: 244
Nov 22, 2012 3:24:55 GMT -5
Nov 22, 2012 3:24:55 GMT -5
|
Post by iking on Nov 20, 2013 1:54:32 GMT -5
whoa! the scratched lightguards are superb luigi! bring on the soviet steel! cheers comrade! |
|
jackh
Full Member
Member since: December 2011
Posts: 1,195
Dec 15, 2011 2:51:27 GMT -5
Dec 15, 2011 2:51:27 GMT -5
|
Post by jackh on Nov 20, 2013 4:50:02 GMT -5
Great work on the lightguards Luigi , they look a good deal better than the kit ones. |
|
|
|
Post by bullardino on Nov 20, 2013 5:30:41 GMT -5
Bill, thanks a lot It was a way to relax during the track cleaning sessions Iking, nice to see you commenting, comrade Paul, after seeing what an italian friend is doing with his Mod. 1972 I couldn't stay with the kit's ones. I had to copy his  |
|
|
|
Post by TRM on Nov 20, 2013 5:57:22 GMT -5
Excellent work Luigi!! Nice bit of scratch on the gaurds!! Worth the effort hans down!!
|
|
|
|
Post by bullardino on Nov 20, 2013 6:18:51 GMT -5
There are still a lot of thing to add, the thing is crammed with details and I'll try to add as many as I can. I'm glad you liked it, Todd |
|
|
|
Post by Deano on Nov 21, 2013 10:20:06 GMT -5
Huge improvement on the kit part Luigi , nice detailing buddy!
Deano
|
|
paulh
Senior Member

Member since: November 2011
build, fail, learn, succeed - ENJOY
Posts: 2,389
Nov 15, 2011 15:54:51 GMT -5
Nov 15, 2011 15:54:51 GMT -5
|
Post by paulh on Nov 21, 2013 10:48:37 GMT -5
Super job on that lightguard Luigi.
P
|
|