Hinksy
Full Member

Member since: June 2012
THE ENGLISH LIONHEART - HINKSY!
Posts: 1,016
Jun 22, 2012 16:46:21 GMT -5
Jun 22, 2012 16:46:21 GMT -5
|
Post by Hinksy on Oct 17, 2013 10:18:11 GMT -5
Hi Ben, Great progress on '48. Make me want to have a crack at the Dragon one now! Looking forward to the next update. Cheers for now R  Thanks Richard - this Dragon kit is just brilliant! One of the best so far for simplicity, ease of assembly and beautiful detailed moulding. The engine deck is very weird in the way it builds up but it works fine. The only issue is no matter which way you do it you'll be left with small gaps somewhere or other but these will fill easily and will be out of view under the Fender. UPDATE & QUESTION:I've got a day off work today (using up holiday)and am just using my time to watch some new DVD's that I bought this morning and also to get some more research under my belt for the M48. Pay day is this weekend (Saturday 19th) so I'll be placing my next order with Lucky for the Legend Stowage set. I figure I best get it ordered asap as the original Mantlet cover that I ordered which arrived yesterday took 5 weeks! QUESTION - 50 SHADES OF GREEN?Ok, probably not 50 - more like 6 at the most! I'm not an experienced US Army modeller and I know that OD will be the wrong colour to use. I do like to try pre and post-shading/CM etc but this build is going to be kept simple where the basecoat painting is concerned. Alan is an experienced US (WWII to 'Nam) and Red Army Army (WWII only) Modeller. He had a look at the colour options on the instructions and his conversion chart recommended that if using Vallejo Model Colour I should go for Vallejo 70.887 Brown Violet. It's a nice shade and I reckon sprayed lightly over over a very dark primer coat the subsequent wahes and filters will be perfect. Now then, having looked at endless photos of new/clean or mucky/dusty M48's the green is a flat dark green - VERY dark in a lot of cases. 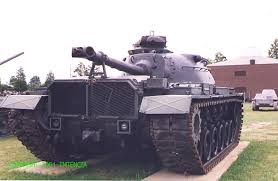 I've been looking at Tamiya paints and think that both the XF-27 Black Green and XF-61 Dark Green look very suitable. Perhaps more suitable than the Vallejo Brown Violiet. See below:1) Vallejo Model Colour 'Brown Violet': 2) Tamiya XF-27 Black Green: 2) Tamiya XF-27 Black Green: 3) Tamiya XF-61 Dark Green: 3) Tamiya XF-61 Dark Green: Here's the Tamiya Colour Chart just for fun - maybe you have a good recipe?www.tamiya.com/english/products/list/acrylic_flat/kit81301.htm Here's the Tamiya Colour Chart just for fun - maybe you have a good recipe?www.tamiya.com/english/products/list/acrylic_flat/kit81301.htmI'd love to read what you guys think about the 3 colour choices that I've given you above and I'd also LOVE to hear what your other choices would be. Thanks a lot guys - I look forward to your feedback! Ben |
|
Deleted
Member since: January 1970
Posts: 0
Apr 29, 2024 7:29:34 GMT -5
Apr 29, 2024 7:29:34 GMT -5
|
Post by Deleted on Oct 17, 2013 18:11:29 GMT -5
LifeColors CS 11 kit with 6 shades would be a good way to go also. Not sure if Red Frog is still carrying them or not.
|
|
Deleted
Member since: January 1970
Posts: 0
Apr 29, 2024 7:29:34 GMT -5
Apr 29, 2024 7:29:34 GMT -5
|
Post by Deleted on Oct 18, 2013 20:16:51 GMT -5
Either the LC set as mentioned above or Tamiya XF 74. I use that almost exclusively for post WWII US armor.
G
|
|
Hinksy
Full Member
Member since: June 2012
THE ENGLISH LIONHEART - HINKSY!
Posts: 1,016
Jun 22, 2012 16:46:21 GMT -5
Jun 22, 2012 16:46:21 GMT -5
|
Post by Hinksy on Oct 26, 2013 8:42:18 GMT -5
Either the LC set as mentioned above or Tamiya XF 74. I use that almost exclusively for post WWII US armor. G Hiya G man! The thing is XF-74 is OD Green and the first thing everyone tells me is NOT to use OD on a post WWII 'Nam Vehicle. Likewise, the OD Modulation sets are aimed at WWII vehicles so I'll be keeping my OD colours and OD Modulation sets for WWII builds. I've posted a few photos of the real thing on my blog so far and that Vallejo Brown Violet looks PERFECT. A few guys have recommended that I use that for this build and after seeing 'it in the flesh' after it was delivered it really does look ideal. Vallejo Model Colour 'Brown Violet' - now that's a darn good colour match if you ask me!   www.bnamodelworld.com/vallejo/av-70887 www.bnamodelworld.com/vallejo/av-70887 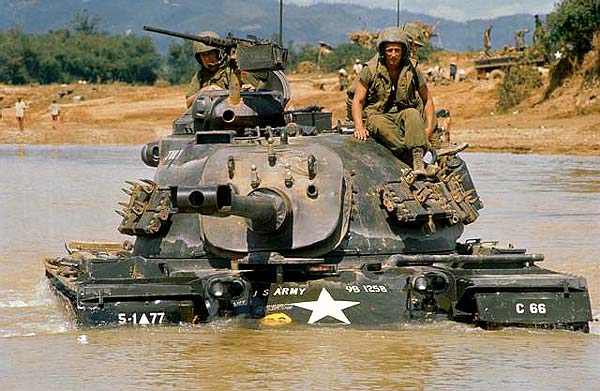 Saturday Update #1: Saturday Update #1:
Righto guys. I've had a VERY busy couple of weeks and have hardly touched this build but that's ok as i have all of this weekend to commit to this work - a lot of time will be spent on research. Also, it's my BIRTHDAY (woohoo!) next monday (November 4th) so I've booked off next Friday 1st November and the Monday 4th so there's 4 days right there. I'm going to visit my club head honcho Alan tomorrow to help me with the fitting of the Legend Mantlet Cover and Xenon Searchlight Resin upgrades as it might involve some surgery and he's a really skilled modeller he will no dount be needed! He's also a big 'Nam modeller and member of a 'Nam SIG (Special Interest Group) so he's a walking, talking piece of research material! I'm starting work on my build in a minute. I'm on section 6 - 8 today which covers the Fender assembly and fitting and suspension fitting. Photo update later! Ben |
|
|
|
Post by Leon on Oct 26, 2013 9:20:04 GMT -5
Following with interest Ben,I just got the Tamy M48/A3.
|
|
Deleted
Member since: January 1970
Posts: 0
Apr 29, 2024 7:29:34 GMT -5
Apr 29, 2024 7:29:34 GMT -5
|
Post by Deleted on Oct 26, 2013 11:43:37 GMT -5
That Vallejo color is good too.
Thing is Ben, I rode on the darn things, and worked with the darn things. To my tired old brain XF 74 is so very close to what I remember it's a sure thing.
Also, these were originally finished in a slight semi gloss which deepens the color a bit.
Remember too, there is NO CORRECT color. It's your build, so paint it some shade of medium/dark green and weather appropriately to your liking!
Determine the color by the S.W.A.G. method, evaluate with the L/A/R scale and you'll be much happier and content.
G
|
|
Hinksy
Full Member
Member since: June 2012
THE ENGLISH LIONHEART - HINKSY!
Posts: 1,016
Jun 22, 2012 16:46:21 GMT -5
Jun 22, 2012 16:46:21 GMT -5
|
Post by Hinksy on Oct 27, 2013 15:57:56 GMT -5
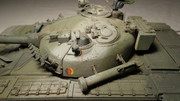
Hi guys, First off, cheers G - didn't know you were a tank man dude! I've got that Vallejo Brown Violet, Tamiya OD XF-74, Tamiya Dark Green, Deep Green and Black Green. I've also got AK's trusty OD Modulation set which I'll be saving for some true WWII AFV builds. The Black Green looks good so I'm going to get to get one of my old builds and try some different colour primer coats and different shades of green to see what works best. Weekend Update:Sorry I didn't anything further posted yesterday but there wasn't a lot to show. I was supposed to be going to Alan's house today to do the Legened Mantlet but short staff at work meant I had to make myself available plus it was pretty busy but I'm exactly where I need to be now - the Hull and Fenders are all in place so it's just the Turret assembly now (and road wheels). I could start on the turret assembly but it's going to involve some 'rough handling' of the turret to get the Legend Mantlet cover fitted. I've arranged to go over to Alan's next Sunday now to do the Mantlet. As I mentioned yesterday it's my Birthday next Monday (November 4th) and I've booked that day off so I'll be hoping to get the build completed and primed on that day ready for painting the following weekend. Problem encountered!: First 'head scratching' moment of the build encountered yesterday! Not being familiar with these more modern AFV's it soon became apparent that when installing the piston style suspension arms I'd installed them incorrectly and they needed to be removed and reversed. The instructions show them from an angle that doesn't make things clear but all sorted now but, all the same, be careful! The Fenders fitted ok - a bit tricky but they are moulded nice and thin and look nice when installed. The headlight guards could have been better thought out and made up partly of PE as they were tricky to join up being in two halves. Photos:     Turret mounted .50cal housing: Turret mounted .50cal housing:  So, looking good. Get this turret coversion set fitted and this is going to make up for a seriously nice build. It's big old lump too! Update next weekend! Ben |
|
|
|
Post by wbill76 on Oct 27, 2013 19:52:16 GMT -5
Moving right along there Ben.  |
|
|
|
Post by deafpanzer on Oct 27, 2013 21:00:34 GMT -5
Looking good mate! Can't wait to see you tackle that modified mantel!
|
|
Deleted
Member since: January 1970
Posts: 0
Apr 29, 2024 7:29:34 GMT -5
Apr 29, 2024 7:29:34 GMT -5
|
Post by Deleted on Oct 28, 2013 14:45:16 GMT -5
Looking like a fine clean build there Ben.
I wasn't armor, I was infantry for the first half of my career. Marine infantry almost always works in close conjunction with tanks. That and we go ashore in Alligators (AAV7's to you folk) that were the same color.
Second half of my career I was assigned to embarkation and maritime prepositioning. I'd see hundreds of vehicles at a time all lined up being prepared for loading. I commented once before you'd see all those tanks, gators,and wheeled vehicles and not more than a few looked like they were the same color at any given time.
G
|
|
Hinksy
Full Member
Member since: June 2012
THE ENGLISH LIONHEART - HINKSY!
Posts: 1,016
Jun 22, 2012 16:46:21 GMT -5
Jun 22, 2012 16:46:21 GMT -5
|
Post by Hinksy on Nov 1, 2013 13:56:04 GMT -5
Hi guys, Thanks for looking in John. I've looked at many photos of CLEAN M48's and I think it's a good match. I'll give it a whirl on an old knock about build and see - I reckon the primer colour will dictate how the colour turns out. I'm thinking about looking into a base for this one. Nothing huge as I haven't the room but just something to set the scene. I'm over at Alans, the top man at our Model Club on Sunday, for some guidance in fitting this Mantlet Cover. Legend ask you to chop a big section out the turret front to accomodate the Mantlet base BUT I reckon we could take the dremel to it and thin it down - I've found a review where someone else did it this way too: [b/]Open the link and read the part of the page called 'review':[b/] www.armorama.com/modules.php?op=modload&name=Reviews&file=index&req=showcontent&id=9500Updates this weekend! Ben |
|
Hinksy
Full Member
Member since: June 2012
THE ENGLISH LIONHEART - HINKSY!
Posts: 1,016
Jun 22, 2012 16:46:21 GMT -5
Jun 22, 2012 16:46:21 GMT -5
|
Post by Hinksy on Nov 7, 2013 19:56:11 GMT -5
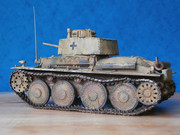
Cheers Rich, I've got the Legend Mantlet cover fitted now so she's ready for paint but a kit I've been waiting on for a while has eventually turned up so I'll be putting this back in the cabinet ready for painting in the New Year. I reckon the build will continue in Feb next year so watch this space! The new kit is Dragon's Panzer III H early production - I can't wait! Take care, Ben |
|
sturmbird
Full Member
Member since: June 2012
Posts: 1,406
Jun 21, 2012 13:51:45 GMT -5
Jun 21, 2012 13:51:45 GMT -5
|
Post by sturmbird on Nov 8, 2013 12:12:31 GMT -5
there were two different O.D. green colors used in Vietnam, and the date your tank is depicted will tell you the color. In mid 68 there was a color change, and it was actually lighter than the original! Yet carried the same number. They looked the same in the can, but the difference was apparent when applied.
A tank in south east Asia will almost have a grey green color at the top, and get darker as you get closer to ground level. There also will be spots of rust from the top of the fenders down to ground level, unless the crew painted the rust over. The spots won't be large, and maybe no bigger than a tennis ball. These spots painted over will be a different shade than the previous paint.
gary
|
|
Hinksy
Full Member
Member since: June 2012
THE ENGLISH LIONHEART - HINKSY!
Posts: 1,016
Jun 22, 2012 16:46:21 GMT -5
Jun 22, 2012 16:46:21 GMT -5
|
Post by Hinksy on Nov 22, 2013 11:08:58 GMT -5
there were two different O.D. green colors used in Vietnam, and the date your tank is depicted will tell you the color. In mid 68 there was a color change, and it was actually lighter than the original! Yet carried the same number. They looked the same in the can, but the difference was apparent when applied. A tank in south east Asia will almost have a grey green color at the top, and get darker as you get closer to ground level. There also will be spots of rust from the top of the fenders down to ground level, unless the crew painted the rust over. The spots won't be large, and maybe no bigger than a tennis ball. These spots painted over will be a different shade than the previous paint. gary Thanks Gary, My Legend Mantlet cover and Xenon light housing arrived and these have been assembled - all there is do now is the turret assembly and wheels. Sorry guys but I have decided to put this build on hold until February as I'm taking part in a 'Nam GB and they've said they'll accept this as starting point it's a simple assembly up to now - In the meantime I'm going WWII and German and starting on my early version Dragon Pz.III Ausf.H. Watch this space! Ben |
|
|
|
Post by bbd468 on Nov 22, 2013 11:28:36 GMT -5
HOLY CRAP BEN!!! How tha hell did you sneak this by me!!!  What a fantastic build my friend. BOOKMARKED!!!! |
|
|
|
Post by Tojo72 on Nov 24, 2013 8:06:42 GMT -5
thanks for the heads-up on the suspension,looks good so far
|
|
|
|
Post by ceresvesta on Nov 24, 2013 15:44:23 GMT -5
Very nice progres Ben! Attention to detail is spot on. Nice to see all the ref. I`ll use this thread for sure when I`ll build one.
Thx for sharing the knowledge people!
Phil.
|
|
possum
Full Member
Member since: January 2013
Posts: 113
Jan 6, 2013 7:20:56 GMT -5
Jan 6, 2013 7:20:56 GMT -5
|
Post by possum on Nov 30, 2013 13:15:57 GMT -5
I missed this one, that's a great looking tank. Great build.
|
|
Hinksy
Full Member
Member since: June 2012
THE ENGLISH LIONHEART - HINKSY!
Posts: 1,016
Jun 22, 2012 16:46:21 GMT -5
Jun 22, 2012 16:46:21 GMT -5
|
Post by Hinksy on Dec 16, 2013 13:27:31 GMT -5
Cheers guys, I've boxed it all up for the minute whilst I'm building the little Dragon Pz.III H I recently purchased. I couldn't resist it! So the lower hull and suspension looks good to go and Alan at the modelling club who loves working with Resin (I don't) helped me sort the Mantlet out. The Legend instructions would have you cut a large portion of the turret away to allow the mantlet cover to be seated but instead we shaved a lot of Resin off the back of the cover leaving a square just big enough to pop into the turret hole where the barrel would be so we didn't have to touch the kit turret. I'm building the box art tand 'Wild One 4' which was assigned to an engineer batallion and in all the photos I have of it the Xenon light is never seen. It looks a real PITA to fit poperly anyway so that's staying off I think. I'll be back at this when the little Panzer is complete so watch this space! Ben |
|


 What a fantastic build my friend.