James Duff
Full Member

Member since: November 2013
Posts: 101
Nov 16, 2013 16:44:36 GMT -5
Nov 16, 2013 16:44:36 GMT -5
|
Post by James Duff on Nov 23, 2013 19:04:50 GMT -5
So I sat around today staring at shelves full of Automotive Goodness, trying to figure out what I want to build...nothing jumping out more than anything else, I counted up the kits on my Import Shelves and then ran it through a Random Integer Generator and it spit out a build order. Now I doubt I'd go so far as to follow it kit by kit, but I couldn't argue with it's first suggestion.  DSC01390 (1055x1280) DSC01390 (1055x1280) by niteowl7710, on Flickr Roundy-Rounds...  DSC01391 (1280x814) DSC01391 (1280x814) by niteowl7710, on Flickr  DSC01392 (1280x864) DSC01392 (1280x864) by niteowl7710, on Flickr Decals, Window Masks, Mesh & (dreaded) Metal Tranfers -- I bought this kit open from a friend and the decals were a dried out cracked mess, so I contacted Tamiya USA over the summer and they sent out a new sheet for free! That's why it's stapled to that piece of paper...  DSC01394 (1280x1008) DSC01394 (1280x1008) by niteowl7710, on Flickr Clear Runner - Notice is has a section of the rear chassis, so you could leave the rear suspension/engine area as "see-thru".  DSC01395 (1280x804) DSC01395 (1280x804) by niteowl7710, on Flickr Shiny Bits  DSC01397 (1280x1172) DSC01397 (1280x1172) by niteowl7710, on Flickr Big "A" Runner - Featuring the chassis and most of the interior  DSC01399 (1280x906) DSC01399 (1280x906) by niteowl7710, on Flickr Interior tub right side up  DSC01400 (1280x1139) DSC01400 (1280x1139) by niteowl7710, on Flickr The Go and Slow Runner  DSC01398 (1280x895) DSC01398 (1280x895) by niteowl7710, on Flickr Body Parts Runner  DSC01396 (1280x1013) DSC01396 (1280x1013) by niteowl7710, on Flickr Couple more shots of the body  DSC01401 (1280x836) DSC01401 (1280x836) by niteowl7710, on Flickr  DSC01402 (1280x802) DSC01402 (1280x802) by niteowl7710, on Flickr |
|
deafpanzer
Administrator 
Member since: June 2012
"Never tell your story to a deaf man"
Posts: 21,152
Member is Online
MSC Staff
|
Post by deafpanzer on Nov 23, 2013 19:17:13 GMT -5
Great choice you have made! It is exactly what I have in my garage... I wish. Count me in... good luck!
|
|
|
|
Post by TRM on Nov 23, 2013 20:58:43 GMT -5
OK Andy!!  James...what beauty!! Count me in!! Lovely sprue shots!! Bring on the building!!! |
|
James Duff
Full Member
Member since: November 2013
Posts: 101
Nov 16, 2013 16:44:36 GMT -5
Nov 16, 2013 16:44:36 GMT -5
|
Post by James Duff on Nov 24, 2013 1:38:56 GMT -5
Well I was hoping I could just assemble the chassis parts in "Step 1" and spray bomb the entire thing at once, but unfortunately there is a small part - pardon the single coat of wet paint...Also with this part installed it is impossible to paint the Lower A-Arms without slopping paint all over this piece and having to do a dance of trying to not slop X-18 on the XF-16 and vice-versa...so the chassis plate and "clear" aero piece will have to be sprayed separately, but that will give this piece a different color and texture anyway breaking up the monotony of 10 acres of Semi-Gloss black.  DSC01404 (1280x1196) DSC01404 (1280x1196) by niteowl7710, on Flickr That goes underneath the large "clear" (it will not be clear in the end) aero "skirt" that makes up the rear of the chassis. The small part fits right in the gap where the "tongue" of the clear part faces the defuser and actually makes up the transmission mount for the engine. The clear piece fits so well that it actually snaps into and out of place...nice engineering  DSC01403 (1280x1107) DSC01403 (1280x1107) by niteowl7710, on Flickr The engine's first step is also assembled - mind the single coat of fresh paint on only half the assembly - but if you notice at the top of the engine there are two engraved "bolts" on what would be the bottom if it were tipped over correctly, the piece in the first picture cradles the bolts in such a way as to look as if the assembly is actually bolted together...snazzy engineering again.  DSC01405 (668x1280) DSC01405 (668x1280) by niteowl7710, on Flickr Lots more XF-16 to be slung about the engine, and gotta wait for something resembling a break in the weather to spray the chassis as it's far to smooth to be brush painted and come out looking decent. But there's plenty more engine work to do, and then onto the interior assemblies... |
|
|
|
Post by Mence on Nov 24, 2013 2:28:14 GMT -5
Ok, you got me, I'm in.  I have lost count of the number of times I have picked this one up and put it down again, watching you will mean I will repeat the process yet again but probably end up buying one instead. James, quick question, are the window masks pre scored so you simply peel them away or do you need to cut them out? Lately Tamiya have issued a few kits (mostly two wheelers) where you must cut the masks out yourself, a right pain in the..... Fingers crossed for you when you get to the foil decal stage.  Following with great interest... |
|
Keith Christie
Full Member
Member since: June 2012
Posts: 292 
|
Post by Keith Christie on Nov 24, 2013 5:33:18 GMT -5
Nice start, count me in too James, Im a sucker for a Ferrari, Watch this space  Best Regards Keith. |
|
James Duff
Full Member
Member since: November 2013
Posts: 101
Nov 16, 2013 16:44:36 GMT -5
Nov 16, 2013 16:44:36 GMT -5
|
Post by James Duff on Nov 24, 2013 11:18:34 GMT -5
Well I've noticed from pursuing other WiP threads around here it's my duty to welcome you all aboard...apparently in addition to building this model I have to pilot the Love Boat too. So with that in mind set your courses for adventure, but y'all are on your own with the new romance part...  |
|
|
|
Post by wbill76 on Nov 24, 2013 14:37:29 GMT -5
Don't worry about the romance part, Andy will propose marriage at any moment now. Nice random choice James, fate intended for it to be built! |
|
James Duff
Full Member
Member since: November 2013
Posts: 101
Nov 16, 2013 16:44:36 GMT -5
Nov 16, 2013 16:44:36 GMT -5
|
Post by James Duff on Nov 25, 2013 22:36:02 GMT -5
Alright just some minor painting progress this evening. This is what the basic scheme of the door will look like. There is of course touch-up to do, the Titanium Silver is only one coat, and the lower speaker isn't going to be that color. When I was looking at the reference photos I downloaded for this build I realized that the interior on the 1:1 I chose wasn't black, but actually a really dark blue. So once I get another coat of the silver on there, I'm going to over paint the black with Royal Blue...it should probably shade out quite nicely  DSC01413 (1280x831) DSC01413 (1280x831) by niteowl7710, on Flickr Couple of engine progress shots. The transmission end is done now with detail painting, and end-cap installed.  DSC01414 (1280x721) DSC01414 (1280x721) by niteowl7710, on Flickr This photo doesn't show it as well as it does in person, but the little "box" on the side of the transmission is also Titanium Silver, a shading that you can see in person, but sort of washes out with the flash. 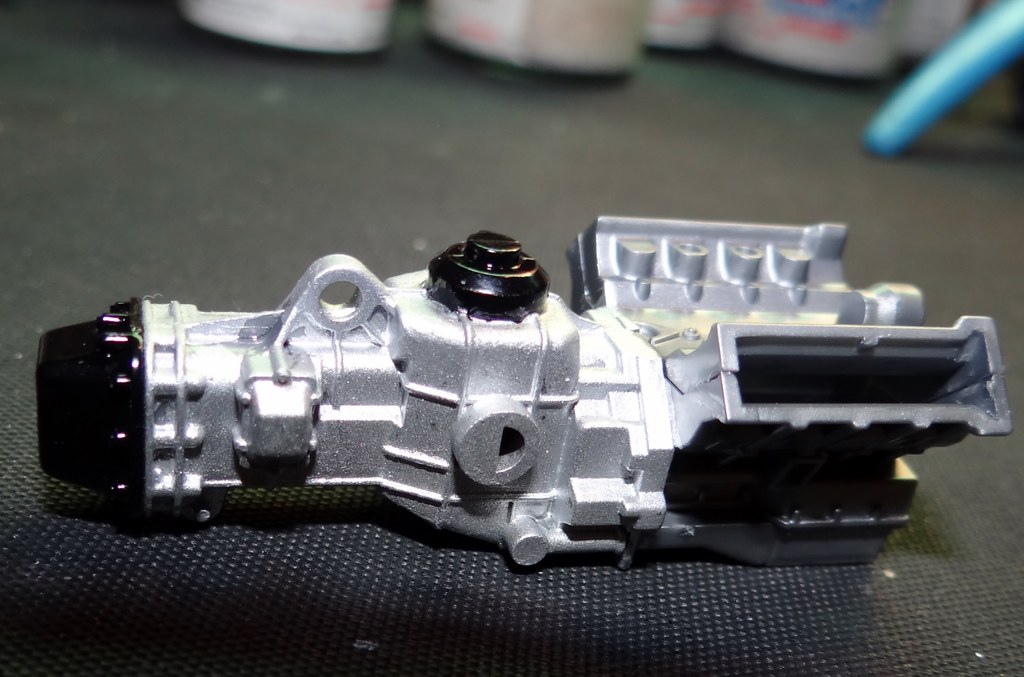 DSC01415 (1280x846) DSC01415 (1280x846) by niteowl7710, on Flickr Right now I have the other 6 engine parts that make up the the "Step 2 - Engine Assembly" in their first coats of paint. The engine cover/serpentine belt is a particularly complex piece as there are 5 color call outs for it. Then there are probably another half-dozen again that get installed in later stages of assembly to worry about when the time comes, or when I get bored waiting for the paint to dry...Looks to be either Saturday and/or Sunday will be warm enough days to get the chassis plates on both this and the Spider painted *fingers crossed*. |
|
|
|
Post by Mence on Nov 26, 2013 2:11:53 GMT -5
Nice update James, engine looking good so far.
|
|
Deleted
Member since: January 1970
Posts: 0
May 12, 2024 19:04:09 GMT -5
May 12, 2024 19:04:09 GMT -5
|
Post by Deleted on Nov 27, 2013 9:17:45 GMT -5
Great start on this one James.
|
|
James Duff
Full Member
Member since: November 2013
Posts: 101
Nov 16, 2013 16:44:36 GMT -5
Nov 16, 2013 16:44:36 GMT -5
|
Post by James Duff on Nov 27, 2013 10:55:05 GMT -5
James, Not to break you down, this is only some positive criticism to get you to a higher level of building that result in a better model at the end. Why not first glue most of the parts together (where possible), place some putty between different parts( where necessary) and after that start painting? That way, you are able to hide some part-joints, that aren't there in the real world. On this pic, the right side, where the valve covers have to come, the block could be 1 piece instead of the 2 plastic parts now. Well the block itself hasn't been painted, and the joints right there have been puttied over since the photo was taken to remove the obvious seam. In an admission of laziness I like to assemble things in order to see where repairs need to be made and where they can be skipped. There are identical seams on the rear portion of the block as well, but those are covered by the front engine cover, so puttying them is..well a waste of putty. Same thing with the block seam itself, the oil pan covers the most obvious bottom seam, and the tranny seam can not be seen in the assembled model. |
|
|
|
Post by Mence on Nov 27, 2013 14:52:43 GMT -5
Fair points from both of you there, must admit I'm one of the worst for spending waaay too much time detailing and painting elements of a model that will never be seen! I'm getting better at disregarding things that shouldn't take up modelling time but I have a long way to go before I'm cured. Look forward to the next update... |
|
James Duff
Full Member
Member since: November 2013
Posts: 101
Nov 16, 2013 16:44:36 GMT -5
Nov 16, 2013 16:44:36 GMT -5
|
Post by James Duff on Feb 1, 2014 17:00:05 GMT -5
Finally got a spot in the weather where it was above freezing and not precipitating at the same time and got the chassis plate and main defuser panel for this painted today so I can resume building it. I wasn't paying enough attention to the forecast so I didn't have the body work completed to paint that too. Shame on me for that, who knows when we'll go back above freezing, looking at 10 more days of Mid-20's (F).
|
|


