|
|
Post by Leon on Dec 14, 2013 19:25:34 GMT -5
|
|
|
|
Post by wbill76 on Dec 14, 2013 21:08:28 GMT -5
Definitely an improvement Leon, looking like a proper Gypsy caravan now with all the stowage!  |
|
|
|
Post by Leon on Dec 14, 2013 21:59:37 GMT -5
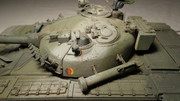
Bill,thank you .Pushing the comfort zone a bit more tonight by adding some chipping.Will post pics tomorrow.  |
|
|
|
Post by Leon on Dec 15, 2013 9:39:30 GMT -5
|
|
|
|
Post by deafpanzer on Dec 15, 2013 12:57:41 GMT -5
The stowage straps look much better now. Nice touch with the chipping... that's what I am hoping to do today on my Chally II. LOL
|
|
Deleted
Member since: January 1970
Posts: 0
May 15, 2024 1:43:27 GMT -5
May 15, 2024 1:43:27 GMT -5
|
Post by Deleted on Dec 15, 2013 13:53:41 GMT -5
nice work Leon the chipping is in all the right places and really enhances the model
|
|
|
|
Post by wbill76 on Dec 15, 2013 13:59:33 GMT -5
More great progress Leon! One small suggestion would be to make the chips smaller...think about the scale size of the chips, for example a 1mm wide chip is actually 35mm on the real vehicle, or just about 1.5 inches, a pretty large chip or scratch when you think about how you've got some of them placed. Maybe dry-brush some of the base coat back over the chips you've created to help blend them back in a bit?
|
|
|
|
Post by Leon on Dec 15, 2013 15:20:19 GMT -5
Andy,thank you buddy. Pete,thank you mate.I was trying not to over do them. Bill thanks for the suggestion as i'm still in the learning process .Your a great help and i appreciate it. |
|
|
|
Post by bullardino on Dec 15, 2013 15:56:05 GMT -5
I like the idea, but I agree with Bill, I'd do the scratches a little smaller...
|
|
|
|
Post by imatanker on Dec 15, 2013 16:29:08 GMT -5
Never thought I'd say this Leon, but smaller is better.  It looks like you actually scratched the paint off. Is that how you did it? |
|
|
|
Post by Leon on Dec 15, 2013 16:56:32 GMT -5
Luigi thank you ,never gave scale size a thought when i did these.  Jeff,say it as often as you like buddy .In this case smaller is better.Scratches were done with a 00 brush and VERY little paint. |
|
|
|
Post by Leon on Dec 21, 2013 10:20:47 GMT -5
|
|
|
|
Post by Deano on Dec 21, 2013 10:26:57 GMT -5
Brilliant work Leon , really like the stowage and all the extra effort trying new things has deffo worked in your favour . Also like the composition on the base .... hills and angles always look good IMO |
|
|
|
Post by Leon on Dec 21, 2013 10:42:52 GMT -5
Deano thank you kindly .Always looking forward to trying new things and improving my skills. |
|
|
|
Post by bbd468 on Dec 21, 2013 12:11:09 GMT -5
Hey brother Leon! Im lookin forward to that sweet M51 sittin side hill....ambush ready! |
|
|
|
Post by Leon on Dec 21, 2013 12:19:28 GMT -5
Gary thanks bro ,off to the craft store now and hope to have some update pics later. |
|
|
|
Post by ceresvesta on Dec 21, 2013 12:24:36 GMT -5
Shaweeeet! Great job Leon! this is going to be a real stunner.
Phil.
|
|
|
|
Post by imatanker on Dec 21, 2013 16:20:28 GMT -5
I like your lay out Leon. This should look really fine when it's finished Dude |
|
|
|
Post by Leon on Dec 21, 2013 18:11:23 GMT -5
Phil,thanks for looking in and your comment.Much appreciated bro .Had planed on starting this today but the Mrs had other plans AARRGGG.  Going to try and work on this in a bit. Jeff thank you buddy .I think it's going to look good to.Off to the bench and try and get this started hopefully with no interruptions. |
|
|
|
Post by Leon on Dec 21, 2013 20:43:54 GMT -5
|
|
Deleted
Member since: January 1970
Posts: 0
May 15, 2024 1:43:27 GMT -5
May 15, 2024 1:43:27 GMT -5
|
Post by Deleted on Dec 22, 2013 2:42:36 GMT -5
nice base idea the angle looks very dramatic
|
|
|
|
Post by imatanker on Dec 22, 2013 3:06:37 GMT -5
Leon, looks pretty good to me. I would maybe try rotating the tank a little so it is climbing the hill more directly? Just my 2 cents |
|
|
|
Post by Leon on Dec 22, 2013 5:19:08 GMT -5
Pete thank you. Jeff thanks for the suggestion.I want to depict the M51 sitting idle in an ambush position. |
|
|
|
Post by ceresvesta on Dec 22, 2013 7:32:48 GMT -5
Keep it up Leon, looking great!
|
|
|
|
Post by Leon on Dec 22, 2013 7:38:48 GMT -5
Phil thank you .Just started the ground work and will post an update in a few minutes. |
|
|
|
Post by TRM on Dec 22, 2013 7:39:49 GMT -5
Playing catch up here Leon...just cool!!! Can't wait to see you get this base together!!!
|
|
|
|
Post by Leon on Dec 22, 2013 7:44:44 GMT -5
Todd glad your getting caught up .Getting ready to post some update pics so stay tuned in. |
|
|
|
Post by TRM on Dec 22, 2013 7:47:48 GMT -5
Will do!! Running out in a bit...Daughter #1 has Basket Ball practice this morning....Sunday at 8:30AM?? The coach is Daft!!!
|
|
|
|
Post by Leon on Dec 22, 2013 8:53:50 GMT -5
|
|
|
|
Post by TRM on Dec 22, 2013 9:10:33 GMT -5
This is going to look super sweet Leon! I would leave the mulch pieces as they should look perfect once painted the sandy color! Flag look great too! Federico is too kind to share all his works!! I little trick on the flag and you can print another to try it out: If using an inkjet printer - A couple of quick squirts with hairspray to seal the ink, then dampen, not soak the flag with some PVA mixed 60/40 with water...brushed on lightly....take a couple small pieces of tubing...one two or three alternating on the sides of the flags giving a wavy look to the flag...allow to dry...  Ben brought up a question about flags the other day which prompted me to start to put together a small SBS on flag making...hope to have this done soon!! |
|


 It looks like you actually scratched the paint off. Is that how you did it?