paulh.
Senior Member
   
Member since: November 2011
build, fail, learn, succeed - ENJOY
Posts: 2,389
Nov 15, 2011 15:54:51 GMT -5
Nov 15, 2011 15:54:51 GMT -5
|
Post by paulh. on Jan 26, 2014 17:49:43 GMT -5
Nice work fella - glad to see yer went with the separate plates, more realistic and a boost when it comes to painting as yer can mix and match the colours or even add some text as if some signage or similar has been cannabalised? Gonna have a trip to Halfords...... Like the idea of recycled plate- MJ's Last Hope Landrover has given me a few ideas on that front. Happy shoppin' P |
|
|
|
Post by wbill76 on Jan 26, 2014 21:45:01 GMT -5
Nice touch on the plates Paul, definitely adds to the detail on this one.
|
|
paulh.
Senior Member
   
Member since: November 2011
build, fail, learn, succeed - ENJOY
Posts: 2,389
Nov 15, 2011 15:54:51 GMT -5
Nov 15, 2011 15:54:51 GMT -5
|
Post by paulh. on Jan 27, 2014 3:44:24 GMT -5
Thanks Bill.
I spent most of my bench time last night struggling (unsuccessfully) to produce something even approaching a rendition of the bedspring armour for the turret, so I'm minded to do something along the lines of the side sheets for the turret also.
What do you guys think?
P
|
|
|
|
Post by TRM on Jan 27, 2014 6:37:38 GMT -5
That is some nice modelling there Paul!!! Love the copper work and fencing!! Keep it coming!!!
|
|
|
|
Post by wouter on Jan 27, 2014 8:33:20 GMT -5
I agree with the lads, that's some seriously cool scratching and playing...love how this looks!
Cheers
|
|
|
|
Post by bullardino on Jan 27, 2014 9:13:28 GMT -5
You can always try your hand at the dreaded rubber added armor, the one used on the famous serbo-bosnian T-34.
I think that probably some aluminium foil from oven trays can be bent realistically to replicate it.
|
|
paulh.
Senior Member
   
Member since: November 2011
build, fail, learn, succeed - ENJOY
Posts: 2,389
Nov 15, 2011 15:54:51 GMT -5
Nov 15, 2011 15:54:51 GMT -5
|
Post by paulh. on Jan 27, 2014 10:43:21 GMT -5
Todd, Wouter, Luigi- thanks very much guys. Feel a visit to the take-away comming on- pre-build research  P |
|
paulh.
Senior Member
   
Member since: November 2011
build, fail, learn, succeed - ENJOY
Posts: 2,389
Nov 15, 2011 15:54:51 GMT -5
Nov 15, 2011 15:54:51 GMT -5
|
Post by paulh. on Jan 27, 2014 16:23:53 GMT -5
Came across this on Militaryphotos.net;  P |
|
paulh.
Senior Member
   
Member since: November 2011
build, fail, learn, succeed - ENJOY
Posts: 2,389
Nov 15, 2011 15:54:51 GMT -5
Nov 15, 2011 15:54:51 GMT -5
|
Post by paulh. on Jan 27, 2014 17:13:05 GMT -5
Great pics- thanks for the link.
P
|
|
|
|
Post by deafpanzer on Jan 27, 2014 23:27:19 GMT -5
Superb work!!! I am loving this already... you are doing great!
|
|
paulh.
Senior Member
   
Member since: November 2011
build, fail, learn, succeed - ENJOY
Posts: 2,389
Nov 15, 2011 15:54:51 GMT -5
Nov 15, 2011 15:54:51 GMT -5
|
Post by paulh. on Jan 28, 2014 3:25:19 GMT -5
Research was nice but Mrs H chucked the foil tray before i could get to it!
Good job I have plenty of the copper strips.
Andy - thanks mate.
Bench time tonight so hopefully an update as well.
P
|
|
paulh.
Senior Member
   
Member since: November 2011
build, fail, learn, succeed - ENJOY
Posts: 2,389
Nov 15, 2011 15:54:51 GMT -5
Nov 15, 2011 15:54:51 GMT -5
|
Post by paulh. on Jan 28, 2014 15:31:33 GMT -5
Ok chaps; here's my next attempt at turret armour. Made of the same stuff as the side plates . but unlike the need for access to running gear etc- once on the turret I reckon there's no need for it to come off. Consequently I've made it up as a single large plate, set on some U-channel and attached with some rod. Currently just tacked on with some white-tac to get a sense of how it looks together. Not too bad but I'm not fully convinced so I would very mush welcome your input on this. 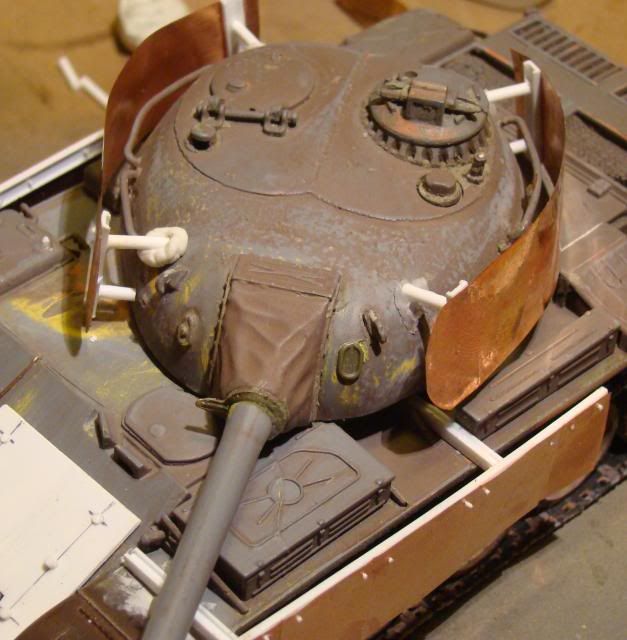 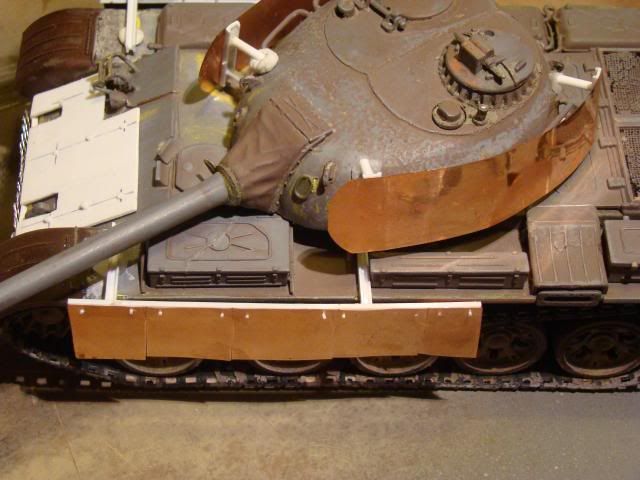 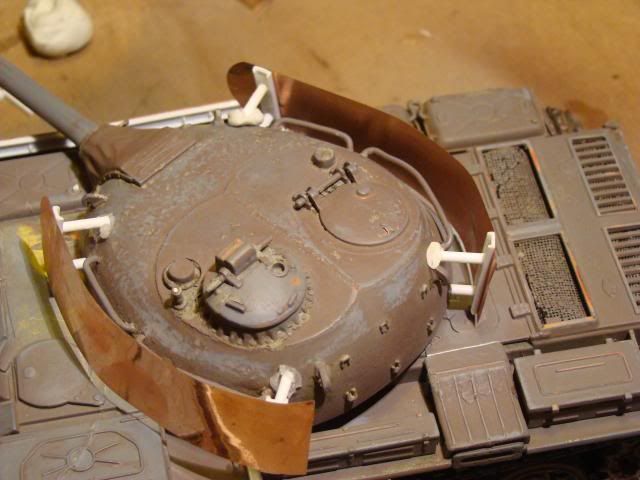 All input welcomed! P |
|
|
|
Post by bullardino on Jan 28, 2014 16:23:48 GMT -5
Mighty fine, Paul  |
|
paulh.
Senior Member
   
Member since: November 2011
build, fail, learn, succeed - ENJOY
Posts: 2,389
Nov 15, 2011 15:54:51 GMT -5
Nov 15, 2011 15:54:51 GMT -5
|
Post by paulh. on Jan 28, 2014 17:27:15 GMT -5
Thanks fellas.
I going to aim to get some primer on these soon. Hopefully give me a better idea of what it might look like with everything attached.
Still not fully sold on the new turret sheets though...
|
|
|
|
Post by Leon on Jan 28, 2014 17:36:27 GMT -5
Fine job on the turret armor Paul,Looking really good.  |
|
|
|
Post by wbill76 on Jan 28, 2014 21:16:34 GMT -5
Not sure what you're not sold on Paul but it may be the fact that they look too 'perfect' as single pieces vs. what's on the lower hull? Maybe if you sectioned them in two pieces so they had a more angular feel vs. being that nicely curved shape it would be more appealing to your eye and you could also bang them up a bit?
|
|
paulh.
Senior Member
   
Member since: November 2011
build, fail, learn, succeed - ENJOY
Posts: 2,389
Nov 15, 2011 15:54:51 GMT -5
Nov 15, 2011 15:54:51 GMT -5
|
Post by paulh. on Jan 29, 2014 2:55:25 GMT -5
Thanks guys.
I think you hit on the head about angles. This one is too uniform for the look Im trying to get.
Im tempted to try a bit of home made slat armour ( a - la -Dicky).That would allow me to create a number of smaller and non-uniform panels.
P
|
|
Deleted
Member since: January 1970
Posts: 0
Nov 25, 2024 12:47:39 GMT -5
Nov 25, 2024 12:47:39 GMT -5
|
Post by Deleted on Jan 29, 2014 17:18:06 GMT -5
I would be tempted to junk the grab handles on the turret, they are horribly over scale anyway, so no loss, and then do the front quarter segment of the turret with segmented armour plates, stuff like this tends to be mounted on short studs which are welded to the turret, and then the plate is bolted to the studs. Plus, take the plate on the frontal armour all the way up past the light guard, these were very often simply removed, and then just welded back on top, but keeping a cutout around the drivers vision ports (as you have) It kinda always depends on what you are aiming at, to me the turret armour looks a little too much like German Schurzen, which is not a bad thing really if that's what you are going for.  |
|
paulh.
Senior Member
   
Member since: November 2011
build, fail, learn, succeed - ENJOY
Posts: 2,389
Nov 15, 2011 15:54:51 GMT -5
Nov 15, 2011 15:54:51 GMT -5
|
Post by paulh. on Jan 29, 2014 17:39:29 GMT -5
Cheers k. True about those grab handles-way overscale. They're going to come off regardless of what ever else happens.
P
Grab handles gone- and it's looking better already!
|
|
paulh.
Senior Member
   
Member since: November 2011
build, fail, learn, succeed - ENJOY
Posts: 2,389
Nov 15, 2011 15:54:51 GMT -5
Nov 15, 2011 15:54:51 GMT -5
|
Post by paulh. on Jan 30, 2014 15:26:11 GMT -5
Ok then; Oversize grab handles have been removed and it all had had a blast with some Tamiya grey primer. Here's what it looks like (screens just tacked on ) : 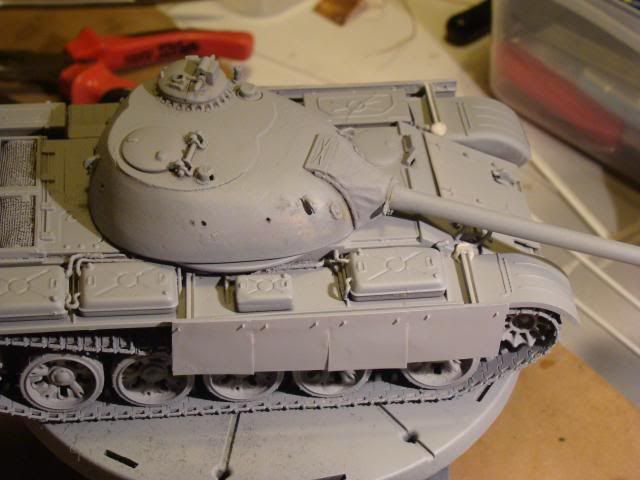 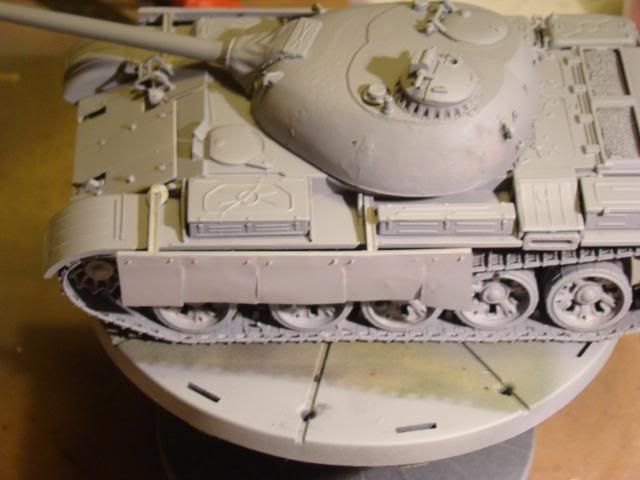 I have to say I'm reasonably happy with how the front end is now looking  . Still playing around with ideas for the turret though as I cant seem to decide on what I want  P |
|
Deleted
Member since: January 1970
Posts: 0
Nov 25, 2024 12:47:39 GMT -5
Nov 25, 2024 12:47:39 GMT -5
|
Post by Deleted on Jan 30, 2014 17:15:46 GMT -5
Simply decide whether you want to go with the 'junkyard' look, or something that is a little more modern, i.e. a proper upgrade job done by the military as part of the many T-55 upgrade programs.
Picture below is the junkyard look, notice the small plates around the turret, frontal armour is done with I beams welded on to act as spaced armour, all very crude, and all probably a complete waste of the welders time.

Picture below is the 'pro' look, this was done by Slovenia I think, as part of their upgrade program, and probably cost vast sums of money, the rubber side skirting is very similar to T-72 side skirts, the extra armour itself looks like some form of 'reactive armour', but it's hard to tell, the segments are fairly large, so might just be extra plating, not sure, I don't pay much attention to upgraded T-55's

If these two pictures don't help, then I give up lol, just try Googling T-55 upgraded armour, I shall try and hunt down the Yugoslav sand bag turret armour pictures, (they are proving hard to find, and I deleted my copy's, doh) they look very good, and would fit very well with your side skirt setup.
 |
|
|
|
Post by robbo on Jan 30, 2014 17:22:13 GMT -5
Very interesting blog Paul
|
|
paulh.
Senior Member
   
Member since: November 2011
build, fail, learn, succeed - ENJOY
Posts: 2,389
Nov 15, 2011 15:54:51 GMT -5
Nov 15, 2011 15:54:51 GMT -5
|
Post by paulh. on Jan 30, 2014 17:36:03 GMT -5
Kharkov- thanks again. I have the first one but the Slovenian one was new to me. All very useful.
Hi Robbo- nice to have you along.
jackwagon- Sounds like a possible plan there. Because of the shape and curvature of the topbox the plates are probably the only realistic option for the front quarter. Need to go on a shopping trip tomorrow to pick up some white stuff for the weekend.
|
|
Deleted
Member since: January 1970
Posts: 0
Nov 25, 2024 12:47:39 GMT -5
Nov 25, 2024 12:47:39 GMT -5
|
Post by Deleted on Jan 30, 2014 17:55:26 GMT -5
If all else fails, just cover it with snow...  I might do a thread that just contains cool T-54/55 pictures, it is just such a good looking tank, holds itself well in a photo.  |
|
Deleted
Member since: January 1970
Posts: 0
Nov 25, 2024 12:47:39 GMT -5
Nov 25, 2024 12:47:39 GMT -5
|
Post by Deleted on Jan 30, 2014 18:26:35 GMT -5
That's an old project that got put on hold, it's a T-55 nose section, i.e. the upper and lower front armour plates done to around scale thickness, and then put together like the real thing. The Tamiya kit, as do most kits simply 'fake' the armour thickness of front plates, and very often just use fake 'glue on' lower plates, as per the Tamiya kit, these tend to not look very good tbh, the hull itself is simply a Tamiya T-55 lower hull with the sides built up back to in effect full form, to create a proper T-55 hull. It was my - "make a red laggy band look good project", lol  |
|
|
|
Post by bbd468 on Jan 30, 2014 19:19:12 GMT -5
Yer right Kharkov - there's never been an ugly T (wait for it!) Ah, i see what ya did there!  Lookin awesome brother Paul!  |
|
|
|
Post by wbill76 on Jan 30, 2014 21:30:51 GMT -5
Looks like you're heading in the right direction Paul! Keep at it.  |
|
paulh.
Senior Member
   
Member since: November 2011
build, fail, learn, succeed - ENJOY
Posts: 2,389
Nov 15, 2011 15:54:51 GMT -5
Nov 15, 2011 15:54:51 GMT -5
|
Post by paulh. on Jan 31, 2014 1:53:29 GMT -5
A styrene shopping we will go.....
Brother Gary , Bill- thank you both very much chaps
P
|
|
|
|
Post by `Boots` on Jan 31, 2014 16:06:44 GMT -5
If all else fails, just cover it with snow...  I might do a thread that just contains cool T-54/55 pictures, it is just such a good looking tank, holds itself well in a photo.  I like the idea of the 54/55 pictures K, a big fan of these myself and i lost a load of my ref pics a while back!! Paul she looks terrific matey......  |
|
paulh.
Senior Member
   
Member since: November 2011
build, fail, learn, succeed - ENJOY
Posts: 2,389
Nov 15, 2011 15:54:51 GMT -5
Nov 15, 2011 15:54:51 GMT -5
|
Post by paulh. on Jan 31, 2014 16:35:25 GMT -5
Cheers Boots. here's what I've come up with; Plates were made up from 10thou' sheet and attached to a frame made up from styrene angle piece. once secure I drilled through and then added some styrene rod that was then cut back as bolts. For the back-end I made up a bar frame and then added some of the aluminium mesh. This was then secured to the back of the turret with CA and the space was built up with some green stuff. 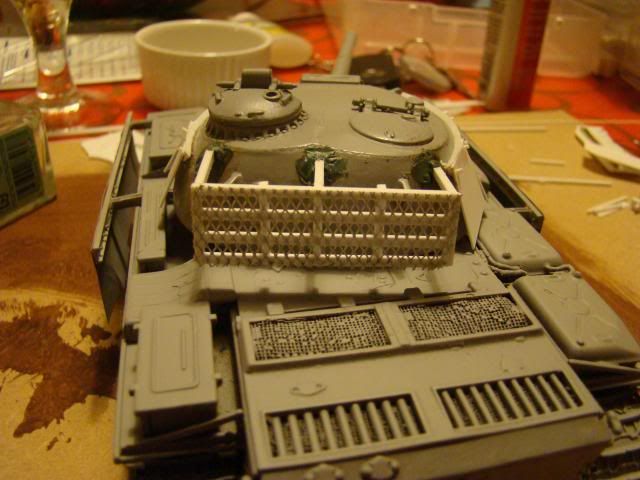 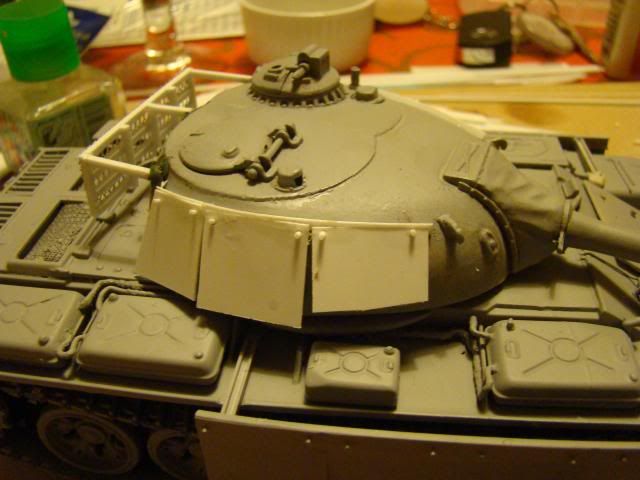 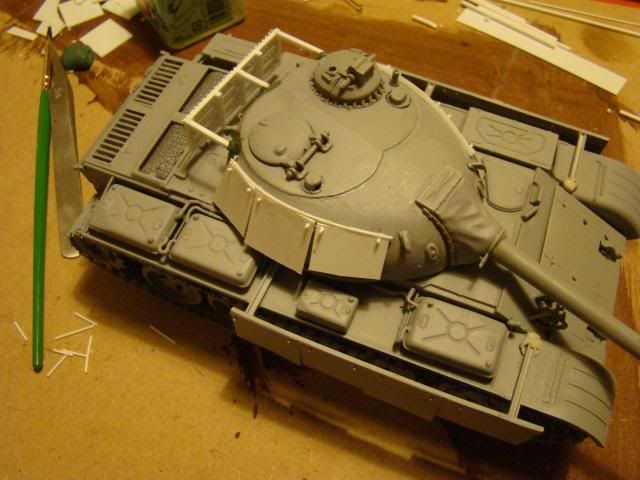 I'm happy with the way this is looking, but all comments are graciously received. P |
|