|
|
Post by wing_nut on Feb 6, 2014 19:36:34 GMT -5
WOW Paul. That's just..well... JUST so nice
|
|
|
|
Post by Leon on Feb 6, 2014 21:18:20 GMT -5
Looking really good Paul  .I'm liking this a lot.  |
|
paulh.
Senior Member
   
Member since: November 2011
build, fail, learn, succeed - ENJOY
Posts: 2,389
Nov 15, 2011 15:54:51 GMT -5
Nov 15, 2011 15:54:51 GMT -5
|
Post by paulh. on Feb 7, 2014 1:54:08 GMT -5
Bill, Wing-nut, Leon. Thank you very much chaps. I am happy you like it.  I think I'm starting to get a handle on this moggeling lark  Somtec- apologies for not fully responding earlier- the tracks are the bands that came with the kit. Not great at holding onto paint tbh, so I'll probably end up doing a lot of pigment work on them. P |
|
|
|
Post by bullardino on Feb 7, 2014 11:45:34 GMT -5
Looking good, certainly got that improvised look. Got any plans for markings or crew, I can just see a bunch of African militia type tank riders on the back. Me too, I like it  |
|
paulh.
Senior Member
   
Member since: November 2011
build, fail, learn, succeed - ENJOY
Posts: 2,389
Nov 15, 2011 15:54:51 GMT -5
Nov 15, 2011 15:54:51 GMT -5
|
Post by paulh. on Feb 7, 2014 14:50:18 GMT -5
Cheers Luigi!
P
|
|
paulh.
Senior Member
   
Member since: November 2011
build, fail, learn, succeed - ENJOY
Posts: 2,389
Nov 15, 2011 15:54:51 GMT -5
Nov 15, 2011 15:54:51 GMT -5
|
Post by paulh. on Feb 11, 2014 16:58:12 GMT -5
Well I've being plodding along with the kinda work that isn't going to be massively noticable tbh. I decided to do some work on the tracks . These are the supplied bands that don't really like paint all that much  leaving them in-situ seemed the best option, so whilst they were still holding onto the primer I gave them a heavy coat of AK track wash. when that was almost dry I added a mix of earthy toned pigments and left to cure overnight. Then I followed it up with another hit of the track wash to hopefully fix them. Again after leaving to dry overnight I then dry-brushed oily steel over the raised face detail and track edges. I've decided to add a figure to this but as i don't have a supply of suitable African milita types or even stuff that could be easily modified, i rummaged around and came up withone from the ICM Ukranian army set- I'm thinking along the lines of either a mercenary or perhaps Cuban/DDR "advisor" type from their foray into the southern regions of Africa perhaps  Thoughts welcomed on that one folks. I'll try and get some pictures by the weekend. |
|
|
|
Post by bullardino on Feb 12, 2014 6:37:11 GMT -5
I'll wait for the pictures very interested  The overall process looks promising and the figure will be a great addition  |
|
pantherf..-Email Not Valid
Full Member
  
Member since: July 2013
"Best Job I've Ever Had"
Posts: 1,253 
|
Post by pantherf..-Email Not Valid on Feb 12, 2014 7:16:06 GMT -5
Oh, GOOD GAWD! What an evil looking tank! I LOVE IT!  I built an old Hobby Craft T-55 many moons ago so I'm due. Thanks for showing off this little jewel.  Jeff |
|
|
|
Post by bbd468 on Feb 12, 2014 12:48:45 GMT -5
Well done Paul, very impressive.  |
|
Deleted
Member since: January 1970
Posts: 0
Nov 25, 2024 12:31:27 GMT -5
Nov 25, 2024 12:31:27 GMT -5
|
Post by Deleted on Feb 12, 2014 15:25:42 GMT -5
looks suitably beat up nice work
|
|
paulh.
Senior Member
   
Member since: November 2011
build, fail, learn, succeed - ENJOY
Posts: 2,389
Nov 15, 2011 15:54:51 GMT -5
Nov 15, 2011 15:54:51 GMT -5
|
Post by paulh. on Feb 12, 2014 17:02:17 GMT -5
Gents thank you all very much indeed. As promised some "update" pics, not sure you can see any difference tbh. I will be adding additional pigments and debris to the tracks to both tone down the harshness and clog up the works a bit more; 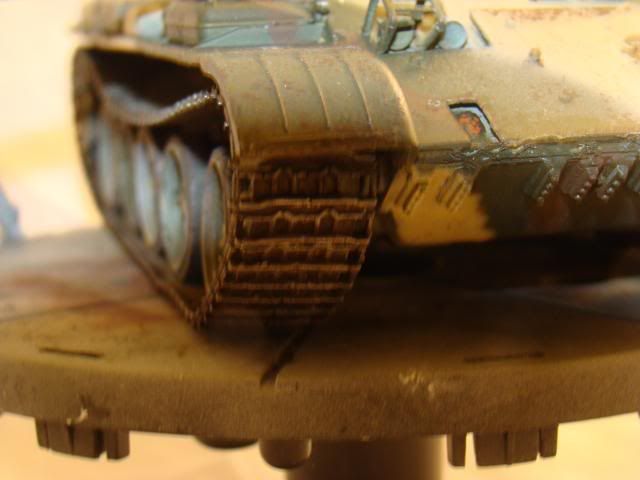 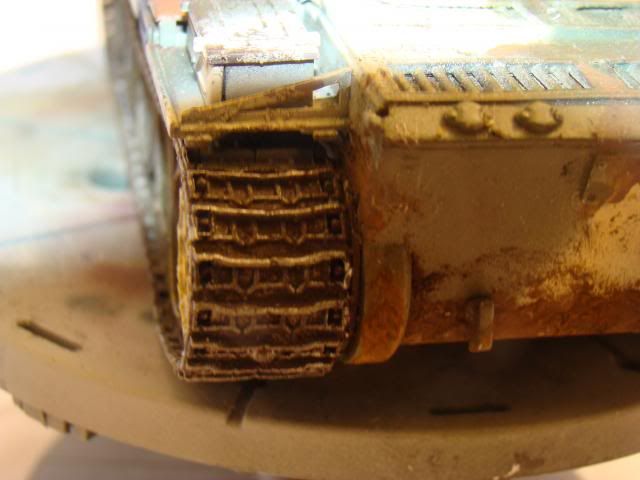 and here's my "advisor"/Merc - currently just cobbled together and in need of some more work before any paint goes on: 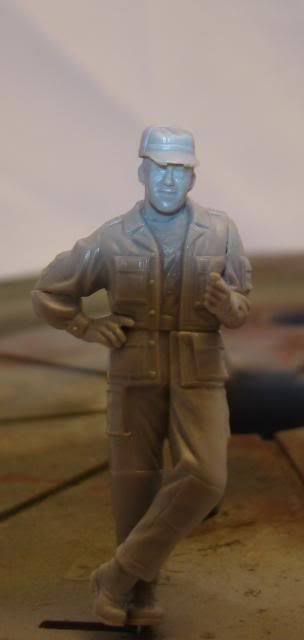 ACW P ps apologies for the quality of the photography- another area requiring development.... |
|
|
|
Post by deafpanzer on Feb 12, 2014 23:37:00 GMT -5
That merc figure is looking good. Nice work on the tracks!
|
|
|
|
Post by `Boots` on Feb 13, 2014 16:47:20 GMT -5
All caught up with this one now Paul.....  , fabulous look to her matey and fully agree with the militia style......excellent work fella  |
|
paulh.
Senior Member
   
Member since: November 2011
build, fail, learn, succeed - ENJOY
Posts: 2,389
Nov 15, 2011 15:54:51 GMT -5
Nov 15, 2011 15:54:51 GMT -5
|
Post by paulh. on Feb 14, 2014 3:31:16 GMT -5
No gardening again this weekend so hopefully I'll be able to get some meaningful work done on the figure and maybe even some paint ( even if its only primer).
P
|
|
|
|
Post by Leon on Feb 14, 2014 3:51:03 GMT -5
The figure is going to make a great addition Paul.  |
|
paulh.
Senior Member
   
Member since: November 2011
build, fail, learn, succeed - ENJOY
Posts: 2,389
Nov 15, 2011 15:54:51 GMT -5
Nov 15, 2011 15:54:51 GMT -5
|
Post by paulh. on Feb 18, 2014 17:29:28 GMT -5
Crew/advisor painting has begun... 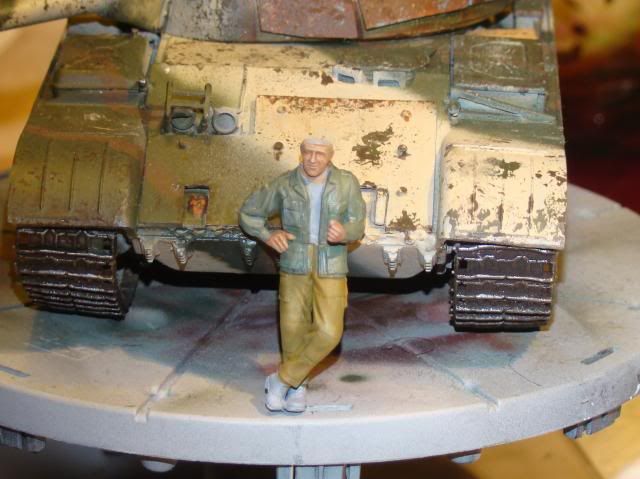 Takin' shape I think.  |
|
|
|
Post by Leon on Feb 18, 2014 17:33:24 GMT -5
Taking shape indeed Paul,nice start on the painting.  |
|
|
|
Post by wbill76 on Feb 18, 2014 20:53:48 GMT -5
Taking shape indeed! Just don't forget to cover the poor guy's head...he'd roast like that in the desert!  |
|
paulh.
Senior Member
   
Member since: November 2011
build, fail, learn, succeed - ENJOY
Posts: 2,389
Nov 15, 2011 15:54:51 GMT -5
Nov 15, 2011 15:54:51 GMT -5
|
Post by paulh. on Feb 19, 2014 2:59:24 GMT -5
Leon - thank you.
jackwagon - thought much the same thing th , but as soon as the paint started to go on things really sharpened up( to my eyes at least).
Bill. - wasn't happy with the original header so deep-sixed it. Still not sure what to add-maybe a boonie or similar.
Later guys. - orf to da Jim for some fatty sweat time - I. Know TMFUI¡
|
|
|
|
Post by bullardino on Feb 19, 2014 4:25:01 GMT -5
Nice start on the fig Paul  |
|
paulh.
Senior Member
   
Member since: November 2011
build, fail, learn, succeed - ENJOY
Posts: 2,389
Nov 15, 2011 15:54:51 GMT -5
Nov 15, 2011 15:54:51 GMT -5
|
Post by paulh. on Feb 19, 2014 5:24:24 GMT -5
Thanks Luigi.
|
|
paulh.
Senior Member
   
Member since: November 2011
build, fail, learn, succeed - ENJOY
Posts: 2,389
Nov 15, 2011 15:54:51 GMT -5
Nov 15, 2011 15:54:51 GMT -5
|
Post by paulh. on Feb 19, 2014 7:30:52 GMT -5
Some basic shading and highlights applied; 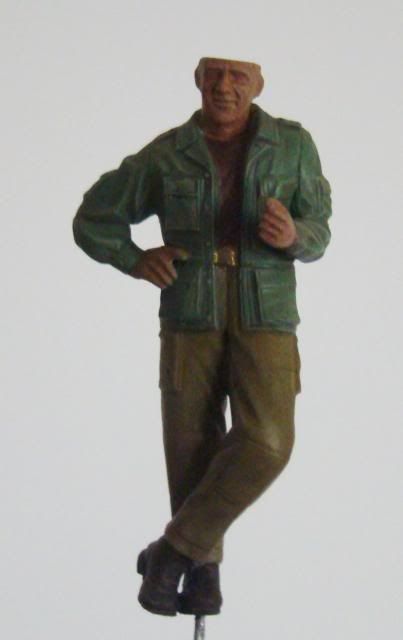 Sorry about the quality of the picture- haven't quite mastered Macro settings yet. P |
|
|
|
Post by bbd468 on Feb 19, 2014 11:39:04 GMT -5
Paul, your doin a fine job my freind, looks great.  |
|
paulh.
Senior Member
   
Member since: November 2011
build, fail, learn, succeed - ENJOY
Posts: 2,389
Nov 15, 2011 15:54:51 GMT -5
Nov 15, 2011 15:54:51 GMT -5
|
Post by paulh. on Feb 19, 2014 11:46:25 GMT -5
Thank you very much bro!
|
|
paulh.
Senior Member
   
Member since: November 2011
build, fail, learn, succeed - ENJOY
Posts: 2,389
Nov 15, 2011 15:54:51 GMT -5
Nov 15, 2011 15:54:51 GMT -5
|
Post by paulh. on Feb 24, 2014 10:04:05 GMT -5
Now he's got a cover on his bonce- c/o the spares box- I think its a Dragon VC bush hat, but looks about right for this fella. The shininess is down to the flash and not what it looks like in real life- honest! 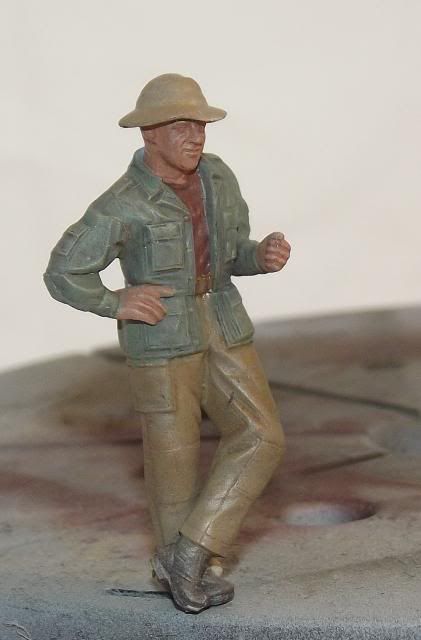 Some more work necessary on the flesh-tones methinks -oh the joys of seeing stuff close up! |
|
|
|
Post by deafpanzer on Feb 24, 2014 14:07:08 GMT -5
Figure looking pretty good... I'd rather to be wearing VC bush hat in hot climate such as desert.
|
|
|
|
Post by Leon on Feb 24, 2014 18:21:16 GMT -5
Paul the figure is coming along nicely,dig the new head cover.  |
|
|
|
Post by wbill76 on Feb 24, 2014 21:28:17 GMT -5
Camera can be relentless Paul but don't lose heart! He's looking good with the bush hat.  |
|
paulh.
Senior Member
   
Member since: November 2011
build, fail, learn, succeed - ENJOY
Posts: 2,389
Nov 15, 2011 15:54:51 GMT -5
Nov 15, 2011 15:54:51 GMT -5
|
Post by paulh. on Feb 25, 2014 3:30:42 GMT -5
It is a challenge to be overcome, but in the meantime got started on some groundwork;
A piece of pink insulating foam was cut and shaped before being coated in a mixture of filler, artists acrylic and pva . As this was drying some texture ws added with a scouring pad. This also helps with later application of rocks and scatter. Varioos grades of talus were then applied randomly along with scatter made up from the content of the great British teabag & the kitchen herb rack. Some Noch railway grass clumps of various hues were added in a random fashion and that's where Im at now.
Pics to follow later- Im having a bit of difficulty with PB at the mo.
Laters
p
|
|
paulh.
Senior Member
   
Member since: November 2011
build, fail, learn, succeed - ENJOY
Posts: 2,389
Nov 15, 2011 15:54:51 GMT -5
Nov 15, 2011 15:54:51 GMT -5
|
Post by paulh. on Feb 25, 2014 17:18:08 GMT -5
Here's some pics as promised. I've just placed the '55 along with the advisor/merc to get a sense of how things might work. The shell casings are from the MiniArt 100mm Soviet Ammo set- perfect for this. 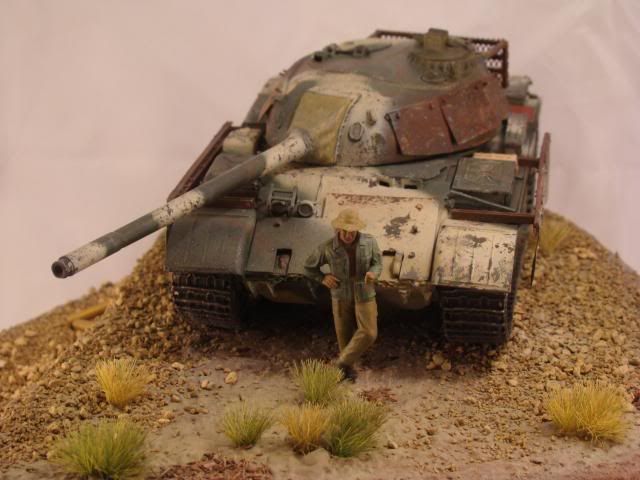 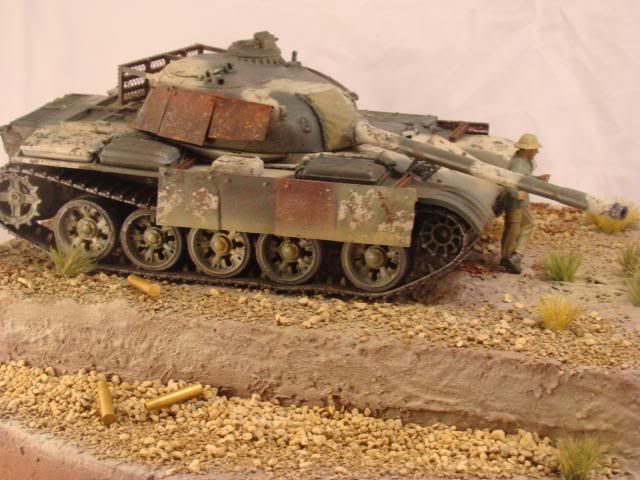 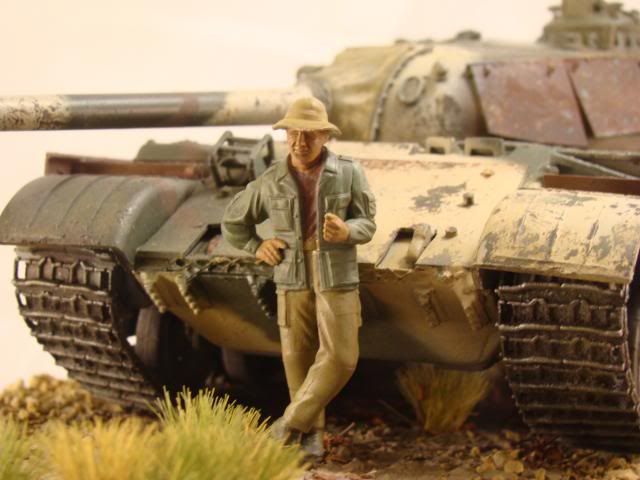 Some more "dressing" is probably in order still, as well as some finishing touches to the beastie but I don't want to go over the top, so all comments, suggestions etc are very welcome. P |
|