redleg12
Full Member
  
Member since: August 2012
www.redleg2scale.com
Posts: 401
Aug 28, 2012 18:59:10 GMT -5
Aug 28, 2012 18:59:10 GMT -5
|
Post by redleg12 on Feb 3, 2014 6:59:41 GMT -5
Leon - Thanks, will keep firing at the target
Helco - Thanks for the peek, the PE projo trays are much better than the kit.
Rounds Complete!!
|
|
|
|
Post by wing_nut on Feb 3, 2014 7:56:48 GMT -5
Assemble tracks during the game? How could you divert your attention away from that?  Nice start Mike. |
|
|
|
Post by wbill76 on Feb 3, 2014 21:36:33 GMT -5
Hopefully your track session was more productive than the Denver offense there Mike. Nice progress on all those tubes and the spade of course.  |
|
redleg12
Full Member
  
Member since: August 2012
www.redleg2scale.com
Posts: 401
Aug 28, 2012 18:59:10 GMT -5
Aug 28, 2012 18:59:10 GMT -5
|
Post by redleg12 on Feb 4, 2014 6:36:06 GMT -5
Marc - After the fist half and the 3 quarter opening kickoff... I could assemble the tracks without missing anything. Even the commercials stunk.
Bill - I know the bad odor of the Denver offense is still in the air...the game is proof defense wins, still.
Thanks guys for the peek and the comments
Rounds Complete!!
|
|
|
|
Post by bullardino on Feb 4, 2014 13:52:57 GMT -5
Nice progress on the beast, Mike  |
|
danb.
Reviews member     March 2013 MoM Winner
Member since: November 2011
Posts: 2,808
Nov 17, 2011 9:22:52 GMT -5
Nov 17, 2011 9:22:52 GMT -5
|
Post by danb. on Feb 4, 2014 14:05:34 GMT -5
Great work Mike this reminds me of a Waffentrager very similar design just a huge ferkin gun lol  Dan B |
|
redleg12
Full Member
  
Member since: August 2012
www.redleg2scale.com
Posts: 401
Aug 28, 2012 18:59:10 GMT -5
Aug 28, 2012 18:59:10 GMT -5
|
Post by redleg12 on Feb 4, 2014 22:06:51 GMT -5
Luigi - Thanks
Dicky - Thanks for the peek
Dan - It is a big boys gun!! Thanks
Rounds Complete!!
|
|
redleg12
Full Member
  
Member since: August 2012
www.redleg2scale.com
Posts: 401
Aug 28, 2012 18:59:10 GMT -5
Aug 28, 2012 18:59:10 GMT -5
|
Post by redleg12 on Feb 9, 2014 19:35:28 GMT -5
This week’s progress includes the tracks. Worked on them during the Super Bowl and finished up later this week. Here are 4 sets of 36 links. On side should have 74 or 75 links, thus two of these sets plus a couple of loose links, which will be added to fit. At 36 links it makes it easier to work with for finishing in my opinion. 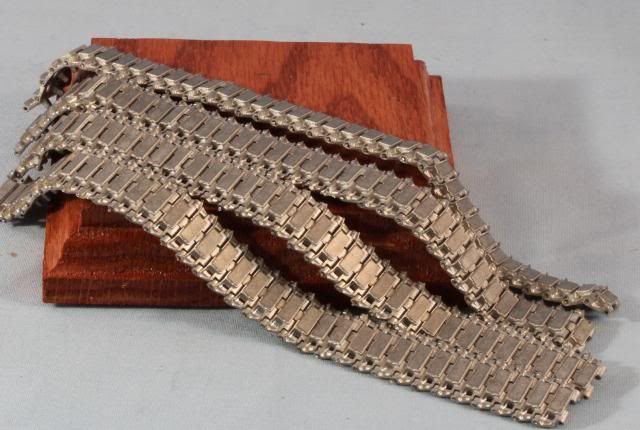 Here is the last assemble, the gun upper carriage. The last few details and filling work completed. 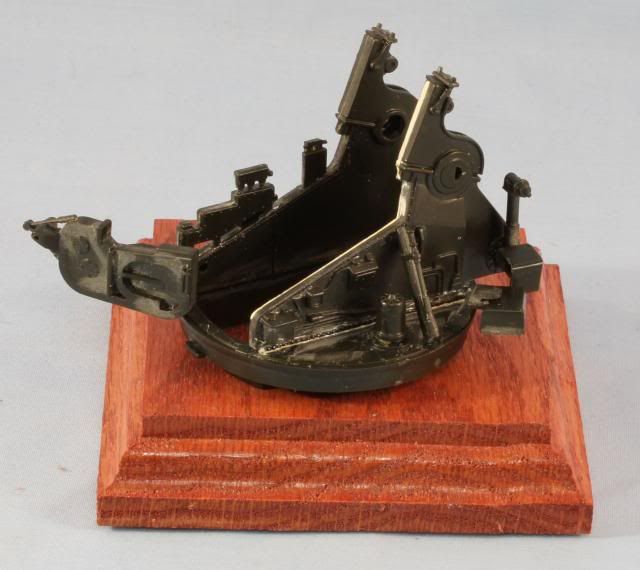 Here is a closer view. You can see my use of Archer surface details welding lines. 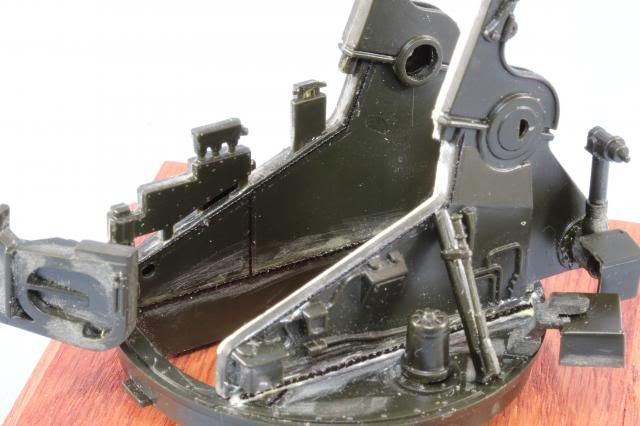 Here is the recoil spade. It has been base painted with NATO Green and the AK Light Rust wash to give a rust bleed look near the bottom. 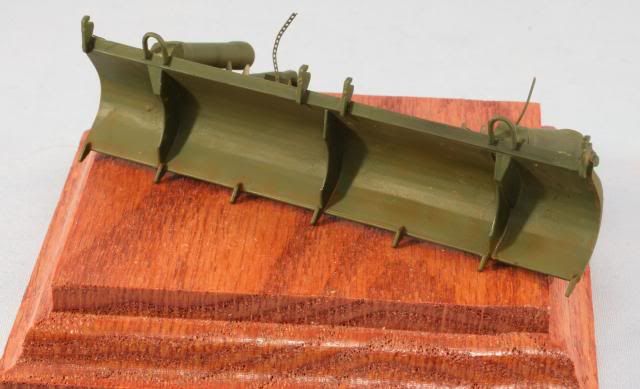 That’s it for now. Next to finish the base coating and start some add on details. As always if you have any comments, please feel free to drop in. Rounds Complete!! |
|
|
|
Post by Leon on Feb 9, 2014 20:00:48 GMT -5
Nice progress update Mike,looks like everything is moving along smoothly.  |
|
|
|
Post by wbill76 on Feb 9, 2014 21:48:52 GMT -5
Good to see you back on a semi-normal cycle of updates Mike! Tracks look nice and can't argue with those weld beads either.
|
|
|
|
Post by bullardino on Feb 10, 2014 3:43:56 GMT -5
Nice progress, everything looks great  |
|
redleg12
Full Member
  
Member since: August 2012
www.redleg2scale.com
Posts: 401
Aug 28, 2012 18:59:10 GMT -5
Aug 28, 2012 18:59:10 GMT -5
|
Post by redleg12 on Feb 10, 2014 6:29:24 GMT -5
Leon - Thanks for the comments
Bill - Thanks, at my age being normal has a different meaning!! LOL I must admit the Spade Ace tracks are Excellent and highly recommended. Love the Archer raised detail, such a time saver with outstanding results.
Luigi - Thanks
Rounds Complete!!
|
|
|
|
Post by fightnjoe on Feb 11, 2014 8:22:26 GMT -5
looks really good. love the look of the spade.
joe
|
|
redleg12
Full Member
  
Member since: August 2012
www.redleg2scale.com
Posts: 401
Aug 28, 2012 18:59:10 GMT -5
Aug 28, 2012 18:59:10 GMT -5
|
Post by redleg12 on Feb 11, 2014 20:43:54 GMT -5
Joe - More fun with the spade to come. thanks for the peek
Dicky - Thanks for stopping by the firing position. Thanks for the kind comments
Rounds Complete!!
|
|
|
|
Post by Mence on Feb 12, 2014 2:21:31 GMT -5
Can't wait to see this beast up together!
|
|
jackh.
Full Member
  
Member since: December 2011
Posts: 1,195
Dec 15, 2011 2:51:27 GMT -5
Dec 15, 2011 2:51:27 GMT -5
|
Post by jackh. on Feb 12, 2014 4:46:56 GMT -5
A bit late in on this but you have my attention now  , nice to have another M110 build going. |
|
redleg12
Full Member
  
Member since: August 2012
www.redleg2scale.com
Posts: 401
Aug 28, 2012 18:59:10 GMT -5
Aug 28, 2012 18:59:10 GMT -5
|
Post by redleg12 on Feb 12, 2014 6:36:50 GMT -5
Mence - Soon..... very soon. Once the sand color and chipping then will pull the assemblies together. Thanks for the peek.
Jack - Thanks for stopping by and you are never late. Happy to have you at the firing point.
Rounds Complete!!
|
|
redleg12
Full Member
  
Member since: August 2012
www.redleg2scale.com
Posts: 401
Aug 28, 2012 18:59:10 GMT -5
Aug 28, 2012 18:59:10 GMT -5
|
Post by redleg12 on Mar 2, 2014 18:36:31 GMT -5
It has been a few weeks as RL and this great winter has kept me away from the bench. After assembling the tracks I coated them with AK Track wash to get the general color and then used AK light rust to enhance the nooks and crannies. Here is how they look as I still have to paint the pads rubber black. 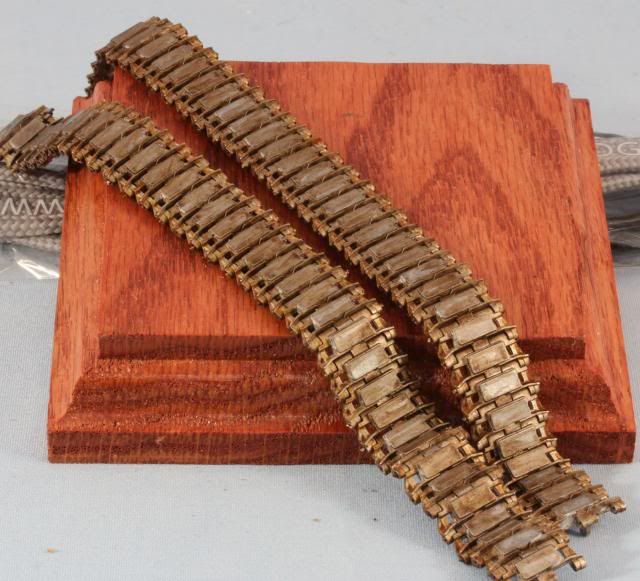 As I stated earlier the ODS vehicles were painted in country with non-military paint and had a tendency to peel and scratch very easily. In order to create the look, the hull was coated using 3 coats of AK Worn Effects. This solution is a simple version of the hair spray technique…without the hairspray! After drying the third coat I used Model Master Acryl US Army Gulf Sand. After the hull dried using a stiff brush for wear areas, an X-Acto blade for edge wear, and my small Eurotool for peel areas, I worked the hull especially in the area of the tracks and fenders. All this work is done keeping the area wet to damp with water. Here is the look after the chipping/peeling process. 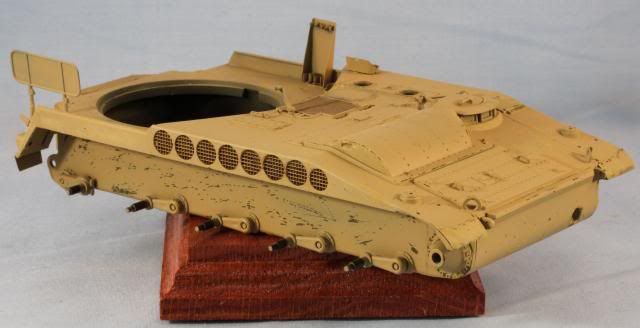 Here is a view from above showing the area where the crew would walk around and wear the paint on the floor. Also note the edge wear in the forward section 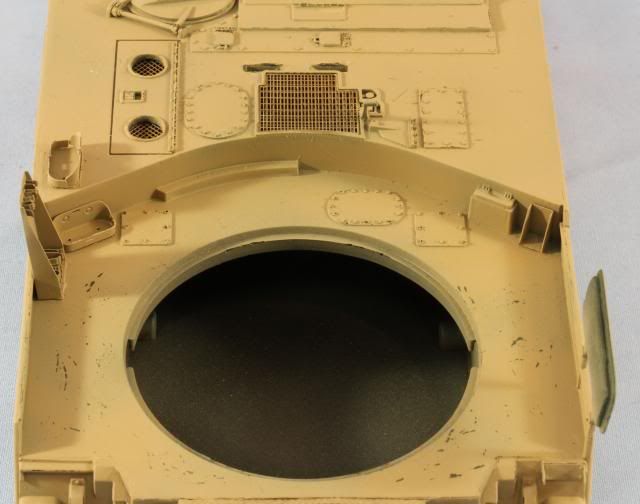 I performed the same process on the road wheels and drive gear. It is a little more time consuming on a bunch of little parts, especially working both sides. 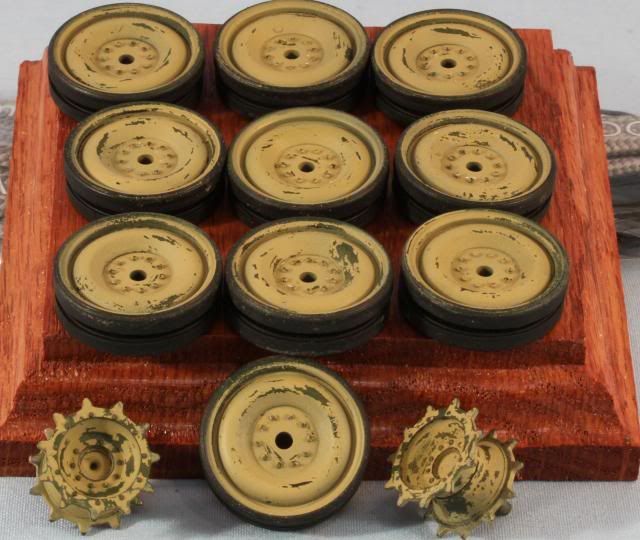 That’s it for now. I will be continuing the process with the other major assemblies next. As always if you have any comments, please feel free to drop in. Rounds Complete!! |
|
|
|
Post by Leon on Mar 2, 2014 18:44:56 GMT -5
WOW fantastic work on the tracks and chipping and peeling paint Mike.   |
|
redleg12
Full Member
  
Member since: August 2012
www.redleg2scale.com
Posts: 401
Aug 28, 2012 18:59:10 GMT -5
Aug 28, 2012 18:59:10 GMT -5
|
Post by redleg12 on Mar 2, 2014 19:20:14 GMT -5
Leon - thanks for the peek and for the comments
Rounds Complete!!
|
|
|
|
Post by deafpanzer on Mar 2, 2014 20:59:46 GMT -5
Tracks look excellent! Love the chipping on the wheels showing its original OD paint.
|
|
|
|
Post by fightnjoe on Mar 2, 2014 21:06:09 GMT -5
even the most modest of updates is stunning.
it looks so subtle but so effective.
joe
|
|
redleg12
Full Member
  
Member since: August 2012
www.redleg2scale.com
Posts: 401
Aug 28, 2012 18:59:10 GMT -5
Aug 28, 2012 18:59:10 GMT -5
|
Post by redleg12 on Mar 3, 2014 6:30:06 GMT -5
Andy - Thanks, chipping is not normal for my builds so this was fun trying something new.
Joe - Thanks, hopefully now that I am getting accustomed to the chipping, I can get the rest of the assemblies done.
Rounds Complete!!
|
|
|
|
Post by Mence on Mar 3, 2014 7:26:46 GMT -5
Lovely stuff, looking really good.
|
|
|
|
Post by bullardino on Mar 3, 2014 10:23:12 GMT -5
Greatly done, Mike  |
|
reserve
Senior Member
   
Member since: July 2012
Si vis pacem para bellum
Posts: 2,373
Jul 11, 2012 9:11:45 GMT -5
Jul 11, 2012 9:11:45 GMT -5
|
Post by reserve on Mar 3, 2014 13:51:40 GMT -5
Very nice Mike is this one going on a base with figgies?
Regards,
Mark
|
|
sturmbird
Full Member
  
Member since: June 2012
Posts: 1,406
Jun 21, 2012 13:51:45 GMT -5
Jun 21, 2012 13:51:45 GMT -5
|
Post by sturmbird on Mar 3, 2014 14:57:25 GMT -5
Andy - thanks for the peek. Your uncle was on the original M110.. the big green artillery machine! Thanks Rounds Complete!! it seems like it was only last week that I was rolling down Ft. Sill Blvd. about as fast as she would go! (the track with the governor removed will hit the 70mph mark). Never shot one with the muzzle brake and the longer barrel, and even then probably only put 25 rounds down range. I spent most of my time on the 175 gun. Be sure to check and see if the track your building is a conversion from an M107, and there is the travel lock brackets. Also many units modified the spade area with the addition of a tool box and a stainless steel leaf chain (still don't know what it was for). There was also a revision in the hydraulic lines in the side of the trunion. They look identical, but the new ones were stainless steel and paint didn't stay put very well. The old lines were running at almost 200% over pressure capacity. gary |
|
Deleted
Member since: January 1970
Posts: 0
Dec 2, 2024 2:50:00 GMT -5
Dec 2, 2024 2:50:00 GMT -5
|
Post by Deleted on Mar 3, 2014 16:50:47 GMT -5
great colour and chippage
|
|
|
|
Post by robbo on Mar 3, 2014 17:41:12 GMT -5
Oh never seen one of these built before, nice job so far Mike
|
|
redleg12
Full Member
  
Member since: August 2012
www.redleg2scale.com
Posts: 401
Aug 28, 2012 18:59:10 GMT -5
Aug 28, 2012 18:59:10 GMT -5
|
Post by redleg12 on Mar 3, 2014 19:52:01 GMT -5
Mence - Thanks
Luigi - Always a pleasure to have you stop in, thanks
Rounds Complete!!
|
|