redleg12
Full Member
  
Member since: August 2012
www.redleg2scale.com
Posts: 401
Aug 28, 2012 18:59:10 GMT -5
Aug 28, 2012 18:59:10 GMT -5
|
Post by redleg12 on Mar 3, 2014 20:04:43 GMT -5
Reserve - I put everything on a base, of course this one will be sand... as for figgies, I generally suck at figures, thus I don't spend my time on them. Thanks for the peek.
Gary - Going to have the gun in the ready to march order look. Will have some gear on the spade, section chest and a camo net, Not sure how much of the hydraulic lines will show but still looking at the layout. Don't want to do a bunch of work that will be hidden. Always a pleasure to have you stop by.
Pete - Thanks
Dicky - Thanks, glad others thinks it looks realistic
Robbo - Thanks, glad to have you along, enjoy the build
Rounds Complete!!
|
|
|
|
Post by wbill76 on Mar 3, 2014 21:17:23 GMT -5
Not often we get to see you chipping something Mike, looking good so far!  |
|
jackh.
Full Member
  
Member since: December 2011
Posts: 1,195
Dec 15, 2011 2:51:27 GMT -5
Dec 15, 2011 2:51:27 GMT -5
|
Post by jackh. on Mar 4, 2014 2:30:30 GMT -5
Nice progress Mike, chipping looks good.
|
|
redleg12
Full Member
  
Member since: August 2012
www.redleg2scale.com
Posts: 401
Aug 28, 2012 18:59:10 GMT -5
Aug 28, 2012 18:59:10 GMT -5
|
Post by redleg12 on Mar 4, 2014 6:42:03 GMT -5
Bill - Chipping is not normally part of building US vehicles. ODS is a unique situation and building this allows me to try a new technique which is normal to my Germahaloic and Russian friends. It is time consuming but interesting.
Jack - Thanks for the peek and for the comment.
Rounds Complete!!
|
|
|
|
Post by TRM on Mar 4, 2014 7:02:58 GMT -5
Coming along very nice there Mike!! Tracks look great as do the wheels!! All coming together now!!
|
|
sturmbird
Full Member
  
Member since: June 2012
Posts: 1,406
Jun 21, 2012 13:51:45 GMT -5
Jun 21, 2012 13:51:45 GMT -5
|
Post by sturmbird on Mar 4, 2014 14:31:53 GMT -5
Reserve - I put everything on a base, of course this one will be sand... as for figgies, I generally suck at figures, thus I don't spend my time on them. Thanks for the peek. Gary - Going to have the gun in the ready to march order look. Will have some gear on the spade, section chest and a camo net, Not sure how much of the hydraulic lines will show but still looking at the layout. Don't want to do a bunch of work that will be hidden. Always a pleasure to have you stop by. Pete - Thanks Dicky - Thanks, glad others thinks it looks realistic Robbo - Thanks, glad to have you along, enjoy the build Rounds Complete!! I remember those hydraulic lines very well, because in a 175 gun they had 19,000 psi in them!!! That's enough oil pressure to cut you in half, and I was wrong about the steel lines being 200% over spec. It's really closer to 400%!! The stainless steel lines are about 200% over pressure. This brings up another tidbit. I'm not positive, but those lines on the trunion look wrong. I have photos and will take a better look see. Anyway those lines are right out in the open, and next to the AG and gunner. One thing that really got me was that they used automotive type seat belts instead of a mil spec device! gary |
|
sturmbird
Full Member
  
Member since: June 2012
Posts: 1,406
Jun 21, 2012 13:51:45 GMT -5
Jun 21, 2012 13:51:45 GMT -5
|
Post by sturmbird on Mar 4, 2014 14:47:00 GMT -5
OK, I just pulled up about two dozen photos of an M110a2. This one starts life out as a basic M110, as you can tell but the hydraulic fittings. They switched over to mil spec Swedgelock with the stainless lines. This one is all old style. Those two chains in the back are not leaf style, but roller style (SS steel). There must be fifty hoses on that beast! They're everywhere! The kit's steel lines look close enough to call them right at least on the AG's side.
gary
|
|
redleg12
Full Member
  
Member since: August 2012
www.redleg2scale.com
Posts: 401
Aug 28, 2012 18:59:10 GMT -5
Aug 28, 2012 18:59:10 GMT -5
|
Post by redleg12 on Mar 5, 2014 6:56:26 GMT -5
T - Thanks for the comment.
Gary - Ahhh, cherry juice spray, all those lines. Looking at the lines now. Thanks for the info.
Rounds Complete!!
|
|
sturmbird
Full Member
  
Member since: June 2012
Posts: 1,406
Jun 21, 2012 13:51:45 GMT -5
Jun 21, 2012 13:51:45 GMT -5
|
Post by sturmbird on Mar 5, 2014 14:06:19 GMT -5
T - Thanks for the comment. Gary - Ahhh, cherry juice spray, all those lines. Looking at the lines now. Thanks for the info. Rounds Complete!! you don't want to catch the oil spray on the trunion sides. That pressure is dangerous. gary |
|
redleg12
Full Member
  
Member since: August 2012
www.redleg2scale.com
Posts: 401
Aug 28, 2012 18:59:10 GMT -5
Aug 28, 2012 18:59:10 GMT -5
|
Post by redleg12 on Mar 9, 2014 18:56:54 GMT -5
This week was finishing the rest of the assemblies with sand color and scratching. The gun carriage edge was painted with my rubber black mix as the gasket between the carriage and the hull. Next it was treated with the AK Scratch mix and then the ODS Sand color as previously discussed. Here is the view of the carriage after scratching. 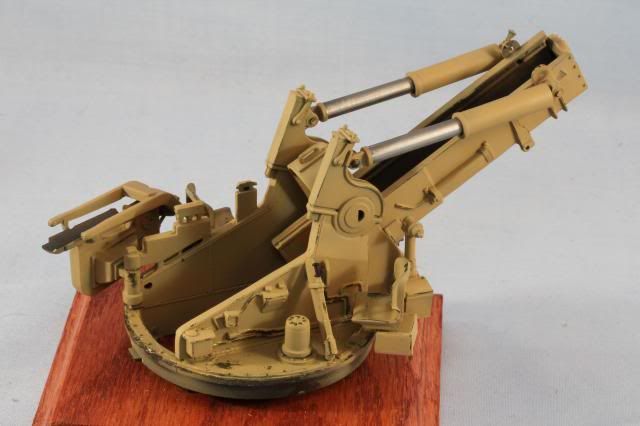 Here is the other side of the carriage 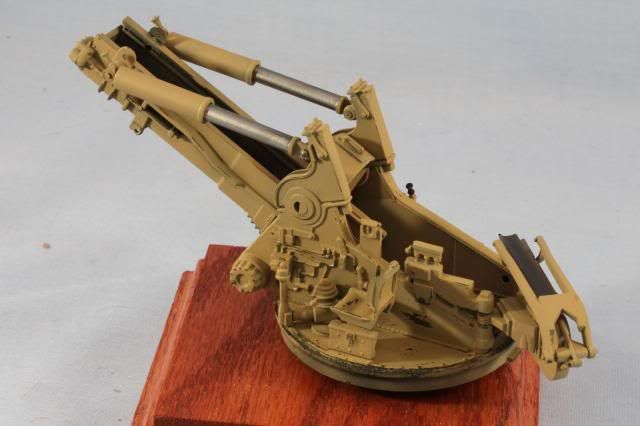 Here is the recoil spade assembly also treated in the same method. The spade needs a bit more scratching considering the way it is used. 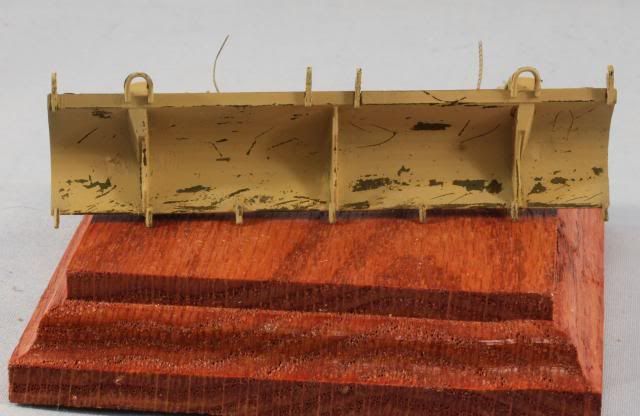 I painted the pads on the track with my rubber mix (50/50 Flat & NATO Black). Here are the tracks now ready for mounting.  That’s it for this week, now its time to begin assembling and adding details. As always if you have any comments, please feel free to drop in. Rounds Complete!! |
|
|
|
Post by fightnjoe on Mar 9, 2014 20:41:02 GMT -5
sharp. very cool. love following along with your work.
joe
|
|
|
|
Post by deafpanzer on Mar 10, 2014 0:16:47 GMT -5
Tracks look GREAT!
|
|
redleg12
Full Member
  
Member since: August 2012
www.redleg2scale.com
Posts: 401
Aug 28, 2012 18:59:10 GMT -5
Aug 28, 2012 18:59:10 GMT -5
|
Post by redleg12 on Mar 10, 2014 5:38:13 GMT -5
Joe - Thanks for the peek and the comment
Andy - Thanks, love the Spade Ace tracks and look great after finishing. Thanks again
Rounds Complete!!
|
|
|
|
Post by bullardino on Mar 10, 2014 7:05:46 GMT -5
Very nice paint and scratches, Mike  |
|
redleg12
Full Member
  
Member since: August 2012
www.redleg2scale.com
Posts: 401
Aug 28, 2012 18:59:10 GMT -5
Aug 28, 2012 18:59:10 GMT -5
|
Post by redleg12 on Mar 10, 2014 19:01:42 GMT -5
Luigi - Thanks
Dicky - Thanks, so far so good, now I have to bring it all together.
Rounds Complete!!
|
|
|
|
Post by Leon on Mar 11, 2014 0:23:51 GMT -5
Excellent work on the scratches,chipping and tracks Mike.  |
|
redleg12
Full Member
  
Member since: August 2012
www.redleg2scale.com
Posts: 401
Aug 28, 2012 18:59:10 GMT -5
Aug 28, 2012 18:59:10 GMT -5
|
Post by redleg12 on Mar 11, 2014 5:44:01 GMT -5
Leon - Thanks for the comments
Rounds Complete!!
|
|
|
|
Post by TRM on Mar 11, 2014 5:51:53 GMT -5
Looking really good here Mike!!! The right amount oif wear!!! All coming together now!!
|
|
|
|
Post by wbill76 on Mar 11, 2014 16:24:33 GMT -5
Looks like you're getting in some regular doses of bench time on this one Mike, very nice progress. On to the details which I know are always the highlights of your arty projects.  |
|
redleg12
Full Member
  
Member since: August 2012
www.redleg2scale.com
Posts: 401
Aug 28, 2012 18:59:10 GMT -5
Aug 28, 2012 18:59:10 GMT -5
|
Post by redleg12 on Mar 11, 2014 19:21:55 GMT -5
T - Thanks, this is the fun part as things come together and your vision becomes reality.
Bill - Yep, this winter up here has been a female dog! I am just now seeing my grass since Xmas. That has allowd for some good shut in days and that means good bench time. Now if I could just get work to bother me less!! LOL Thanks for the comments.
Rounds Complete!!
|
|
|
|
Post by tonylee-Rest In Peace on Mar 11, 2014 19:57:50 GMT -5
I saw this this morning big guy and was going to post but I guess I got side tracked. I sure like the looks of it but it's a little out of my time frame and will have to wait if I should live so long  Love it Tony lee |
|
redleg12
Full Member
  
Member since: August 2012
www.redleg2scale.com
Posts: 401
Aug 28, 2012 18:59:10 GMT -5
Aug 28, 2012 18:59:10 GMT -5
|
Post by redleg12 on Mar 12, 2014 5:44:32 GMT -5
Tony - My old friend, you are always welcome anytime and you are never late! As for the out of time frame an live so long, I understand. As I always say "so many models, so little time"!
Thanks, my friend
Rounds Complete!!
|
|
redleg12
Full Member
  
Member since: August 2012
www.redleg2scale.com
Posts: 401
Aug 28, 2012 18:59:10 GMT -5
Aug 28, 2012 18:59:10 GMT -5
|
Post by redleg12 on Mar 30, 2014 18:34:42 GMT -5
I worked on the chassis and setting up a base for the model. On the chassis first, I drilled out the molded headlights and added MV Lenses for the clear and blackout lights. I made the decals for the unit marking and vehicle number. After applying some clear future to the model and after a day to cure the decals were applied. Once the decals were applied and allowed to set for a day then I air brushed the chassis with a flat clear coat. The periscopes are done with decal paper that has been painted with chrome paint then covered with smoke clear and then a lacquer clear coat. I keep a small sheet available so I just have to cut to size and apply. Next was weathering using AK OIF Streaking Highlight. After moving panel by panel here is the chassis 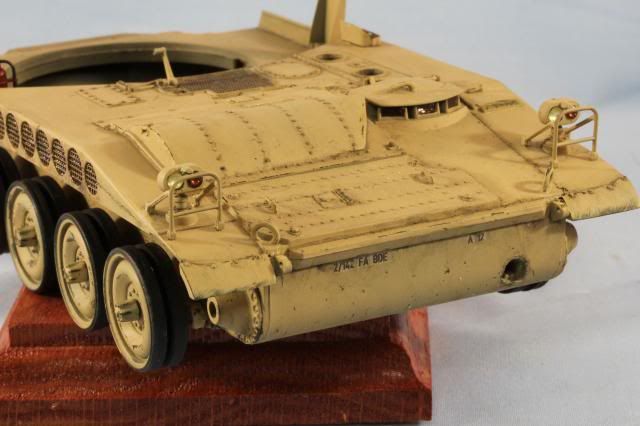 While waiting for things to dry I painted the fire extinguisher flat red with flat black nozzle and steel band and top knob. Here is a rear view of the chassis. 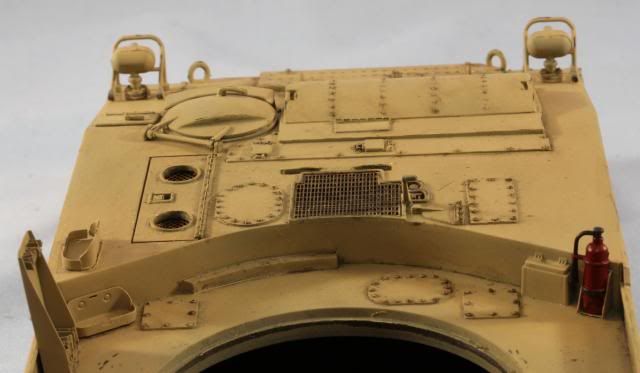 In between the model work was time in the woodwork shop to cut an oak board and edge the board on the router table. Then the board was stained and given two coats of polyurethane. I added a base of ¼ inch foam with white glue. Lastly I started the sand base using paper mache mixed with white glue and sand color craft paint. I used the kit rubber band tracks to create the sand indentation. While the paper mache is drying I applied a light coat of fine sand sprinkled onto the groundwork. More work to come on this. 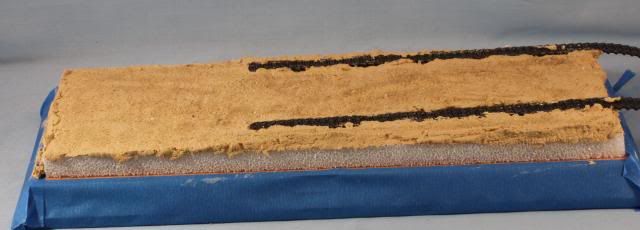 Well, next week I will be at AMPS. For those of you who will be there please feel free to look me up. I will be back to the bench in a few weeks. At that point it will be time to put the tracks on this puppy and finish up the chassis and attach the recoil spade. As always if you have any comments, please feel free to drop in. Rounds Complete!! |
|
|
|
Post by wbill76 on Mar 30, 2014 20:39:53 GMT -5
Have fun at AMPS Mike! Wish I could be there in person. Nice progress on this one as usual buddy.  |
|
jackh.
Full Member
  
Member since: December 2011
Posts: 1,195
Dec 15, 2011 2:51:27 GMT -5
Dec 15, 2011 2:51:27 GMT -5
|
Post by jackh. on Mar 31, 2014 1:20:53 GMT -5
Nice progress and fine start on the base.
|
|
redleg12
Full Member
  
Member since: August 2012
www.redleg2scale.com
Posts: 401
Aug 28, 2012 18:59:10 GMT -5
Aug 28, 2012 18:59:10 GMT -5
|
Post by redleg12 on Mar 31, 2014 5:33:21 GMT -5
Bill - Thanks, will be missing you at the show.
Jack - Thanks for the comments
Rounds Complete!!
|
|
|
|
Post by deafpanzer on Mar 31, 2014 14:32:05 GMT -5
Looking GREAT!!! Have fun at AMPS. Hope we will run into each other one day...
Where will be it be next year?
|
|
redleg12
Full Member
  
Member since: August 2012
www.redleg2scale.com
Posts: 401
Aug 28, 2012 18:59:10 GMT -5
Aug 28, 2012 18:59:10 GMT -5
|
Post by redleg12 on Mar 31, 2014 19:28:59 GMT -5
Andy - Thanks, looking forward to the show. not sure yet where it will be next year but will let you know. Someday for sure!!
rounds Complete!!
|
|
|
|
Post by bullardino on Apr 1, 2014 8:55:45 GMT -5
Nice job as per your usual standards Mike  |
|
redleg12
Full Member
  
Member since: August 2012
www.redleg2scale.com
Posts: 401
Aug 28, 2012 18:59:10 GMT -5
Aug 28, 2012 18:59:10 GMT -5
|
Post by redleg12 on Apr 2, 2014 6:02:40 GMT -5
Luigi - Thanks for the peek and for the kind comments
Rounds Complete!!
|
|