|
|
Post by 406 Silverado on Nov 17, 2011 17:52:40 GMT -5
|
|
|
|
Post by TRM on Nov 17, 2011 21:33:17 GMT -5
Outstanding Ivan!!! Being your 1st too!! WOW!! Good stuff!!!
|
|
|
|
Post by `Boots` on Nov 19, 2011 18:03:10 GMT -5
That is superb Edi..................need to make the pics smaller tho bud as the text is disappearing off the screen !!!
|
|
|
|
Post by `Boots` on Nov 19, 2011 18:12:49 GMT -5
The last ones are perfect Edi......................the first couple are the ones that have come out a little oversized...................i tend to use the 800x800 size, if you click the box in PB on the `customize your options` all the pics will come out the same size without having to re-size each individual one my friend............HTH buddy :0)
|
|
|
|
Post by TRM on Nov 19, 2011 18:17:54 GMT -5
Beautiful work Ivan!!! Damage detail is downright sweet!!!
|
|
|
|
Post by TRM on Nov 19, 2011 18:31:21 GMT -5
Sorry Chris!!! I didn't see your post! I think I took care of it! Let me know if that worked! All I did was put spaces between the pics!
|
|
|
|
Post by `Boots` on Nov 19, 2011 18:31:34 GMT -5
Lovin` the Avatar Ivan..........
|
|
|
|
Post by 406 Silverado on Nov 19, 2011 23:11:22 GMT -5
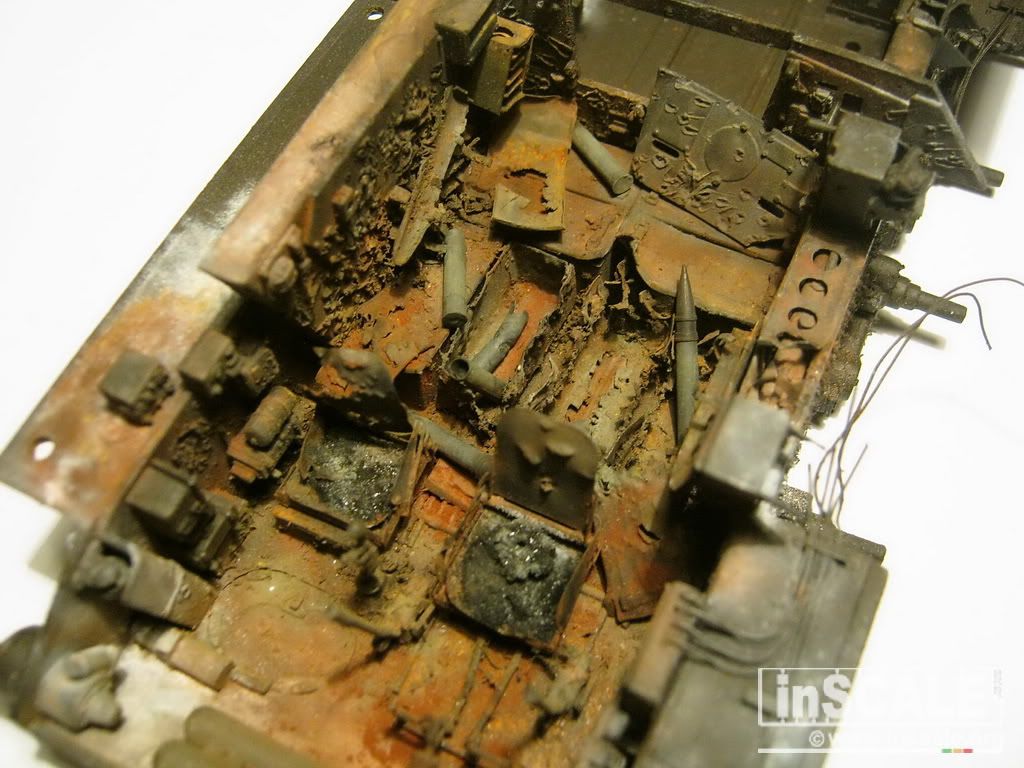
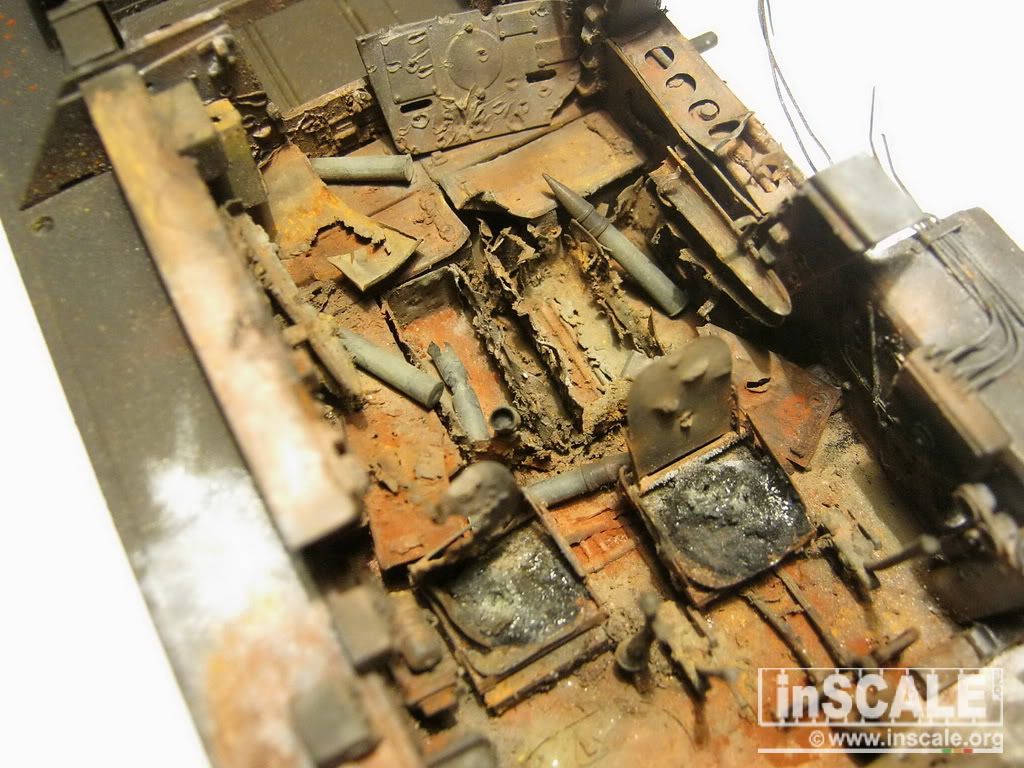
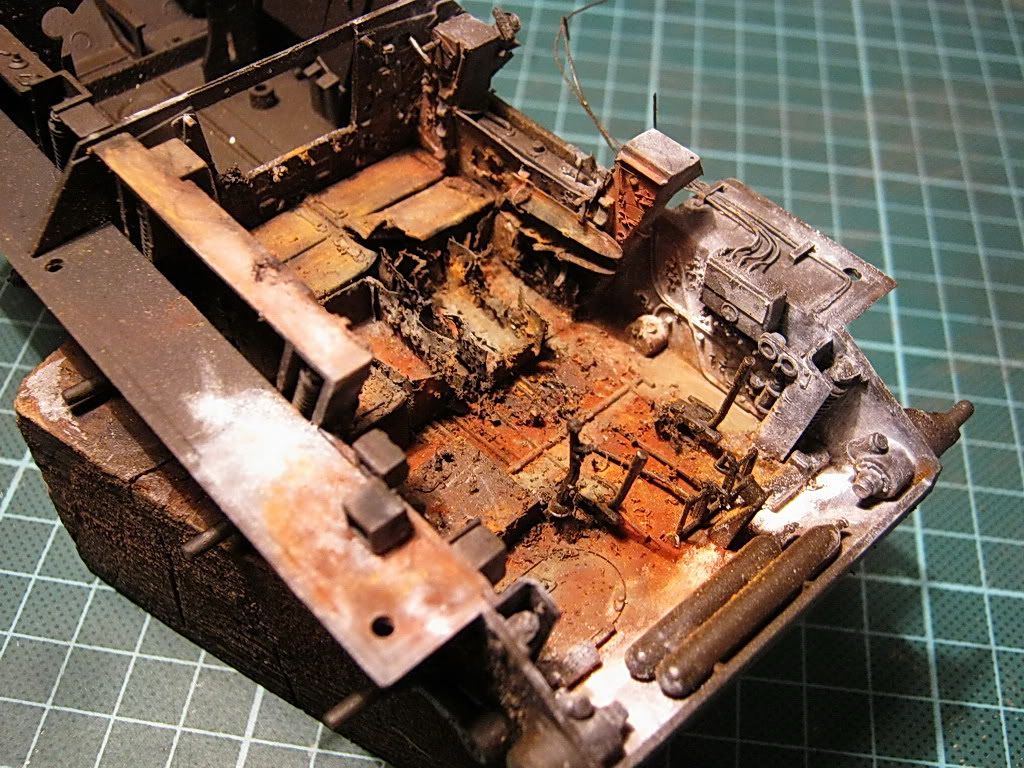
Oh nuts  now I'm itching to start a full blown wreck again. Edi the T-34 looks fantastic bro. The colors and rust tones are spot on....and that motor really rocks too. Some of the AK engine grime and oil will be perfect now. Looking forward to the next round of pics. T and chris...thanks guys. I was out all day then had guests so I miss this posting up. |
|
|
|
Post by wouter on Nov 20, 2011 4:29:38 GMT -5
wow...this is a most impressive build...and first wreck?  wow mate, big talent! Cheers |
|
|
|
Post by robbo on Nov 20, 2011 5:56:16 GMT -5
Very nice Ivan, a great start to your time on the site
|
|
johnt
Full Member
 Feb 2012 MoM and 2012 Model of the Year Winner
Member since: November 2011
Posts: 1,174
Nov 15, 2011 5:38:32 GMT -5
Nov 15, 2011 5:38:32 GMT -5
|
Post by johnt on Nov 20, 2011 10:47:20 GMT -5
 Really awesome realism Ivan!! Brilliant!!! Cheers JT
|
|
|
|
Post by armorguy on Nov 20, 2011 12:55:41 GMT -5
IMPRESSIVE STUFF !!! Congratulations, who says destruction can't be beautiful ?
|
|
paulh.
Senior Member

Member since: November 2011
build, fail, learn, succeed - ENJOY
Posts: 2,389
Nov 15, 2011 15:54:51 GMT -5
Nov 15, 2011 15:54:51 GMT -5
|
Post by paulh. on Nov 22, 2011 9:56:06 GMT -5
Holy mother of God- that is one seriously impressive first wreck. Truely inspirational job Ivan. Can't wait to see what else you've got on the go! |
|
|
|
Post by `Boots` on Nov 25, 2011 11:48:55 GMT -5
I`m absolutely blown away Ivan...................pure class fella |
|
|
|
Post by Mence on Nov 25, 2011 13:43:23 GMT -5
This is amazing, easily believe it is 1:1 scale!
|
|
|
|
Post by 406 Silverado on Nov 26, 2011 15:44:24 GMT -5
|
|
|
|
Post by `Boots` on Nov 26, 2011 17:42:18 GMT -5
Man that is superb.....................soooo lifelike |
|
Deleted
Member since: January 1970
Posts: 0
Nov 27, 2024 23:35:20 GMT -5
Nov 27, 2024 23:35:20 GMT -5
|
Post by Deleted on Nov 27, 2011 17:24:31 GMT -5
Outstanding,
|
|
|
|
Post by 406 Silverado on Nov 27, 2011 18:33:36 GMT -5
Awesome work Edi ....and that ref pic is fantastic. I've saved it for the KV painting.
Here you go Steve, this is how your T-34 should look. Edi has an even easier approach.
|
|
|
|
Post by TRM on Nov 27, 2011 19:42:12 GMT -5
Edi!! Great!!! One word sums this up!! Incredible results!! Yup saving that reference picture too!! Thanks for posting the SBS as well!!
Steve....think the party list for that BBQ is getting bigger!!
|
|
|
|
Post by 406 Silverado on Nov 30, 2011 17:18:41 GMT -5
Nice progress on the turret Edi. Looks very dry and real. Also thanks for the pic.....another for the ref library.
|
|
|
|
Post by 406 Silverado on Nov 30, 2011 18:14:16 GMT -5
Edi since you've done most of the effects with pigments, basically you have to stick with it or you could ruin the sides and or cause tide marks there. If you can just dampen the roof then apply light rusts to the damp area. Basically you stipple the various shades of light rust onto the wet roof. Once dry, apply the dark soot (black pigment) to the open hatch areas.
Sound ok to you. If not then you can go another route using paints, washes and filters.
|
|
|
|
Post by 406 Silverado on Nov 30, 2011 23:15:28 GMT -5
No prob Edi. Keep us up to date on how it turns out.
|
|
|
|
Post by TRM on Dec 2, 2011 17:49:28 GMT -5
Those subtle touches are showing really nice there Edi!!! Keep it coming!!
|
|
johnt
Full Member
Feb 2012 MoM and 2012 Model of the Year Winner
Member since: November 2011
Posts: 1,174
Nov 15, 2011 5:38:32 GMT -5
Nov 15, 2011 5:38:32 GMT -5
|
Post by johnt on Dec 3, 2011 11:29:31 GMT -5
Hi Ivan, that's some realistic effects! The texture and welds are shown up nicely also, looks just like a real steel turret. Awesome!!
Cheers
JT
|
|
|
|
Post by 406 Silverado on Dec 3, 2011 12:38:53 GMT -5
Man that cast turret looks...............well, cast. The most realistic looking turret and effects I've seen.
|
|
|
|
Post by 406 Silverado on Dec 3, 2011 12:54:31 GMT -5
I like the turret the way it is....but you have to be happy with it, not me. Yes the green will add contrast to it and liven it up more. Look forward to whatever you do next.
|
|
|
|
Post by 406 Silverado on Dec 3, 2011 17:10:02 GMT -5
looks great the base rust. That is perfect for the bright rust. If mixed with other shades you can come up with some great effects.
|
|
|
|
Post by TRM on Dec 3, 2011 19:52:41 GMT -5
Outstanding so far Edi!!! That will be a great showing with the blown out side!!
|
|
|
|
Post by `Boots` on Dec 6, 2011 15:18:42 GMT -5
Terrific SBS Ivan........thanks for that bud, keep up the spectacular work on this.................it`s fantastic ;D |
|


 wow mate, big talent!