lastcav
MSC Sponsor 
Member since: June 2012
Posts: 213
Jun 26, 2012 13:57:56 GMT -5
Jun 26, 2012 13:57:56 GMT -5
|
Post by lastcav on Sept 15, 2014 11:48:33 GMT -5
The white metal castings are cleaned and primed. The head that I will be using using has been primed in gray while all other parts are primed in black.  The optinal head with the 1917 pattern gas mask was also primed in black. It is an excellent sculpt and a very clean casting which makes the painting of the eyes and cheeks much easier! Care must be taken when cutting the gas mask lenses out as the printed "bars" will rub right off if handled. You get four of these and I ruined the first one - so I then laid a thin coat of Vallejo gloss varnish over the remaining ones and let it dry. This protects the printing. I also used a small amount of the gloss varnish to install the lenses onto the mask. When dry, I added the outer rings and glued them from the outside (you do not want to frost the plastic) once in place with a VERY small of super glue. The flesh tones are painted using the Andrea Flesh set. 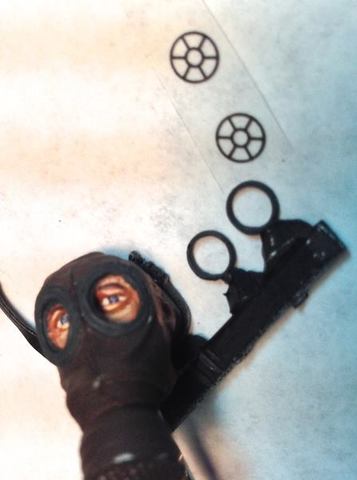 The leather of the mask was first painted with Vallejo Burnt Umber with highlights using Mahogany Brown and Red Leather. A thin layer of Vallejo Smoke was then washed over it. The filter and all other metal areas were painted with US Dark Green, shadowed with black and highlights created by adding a bit of Flat Flesh to the mix... the cord was painted with German Camo Biege and highlighted with Iraq Sand. 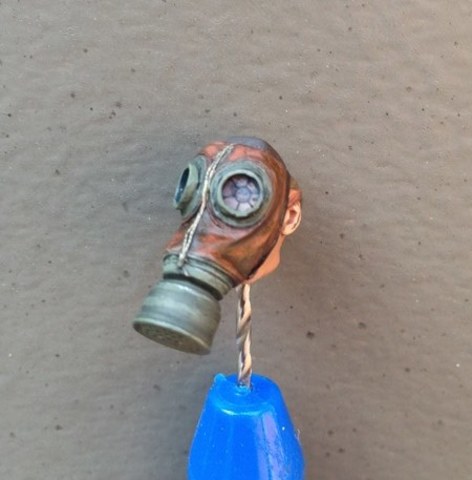 PART TWO TOMORROW. Dave |
|
|
|
Post by TRM on Sept 15, 2014 12:29:42 GMT -5
Great SBS Dave!! Super results!! Thanks for taking the time to share it with us!
|
|
|
|
Post by deafpanzer on Sept 15, 2014 14:19:45 GMT -5
You definitely have my attention! Now you have made me curious why you didn't have head primed in black too...
|
|
lastcav
MSC Sponsor
Member since: June 2012
Posts: 213
Jun 26, 2012 13:57:56 GMT -5
Jun 26, 2012 13:57:56 GMT -5
|
Post by lastcav on Sept 15, 2014 17:45:27 GMT -5
Andy,
I have tried priming faces in black but it just does not suit my painting style - so I stick to grey!
|
|
dupes
Head Moderator  Jan '16 MoM Winner
Member since: March 2012
Need to build 80 kits per year until I'm 100 to deplete my stash. Maybe I should sell a couple.
Posts: 6,978
Member is Online
MSC Staff
|
Post by dupes on Sept 15, 2014 18:23:24 GMT -5
Too bad you have to put in the gas mask inserts - that face painting work under there is spectacular!
|
|
|
|
Post by Leon on Sept 15, 2014 18:40:09 GMT -5
Awesome work as usual Dave,looking really good.
|
|
|
|
Post by deafpanzer on Sept 15, 2014 19:55:39 GMT -5
Got it... appreciate you taking your time to answer our questions. Keep it coming buddy!
|
|
lastcav
MSC Sponsor
Member since: June 2012
Posts: 213
Jun 26, 2012 13:57:56 GMT -5
Jun 26, 2012 13:57:56 GMT -5
|
Post by lastcav on Sept 16, 2014 12:20:42 GMT -5
The face has two thin layers of Andrea color#1 from the ACS01 Flesh Paint set applied. The whites of the eyes were painted using Vallejo Pale Sand and the iris blocked in with Andrea Flat Black. 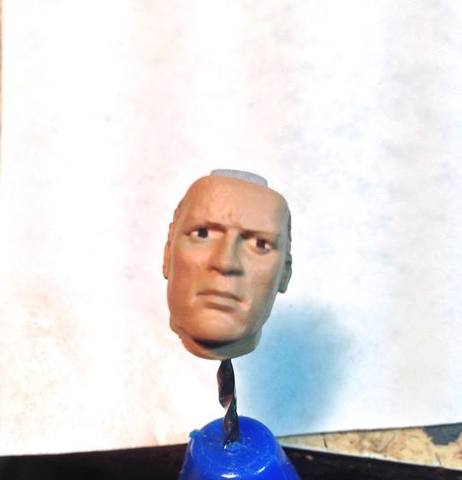 Vallejo Pale Grey Blue was added to the iris - needs some clean up and better alighnment at this point. 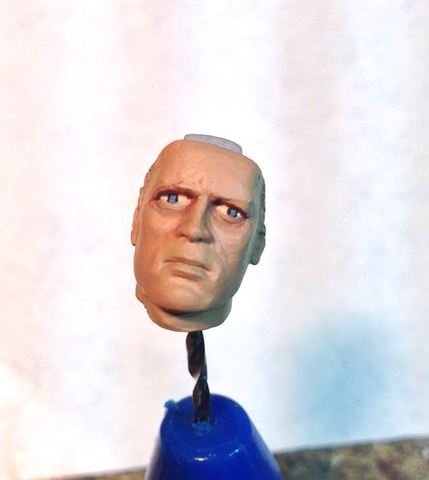 The eyes have been reduced by cutting in the upper lids with Vallejo Mahogany Brown. Andrea color #5 is used to create the lower eye bags. A very fine line of Andrea #4 was used to add a highlight on top of the lower eye bag. A bit of White mixed with the Grey Blue was used to add a 'pop' to the iris. 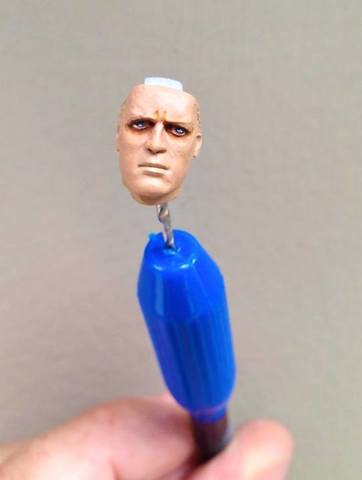 The first layers of shadow are applied using Andrea Color#4 heavily thinned to the sides of the nose, below the lip, under the chin, furrows in the brow, and the hollows of the cheeks.  PART FOUR TOMORROW Dave |
|
|
|
Post by Leon on Sept 16, 2014 15:58:40 GMT -5
Great SBS on the face painting Dave.On to step four.   |
|
lastcav
MSC Sponsor
Member since: June 2012
Posts: 213
Jun 26, 2012 13:57:56 GMT -5
Jun 26, 2012 13:57:56 GMT -5
|
Post by lastcav on Sept 17, 2014 10:32:44 GMT -5
More shadows added using Andrea #5 and #4. First highlights applied with Andrea #2. The upper lip was painted with Andrea#6 - a very dark red and the lower lip was painted with a mix of Andrea#2 and #6 then highlighted by adding more #2. Hair and eyebrows blocked in with Vallejo Flat Earth. Now for the 5 o'clock shadow and deeper shadows and higher highlights! 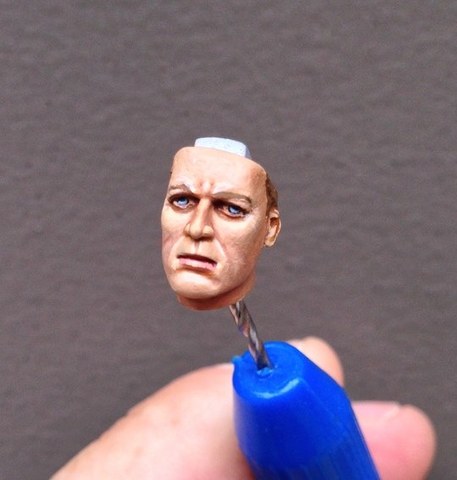 View of the right side of the face in-progress before the final shadows, highlights, 5 o'clock shadow and a deeper red tone in the hollow of the cheeks. 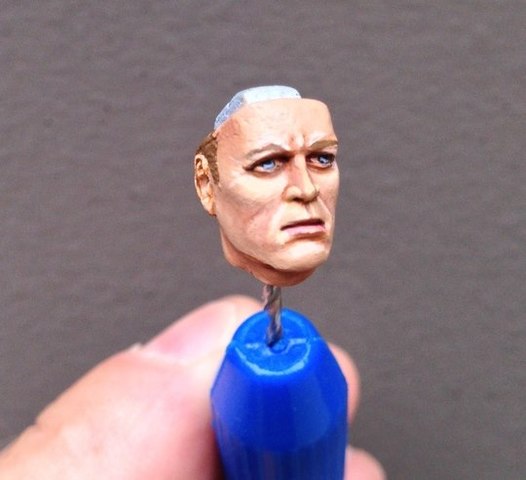 STEP FIVE TOMORROW Dave |
|
desertrat
Full Member

Member since: October 2013
Posts: 934 
|
Post by desertrat on Sept 17, 2014 11:13:56 GMT -5
NICE!!!! loving this lesson on face painting!!!
|
|
lastcav
MSC Sponsor
Member since: June 2012
Posts: 213
Jun 26, 2012 13:57:56 GMT -5
Jun 26, 2012 13:57:56 GMT -5
|
Post by lastcav on Sept 18, 2014 8:30:22 GMT -5
Further highlights are added once again using Andrea #2 from the ACS01 paint set on the top of the cheeks, bridge of the nose and the top of the chin. Using a heavily thinned #6 (a very dark red) from this same set color was added to the hollows of the cheeks and temples. 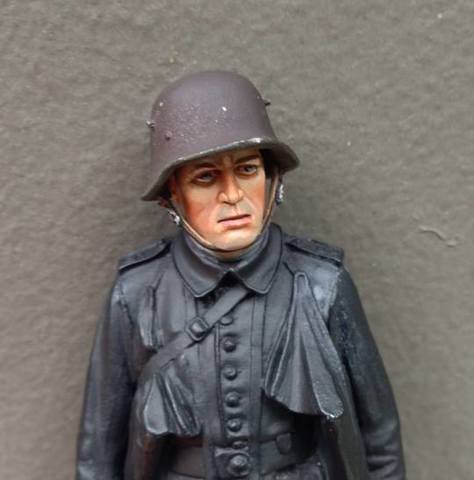 A faint 5 o'clock shadow is added by mixing Vallejo Prussian Blue with the base color Andrea #1 to create a dirty grayish tone. This is then stippled on using a VERY thin mixture and feathering it out while wet. Two or three translucent layers are better than too much color at once - the first layer should be almost invisible. 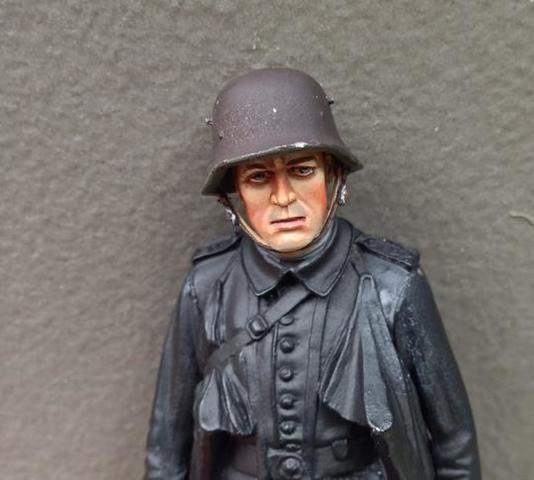 The chin strap is carefully added and painted with Vallejo Camo Black Brown on the outside, Vallejo Yellow Tan on the inside, then glazed with Vallejo Smoke to add a bit of sheen and finally the edges were highlighted with Vallejo Mahogany Brown to replicate "scuffing". 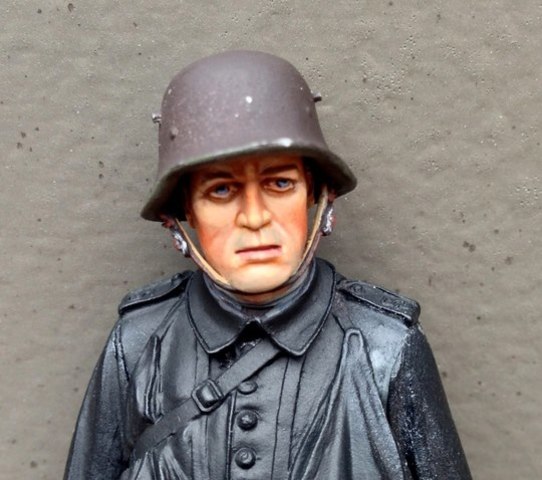 STEP SIX TOMORROW dave |
|
lastcav
MSC Sponsor
Member since: June 2012
Posts: 213
Jun 26, 2012 13:57:56 GMT -5
Jun 26, 2012 13:57:56 GMT -5
|
Post by lastcav on Sept 19, 2014 10:48:49 GMT -5
Original examples of the pieces to be painted in miniature from the LC collection. The wire cutters are a different example then the long Pioneer cutters included with the figure but is very useful for getting the colors correct. 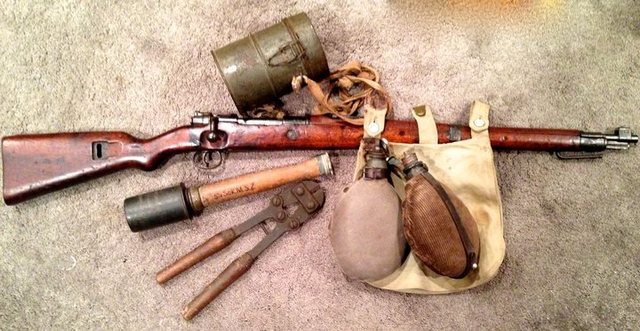 Two thin base coats of Andrea Field Gray #1 from the set ACS10 are applied first and left to dry overnight. First shadows are laid in using heavily thinned Andrea #5 and #6 from the same set. Keep the very dark #6 in the deepest shadow areas and repeated thin layers will allow you to control the intensity of the effect. 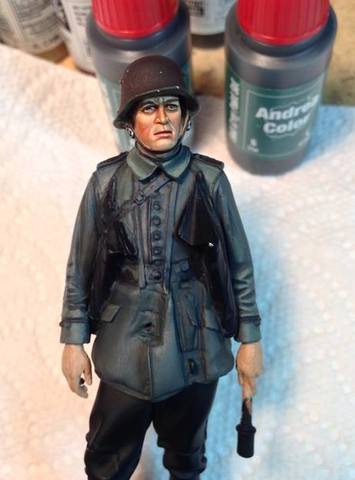 MORE NEXT WEEK. Dave |
|
|
|
Post by Leon on Sept 19, 2014 16:39:52 GMT -5
Just keeps getting better and better Dave.Excellent painting. |
|
lastcav
MSC Sponsor
Member since: June 2012
Posts: 213
Jun 26, 2012 13:57:56 GMT -5
Jun 26, 2012 13:57:56 GMT -5
|
Post by lastcav on Sept 20, 2014 8:33:19 GMT -5
Thanks Leon,
Lot's more to come!!
Dave
|
|
|
|
Post by kaytermarram on Sept 20, 2014 12:31:16 GMT -5
Really great,top work!! Can´t wait for the uniform and your handling of it! The Face looks extraordinaire!
Frank
|
|
lastcav
MSC Sponsor
Member since: June 2012
Posts: 213
Jun 26, 2012 13:57:56 GMT -5
Jun 26, 2012 13:57:56 GMT -5
|
Post by lastcav on Sept 20, 2014 15:14:45 GMT -5
Thanks Frank - more on Monday!
|
|
|
|
Post by deafpanzer on Sept 20, 2014 23:19:29 GMT -5
Fantastic work!!! Sorry for being slow... in Maine now for a conference.
|
|
lastcav
MSC Sponsor
Member since: June 2012
Posts: 213
Jun 26, 2012 13:57:56 GMT -5
Jun 26, 2012 13:57:56 GMT -5
|
Post by lastcav on Sept 22, 2014 9:32:57 GMT -5
First layers of highlights applied by using once again the Andrea ACS10 Field Grey set. Colors #2, #3, #4 are used in the areas that would receive the most light with color #4 having a bit of Vallejo Flat Flesh added for a bit of a worn look. More refinement on the collar blending and a bit more "pop" on the high highlights is still to come. The gas mask straps, belt, carbine sling, and one grenade bag have been blocked in to check for correct color contrasts. Stay tuned! 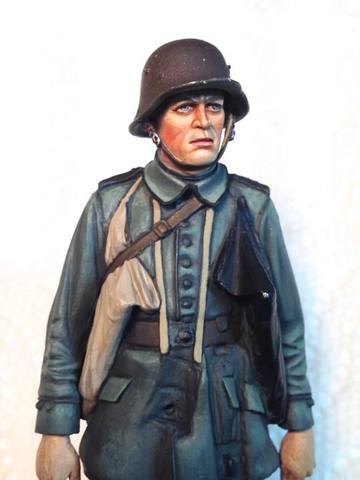 |
|
|
|
Post by kaytermarram on Sept 22, 2014 11:58:16 GMT -5
Yeah, I stay tuned! Looks great!
Frank
|
|
lastcav
MSC Sponsor
Member since: June 2012
Posts: 213
Jun 26, 2012 13:57:56 GMT -5
Jun 26, 2012 13:57:56 GMT -5
|
Post by lastcav on Sept 23, 2014 9:22:14 GMT -5
The Pioneer wire cutters are painted using Andrea Flat Black as a base, Uschi Steel powder rubbed into the paint, highlighted with a #2 pencil and buffed out. Wooden handles painted using Vallejo Mahogany Brown and then washed with Vallejo Smoke. The lanyard was painted with Vallejo German Camo Beige and highlighted with Vallejo Iraq Sand. 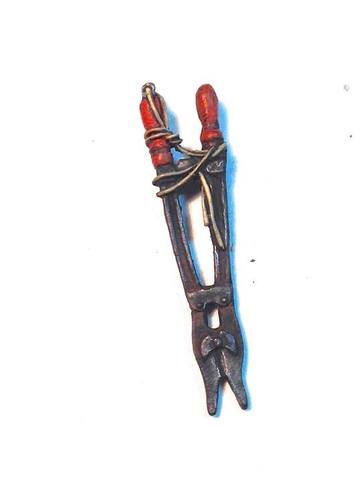 The Pioneer shovel carrier in the kit is the all leather version and I wanted to make mine the heavy canvas version so... it was detailed by adding thin strips of lead foil and new buttons. Ready for paint! 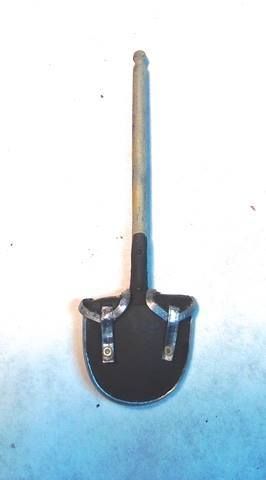 The painted 98AZ Carbine, Pioneer shovel and converted canvas carrier, and the Pioneer wire cutters. The carbine was primed in black and the n the 'metal' areas were rubbed with Uschi Steel Powder. The stock was first painted with Vallejo Mahagony Brown and then multiple layers of VERY thin Vallejo Smoke were carefully brushed on to simulate the wood grain and sheen. The shovel carrier was first painted with a mix of Vallejo Iraq Sand and German Camo Beige. The leather was painted with Vallejo Camo Black Brown and scuffs added with Mahagony Brown. Ten or twenty (I lost count) thin layers of Vallejo Burnt Umber, Flat Earth, and Black Brown were washed and stippled on to represent shadows, wear, and dirt. The metal of the shovel was painted with a mix of Vallejo Steel and Burnt Umber, then washed with Andrea Flat Black and a bit of Red Leather. The wood handle was painted with Vallejo Khaki then washed with V. Smoke. 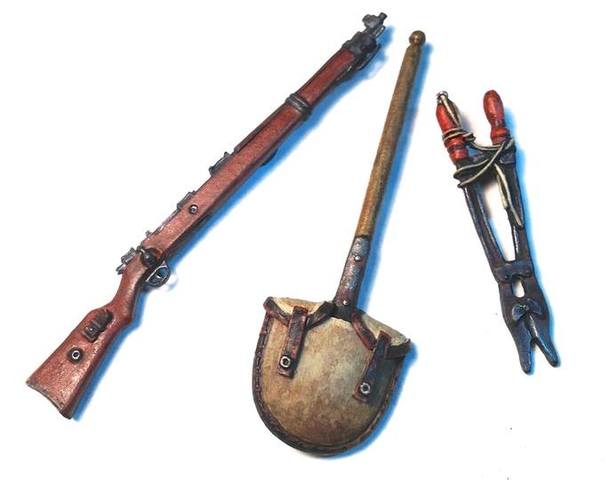 |
|
lastcav
MSC Sponsor
Member since: June 2012
Posts: 213
Jun 26, 2012 13:57:56 GMT -5
Jun 26, 2012 13:57:56 GMT -5
|
Post by lastcav on Sept 24, 2014 8:47:47 GMT -5
The gas mask can was first painted with Vallejo US Dark Green and then 'beat up' with Camo Black Brown chips, washes of Flat Black, Mahagony Brown, and Burnt Umber. The bare metal effects are created by using a #2 pencil. The grenade sandbag is a base mix of Iraq Sand, Burnt Umber, and Vallejo Light Mud. Dirt, staining and shadows effects are applied by washing and stippling Flat Earth, Burnt Umber, Camo Black Brown into the base color. 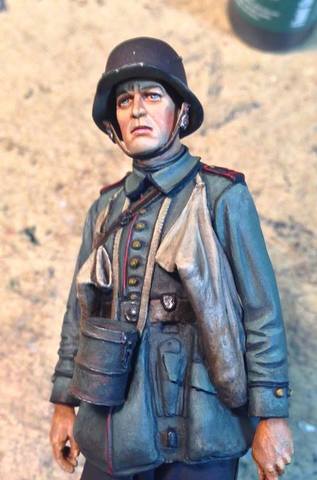 |
|
|
|
Post by deafpanzer on Sept 24, 2014 22:53:39 GMT -5
Can I borrow that wire cutter? Everything looks great!
|
|
|
|
Post by bbd468 on Sept 24, 2014 23:05:39 GMT -5
WOW....Superb painting Dave! Very nice indeed. |
|
lastcav
MSC Sponsor
Member since: June 2012
Posts: 213
Jun 26, 2012 13:57:56 GMT -5
Jun 26, 2012 13:57:56 GMT -5
|
Post by lastcav on Sept 25, 2014 8:05:52 GMT -5
The gas mask bag received a base coat of Vallejo Khaki then very fine lines were painted (to represent the coarse canvas) on by adding Pale Sand to the base color. The canteens were painted using different tones of tan, khaki, flat earth, etc... all stippled on to create a wool effect. 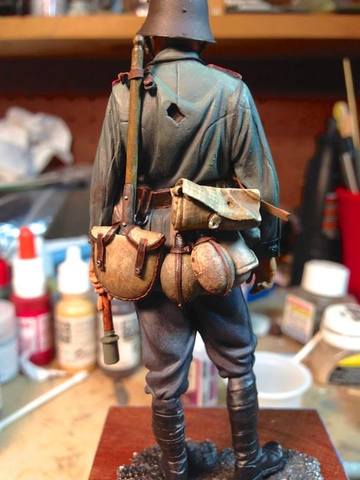 |
|
vlpbruce
Full Member
Member since: March 2013
Posts: 1,463
|
Post by vlpbruce on Sept 25, 2014 9:41:39 GMT -5
Fantastic painting my friend. Everything looks great.
|
|
johnt
Full Member
Feb 2012 MoM and 2012 Model of the Year Winner
Member since: November 2011
Posts: 1,174
Nov 15, 2011 5:38:32 GMT -5
Nov 15, 2011 5:38:32 GMT -5
|
Post by johnt on Sept 25, 2014 10:20:12 GMT -5
Very nice work there!!
Cheers
JT
|
|
lastcav
MSC Sponsor
Member since: June 2012
Posts: 213
Jun 26, 2012 13:57:56 GMT -5
Jun 26, 2012 13:57:56 GMT -5
|
Post by lastcav on Sept 29, 2014 10:37:58 GMT -5
Strap to hold the shovel made from lead foil and plastic card. This is not included in the kit and should be added. 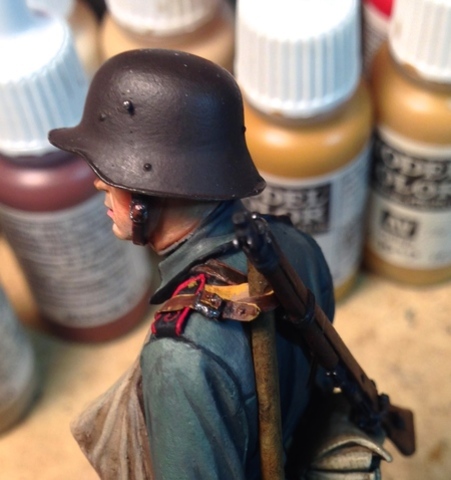 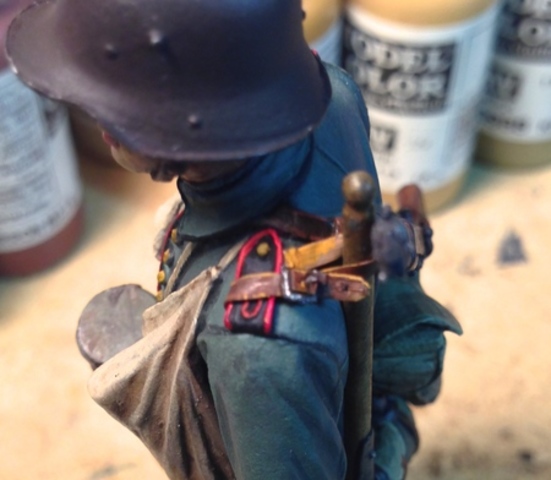 |
|
|
|
Post by deafpanzer on Sept 29, 2014 14:16:17 GMT -5
I enjoy EVERY update you post here. I can't wait to see your work in person again at future shows.
How was the show in Michigan? I saw that you brought home more gongs! LOL
|
|
dennis
Full Member
Member since: November 2012
Posts: 476
Nov 11, 2012 7:28:35 GMT -5
Nov 11, 2012 7:28:35 GMT -5
|
Post by dennis on Sept 29, 2014 16:50:52 GMT -5
Dave this is great! great! great! a real treat to drop in on.
Thanks for posting.
Dennis
|
|