paulh.
Senior Member
   
Member since: November 2011
build, fail, learn, succeed - ENJOY
Posts: 2,389
Nov 15, 2011 15:54:51 GMT -5
Nov 15, 2011 15:54:51 GMT -5
|
Post by paulh. on Mar 25, 2012 15:44:29 GMT -5
Inspired by the fantastic work in here, I've decided to step prevaricating adnjump in with my first attempt at a major conversion; The base kit;  Plenty of this stuff: 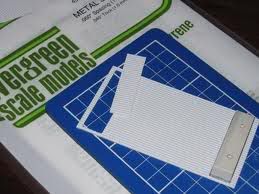 Load of referecnes from here:  And I WILL end up with............................................. 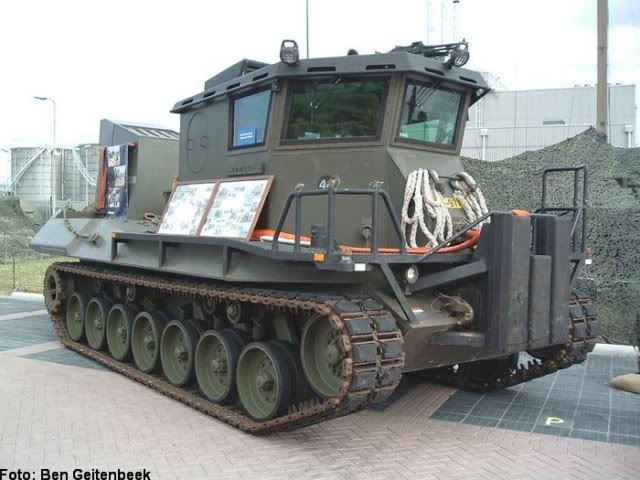 ;D and additional image from the Dutch MoD site(for discussion purposes only) 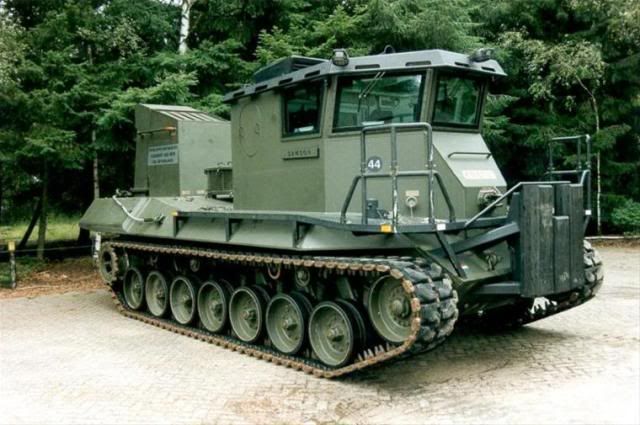 I've chosen this to pop my cherry as its all straight lines ;D -so even I should be able to achieve a result that vaguely looks like a BARV  A bit of background: Based on the hull & running gear of the Leopard 1 with a number of modifications inlcuding: Repelcement of the steel running gear with alumninum; Obvious cooling and exhaust towers; Steel cabin with armoured glass; Extra balast for improved traction; Free flooding and draining (old) drivers position. This particular baby is used exclusively by the Royal Netherlands Marine Corps, but a modified form was propsed as part of the competiton for te FBRV programme that was eventually won by Haagluns Hippo BARV. From my references, currenty 4 are in use. First stage of the build will be a fairly straight forward with some work to remove un-necessary hull detail. Externally. all that's used is the lights and tow hooks, everything else is for the spares box. This is not going to be quick- more of a between-other-projects kind of build. Also, I had originally hoped to avoid inside stuff, but realistically with all the glass- not bleedin' likely  |
|
paulh.
Senior Member
   
Member since: November 2011
build, fail, learn, succeed - ENJOY
Posts: 2,389
Nov 15, 2011 15:54:51 GMT -5
Nov 15, 2011 15:54:51 GMT -5
|
Post by paulh. on Mar 25, 2012 16:01:00 GMT -5
Cheers Guys ;D Hope I can live up to the standard on here.  |
|
|
|
Post by spud on Mar 25, 2012 16:16:29 GMT -5
lol Very nice paul it will be cool im sure, and if ya ferk it up blame dicky for making it look so easy  |
|
paulh.
Senior Member
   
Member since: November 2011
build, fail, learn, succeed - ENJOY
Posts: 2,389
Nov 15, 2011 15:54:51 GMT -5
Nov 15, 2011 15:54:51 GMT -5
|
Post by paulh. on Mar 25, 2012 16:47:57 GMT -5
LOL spud-perfect fall back position
|
|
Deleted
Member since: January 1970
Posts: 0
Nov 22, 2024 14:40:57 GMT -5
Nov 22, 2024 14:40:57 GMT -5
|
Post by Deleted on Mar 25, 2012 18:16:11 GMT -5
I'm in, I need all the tips i can get hold of, This looks like a cracker.
|
|
bigjohn
Reviews member    
Member since: December 2011
John Hale
Posts: 3,438
Dec 21, 2011 2:17:45 GMT -5
Dec 21, 2011 2:17:45 GMT -5
|
Post by bigjohn on Mar 25, 2012 19:50:26 GMT -5
Cool looking subject, I'll be keeping an eye on this one as well.
|
|
|
|
Post by TRM on Mar 25, 2012 20:54:37 GMT -5
Looks like a real fun project!!! Count me in!! Like jackwagon, looking for the popcorn!!!  |
|
Wes
Full Member
  
Member since: November 2011
Posts: 686
Nov 16, 2011 9:34:50 GMT -5
Nov 16, 2011 9:34:50 GMT -5
|
Post by Wes on Mar 26, 2012 9:35:24 GMT -5
Looking forward to this one too Paul.
|
|
multicam
Senior Member
   
Member since: January 2012
Nate
Posts: 2,039
Jan 10, 2012 14:35:41 GMT -5
Jan 10, 2012 14:35:41 GMT -5
|
Post by multicam on Mar 27, 2012 17:25:47 GMT -5
Missed this one Paul, looks really cool:)
|
|
paulh.
Senior Member
   
Member since: November 2011
build, fail, learn, succeed - ENJOY
Posts: 2,389
Nov 15, 2011 15:54:51 GMT -5
Nov 15, 2011 15:54:51 GMT -5
|
Post by paulh. on Mar 27, 2012 17:43:56 GMT -5
First job is to make good on the hull; As well as filling in the turret socket, I need to remove the drivers periscopes and fill the resulting gaps there also. On this baby the drivers position is now up in the cabin , so the drivers original compartment is now a free flooding space. For this I need to create a drainage slot in the hull floor,probably with some form of meshcover or similar, but as I don't have any pics  of this I'll just have to make and educated guess of location and size. I've made a start on filling the usual tool mounting holes as the real McCoy has virtually clean lines, with tools etc, safely stowed away in various boxes. I'm also working on rising the lower hull wall so that it actually touches the hull top and will make a stab at creating a floor for the currently hollow sponsoons.  Finally, I'll need to grind off some hull top detail that is no longer required. Should be fun. Sorry for the lack of pictures , can't find me camera at hte mo  , but hopefully get some progress shots up by the week-end. |
|
paulh.
Senior Member
   
Member since: November 2011
build, fail, learn, succeed - ENJOY
Posts: 2,389
Nov 15, 2011 15:54:51 GMT -5
Nov 15, 2011 15:54:51 GMT -5
|
Post by paulh. on Apr 3, 2012 17:02:18 GMT -5
White stuff came out tonight ,and after a about 2 hours of measuring once and cutting twice this is where I'm at...    I need to point out that the "plan" in the background is for the modified Bulldog variant proposed for th British FBRV competition and NOT the Dutch version I am attempting to build which has a somewhat smaller cabin for the crew of three -rahter than 4 for the Bulldog. The cabin floor is made of 20 thou (I think) thread plate with some "L" shapped plastruct to gove the walls something to hold on to and also help keep the walls true. Walls thenselves are 40 thou evergreen stock -as is the undersized roof (measured once- cut twice!!  Given that this is mostly angles I feel as though I'm making hard work of it so far TBH    As mentioned in an earlier post, becasue of all the windows there's no way I'll get away with not trying to build some kind of detial internally- luckilly, I've got a decent number of references from the Michael Shackelton books to go by. ACGW P |
|
Deleted
Member since: January 1970
Posts: 0
Nov 22, 2024 14:40:57 GMT -5
Nov 22, 2024 14:40:57 GMT -5
|
Post by Deleted on Apr 3, 2012 17:21:01 GMT -5
Hi Paul....I STILL don't like Leos,but at least this is a recovery vehicle....and it's Dutch!! Liking where you're trying to go with this mate.I'm sure you'll get it sorted!! ;D  ,and it's looking good so far.  |
|
Deleted
Member since: January 1970
Posts: 0
Nov 22, 2024 14:40:57 GMT -5
Nov 22, 2024 14:40:57 GMT -5
|
Post by Deleted on Apr 3, 2012 17:27:10 GMT -5
Hi Paul,
It looks like it's coming on well.
|
|
multicam
Senior Member
   
Member since: January 2012
Nate
Posts: 2,039
Jan 10, 2012 14:35:41 GMT -5
Jan 10, 2012 14:35:41 GMT -5
|
Post by multicam on Apr 3, 2012 23:31:25 GMT -5
Nice work there Paul. This is a great start mate:)
|
|
paulh.
Senior Member
   
Member since: November 2011
build, fail, learn, succeed - ENJOY
Posts: 2,389
Nov 15, 2011 15:54:51 GMT -5
Nov 15, 2011 15:54:51 GMT -5
|
Post by paulh. on Apr 4, 2012 3:59:17 GMT -5
Mr B, Mack, Multi- , thanks for the encouragement guys  I'm hoping to get the remaining walls of this done tonight- but going by last-nights progress I wouldn't hold out too much hope. I'm away for the weekend tomorrow- but I've already packed a little box of various styrne sheets, rods and shapes to hopefully keep working on this and maybe evn have a go at some innards. The minimum for this is going to be: control panels (? how many) and associated trunking etc steering yolk and pedals Cylinders- for what I'm assuming to be a fire suppression system- though may be simply compressed air to help blow ballast tanks Some internal detail on the escape hatches in the cabin side(normal entry/exit is via a roof hatch(loaders hatch from a leo turret[/li][li] [/li][li] [/list] Not that much really but as I've never even tried this stuff before its going to take a while to get passable results I think   |
|
paulh.
Senior Member
   
Member since: November 2011
build, fail, learn, succeed - ENJOY
Posts: 2,389
Nov 15, 2011 15:54:51 GMT -5
Nov 15, 2011 15:54:51 GMT -5
|
Post by paulh. on Apr 4, 2012 17:04:11 GMT -5
The results of tonight's cuttin'& cursin'  New, correctly size roof pane; Rear walls with windows - not convinced about these  -will have another go again with these after the weekend;Cabin front end panels -obviously will get cut back once cured.      BTW; sorry about the qualities of the pics.   I'm also going to cheat and save myself a lot of work with the windows for the front end- clear styrene pnels dressed inside and out with strip and appropriate shapes This is my first attempt at the drivers instrument panel  - reboot needed for that one as well.  As always gents, all comments and suggestions very graciously welcomed. P |
|
Deleted
Member since: January 1970
Posts: 0
Nov 22, 2024 14:40:57 GMT -5
Nov 22, 2024 14:40:57 GMT -5
|
Post by Deleted on Apr 4, 2012 17:39:02 GMT -5
Hats off to you matey, Realy watching with interest!!
|
|
paulh.
Senior Member
   
Member since: November 2011
build, fail, learn, succeed - ENJOY
Posts: 2,389
Nov 15, 2011 15:54:51 GMT -5
Nov 15, 2011 15:54:51 GMT -5
|
Post by paulh. on Apr 4, 2012 17:55:17 GMT -5
jackwagon, thank you very much for the words of wisdom , its ll very welcome to a styrene virgin like me.  I'm not averse to starting again if I have to tbh. Defo re-doing the two rear panels. so I'll see if I can get my hands on one of those files over the next few days. Think I'll also invest in a Stanley if I'm going to try and do this scratchersing properly. Really learning a lot just doing it -would do it all very differently if I were to start again- and I still might   Mack -thank you also. Well guys I'm off up the wooden hill to Bedfordshire and going off radar for a few days, so have a nice Easter one and all. keep buidling (or should that be keep wreckin' on here  ) P |
|
paulh.
Senior Member
   
Member since: November 2011
build, fail, learn, succeed - ENJOY
Posts: 2,389
Nov 15, 2011 15:54:51 GMT -5
Nov 15, 2011 15:54:51 GMT -5
|
Post by paulh. on Apr 13, 2012 18:26:36 GMT -5
Following the steryne meister's advice, so after some re-measuring and re-cutting and this is where things are with the cabin, and also a start with the transmission cooling tower;  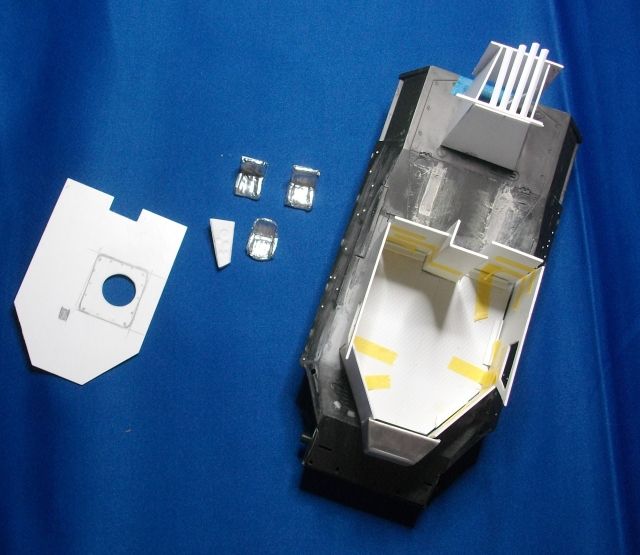 Here's my second attempt at the main control pane land a go also at the seats;  ACW P |
|
Jaymes Crowther.
Full Member
  
Member since: November 2011
I've rekindled my passion for Israeli armour wahooo....
Posts: 206
Nov 16, 2011 6:21:11 GMT -5
Nov 16, 2011 6:21:11 GMT -5
|
Post by Jaymes Crowther. on Apr 14, 2012 4:47:47 GMT -5
Top marks for buidling this vehicle Paul I like the Hippo version as we have the four in service although there is a lack of spares for them being's we don't have Leo's in service...One thing I will warn you about is if you use images of the net be careful as the Dutch one alters slightly to the Hippo..Your work so far is really impressive may I add I really like the way it's coming along. I've got plans to build one in 1/72 so I'll be watching this closely great work so far!
Jaymes
|
|
|
|
Post by robbo on Apr 14, 2012 7:25:09 GMT -5
Major convertion indeed Paul. Coming along nicely, keep at it mate
|
|
|
|
Post by spud on Apr 14, 2012 7:46:16 GMT -5
i see you have taken the bull by the horns and dug deep paul ;D. this ie agreat start and looking forward to more
|
|
paulh.
Senior Member
   
Member since: November 2011
build, fail, learn, succeed - ENJOY
Posts: 2,389
Nov 15, 2011 15:54:51 GMT -5
Nov 15, 2011 15:54:51 GMT -5
|
Post by paulh. on Apr 14, 2012 12:16:46 GMT -5
Jaymes- thank you. On the image front- most of what I'm working from is in Mike Shackeltons Volume on special variants from his leo triology so the images are less likely to be cropped/stretched ( I'm hoping  Mind you I've not got scale plans to work from- I'm using my interpretation of the Bulldog variant so there's more thanjust a bit of creativity in the final result.  Robbo -thank you indeed sir  Spud- think it's less about digging deep and more of digging a deep one for myself....  |
|
jackh.
Full Member
  
Member since: December 2011
Posts: 1,195
Dec 15, 2011 2:51:27 GMT -5
Dec 15, 2011 2:51:27 GMT -5
|
Post by jackh. on Apr 15, 2012 9:20:34 GMT -5
Scratching and a Leopard  ;D I'm in Paul, looks like the perfect subject to jump on the scratch wagon with  . |
|
paulh.
Senior Member
   
Member since: November 2011
build, fail, learn, succeed - ENJOY
Posts: 2,389
Nov 15, 2011 15:54:51 GMT -5
Nov 15, 2011 15:54:51 GMT -5
|
Post by paulh. on Apr 16, 2012 11:06:13 GMT -5
Jack - nice to have you along- just don't expect anything too speedy here  jackwagon- I had indeed noticed Mr S had joined us- ya know I feel a Leo GB commin up sometime- whadaya think?  P |
|
Deleted
Member since: January 1970
Posts: 0
Nov 22, 2024 14:40:57 GMT -5
Nov 22, 2024 14:40:57 GMT -5
|
Post by Deleted on Apr 16, 2012 17:01:35 GMT -5
Hi Paul,
The top shot makes the thing look huge, Keep up the good work.
mack
|
|
Deleted
Member since: January 1970
Posts: 0
Nov 22, 2024 14:40:57 GMT -5
Nov 22, 2024 14:40:57 GMT -5
|
Post by Deleted on May 25, 2013 19:36:54 GMT -5
Interesting conversion, watching in anticipation!
|
|