ClayK.
Junior Member
 
Member since: November 2011
Posts: 68
Nov 15, 2011 9:06:54 GMT -5
Nov 15, 2011 9:06:54 GMT -5
|
Post by ClayK. on Mar 28, 2012 19:10:08 GMT -5
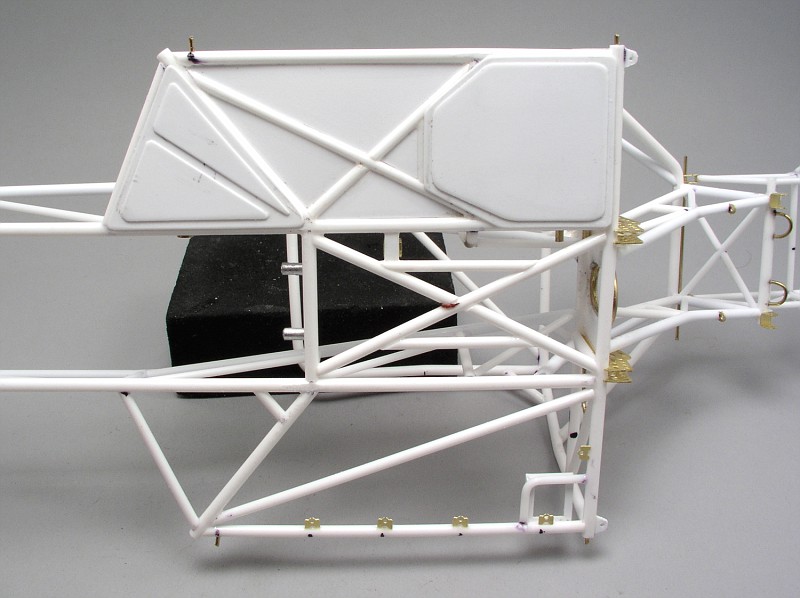
Now that I've survived another winter here, and Spring has sprung, it's time to get back into another serious project! This will be a fully detailed 1/16 Mustang Pro Mod. I'm doing it as sort of a fictional car again. At least the paint job, and the choosing of components. I'll try to make it as accurate and believable as possible, but not a replica of any certain car. I'm starting off with a resin '68 Mustang body from Flashpoint Resins. This is the third one of Terry's large scale bodies I've bought, and I think it is my favorite so far. It's cast well, and has some serious attitude and rake. Perfect for a Pro Mod! I've got a few ideas in my head for paint and graphics, and if all works out, it should be pretty cool. I'll also be using some parts from some other great folks. Jim from Micro Nitro is turning the wheels and other parts for me, and I'll be using plenty of brass etch from Dirt Modeler. I plan do to a lot of machining on my own as well. A BAE block, heads, valve covers and so on are all on the machining list. I'm basing my chassis off of an R2B2 design. After gathering as many pics as I could I started drawing the chassis plans in Illustrator. I work out all the kinks and measurements before I ever start cutting. Plans only get me so far, but they are a great foundation for a well built and accurate chassis. Here's my stack of photos to get started. I print everything out on glossy 8X10 paper and keep it right beside me as I build.  Once my chassis is all drawn from the side, top and whatever else I need, I print those out and tape them to some metal sheet. This way I can use magnets to hold my parts in place as I work keeping everything in line, and flat. Something I learned from Michael at dirt modeler that really helps my chassis work. For this chassis I'm using .100 rod for the main bars, 3/32 tube, .080 rod and smaller for the rest of the bars.  I start with the floor first, then the main hoop, then the upper frame rails. I've also started adding the first parts of brass etch as you can see.   I'll also be using the dirt modeler dzus tabs where needed.  Here's a quick shot of the chassis so far along with the FP Mustang body. I need a bigger photo booth. This thing fill sit up!  I have got started on a little bit of machining. I decided I wanted to try the clutch can on my own. After laying out all the measurements first in the computer, and getting all my cut points established, I machined a new one from aluminum. Still needs detailing obviously. this is right as it came off the mill. It's drilled for some aluminum rod that I will slide on the tranny pieces later. I may chuck this back up and thin the flange down some. Haven't decided yet.   For a bit of size comparison, that is my second version of Roger Burgess' Firebird chassis in the background. 1/24 scale compared to the new 1/16 chassis.  My next goal is to update the seat, get my pedals and hand brake all worked out, and get the tranny mounts in. Then I'll finish off the rest of the cage, and get started on the rear clip.  Thanks for looking! Clay |
|
|
|
Post by spud on Mar 28, 2012 19:28:11 GMT -5
WOW Clay that is Some serious work. this will be Sweet
|
|
|
|
Post by TRM on Mar 28, 2012 20:56:31 GMT -5
Serious Stuff clay....count me in on this!!!
|
|
|
|
Post by Mence on Mar 29, 2012 0:48:02 GMT -5
Always extremely impressed by your work Clay, looking forward to more...
|
|
Wes
Full Member
  
Member since: November 2011
Posts: 686
Nov 16, 2011 9:34:50 GMT -5
Nov 16, 2011 9:34:50 GMT -5
|
Post by Wes on Mar 29, 2012 8:05:32 GMT -5
This is going to be one seriously good build to follow.
Cant wait.
|
|
|
|
Post by robbo on Mar 29, 2012 10:58:34 GMT -5
Wow this is a biggun  |
|
|
|
Post by `Boots` on Mar 29, 2012 12:36:02 GMT -5
Wow Clay.................that is one seriously big motor car  , fantastic start so far bud and i`ll be following for certain ;D One quick question Clay.................did you once put up an SBS article on using Alclads.................appologies if i`ve got it wrong but i did have an Alclad article saved on my old PC but can`t remember who did it..................unfortunetly all my old ref stuff is locked on my old Hard drive  |
|
|
|
Post by 406 Silverado on Mar 29, 2012 21:42:05 GMT -5
Duuuuuuuuude.................wow bro.
Doesn't matter what you bring to show Clay, it's all freakin awesome. ok. bring the 1/24 frame. See you in three weeks my man.
|
|
multicam
Senior Member
   
Member since: January 2012
Nate
Posts: 2,039
Jan 10, 2012 14:35:41 GMT -5
Jan 10, 2012 14:35:41 GMT -5
|
Post by multicam on Apr 2, 2012 9:38:13 GMT -5
Really cool, Clay! Unbelievable work. Ill be watching:)
|
|
ClayK.
Junior Member
 
Member since: November 2011
Posts: 68
Nov 15, 2011 9:06:54 GMT -5
Nov 15, 2011 9:06:54 GMT -5
|
Post by ClayK. on Apr 9, 2012 13:39:19 GMT -5
Thank you very much guys! I'm way behind on posting updates, so here come a bunch of them! I started adding some brass wire for the seat mounts, as well as some brass etch from dirt modeler for the seat belt mounts. I've also been working on getting the hand brake laid out and situated.  Next up was to start tweaking the Flashpoint seat a bit. I extended the front edge with strip plastic and sanded it to shape. Then using .020 sheet plastic I made the front lip of the seat and sanded and blended it to shape. The back was also raised up as well as the sides slightly, then all blended together. I still need to do a bit of putty work, then open up the seat belt slots. But so far it's fitting pretty well.    The other thing I'm excited about is my Shapeways parts came! I didn't order a whole lot, but I'm really digging what I did get. I popped them open right away and started mocking up the tranny sections.    |
|
ClayK.
Junior Member
 
Member since: November 2011
Posts: 68
Nov 15, 2011 9:06:54 GMT -5
Nov 15, 2011 9:06:54 GMT -5
|
Post by ClayK. on Apr 9, 2012 13:41:15 GMT -5
My pedal layout is pretty much just like how the R2B2 cars are. The brake/clutch assemble is all made up of brass tubing, styrene rod, and RB rod ends. The gas pedal was bent up from brass wire and soldered together. Six pieces in all. I'm not that fond of soldering and all that, but it came out pretty cool, and wouldn't have been possible to do in plastic and still be sturdy enough. The other pedals are styrene rod with plastic pads, with PE mesh for some traction. All the brass tabs are from dirt modeler PE sheets. Here's the layout. Once assembled into the chassis, everything will work independently of each other.    Here's everything in place.    I also made up a set of Lenco slide mount bars, and then craddles on the chassis.   And after my first post, my buddy Sherm pointed out i had installed my front body supports incorrectly. After going back though my pile of ref pics, and seeing how it should be done, I corrected them, and added the small braces as well as the fire line tabs. Thanks Dave!  With all this fiddly stuff out of the way, now I can get back to chassis building. |
|
ClayK.
Junior Member
 
Member since: November 2011
Posts: 68
Nov 15, 2011 9:06:54 GMT -5
Nov 15, 2011 9:06:54 GMT -5
|
Post by ClayK. on Apr 9, 2012 13:42:23 GMT -5
Something I've been waiting to do, and think is kind of cool. One of the reasons I wanted to do an R2B2 chassis is I love some of the design features of their cars. The main one is the removable body/titanium rear tree. You may have noticed my rear clip stops short. Right at the rear coil over mounts. The reason why is everything beyond that is all lightweight titanium frame work sort of like a funny car. I had already added the top tabs before, so I set out to make the two thicker lower picots. I used /040 sheet plastic cut to shape, and added those to the back of the chassis.  Next I mounted to the body to the chassis and slowly started building inside connecting the tree bar by bar. I used brass rod for the main support because it was easier to bend to the proper shape. Here's the tree about 80% finished......   And pinned in place.   And with it mocked up inside the body. I still have more tabs, and body support pieces to add. But it's pretty close.  |
|
ClayK.
Junior Member
 
Member since: November 2011
Posts: 68
Nov 15, 2011 9:06:54 GMT -5
Nov 15, 2011 9:06:54 GMT -5
|
Post by ClayK. on Apr 9, 2012 13:43:32 GMT -5
I was out of town all weekend, so I didn't get any new work done. But before I left on Friday a little box of goodies from Jim at micro nitro www.micronitro.net/ showed up! I can't get over how good Jim's parts are. I had some 1/24 wheels of his before, but to see what he can do in 1/16 scale is just amazing. Here's the three piece rear wheels, and hubs. I need to open up my slicks a bit to get these to fit, but they are going to look awesome!    And here's what I'm using for the fronts.....his new Gibson style front wheels.  Thanks again Jim! And thanks everyone for looking! Clay |
|
ClayK.
Junior Member
 
Member since: November 2011
Posts: 68
Nov 15, 2011 9:06:54 GMT -5
Nov 15, 2011 9:06:54 GMT -5
|
Post by ClayK. on Apr 9, 2012 13:45:28 GMT -5
|
|
|
|
Post by Mence on Apr 9, 2012 13:59:25 GMT -5
So impressive Clay, this is a joy to follow!
|
|
|
|
Post by spud on Apr 9, 2012 14:08:19 GMT -5
Unferking real man that's awsome
|
|
|
|
Post by `Boots` on Apr 9, 2012 15:02:30 GMT -5
|
|
ClayK.
Junior Member
 
Member since: November 2011
Posts: 68
Nov 15, 2011 9:06:54 GMT -5
Nov 15, 2011 9:06:54 GMT -5
|
Post by ClayK. on Apr 11, 2012 9:09:44 GMT -5
Thanks guys! Back to work on the big Mustang......I reworked a few inner bars of the chassis, and it's kind hard to see down in there but I did get the mounting tubes on for the master cylinder. (Two brass tubes by the lower seat belt mount) I also finally got to the main halo and a few support braces. I still need to finish the drivers floor panels, seat brace straps and a few other things before I add the a-pillar bars in there.   One other thing I needed to get done before the interior sealed up was the simulated titanium tranny tunnel. I started with two pieces of .05 brass sheet to form the back part. Then I added the back loop, middle loop, and handle. I couldn't find any brass tube the right size for the front part so I machined one real quick. It was then added along with the front loop. A few strips of Aber PE welds finished it off.    Still needs a bit more clean up, but it's getting there.  Thanks for looking....Clay |
|
|
|
Post by 406 Silverado on Apr 11, 2012 9:22:25 GMT -5
Man have I missed a few up dates, sorry bro. Man thing thing is sick. Some fantastic scratchwork Clay. See you in two weeks bro.
|
|
|
|
Post by `Boots` on Apr 11, 2012 15:37:14 GMT -5
Each update just blows me away  .....................absolutely stunning !!!!!!!!!!!, man that tranny tunnel is just something else  ;D |
|
ClayK.
Junior Member
 
Member since: November 2011
Posts: 68
Nov 15, 2011 9:06:54 GMT -5
Nov 15, 2011 9:06:54 GMT -5
|
Post by ClayK. on Apr 17, 2012 13:23:32 GMT -5
Unbelievable Clay, this is car modelling at it's most inspiring. Does Jim make wheels in 1/5 too, I would love some made up for my Losi 5ive T ? Mark. I'm not sure if he goes that big. I know he has done some 1/12 scale Mustang wheels, and maybe some 1/6 drag wheels. Hit his link in my other update to find out for sure. Got some work in on the floor panels the last few days. I started out on the bottom doing the front and rear panels first. This is all .015 sheet plastic.  Then I flipped it over and did the top panels one by one. They aren't actually "top" per se, but more of in the middle of the bars around them. I made the basic shape first, then drew out and cut out the center. Then once cleaned up that piece was glued directly to another piece of plastic and trimmed to size. Once all the edges were smooth, and blended in I added them to the chassis.   I've also got more brass PE tabs and brackets installed, as well as the battery box and support.  I decided to have Jim work up another set of hubs and rotors for me since the other ones just weren't quite what I needed. He did a new smaller rotor hat/hub, as well as some new small rotors. These will work much better! I'll trim down the lug studs later.  The slicks also got some attention. Using a drum sander in my moto-tool, I opened up the centers a bit to get the new wheels in. I can't wait until I get to the point I can detail these babies. They look so cool with all that rubber around them!  |
|
ClayK.
Junior Member
 
Member since: November 2011
Posts: 68
Nov 15, 2011 9:06:54 GMT -5
Nov 15, 2011 9:06:54 GMT -5
|
Post by ClayK. on Apr 17, 2012 13:24:06 GMT -5
Another cool feature on theses cars is the drilled out steering column support. I set up my mill with the rotary table/chuck at 90 degrees and chucked up some 3/32" K&S brass......then slowly started bringing the bit down hole by hole and drilling the tube out. Close to the chuck wasn't too bad, but by the time I got a couple inches away from it I was getting some serious deflection! I had to scrap the first tube, and about four bits, but tube #2 came out perfect. I got it installed as well as starting to add the dash bars, right side door bars, and a few more brackets. I still need to do a bit more around the seat and floor area, then I can add the rest of the FC cage, and left side door bars.    Back to work! Clay |
|
|
|
Post by Mence on Apr 17, 2012 14:22:24 GMT -5
Faultless, superb!
|
|
|
|
Post by `Boots` on Apr 17, 2012 15:00:05 GMT -5
|
|
multicam
Senior Member
   
Member since: January 2012
Nate
Posts: 2,039
Jan 10, 2012 14:35:41 GMT -5
Jan 10, 2012 14:35:41 GMT -5
|
Post by multicam on Apr 19, 2012 22:26:10 GMT -5
Outstanding Clay!
|
|
gert.
Full Member
  
Member since: January 2012
Posts: 123
Jan 14, 2012 3:00:43 GMT -5
Jan 14, 2012 3:00:43 GMT -5
|
Post by gert. on Apr 20, 2012 17:05:49 GMT -5
This is it... F&"#ck... End of the hobby for me !!! I'm just an amateur... Collecting stamps will be my hobby ! See you guys,have fun  AAAAAAmazing Clay ! Love what you do. Greetings, Gert  |
|
bigjohn
Reviews member    
Member since: December 2011
John Hale
Posts: 3,438
Dec 21, 2011 2:17:45 GMT -5
Dec 21, 2011 2:17:45 GMT -5
|
Post by bigjohn on Apr 30, 2012 20:54:41 GMT -5
Seen this up close and personal over the week end, and man it is some fantastic work!
|
|
|
|
Post by Mence on May 2, 2012 7:09:07 GMT -5
Eye wateringly good, amazing attention to detail, stunning.
|
|
joelsmith
Full Member
  
Member since: July 2012
There no winners in war, only survivors.
Posts: 1,404
Jul 5, 2012 22:33:58 GMT -5
Jul 5, 2012 22:33:58 GMT -5
|
Post by joelsmith on Jul 7, 2012 18:18:05 GMT -5
I hope all is well with you Clay, since we haven't heard from you in 2 months. Look forward to more updates soon, Joel
|
|
multicam
Senior Member
   
Member since: January 2012
Nate
Posts: 2,039
Jan 10, 2012 14:35:41 GMT -5
Jan 10, 2012 14:35:41 GMT -5
|
Post by multicam on Jul 9, 2012 22:38:06 GMT -5
I have been thinking the same thing Joel. Missing your work Clay:) Hope all is well.
|
|


 , fantastic start so far bud and i`ll be following for certain ;D


 ;D
;D