Post by TRM on Jan 29, 2015 14:12:56 GMT -5
Static Grass Applicator
At one time or another, we have all thought about how we could try and save ourselves a little money and make something to help us when modelling. More often than not, preventing added expenditures to this already high priced hobby is the driving force. This of course is nothing new when we discuss adding grassy accessories to our dioramas. I myself have become complacent in just going online, buying small packages of flock and tufts to use as creating the real look of grass is often too difficult or not actually possible; that is without the aid of some fairly high cost applicators to help with the process.
Don’t get me wrong, as these applicators go, well most of them, are of high quality and do the job just fine; however, as most of you probably feel, I would rather spend that $50 to $100 US on another kit or two…maybe some aftermarket bling; anything other than a tool when I could possibly create such an item on my own.
Enter the homemade grass applicator
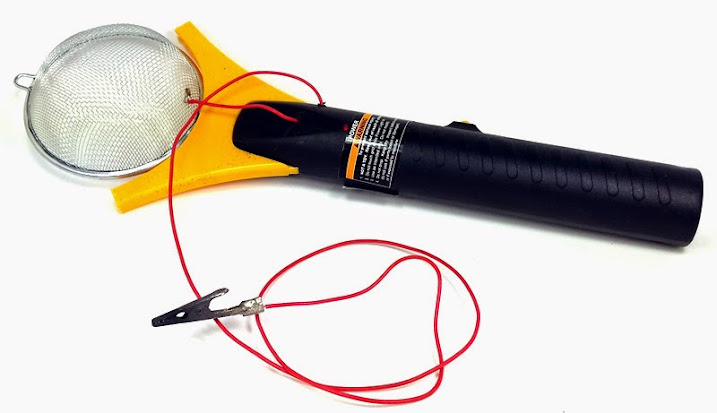
Some of you have seen a few of these made online through forum posting or video…heck, it’s exactly what I did before I went out and grabbed some things to actually make my own. In this article, I will explain how this homemade version of the grass applicator is made using an electronic fly swatter and a couple of cheap little items real easy. This IS NOT a How To, but if the information can be taken form it by someone looking to do something in line with what I have done, so be it. Rather than put a bunch of links up, pointing you guys to endless watching of poorly rendered video or trolling through forums to find a clearly written process for making one, I have created this article for MSC members to share how I created one and you never know, maybe you will try and make one of your own someday.
While the creation is pretty much the same as many of the other, I did put a small twist to change the power rating a bit (somehow I keep hearing Tim the Tool Man’s voice and grunts in my head). The first thing we will cover will be a little bit of safety. Nothing worse than hurting yourself when trying to do something that is supposed to be fun!! So grin and bear it and just read the precautions I will list here and elsewhere in the article.
WARNING
1 – It is always best to use PPE (Personal Protective Equipment) while working on anything. This means protective eyewear, gloves and a dusk mask if you think you may need one.
2 – The Electronic Fly Swatter is in fact a low voltage item; however, the voltage is bumped up through the use of a small transformer located inside the handle. So basically it takes a small amount of voltage to run the swatter as it is bumped up through the step up transformer and serious injury can and will happen if handled improperly. Remember to not allow metal to come in contact with the metal screening of the fly swatter while loaded with batteries and/or while the button control is pressed. Improper use of the unaltered product or the modified static grass applicator version can result in serious injury.
3 – A clean, non-metallic work area is recommended. Non-metallic as this is an “electronic” fly swatter and will discharge the electricity through the metal surface if handled improperly. Clean because you will be using a soldering iron and it is best to keep the area free from combustibles.
Disclaimer
While the intended purpose of this article is to show how I created a homemade alternative to purchasing a commercially marketed static applicator I am only showing my version and the steps I went through in making it not advocating anyone take the same steps I have to making one. There are a number of online tutorials showing how to make a version of the Fly-swatting static grass applicator and this article shows only my version created from what I have learned, attempted and completed from these online tutorials. Any attempt to create your own version of a static grass applicator through the use of products shown herein or elsewhere online, are the sole responsibility of the person or persons, attempting to make their own version of the applicator. Basically, it’s not my fault if you attempt to make one of these static grass applicators on your own without following general safety guidelines and/or researching information which can be found openly online resulting in hurting yourself or anyone else in the process.
My Shopping List
1 – Electronic Fly Swatter – Harbor Freight…$3.99
1 – Handheld sifting colander - The Dollars Store… $2.09 (yeah, that didn’t make sense either, but I bought a package of gum and there was tax…colander was $1)
1 – 9-volt adapter lead – Radio Shack…$2.27 (great deal as it was 25% off and there were four of them in the pack)
Soldering iron, solder and soldering paste ( I had this stuff in the cave already)
2 – D-Cell batteries or one 9-volt (I chose the 9-volt route obviously)

The first step I took in making this applicator was getting inside. There is a small circuit board that controls the fly swatter’s electronic properties which I need to create the correct static electricity to apply flock so that it stands up creating a realistic grassy look. There were five screws holding the handle together on the model I purchased. I saved these as they are needed to get the handle back together.


Once the fly swatter was opened, I could the battery bay and circuit board clearly. I was careful not to lose the yellow cap to the on button as this is just held in by the handle sides when closed.
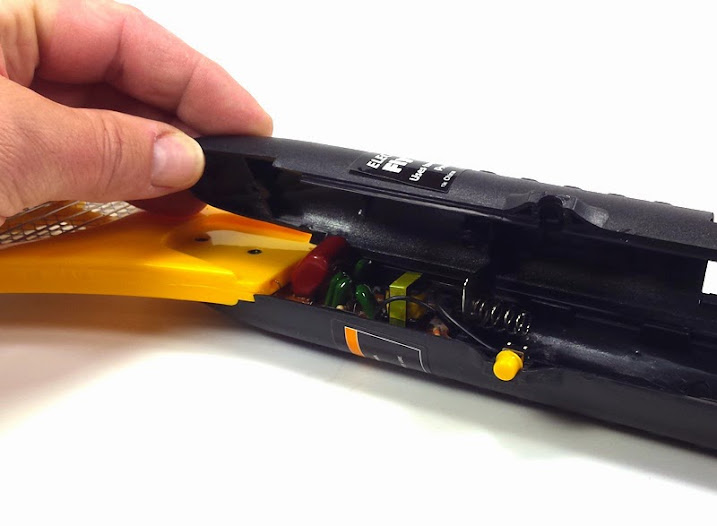

This particular model of fly swatter uses two wires coming off of the high voltage side of the circuit board to electrify the metal grating in the tennis racket designed head. These two wires were the first thing I needed to remove. I snipped the wires to separate the handle from the business end (tennis racket head) of the swatter.


The next step I chose to jump around and prepare the new static grass applicator end which will reattach to the existing handle when complete. First thing was to remove almost the entire end of the swatter leaving only the hilt end which gets attached to the handle. After carefully removing all of the wire rods and mesh, a simple cut was made on either side of the hilt end of the head piece. I probably could have figured out a cleaner, more streamlined look but between excitement to get this done and practical functionality the cuts were made.


After removing the black plastic grip located in the handle of the sifting colander I snipped the wire handle so that there was two legs of the handle. These two legs slid perfectly into the hilt end of the fly swatter remnant. I had to slightly bend both of the colander handle legs to slide through the opening, but once through the fit was tight.
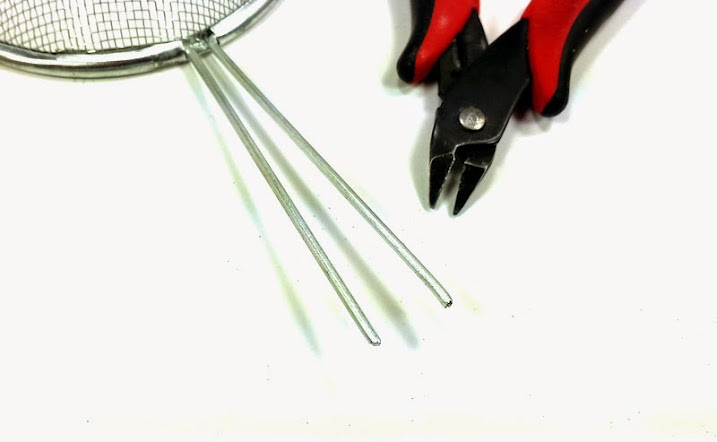


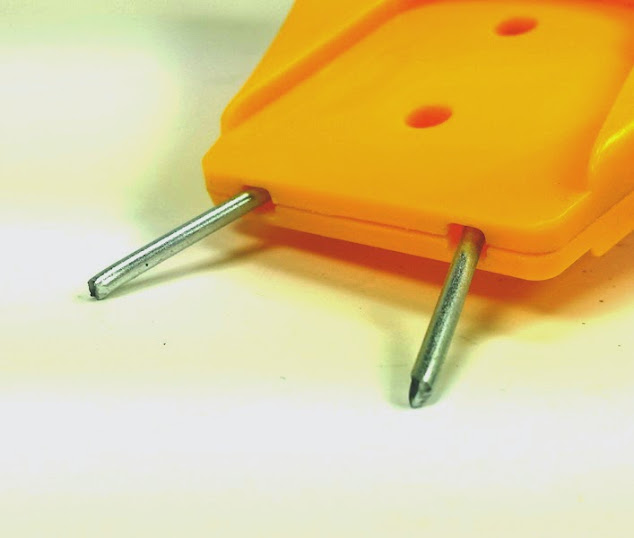
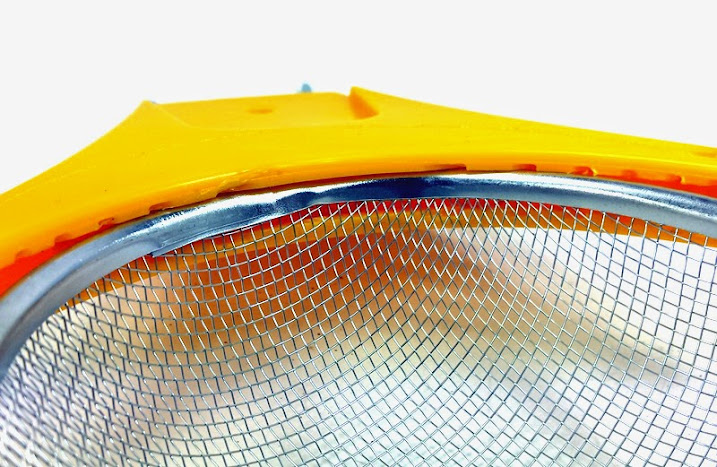
I chose to flatten the bottom of the basket just a little...there was no real reason, just looked good to me.

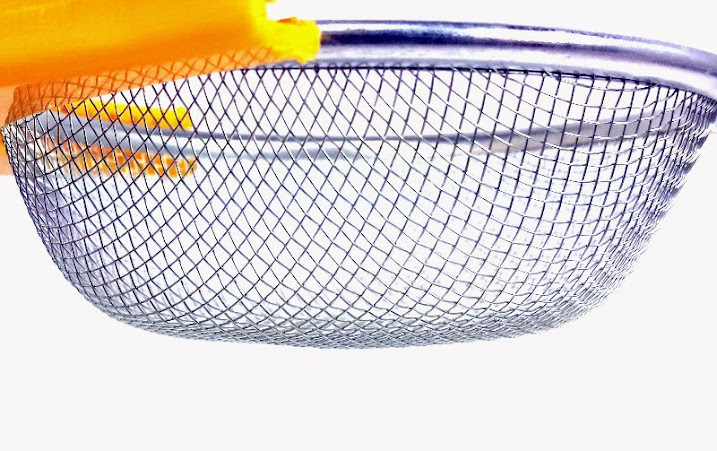

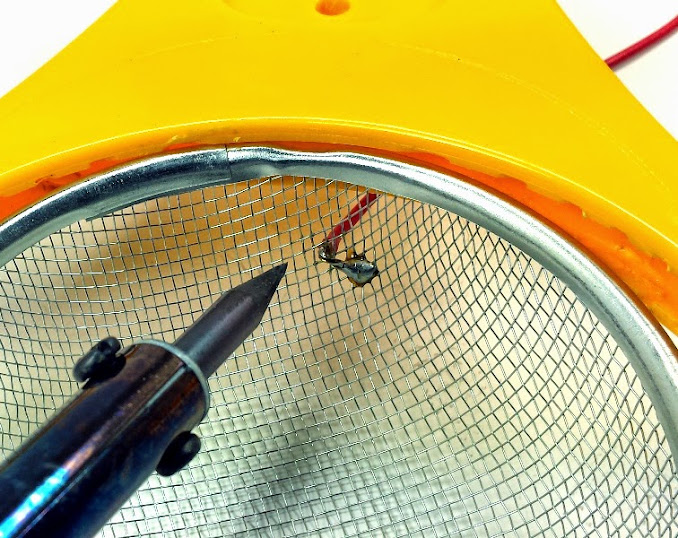
Sticking with the sifting applicator end, I needed to apply a wire lead from the metal basket. This was done through the use of some shielded copper wire I had and my trusty soldering iron. I slit the wire through the opening of the sifter, applied some soldering paste to the wire and sifter where I wanted the solder to stick and then applied the solder.
With the basket applicator end of the new tool complete basically, I turned my attention to the electronics end of the applicator. Seen in my picture, one half of the board is the low voltage side and you guessed it, the other is the high voltage side. The Low voltage side is where the juice from the batteries comes in. After passing through the step up transformer, capacitors and diodes, the power pretty much doubles coming out of the other end. Long story short, I needed to remove the existing wires that I snipped earlier, from the circuit board to make room for my two new wires.

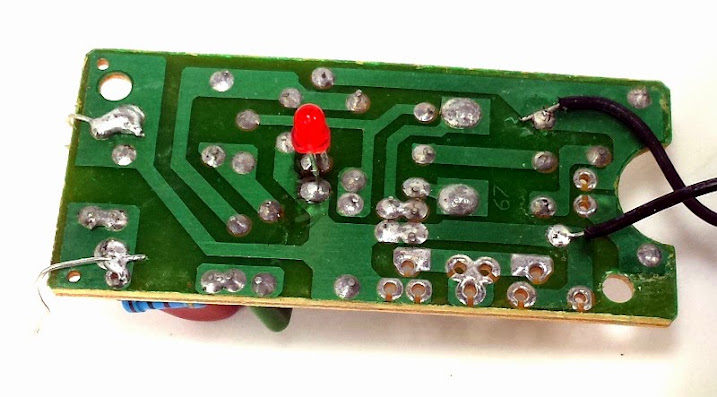

Two wires are needed to make my applicator work; first being the one that will run to the metal sifting basket, the second is a grounding lead. I am somewhat confident that it did not matter which wire was attach to which spot on the board as the general idea allows the process to work in either placement. First I needed to remove the existing wires.

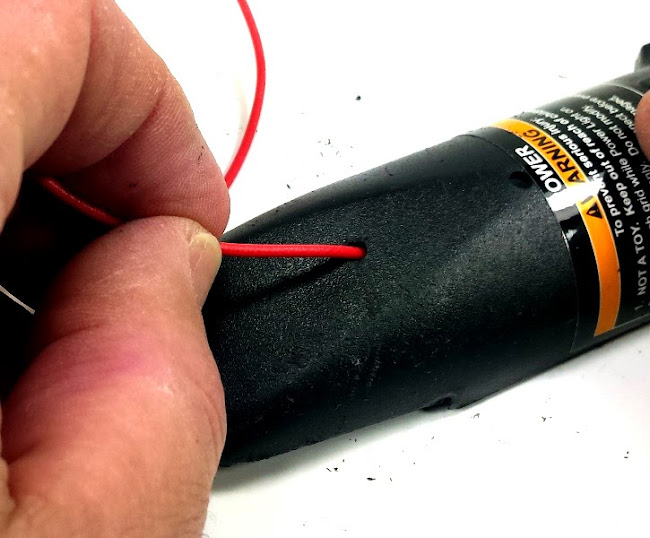
Once both wires were removed, I needed to solder my new leads into place. After sliding the basket wire through a hole I drilled in the handle, I soldered the wire into place. Next I needed to slide the grounding lead through a separate hole in the handle…what is not shown, is I actually forgot to do this the first time and ended up mumbling some obscenities, removing one lead to slide the new wire in place as I already had an alligator clip installed!! Oh by the way, I wanted to use an alligator clip soldered to the wire, for the grounding lead.



![]()

At this point I could have stopped, put everything back together and the new static grass applicator would have worked sufficiently by using the two D-cell batteries the fly swatter was intended to use. I chose to see if I could get a little more power squeezed form the unit. I wanted to also use a 9-volt battery as they as smaller and lighter and had the added bonus of more power. Made sense to me!!
This is where the 9-volt adapter came into play. First I needed to remove the two wires leading to the contact points used with the D-cell batteries. In this case, the side sides leading to the board did matter. The shorter lead coming off of the on button is the negative side and as a result I needed to attach the black wire, which goes to the negative side of the battery, to it. Subsequently, the longer wire, which is attached to the board leading to the end of the handle needed to be attached to the red wire or positive lead. I chose to use some connectors to marry the wires together. Another viable option would have been to solder the wires together. At which point I would have needed to cover the exposed wires so I would not short circuit the board within the handle after it went back together.


Once all the connections were done, I placed the applicator end piece in place, reinstalled the circuit board and screwed the handle back together and the new static applicator was ready to use.

Here is where I add another little note of caution. Whether I used the D-cell batteries or the newly installed 9-volt battery, there is a charge that is loaded to the basket end of the applicator once the on button is pushed. This charge is present after the button is released. If the metal basket comes in contact with any metal objects the applicator grounds out resulting in a discharge of electricity. The charge that is still present after releasing the button will in fact be much less than when the button is pressed…but it can still deliver a good bite. So rather than ending up with a Static Grass Taser Gun, I just need to remember to not tough any metal surface or my person, with the basket applicator after pressing the button.

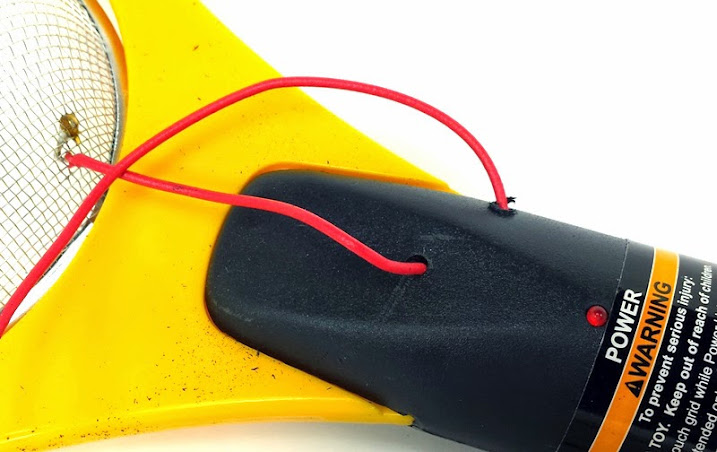


Basically the unit work as such; the basket applicator positively charges the flock placed in the sifter before application. The grounding wire effectively completes the circuit creating static electricity between the surface where you want the grass and the flock used to create such grass which forces the grass to stand on end giving a realistic grass look and feel to a diorama or vignette.
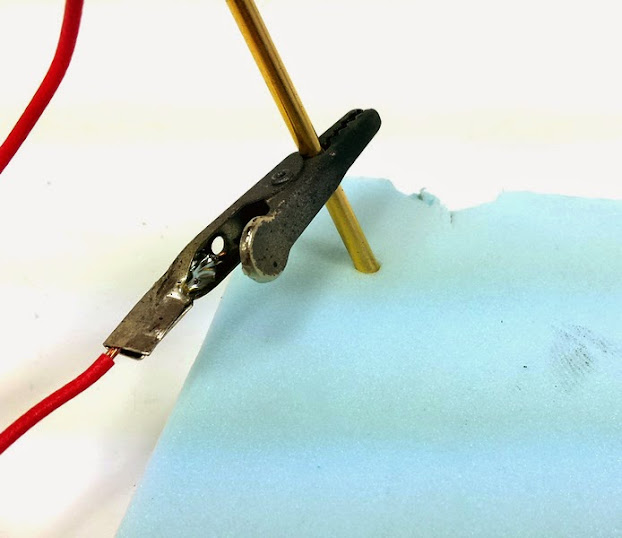


Using the applicator was really simple. After applying some PVA (typically I use standard white school glue) to the surface of a diorama base piece, I attached a grounding rod into the jaws of the alligator clip (in this case a metal Dremel bit but a common pin can be used as well) which is placed into the surface of the base I am using. Add some flock or a mixture of grass flock to the basket, press the button and shake lightly over the surface of the base making sure not to come in contact with the grounding rod or other metal surfaces.


The result is excellent if you ask me. The flock, mind you is a heck of a lot cheaper than buying pre-made mats, stands up quite nicely in my first application. I think with more evenly applied mixture taller grasses can be achieved. Next, I turned my attention to manufacturing my own tufts.

Tufts are some of the best little products we can use in dioramas and give a realistic feel to any scene. Until now, I have found myself spending $20 to $30 to get a few packages only to use them up quickly in one of two dioramas. With the static applicator, I was able to reproduce a credible grass tuft first time out of the gate.

Using the slip sheet from a standard sheet of return labels, this backing to basically any sticker, I added several small irregular sized drops of PVA to the surface. The backing sheet was placed on top of a metal surface…in this case I used one of my wife’s old cookie sheets. I always knew there was a good reason for saving these when she was tossing them out!! I attached the grounding to the cookie sheet. Once my mixture of grass flock was inserted into the basket of the applicator it was just a matter of pressing the button and giving the applicator a couple shakes letting the flock land on the glue.


At first, the tuft look rounded up off the surface, but as the glue dries it flattens out crating a very nice looking tuft of grass if you ask me!


So there you have it, my homemade static grass applicator; a very economical, easy way to make an applicator for making realistic grass effects to my dioramas. I am planning on trying to add a small plastic extension covering the lip of the applicator basket, making it wide enough so the applicator can be placed onto any surface without fear of the basket coming in contact with any metal. If you so choose to have a go at making one of your own, all I ask is that you be careful and do a bit of research so you know what you are doing and using as there is a risk of electric shock that can occur when using one of these.

At one time or another, we have all thought about how we could try and save ourselves a little money and make something to help us when modelling. More often than not, preventing added expenditures to this already high priced hobby is the driving force. This of course is nothing new when we discuss adding grassy accessories to our dioramas. I myself have become complacent in just going online, buying small packages of flock and tufts to use as creating the real look of grass is often too difficult or not actually possible; that is without the aid of some fairly high cost applicators to help with the process.
Don’t get me wrong, as these applicators go, well most of them, are of high quality and do the job just fine; however, as most of you probably feel, I would rather spend that $50 to $100 US on another kit or two…maybe some aftermarket bling; anything other than a tool when I could possibly create such an item on my own.
Enter the homemade grass applicator

Some of you have seen a few of these made online through forum posting or video…heck, it’s exactly what I did before I went out and grabbed some things to actually make my own. In this article, I will explain how this homemade version of the grass applicator is made using an electronic fly swatter and a couple of cheap little items real easy. This IS NOT a How To, but if the information can be taken form it by someone looking to do something in line with what I have done, so be it. Rather than put a bunch of links up, pointing you guys to endless watching of poorly rendered video or trolling through forums to find a clearly written process for making one, I have created this article for MSC members to share how I created one and you never know, maybe you will try and make one of your own someday.
While the creation is pretty much the same as many of the other, I did put a small twist to change the power rating a bit (somehow I keep hearing Tim the Tool Man’s voice and grunts in my head). The first thing we will cover will be a little bit of safety. Nothing worse than hurting yourself when trying to do something that is supposed to be fun!! So grin and bear it and just read the precautions I will list here and elsewhere in the article.
WARNING
1 – It is always best to use PPE (Personal Protective Equipment) while working on anything. This means protective eyewear, gloves and a dusk mask if you think you may need one.
2 – The Electronic Fly Swatter is in fact a low voltage item; however, the voltage is bumped up through the use of a small transformer located inside the handle. So basically it takes a small amount of voltage to run the swatter as it is bumped up through the step up transformer and serious injury can and will happen if handled improperly. Remember to not allow metal to come in contact with the metal screening of the fly swatter while loaded with batteries and/or while the button control is pressed. Improper use of the unaltered product or the modified static grass applicator version can result in serious injury.
3 – A clean, non-metallic work area is recommended. Non-metallic as this is an “electronic” fly swatter and will discharge the electricity through the metal surface if handled improperly. Clean because you will be using a soldering iron and it is best to keep the area free from combustibles.
Disclaimer
While the intended purpose of this article is to show how I created a homemade alternative to purchasing a commercially marketed static applicator I am only showing my version and the steps I went through in making it not advocating anyone take the same steps I have to making one. There are a number of online tutorials showing how to make a version of the Fly-swatting static grass applicator and this article shows only my version created from what I have learned, attempted and completed from these online tutorials. Any attempt to create your own version of a static grass applicator through the use of products shown herein or elsewhere online, are the sole responsibility of the person or persons, attempting to make their own version of the applicator. Basically, it’s not my fault if you attempt to make one of these static grass applicators on your own without following general safety guidelines and/or researching information which can be found openly online resulting in hurting yourself or anyone else in the process.
My Shopping List
1 – Electronic Fly Swatter – Harbor Freight…$3.99
1 – Handheld sifting colander - The Dollars Store… $2.09 (yeah, that didn’t make sense either, but I bought a package of gum and there was tax…colander was $1)
1 – 9-volt adapter lead – Radio Shack…$2.27 (great deal as it was 25% off and there were four of them in the pack)
Soldering iron, solder and soldering paste ( I had this stuff in the cave already)
2 – D-Cell batteries or one 9-volt (I chose the 9-volt route obviously)

The first step I took in making this applicator was getting inside. There is a small circuit board that controls the fly swatter’s electronic properties which I need to create the correct static electricity to apply flock so that it stands up creating a realistic grassy look. There were five screws holding the handle together on the model I purchased. I saved these as they are needed to get the handle back together.


Once the fly swatter was opened, I could the battery bay and circuit board clearly. I was careful not to lose the yellow cap to the on button as this is just held in by the handle sides when closed.


This particular model of fly swatter uses two wires coming off of the high voltage side of the circuit board to electrify the metal grating in the tennis racket designed head. These two wires were the first thing I needed to remove. I snipped the wires to separate the handle from the business end (tennis racket head) of the swatter.


The next step I chose to jump around and prepare the new static grass applicator end which will reattach to the existing handle when complete. First thing was to remove almost the entire end of the swatter leaving only the hilt end which gets attached to the handle. After carefully removing all of the wire rods and mesh, a simple cut was made on either side of the hilt end of the head piece. I probably could have figured out a cleaner, more streamlined look but between excitement to get this done and practical functionality the cuts were made.


After removing the black plastic grip located in the handle of the sifting colander I snipped the wire handle so that there was two legs of the handle. These two legs slid perfectly into the hilt end of the fly swatter remnant. I had to slightly bend both of the colander handle legs to slide through the opening, but once through the fit was tight.


I chose to flatten the bottom of the basket just a little...there was no real reason, just looked good to me.


Sticking with the sifting applicator end, I needed to apply a wire lead from the metal basket. This was done through the use of some shielded copper wire I had and my trusty soldering iron. I slit the wire through the opening of the sifter, applied some soldering paste to the wire and sifter where I wanted the solder to stick and then applied the solder.

With the basket applicator end of the new tool complete basically, I turned my attention to the electronics end of the applicator. Seen in my picture, one half of the board is the low voltage side and you guessed it, the other is the high voltage side. The Low voltage side is where the juice from the batteries comes in. After passing through the step up transformer, capacitors and diodes, the power pretty much doubles coming out of the other end. Long story short, I needed to remove the existing wires that I snipped earlier, from the circuit board to make room for my two new wires.


Two wires are needed to make my applicator work; first being the one that will run to the metal sifting basket, the second is a grounding lead. I am somewhat confident that it did not matter which wire was attach to which spot on the board as the general idea allows the process to work in either placement. First I needed to remove the existing wires.

Once both wires were removed, I needed to solder my new leads into place. After sliding the basket wire through a hole I drilled in the handle, I soldered the wire into place. Next I needed to slide the grounding lead through a separate hole in the handle…what is not shown, is I actually forgot to do this the first time and ended up mumbling some obscenities, removing one lead to slide the new wire in place as I already had an alligator clip installed!! Oh by the way, I wanted to use an alligator clip soldered to the wire, for the grounding lead.


At this point I could have stopped, put everything back together and the new static grass applicator would have worked sufficiently by using the two D-cell batteries the fly swatter was intended to use. I chose to see if I could get a little more power squeezed form the unit. I wanted to also use a 9-volt battery as they as smaller and lighter and had the added bonus of more power. Made sense to me!!
This is where the 9-volt adapter came into play. First I needed to remove the two wires leading to the contact points used with the D-cell batteries. In this case, the side sides leading to the board did matter. The shorter lead coming off of the on button is the negative side and as a result I needed to attach the black wire, which goes to the negative side of the battery, to it. Subsequently, the longer wire, which is attached to the board leading to the end of the handle needed to be attached to the red wire or positive lead. I chose to use some connectors to marry the wires together. Another viable option would have been to solder the wires together. At which point I would have needed to cover the exposed wires so I would not short circuit the board within the handle after it went back together.


Once all the connections were done, I placed the applicator end piece in place, reinstalled the circuit board and screwed the handle back together and the new static applicator was ready to use.

Here is where I add another little note of caution. Whether I used the D-cell batteries or the newly installed 9-volt battery, there is a charge that is loaded to the basket end of the applicator once the on button is pushed. This charge is present after the button is released. If the metal basket comes in contact with any metal objects the applicator grounds out resulting in a discharge of electricity. The charge that is still present after releasing the button will in fact be much less than when the button is pressed…but it can still deliver a good bite. So rather than ending up with a Static Grass Taser Gun, I just need to remember to not tough any metal surface or my person, with the basket applicator after pressing the button.


Basically the unit work as such; the basket applicator positively charges the flock placed in the sifter before application. The grounding wire effectively completes the circuit creating static electricity between the surface where you want the grass and the flock used to create such grass which forces the grass to stand on end giving a realistic grass look and feel to a diorama or vignette.


Using the applicator was really simple. After applying some PVA (typically I use standard white school glue) to the surface of a diorama base piece, I attached a grounding rod into the jaws of the alligator clip (in this case a metal Dremel bit but a common pin can be used as well) which is placed into the surface of the base I am using. Add some flock or a mixture of grass flock to the basket, press the button and shake lightly over the surface of the base making sure not to come in contact with the grounding rod or other metal surfaces.


The result is excellent if you ask me. The flock, mind you is a heck of a lot cheaper than buying pre-made mats, stands up quite nicely in my first application. I think with more evenly applied mixture taller grasses can be achieved. Next, I turned my attention to manufacturing my own tufts.

Tufts are some of the best little products we can use in dioramas and give a realistic feel to any scene. Until now, I have found myself spending $20 to $30 to get a few packages only to use them up quickly in one of two dioramas. With the static applicator, I was able to reproduce a credible grass tuft first time out of the gate.

Using the slip sheet from a standard sheet of return labels, this backing to basically any sticker, I added several small irregular sized drops of PVA to the surface. The backing sheet was placed on top of a metal surface…in this case I used one of my wife’s old cookie sheets. I always knew there was a good reason for saving these when she was tossing them out!! I attached the grounding to the cookie sheet. Once my mixture of grass flock was inserted into the basket of the applicator it was just a matter of pressing the button and giving the applicator a couple shakes letting the flock land on the glue.


At first, the tuft look rounded up off the surface, but as the glue dries it flattens out crating a very nice looking tuft of grass if you ask me!


So there you have it, my homemade static grass applicator; a very economical, easy way to make an applicator for making realistic grass effects to my dioramas. I am planning on trying to add a small plastic extension covering the lip of the applicator basket, making it wide enough so the applicator can be placed onto any surface without fear of the basket coming in contact with any metal. If you so choose to have a go at making one of your own, all I ask is that you be careful and do a bit of research so you know what you are doing and using as there is a risk of electric shock that can occur when using one of these.


 Nice write-up and how-to there T.


 Thanks Bill! Something tells me I have too much time on my hands or way too much on the bench!! LOL!!


