delta
Full Member

Member since: January 2015
Posts: 365 
|
Post by delta on Feb 2, 2015 19:02:52 GMT -5
Today has been quite an adventure. It began when I was awakened by the doorbell announcing the arrival of my Tachikoma model from Japan. 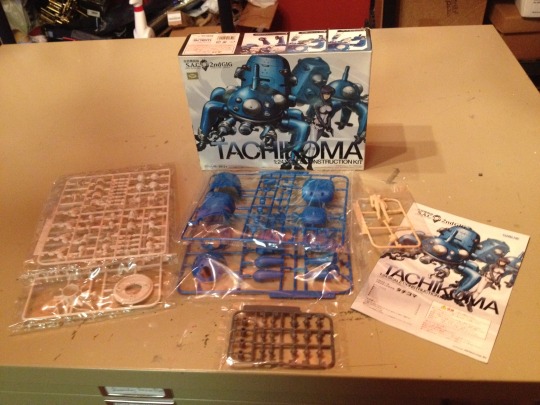 After (naturally) posting it in the appropriate thread here, I headed out to get the right paints and primers and tools and LEDs to light it up:  Then I took a shot at painting the weird material the small figure was made out of:  I painted the sprue of course, because I wasn't about to ruin the figure, that would be terrible for any model kit let alone an expensive Japanese one. I found that it was rubbery and didn't hold paint. Tried another spray primer. The paint held. So I decided to prime the figure, having cautiously tested the primer on the sprue. Well, today's lesson in modeling came to me from the letter "S," as in "spray-primer-will-erase-every-last-trace-of-detail-your-miniature-figure-ever-had-what-the-hell-were-you-thinking-you-idiot." After rushing to the sink and turning my hands white and ruining a brush to pry the primer out of every last crevice in the figure it may be salvagable. But oof. Not off to a good start but at least the model kit portion is looking good primed. As for the figure, well, it's hideously grey and white now in ugly splotches but, hey, it's primed! Kind of. And the detail seems to be intact. Mostly. Won't know how bad the damage is until I paint it. Hopefully it'll recover. Off now to spray the chrome layer onto the gloss-black primed pieces. Hopefully I'll manage not to ruin those in the process... |
|
|
|
Post by TRM on Feb 2, 2015 22:47:24 GMT -5
Nice looking...and different kit Ari!! Looking forward to seeing you bring it to life!!
Good call test priming the sprue first. Odd that you would lose most of the detail though. Rattle can? Try stepping back from the fig a bit and make quick light passes letting them dry in between.
As for removing the paint...a good oven cleaner in a Ziploc type bad will break down just about every type of paint. Take an old tooth brush (wearing rubber gloves) and give it a scrubbing and back into the bag! Lacquer thinner would work too....in either case you know about the fumes...just be careful!!
|
|
delta
Full Member
Member since: January 2015
Posts: 365
|
Post by delta on Feb 3, 2015 0:44:30 GMT -5
Thank you TRM for the advice! You may have saved it with that. Yes, it was a rattle can at close range. I'll see what I can do, thank you again!!!
|
|
delta
Full Member
Member since: January 2015
Posts: 365
|
Post by delta on Feb 3, 2015 2:33:34 GMT -5
Here's the completed figure, extra special thanks to TRM for the advice on saving it! I may go back and give it a bit of fine tuning once it's completely dry.   And here's Mork helping me show the scale:  |
|
|
|
Post by Leon on Feb 3, 2015 4:57:47 GMT -5
Nice save on the figure Ari! She's looking really good.
|
|
|
|
Post by TRM on Feb 3, 2015 5:38:03 GMT -5
Well done on the figure painting Ari!! She look pretty good! Mork doesn't seem to mind helping out too much!!  |
|
|
|
Post by deafpanzer on Feb 3, 2015 13:12:04 GMT -5
I think I like her ALOT!!!  |
|
delta
Full Member
Member since: January 2015
Posts: 365
|
Post by delta on Feb 3, 2015 22:27:45 GMT -5
Thank you all very much!
|
|
M1Carbine
Senior Member

Member since: November 2012
Posts: 1,630
Nov 16, 2012 2:49:11 GMT -5
Nov 16, 2012 2:49:11 GMT -5
|
Post by M1Carbine on Feb 3, 2015 22:43:32 GMT -5
Nice work.
Andy take her out to dinner first!
Bob
|
|
delta
Full Member
Member since: January 2015
Posts: 365
|
Post by delta on Feb 4, 2015 1:55:32 GMT -5
Thanks M1! Progress-  The Tachikoma is fully assembled, glue-wise. The disconnected parts in the photo are detachable by design, and can be articulated once its complete. It needs to be repainted as the unanticipated forceful construction required for the rubber joints ended up rubbing and scraping most parts. Drilling for the LEDs has also scraped up a few of the parts, owing to this being my first use of a mini-drill. I think everything wrong can be saved though, and this will come out well for the whole project being such a 'learning experience.' |
|
|
|
Post by Leon on Feb 4, 2015 4:50:48 GMT -5
That is one cool looking Ari! |
|
delta
Full Member
Member since: January 2015
Posts: 365
|
Post by delta on Feb 4, 2015 16:32:34 GMT -5
Thanks Leon!
|
|
|
|
Post by kaytermarram on Feb 5, 2015 14:31:38 GMT -5
Hehe, looks like Mork (of Ork, does anyone remember??) loves to take a bite or two on the little Lady. I guess she is done in Vinyl. For that, mostly acrylics do the job. Even without undercoating (have painted tons of vinyl kits way back in the 90ties). Those Animee stuff is cool and full of original designs, but the figures itself aren´t my figures. Hell, think what would happen if they were my piece of cake, too!!
Frank
|
|
|
|
Post by wbill76 on Feb 5, 2015 16:28:28 GMT -5
Nice save on the figure and good progress on the Tachikoma. Looks like a lot of pose potential with a fully articulated assembly.
|
|
delta
Full Member
Member since: January 2015
Posts: 365
|
Post by delta on Feb 5, 2015 16:47:50 GMT -5
Thanks Kaytermarram! Yeah, Mork (Who has a sister named Mindy) saw a hand near the floor and had to rub against it. He's been pretty good about not destroying my hard work. The figure felt softer and rubberier than Vinyl, it was very flexible. I'm really not sure what it might have been. I'll remember the acrylic thing though, thank you! Thanks WBill76! It has exceptional pose diversity for sure |
|
|
|
Post by deafpanzer on Feb 5, 2015 17:05:13 GMT -5
Really like where it is heading now...
|
|
delta
Full Member
Member since: January 2015
Posts: 365
|
Post by delta on Feb 6, 2015 22:39:47 GMT -5
Thank you!
|
|
|
|
Post by TRM on Feb 6, 2015 22:55:51 GMT -5
Great job on the Tachikoma Ari!! Coming together nicely!!
|
|
delta
Full Member
Member since: January 2015
Posts: 365
|
Post by delta on Feb 7, 2015 0:21:13 GMT -5
Thank you TRM!
|
|
delta
Full Member
Member since: January 2015
Posts: 365
|
Post by delta on Feb 9, 2015 19:01:09 GMT -5
Lighting systems activated! Now I just have to stuff them in somehow...  |
|
|
|
Post by Leon on Feb 9, 2015 19:08:49 GMT -5
Really looking forward to seeing how you stuff those lights in that little critter Ari. |
|
delta
Full Member
Member since: January 2015
Posts: 365
|
Post by delta on Feb 9, 2015 19:17:52 GMT -5
Me too. I've tried, they do fit, battery and all just barely, but I'm not sure how to get the LEDs in the right spots facing the right directions. There may be some tin foil trickery involved.
|
|