delta
Full Member
  
Member since: January 2015
Posts: 365 
|
Post by delta on Feb 13, 2015 0:17:48 GMT -5
AFVfan and TRM quite wisely suggested I get a junk kit to try out some rusting and wrecking techniques. TRM was also kind enough to link me to his tutorial videos, and that abandoned truck has inspired a somewhat ambitious project on which to experiment. And AFVfan suggested it have a lot of surface area, so from the discount bin... 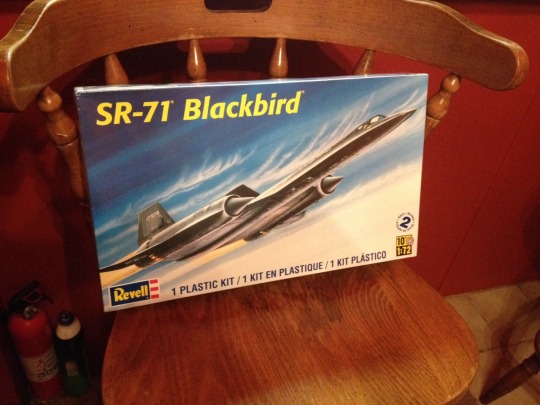 Now, I know these things are titanium and titanium doesn't tend to rust, and they're probably all in the care of museums now and I'm quite certain a real SR-71 wouldn't be able to stay propped up on cinderblocks like a raided car in a bad neighborhood, but I'm taking some artistic license and adding a dash of humor to give myself a playground on which to test every extreme-weathering trick I can find. 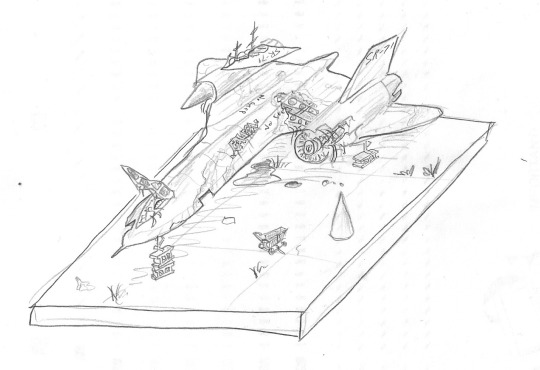 In addition to the cinderblock-replaced wheels and chipped paint with rust, my plans include missing panels, visible engines and inner support structures, at least one graffiti "gangsta" tag, a missing and possibly duct taped over window in one of the canopies, all the usual signs of dirt and aging, an overgrown tarmac with oil stains, a single moldy sock and possibly a derelict shopping cart if I can find wire thin enough to build it to scale. The SR-71 has always been my favorite aircraft, actually favorite of any vehicle. I was obsessed with them as a kid and honestly I still am, so I really wanted to do a kit of one but simply couldn't justify a build that would teach me little, as most of them are very few pieces and they're generally flat flawless black. But I think this will be a good learning opportunity with the potential for a striking, darkly humorous image that I haven't seen anyone do before. This is my first time using most of the techniques so I can't claim it will come out well at all, and it may take years as I have severe project build-up going on already, but well, I have to admit this one seems like a lot of fun. |
|
|
|
Post by 406 Silverado on Feb 13, 2015 0:46:59 GMT -5
Who cares if really wouldn't rust, as long as you have fun, test out techniques and improve skills. THAT is all that matters. I'm looking forward to seeing this one come to life.
|
|
delta
Full Member
  
Member since: January 2015
Posts: 365 
|
Post by delta on Feb 13, 2015 1:05:54 GMT -5
Thank you! I'm honored you'll take a look, your wrecks are definitely an inspiration for the attempt!
|
|
afvfan
Senior Member
   
Member since: December 2012
Bob
Posts: 1,772
Dec 10, 2012 17:32:38 GMT -5
Dec 10, 2012 17:32:38 GMT -5
|
Post by afvfan on Feb 13, 2015 1:59:05 GMT -5
Interesting concept ... not quite what I had in mind when I suggested a junker to practice on ... but interesting. I was actually alluding to something where you could just work in small areas practicing and trying out various techniques - more of a test mule than a finished model. This would help you out more in the short term and keep you from having to experiment on a model you actually are trying to finish. Here's one of the ones I use: 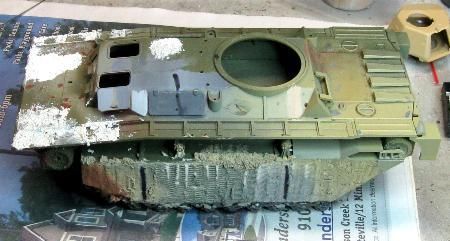 |
|
delta
Full Member
  
Member since: January 2015
Posts: 365 
|
Post by delta on Feb 13, 2015 3:15:33 GMT -5
Indeed it's a bit of a departure from your intent. Luckily, the Revell kit came with the D21 drone, which will prove an ideal test mule for its larger sibling as it has similar detail and the same plastic. I've already assembled it and started with a corner for damage- 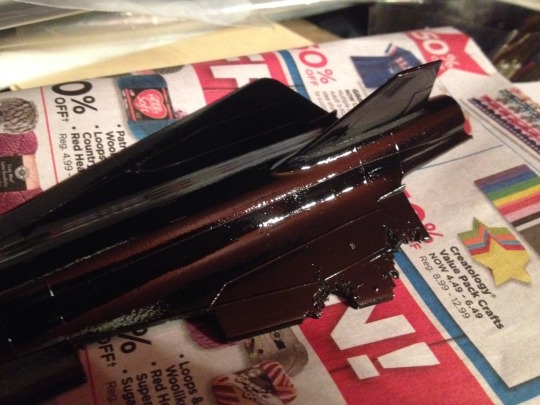 I've tried prying up a few panels on the other side as well, making them curl at the edges. I'll still be sure to pick up a genuine junk kit if something turns up on sale, something with lots of small parts for greebles and a large one to use as in your photo. I'll be treating the SR-71 with a bit more caution, but the project origins came from your suggestion, despite how they've changed. So thank you again for that! |
|
afvfan
Senior Member
   
Member since: December 2012
Bob
Posts: 1,772
Dec 10, 2012 17:32:38 GMT -5
Dec 10, 2012 17:32:38 GMT -5
|
Post by afvfan on Feb 13, 2015 3:46:12 GMT -5
Like I said, it's an interesting concept, and being a 71 fan, myself, I'll be keeping an eye out for it.
I don't know where you're located at, but if there are ever any model shows around, you can usually find some really cheap kits at them. Look hard enough and you can probably find a couple that the vendors would pay you to take them off their hands.
|
|
delta
Full Member
  
Member since: January 2015
Posts: 365 
|
Post by delta on Feb 13, 2015 4:08:26 GMT -5
Very cool, I've not yet looked into local model shows. Will do so now  |
|
|
|
Post by TRM on Feb 13, 2015 9:44:19 GMT -5
It's all about the fun!! First and foremost! Each time you try something new, you add that tool to the virtual tool box for the bench! Reminds me I have a nice wrecked aircraft to finish up soon...LOL!! Maybe I'll pull the base out and do some work on it!!  |
|
|
|
Post by wbill76 on Feb 13, 2015 13:01:24 GMT -5
Sounds like a great way to experiment and have fun at the same time! Go for it.  |
|
|
|
Post by 406 Silverado on Feb 13, 2015 13:17:52 GMT -5
Like I said, it's an interesting concept, and being a 71 fan, myself, I'll be keeping an eye out for it. I don't know where you're located at, but if there are ever any model shows around, you can usually find some really cheap kits at them. Look hard enough and you can probably find a couple that the vendors would pay you to take them off their hands. Right on the money. I always looked under the table for those boxes of old built models. These are great because they are glued for you and you can just slap some primer on them and try different things. Years ago I used to use those old built kits and redo them and sell them on ebay. That of course was before all the cool Dragon and Trumpy kits....Italeri and Tammy from the 70's. Just have fun with it. |
|
delta
Full Member
  
Member since: January 2015
Posts: 365 
|
Post by delta on Feb 13, 2015 16:46:46 GMT -5
Luckily, fun is always a given whenever I'm working on one. Thank you all  |
|
delta
Full Member
  
Member since: January 2015
Posts: 365 
|
Post by delta on Feb 14, 2015 1:28:35 GMT -5
Progress begins with panels missing in the cockpit with exposed wiring, and slashed seats with 1:72 scale stuffing coming out. The wires and stuffing need a bit of work, but I'm very happy with the paint on the seats and the slashes themselves. The cockpit has yet to be painted and fully assembled, I'll need to hunt though the forum to see how others have weathered cockpits before and see if I can find any photo reference online. 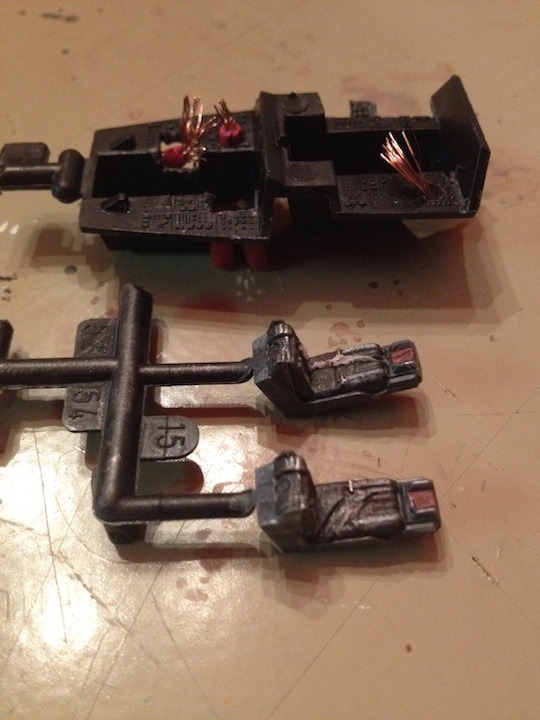 |
|
delta
Full Member
  
Member since: January 2015
Posts: 365 
|
Post by delta on Feb 14, 2015 13:41:05 GMT -5
The finished and weathered cockpit test fit with the fuselage. Though the frame casts most of it into shadow and obscures some of the missing panels and underdetail for them, I think the overall effect is about right. 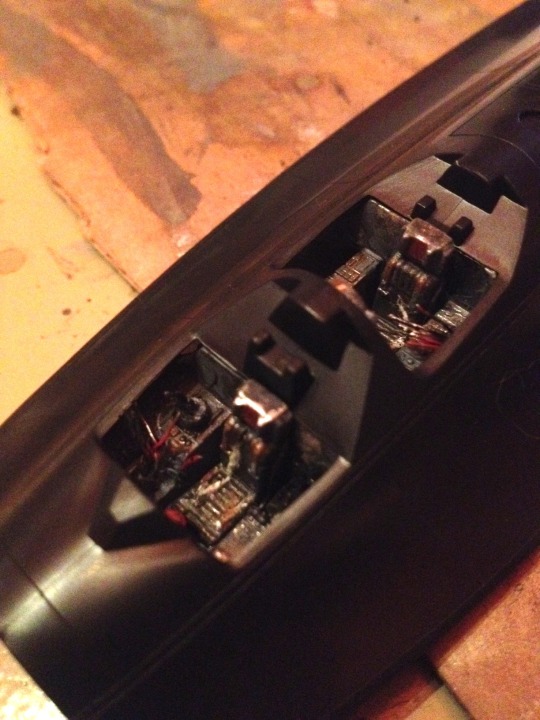 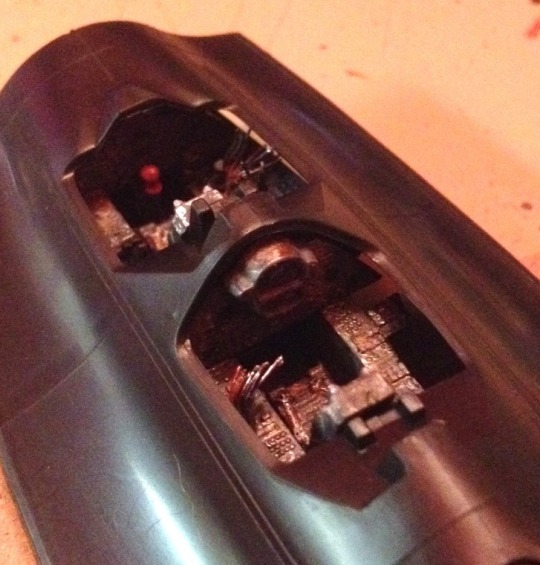 |
|
|
|
Post by Leon on Feb 14, 2015 13:59:19 GMT -5
Nice detail work on the pit Ari!Really like the bare wiring and slashed seats.
|
|
delta
Full Member
  
Member since: January 2015
Posts: 365 
|
Post by delta on Feb 14, 2015 14:55:51 GMT -5
Thank you Leon!!! I've started major fuselage damage- 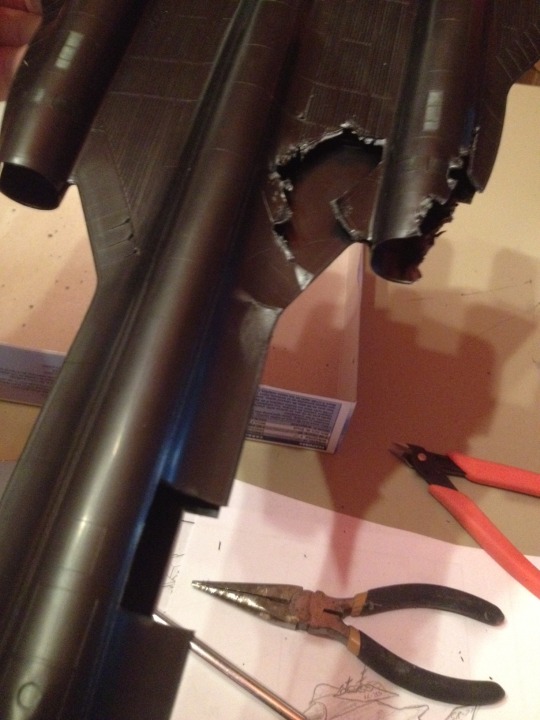 And a friend has suggested I leave at least one of the back tires on so I can give it "The Boot" 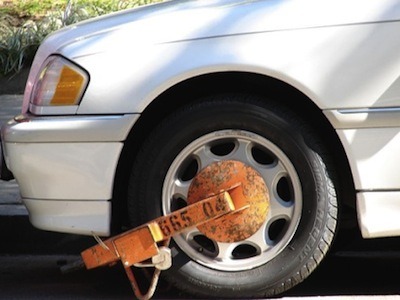 Needless to say this will now be a critical scratch build for the model! Seriously never park your SR-71 overnight in downtown Denver. |
|
|
|
Post by deafpanzer on Feb 14, 2015 21:04:36 GMT -5
Sorry for being late... saw the real thing at US Air Force museum. It was MUCH bigger than I expected. You have my attention too... good luck!
|
|
delta
Full Member
  
Member since: January 2015
Posts: 365 
|
Post by delta on Feb 14, 2015 21:57:37 GMT -5
Thank you! I hope to see a real one too someday. Amazing things!
|
|
|
|
Post by Leon on Feb 14, 2015 22:04:34 GMT -5
Nice looking damage Ari!  Remind me to never park in Denver!!!  |
|
delta
Full Member
  
Member since: January 2015
Posts: 365 
|
Post by delta on Feb 14, 2015 22:33:57 GMT -5
Thanks! If you're ever in the area I'll show you the good parking  |
|
|
|
Post by TRM on Feb 15, 2015 0:29:27 GMT -5
Nice bit of damage Ari!! Moving right along now!!  |
|
John Everett
Full Member
  
Member since: January 2012
July, 2016 MoM Winner
Posts: 1,278
Jan 17, 2012 0:53:48 GMT -5
Jan 17, 2012 0:53:48 GMT -5
|
Post by John Everett on Feb 15, 2015 1:26:14 GMT -5
For an extra bit of fun, add some odd characters, Star Wars Ewoks, giant blue people, a talking tree, whatever. Will you go mostly for rust and long-term effects or battle damage a recent effects? Who cares. Do both.
Just remembered. The Boeing museum in Seattle has an SR71 engine on display under the aircraft. It may prove handy through your scratchbuilding. If you can't find good copies on the internet, I've got a couple of pictures on my hard drive someplace.
|
|
afvfan
Senior Member
   
Member since: December 2012
Bob
Posts: 1,772
Dec 10, 2012 17:32:38 GMT -5
Dec 10, 2012 17:32:38 GMT -5
|
Post by afvfan on Feb 15, 2015 3:17:35 GMT -5
Thank you! I hope to see a real one too someday. Amazing things! Here are where all the surviving ones are located: www.sr-71.org/blackbird/locations.php#SR-71C_61-7981Unfortunately, there's none really close. The Ks location is the nearest, but it's still 470 miles away from Denver - nice little museum dealing with space and rockets. The Utah location is a bit farther, however, it's located at a larger aircraft oriented museum. |
|
delta
Full Member
  
Member since: January 2015
Posts: 365 
|
Post by delta on Feb 15, 2015 19:12:05 GMT -5
TRM- Thnak you! John Everett- I'm tempted! I'm going mostly for long term abandonment damage though, it never crashed, it just got left out in the sun. There are many good reference photos online of construction and cutaways, but I very much appreciate the offer, thank you! AFVFan- Thanks for the link! Hopefully next time I'm in DC or CA  |
|
|
|
Post by wbill76 on Feb 15, 2015 20:58:52 GMT -5
Some nice progress on the wreck experiment Delta. Nice touch with the exposed wiring and slashed seats ideas.
|
|
delta
Full Member
  
Member since: January 2015
Posts: 365 
|
Post by delta on Feb 15, 2015 21:14:25 GMT -5
Thanks Bill!  |
|
delta
Full Member
  
Member since: January 2015
Posts: 365 
|
Post by delta on Feb 16, 2015 0:42:01 GMT -5
Rusty Titanium underbelly: 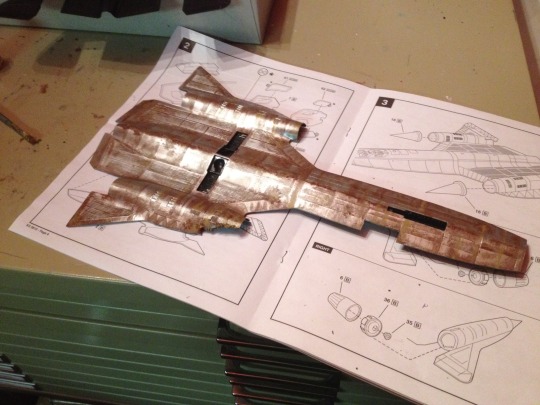 I've done several chipping experiments with hairspray and without but haven't found a good solution for the mass chipping that will reveal this layer under the flat black exterior coat. I'm thinking of finding a way now to simply mask off an organic series of holes and then spray painting it with the outside paint layer. Salt would be ideal, but those experiments have also gone awry, with the salt either not staying during painting or not leaving after it. More testing will be required before I'm willing to cover this layer up. |
|
4bogreen
Full Member
  
Member since: January 2014
On the bench; Yak-1B, T-30, T-34 model 1940
Posts: 568 
|
Post by 4bogreen on Feb 21, 2015 2:50:43 GMT -5
Great work Delta! I think it wil be a succes!
|
|
kiwibelg
Full Member
  
Member since: December 2014
Posts: 613 
|
Post by kiwibelg on Feb 21, 2015 3:30:40 GMT -5
Looking good Ari!! I will be following this one closely, I have to learn these techniques too as they are something new to me. Diving in the deep end in with such a project is always a challenge!
Hope you have a great weekend mate,
Shay
|
|
delta
Full Member
  
Member since: January 2015
Posts: 365 
|
Post by delta on Feb 21, 2015 16:53:30 GMT -5
Thank you both! I hope to get back to this one soon, it's all been chipping and fading experiments since my last post. And other models of course.
|
|
|
|
Post by TRM on Feb 21, 2015 22:41:14 GMT -5
Part of the game...and all the fun is the testing to see what works and what doesn't! There is a learning curve but you seem to be closing in on the crest! When it comes to the hairspray technique, there is a couple things to remember...first, the amount of hairspray applied will yield different results. Less will give you tighter patterns but will be a bit harder to remove..more will give you more expansive chipping and will remove easy...even more (which I suppose would be the most  ) can even give you crackling and peeled effects but will remove extremely easy. It comes down to control and how much you want to remove. The salt...keeping the salt in check while getting to the next step of paint and even during, is just a matter of getting it to stick. If your base is acrylic, you can use standard thinner to wet the area, app;y the salt and most should stay put. Another quick and dirty way is spray the hairspray on the surface (much more controlled through and airbrush) and while still wet, apply the salt, then back the pressure off (or move the can further away) and apply a thin layer again to effectively glue it in place. You can use a brush too, if you are thinking of confining the rusting to where the seams and bolts are. I can't tell in the picture which is the base coat...the rust or Titanium? It may be easier to control the Titanium application if you have a rust base, salt what you want to leave rusty and paint. Remove salt and see if you need to remove more form there...then get scrubbing. Keep playing, I like what I see happening!! There are just too many possibilities for weathering this thing once the chipping is done!!  |
|


 ) can even give you crackling and peeled effects but will remove extremely easy. It comes down to control and how much you want to remove.