delta
Full Member
  
Member since: January 2015
Posts: 365 
|
Post by delta on Mar 15, 2015 1:18:06 GMT -5
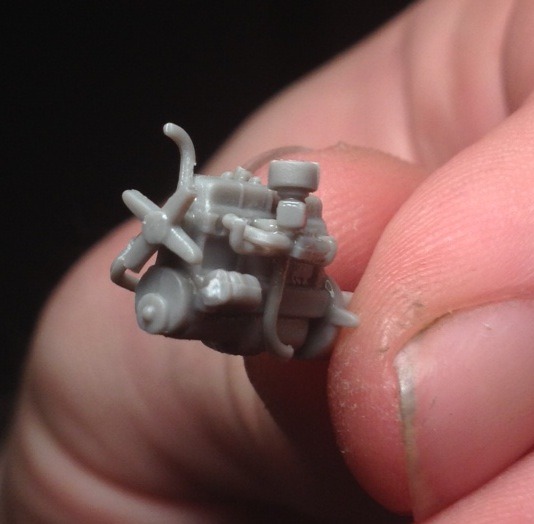
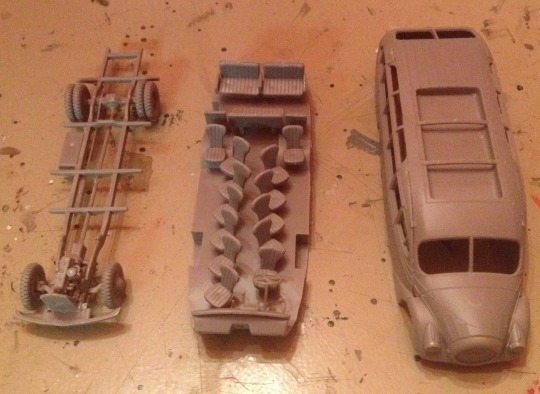
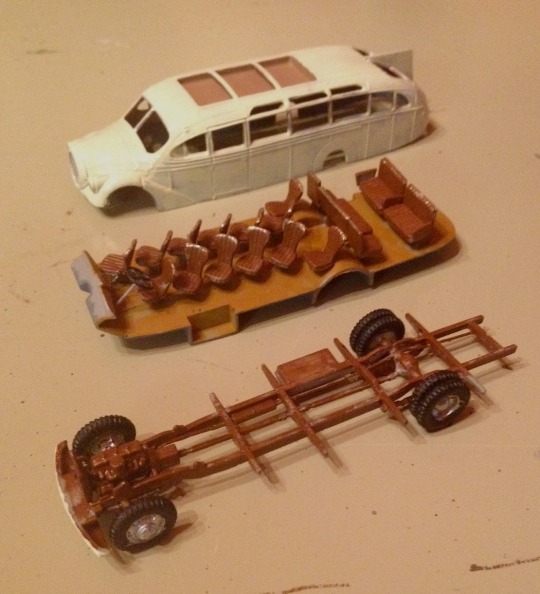
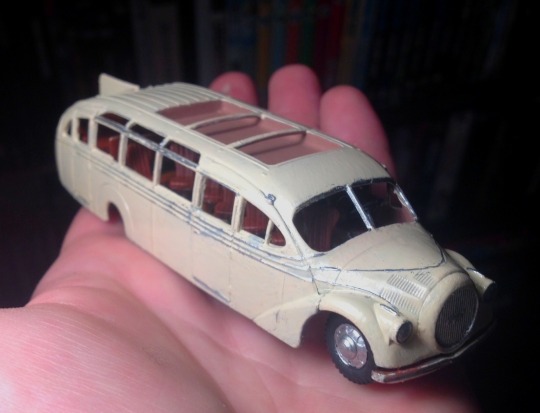
 Unfortunately, I can’t speak very highly of Roden's product. The kit was a cacophony of ill-fitting parts, excessive flash, very brittle plastic, numerous instruction errors, visible pits and prominences on many parts, and a couple design errors I can’t imagine getting past a quality control team, such as parts that stick out below the bottoms of the wheels and a hole for the exhaust on the opposite side as the other two holes for the same pipe. I’ve hunted for any possible thing I’m missing, any errors on my part, but given the amount of other mistakes and design flaws, I can only conclude this isn’t a particularly well designed product. Age can explain the plastic breaking so easily and I can admit the possibility of a few mistakes on my part, but some problems are just unquestionably problems with the kit design. Have others experienced similar problems with Roden kits? All the same, the build was reasonably fun. There was some good engine detail for 1/72:  They got a few points back for the detail and enjoyability of the main assemblies, and part distinction logic:  And the first layers of paint looked hopeful:  But points were lost again when it came to the windows. An acetate sheet was included but it was inflexible and drawn with inaccurate boundaries. Gentle test fitting broke the fragile acetate despite utterly minimal pressure. In the end I had to complete it without windows.  To my shame, that was the best I could clean up the paint around the fine chrome details. And that's the main reason I'm posting this, despite my end failure to fix the kit's problems and my very poor detail job. To ask- How does one paint incredibly small lines such as these? I tried masking them at first but they're so small tape was either infeasible or the tiny flaws in the tape edge or masking fluid made for errors as big as those you see above. In the end, I basically drybrushed the ridges. Unfortunately, this resulted in uneven edges and some spots. I cleaned up the really major flaws with more ivory but at 1/72, every tiny tiny uneven bit or spot looks about 5 inches tall in scale. I know a lot of this is just skill I need to build up over time, but any advice on painting long, thin, tiny raised lines is welcome, as is any advice on scratch-building curved windows. The kit can still be saved, I think. The interior is good, it's just windows and a bad paint job on my part that need fixing. Thank you in advance for any advice you can share. |
|
afvfan
Senior Member
   
Member since: December 2012
Bob
Posts: 1,772
Dec 10, 2012 17:32:38 GMT -5
Dec 10, 2012 17:32:38 GMT -5
|
Post by afvfan on Mar 15, 2015 9:50:31 GMT -5
Sounds like a good kit to make a wreck out of. I've never attempted one of their kits, but I've seen a fair number of people offering similar complaints about them (poor plastic, poor design, etc...). Fortunately, they offer nothing I'd be interested in building.
|
|
delta
Full Member
  
Member since: January 2015
Posts: 365 
|
Post by delta on Mar 15, 2015 11:03:29 GMT -5
I've found a few online complaints as well since this build to the same effect. Guess it's a name to be wary of.
A wreck is compelling. I'd really wanted a pristine version given the sleek shape and curious design, but if it can't be fixed and polished that may be the way to go. After all, I don't think any of these have survived, the only photos I can find are this kit or vintage.
|
|
|
|
Post by eastrock on Mar 15, 2015 12:53:10 GMT -5
 Unfortunately, I can’t speak very highly of Roden's product. The kit was a cacophony of ill-fitting parts, excessive flash, very brittle plastic, numerous instruction errors, visible pits and prominences on many parts, and a couple design errors I can’t imagine getting past a quality control team, such as parts that stick out below the bottoms of the wheels and a hole for the exhaust on the opposite side as the other two holes for the same pipe. I’ve hunted for any possible thing I’m missing, any errors on my part, but given the amount of other mistakes and design flaws, I can only conclude this isn’t a particularly well designed product. Age can explain the plastic breaking so easily and I can admit the possibility of a few mistakes on my part, but some problems are just unquestionably problems with the kit design. Have others experienced similar problems with Roden kits? All the same, the build was reasonably fun. There was some good engine detail for 1/72:  They got a few points back for the detail and enjoyability of the main assemblies, and part distinction logic:  And the first layers of paint looked hopeful:  But points were lost again when it came to the windows. An acetate sheet was included but it was inflexible and drawn with inaccurate boundaries. Gentle test fitting broke the fragile acetate despite utterly minimal pressure. In the end I had to complete it without windows. you can replace the windows for acetate that can be bought from the office supplies, its more flexible to work with and use micro crystal clear this step is the last step if you want the kit shine To my shame, that was the best I could clean up the paint around the fine chrome details. And that's the main reason I'm posting this, despite my end failure to fix the kit's problems and my very poor detail job. To ask- How does one paint incredibly small lines such as these? I tried masking them at first but they're so small tape was either infeasible or the tiny flaws in the tape edge or masking fluid made for errors as big as those you see above. In the end, I basically drybrushed the ridges. Unfortunately, this resulted in uneven edges and some spots. I cleaned up the really major flaws with more ivory but at 1/72, every tiny tiny uneven bit or spot looks about 5 inches tall in scale. I know a lot of this is just skill I need to build up over time, but any advice on painting long, thin, tiny raised lines is welcome, as is any advice on scratch-building curved windows. The kit can still be saved, I think. The interior is good, it's just windows and a bad paint job on my part that need fixing. I may suggest if you can acquire a bare metal foil sheet, but the body needs to be clean first. the kit should be strip of paint even the chrome parts, then apply the foil and cut the excess... then spray paint the body on light coats with every coat you need to wipe the paint from the foil with damp toothpick dip in lacquer thinnerThank you in advance for any advice you can share. I hope this one helps... just fire away any question, and I will try or other might give others suggestion to help you out  Cheers!! |
|
delta
Full Member
  
Member since: January 2015
Posts: 365 
|
Post by delta on Mar 15, 2015 15:09:10 GMT -5
Great advice, thank you Eastrock! I'll let you know how the techniques work when I try them  |
|
|
|
Post by wbill76 on Mar 16, 2015 14:30:16 GMT -5
Roden's stuff can be all over the map depending. Some of their aircraft kits like the C-123 get good marks while others are like what you experienced here. ER's advice on the metal foil option is what I would've suggested as well judging by what I've read that the automotive guys typically do for that kind of trim detail vs. trying to hand paint it. Especially in that small of a scale you're always going to have a challenge getting paint to look the way you want it to!
|
|
delta
Full Member
  
Member since: January 2015
Posts: 365 
|
Post by delta on Mar 16, 2015 14:48:20 GMT -5
Excellent to hear, and thanks for the word on Roden!
|
|
afvfan
Senior Member
   
Member since: December 2012
Bob
Posts: 1,772
Dec 10, 2012 17:32:38 GMT -5
Dec 10, 2012 17:32:38 GMT -5
|
Post by afvfan on Mar 16, 2015 16:41:19 GMT -5
I'd really wanted a pristine version given the sleek shape and curious design, ..... It really is a neat design....so much so that I wouldn't mind having one in the garage. Clear those seats out, do a little remodeling inside, and it would make one unique RV! |
|


 Cheers!!


