|
|
Post by wbill76 on May 13, 2015 13:59:05 GMT -5
My pleasure BJ and Dupes . These sheets are often in the bottom of the MK boxes folded up. Of course all the careful planning with the different style tracks went straight out the window when a vehicle had a track change. Then it just boiled down to whatever style was on hand from supply, or whatever style the factory was working with at the time of the refurb.....but it is nice to see the variations brought out. It is surprising that Dragon makes the distinction between types with the MTs.It would have been nice if that attention to detail had been carried over to their instruction sheets.  You're right there Bob! Especially since production of several of the types overlapped and the Germans would use up existing supply first as a general rule. Not uncommon to see vehicles sporting different tracks vs spare links or the 'extra' armor often added. The distinction that Dragon does is in line with their 'variant of the month' approach to kit features for many of the Pz 3/stug/Pz 4 family of kits so just one more feature they can add to a particular kit.  If only they would put out Osketten they would have all the bases covered! The light pattern track SK-27 were one of those exceptional types though. They were specifically designed for the JPIV L/70 and later also used on Pz IV Js as part of the simplification program for that vehicle class. |
|
|
|
Post by wing_nut on May 13, 2015 19:53:16 GMT -5
Hmmm what fun. I have this kit so I can copy you again. That's if I ever get out of "wingnut" mode
|
|
|
|
Post by wbill76 on May 13, 2015 20:07:11 GMT -5
Hmmm what fun. I have this kit so I can copy you again. That's if I ever get out of "wingnut" mode You may have to beat Andy to it first Marc!  |
|
|
|
Post by dierk on May 14, 2015 3:00:34 GMT -5
Typically German: why go for a simple solution, when you can come up with something really complex? cuckoo Give 'em a T-34 to copy and they come up with the Panther... (hammer hit)
|
|
|
|
Post by wing_nut on May 14, 2015 6:22:03 GMT -5
Hmmm what fun. I have this kit so I can copy you again. That's if I ever get out of "wingnut" mode You may have to beat Andy to it first Marc!  Oh don't for a minute think the similarities were lost on me. This is ripe for... "Kapitän Zupfen's Rache -Zwei, The Rampage on the Range"I can't find time to work on my Corsair and your comment in the the thread about my wee little drill bits was quite correct.  |
|
|
|
Post by wbill76 on May 14, 2015 10:14:05 GMT -5
Oh don't for a minute think the similarities were lost on me. This is ripe for... "Kapitän Zupfen's Rache -Zwei, The Rampage on the Range"I can't find time to work on my Corsair and your comment in the the thread about my wee little drill bits was quite correct.  Poor Andy has a full schedule these days!  I think he's booked through to 2017 what with all the big projects he has waiting! As for the drill bits you can't have idle tools on the bench for sure.  |
|
|
|
Post by wing_nut on May 14, 2015 11:34:10 GMT -5
So true. Sadly, I am the idle tool these days.
|
|
|
|
Post by wbill76 on May 14, 2015 15:41:19 GMT -5
Typically German: why go for a simple solution, when you can come up with something really complex? cuckoo Give 'em a T-34 to copy and they come up with the Panther... (hammer hit) Have to chalk that up to Hitler's influence too! He was a military genius in his own mind remember.  |
|
|
|
Post by wbill76 on May 23, 2015 16:54:12 GMT -5
As is often the case with Dragon kits, it pays to skip around a bit in the instructions. The latest round of effort focused on getting the main hull components in place starting with the rear hull plate. Step 2 would have you put all the details on the plate first and then install it, but that's not really a good idea. You do have to choose your style of exhaust though in this step and this choice impacts all the other options that should go on the vehicle in subsequent steps. Since I'm depicting a vehicle produced in the Oct-Nov window, I chose the vertical tube exhausts and worked with the corresponding plate and details that match it. Having built previous kits of the Pz IV family from Dragon, I know it's also a good idea to assemble and add the idler housings to the plate first vs. trying to add them after the plate is installed to the hull like the instructions want you to do in Step 3. 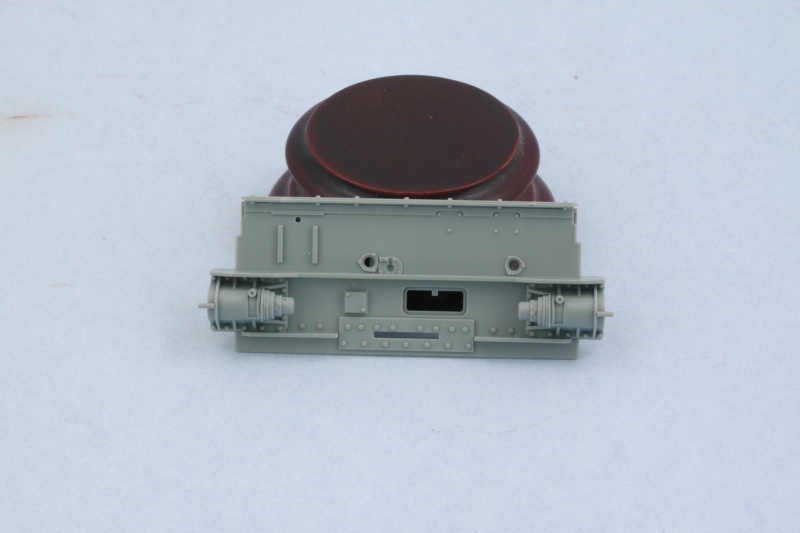 Once that's done, the rear plate was installed along with the glacis plate from Step 3 and the brake access hatch plate from Step 4-5. Just like with the rear plate, I deliberately left the details off the brake hatch plate to make it easier to install. A little bit of finger pressure from underneath the plate is needed to make sure it lines up evenly with the glacis plate, otherwise it has a tendency to want to sag a bit in the middle. The fighting compartment bulkhead from Step 5 was also added to ensure everything lined up properly and the hull keeps its rigidity. 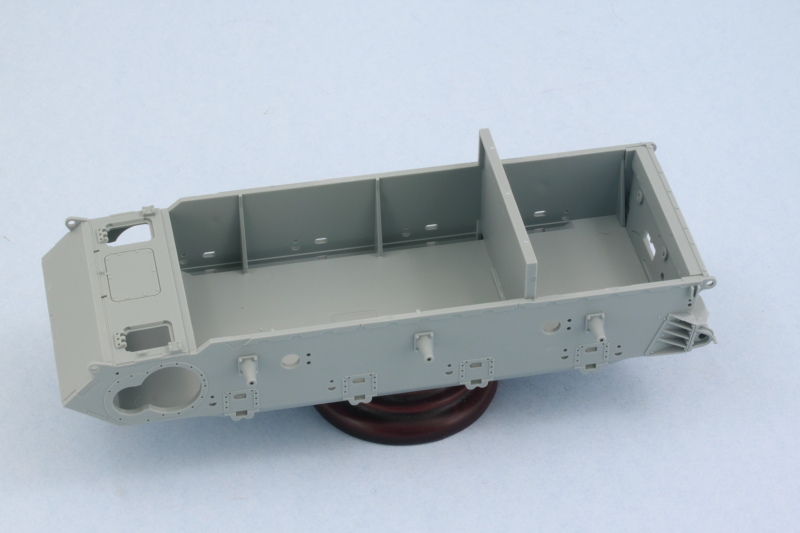 That allowed me to circle back and complete the details from Step 2 for the rear hull plate. It's a good idea to add the H24/H25 combo parts first as they influence how the left exhaust tube lines up. The stacks themselves are a little tricky to get together since a PE plate is used as the base for the stacks and the tops for the support trays. I found it easiest to glue the PE plate to the tube exhaust first and then line it up with the tray as the bend in the pipe that connects to the hull makes that a tight fit if you attach the plate to the tray first. In keeping with my Oct-Nov production vehicle, I opted for the standard Pz IV type of rear tow hitch to round things out. The instructions in Step 3 have a part number error, the base of the hitch is actually B54 and not H54. 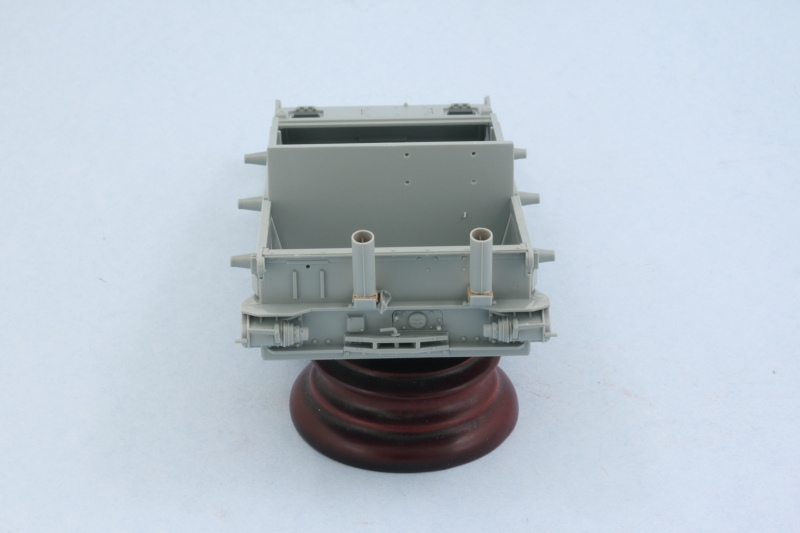 Next up will be the hull side details and the suspension elements. |
|
|
|
Post by TRM on May 23, 2015 17:02:14 GMT -5
Say it ain't so...the part numbers are wrong? LOL!! A little facetious frivolity!  Nice work so far Bill!! Always good fun to sit back and watch you assemble!!  |
|
|
|
Post by wbill76 on May 23, 2015 18:08:07 GMT -5
Say it ain't so...the part numbers are wrong? LOL!! A little facetious frivolity!  Nice work so far Bill!! Always good fun to sit back and watch you assemble!!  Thanks T! You know that Dragon has a reputation to uphold after all when it comes to the 'destructions'!  |
|
|
|
Post by Leon on May 23, 2015 19:41:29 GMT -5
Nice start on the hull assembly Bill!  |
|
ogrejohn
Full Member
   Oct '23 Showcased Model Awarded
Member since: June 2012
Go away or I shall taunt you a second time!
Posts: 1,302
Jun 1, 2012 17:33:59 GMT -5
Jun 1, 2012 17:33:59 GMT -5
|
Post by ogrejohn on May 24, 2015 4:52:44 GMT -5
Nice and straight Bill!
|
|
|
|
Post by wing_nut on May 24, 2015 6:19:18 GMT -5
Say it ain't so...the part numbers are wrong? Ya know how when an incorrect word is used often enough and long enough it eventually makes it into the dictionary? That's what dragon is trying to do. They want us to eventually think THEY are right.  Looking good Bill. A buddy just got back form a biz trip. Said he had the best burger in his life at Rodeo Goat. |
|
|
|
Post by wbill76 on May 24, 2015 11:49:46 GMT -5
Thanks Leon and OJ ! Say it ain't so...the part numbers are wrong? Ya know how when an incorrect word is used often enough and long enough it eventually makes it into the dictionary? That's what dragon is trying to do. They want us to eventually think THEY are right.  Looking good Bill. A buddy just got back form a biz trip. Said he had the best burger in his life at Rodeo Goat. Could be onto something there Marc! Rodeo Goat sounds weird and inviting all at the same time.  |
|
|
|
Post by wing_nut on May 24, 2015 20:43:53 GMT -5
Bill, that place is in Dallas. They way my buddy said the way everyone talked about it it sounded like it was famous or something. Can't remember f I mention that I was was gonna be in Dallas in January. You're in/near Dallas aren't you? I am looking forward to going there. And a really good BBQ place if you can recommend one.
|
|
reserve
Senior Member
   
Member since: July 2012
Si vis pacem para bellum
Posts: 2,372
Jul 11, 2012 9:11:45 GMT -5
Jul 11, 2012 9:11:45 GMT -5
|
Post by reserve on May 25, 2015 8:34:55 GMT -5
Dragon instructions erroneous? Nah gotta be your imagination...
Shaping up nice
Regards,
Mark
|
|
|
|
Post by wbill76 on May 25, 2015 13:45:55 GMT -5
Bill, that place is in Dallas. They way my buddy said the way everyone talked about it it sounded like it was famous or something. Can't remember f I mention that I was was gonna be in Dallas in January. You're in/near Dallas aren't you? I am looking forward to going there. And a really good BBQ place if you can recommend one. Sorry Marc, can't help you there. I'm on the opposite side of the state in El Paso! Dallas has lots of good steak and BBQ places so shouldn't be hard to find a good one while you're there.  Dragon instructions erroneous? Nah gotta be your imagination... Shaping up nice Regards, Mark I know what you mean other Mark! I think Dragon does it just to keep things interesting.  |
|
|
|
Post by wbill76 on May 25, 2015 18:26:00 GMT -5
Latest round of effort dealt with the lower hull suspension components and the left over details for the brake hatch plate. Even though the instructions don't indicate this in Step 4, it's possible to assemble and install the gun travel lock and have it remain workable. The key is to only glue the base hinge points G12/G13 into the hull after you've dry fit them in position and slipped the pins of the lock into them so that it will remain workable. The main benefit this provides is making life easier for painting/finishing the nose area later on and, of course, giving you the option of posing the lock if you like. I also added the suspension bump stops and final drive housings as called for in Step 5. 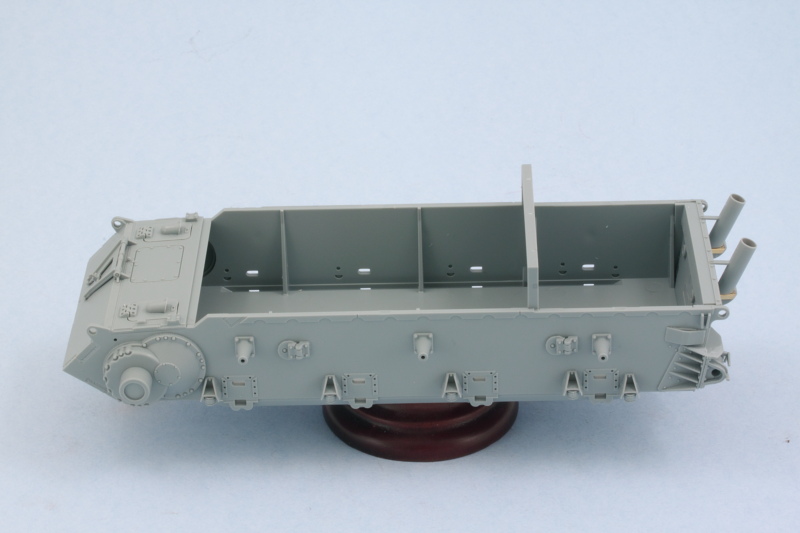 Step 6 assembles and installs the suspension bogeys. These are handed and the parts are designed to make it impossible to mix them up, but it still pays to work only on one side at a time to avoid any glue mishaps. Some of the suspension pairs had some flash on the hinge point where they meet up with the base parts and a triangular needle file helped eliminate that and ensure they fit properly. The suspension is fixed and non-workable unfortunately but not a big deal for my purposes. 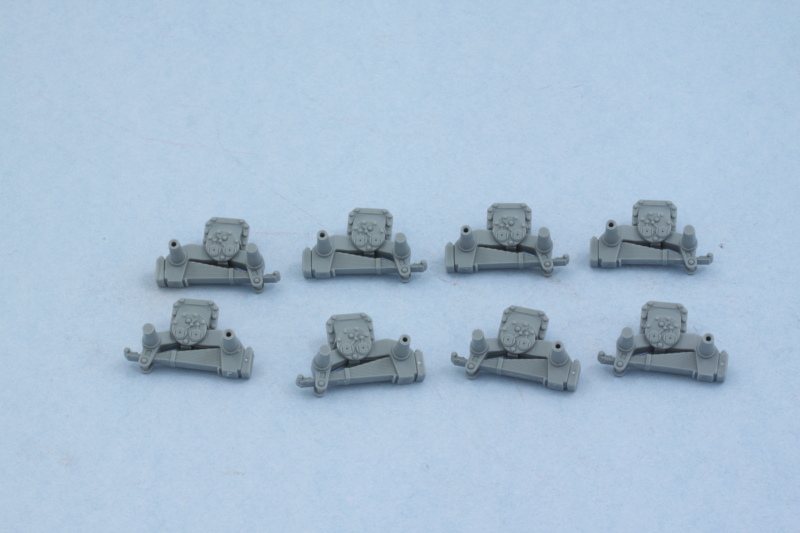 Once all the components were ready, they were installed on both sides. Small adjustments were needed to get them to line up properly and I used small amounts of blue tack poster putty to hold single road wheels in place to ensure a level set while the glue grabs. This avoids the possibility of 'floating' road wheels when it comes time to install them later. 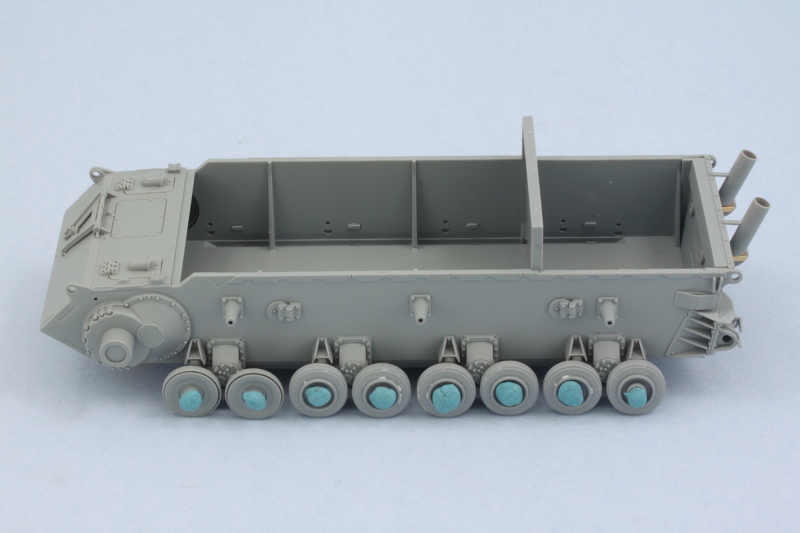 Next up will be moving to the upper hull and dealing with the fenders and engine deck. |
|
|
|
Post by Leon on May 25, 2015 18:40:21 GMT -5
Coming along nicely Bill!  Nice trick with the road wheels and blue tack.  |
|
|
|
Post by wbill76 on May 25, 2015 19:35:21 GMT -5
Thanks Leon! It's a trick I picked up a while back and have used ever since when it comes to these Dragon Pz IV family of kits.  |
|
|
|
Post by TRM on May 25, 2015 20:05:13 GMT -5
Moving right along Bill!! She looks good standing on here own legs! You're killing me right now!! LOL!! I want so much to dig into a IV!!  I will live vicariously through your build for the moment...and work on my DML Math skills!  |
|
|
|
Post by wbill76 on May 26, 2015 11:03:01 GMT -5
Moving right along Bill!! She looks good standing on here own legs! You're killing me right now!! LOL!! I want so much to dig into a IV!!  I will live vicariously through your build for the moment...and work on my DML Math skills!  Sorry to torture you T!  Just remember when it comes to Dragon calculations that A+B = 1/3(a-1) but only if the a is marked 'blue' on the instruction sheet!  |
|
|
|
Post by deafpanzer on May 26, 2015 12:48:40 GMT -5
Bet you are HAPPY that those wheels are done! Looking real good professor!
|
|
|
|
Post by wbill76 on May 26, 2015 13:02:58 GMT -5
Bet you are HAPPY that those wheels are done! Looking real good professor! Thanks Andy! Wheels are always a pain but necessary evil when it comes to German armor.  |
|
elco
Full Member
   July & Oct 2014 MoM Winner
Member since: May 2013
MOY 2014 Winner
Posts: 660 
|
Post by elco on May 26, 2015 13:21:15 GMT -5
I envy you with this easy kit  [Coming nicely together now, almost time for the disc camo huhuhu |
|
|
|
Post by wbill76 on May 26, 2015 13:44:22 GMT -5
I envy you with this easy kit  [Coming nicely together now, almost time for the disc camo huhuhu Ha! Still waiting for the masks to arrive so it may be a little while yet before any camo appears.  |
|
|
|
Post by wbill76 on May 28, 2015 16:37:15 GMT -5
Moving on to the upper hull and fenders requires a delicate balancing act between a lot of components that all have to play nice with each other front to back so that the casemate and engine deck line up with each other as well as the fenders and lower hull. To that end, I started with the fenders first as called for in Step 7 but assembled them a little differently than the instructions would have you do it. I left off the front and rear mud guards and only glued the middle portions of the fenders down to the hull as this is where they have the most 'grip' while still leaving some flexibility to line up the front and back portions as needed to keep things straight and level. Then the guards were added front and back along with their appropriate details. The casemate was taped into position throughout to make sure that the fenders didn't bow out at the edges to also help things along. Have to be careful not to get any glue on it though as it has to remain loose to allow the gun to be installed later on. I also added the missing wiring for the Bosch headlight using some 0.5mm solder and a #76 finger drill to open up the base of the light and the armored hump on the hull plate that the conduit feeds into. 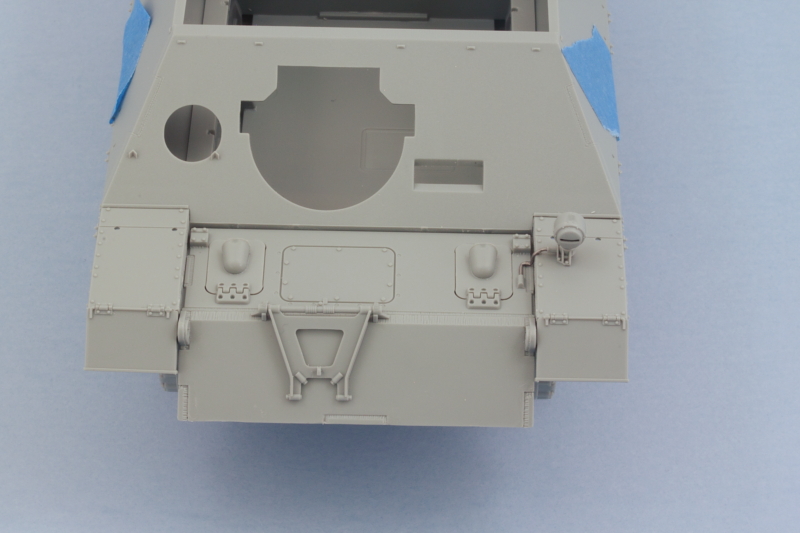 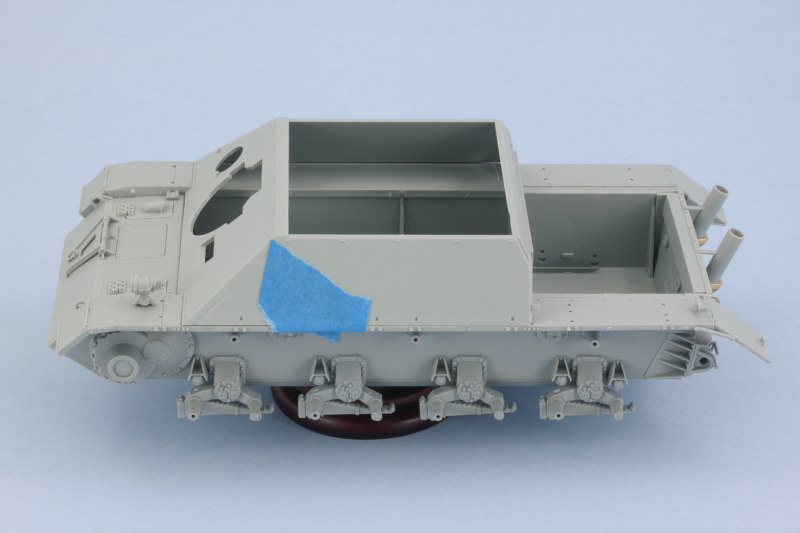 With the fenders out of the way, attention turned to the engine deck. This is covered in steps 8-10 but I don't recommend you follow the instruction order for getting the deck together or you might encounter fit issues with the lower hull. The instructions would have you assemble the entire deck and then set it off to the side and not add it until Step 18 when it calls for it to go in along with the complete casemate. The problem with this approach is that the intake sides are a very snug fit into the available opening and slots with the lower hull bulkhead, fenders, etc. If the full engine deck is assembled, it's almost impossible to 'flex' these properly to get them to line up correctly. So the solution is to only add the intake sides to the top of the engine deck and then install those onto the fenders and lower hull. I also found after doing some test fits that I needed to sand down the rear edges of the tow hook extensions as they have some interference with the rear engine deck plate and this also has to be done at this point before the deck is installed or you can't get at them to make the correction. 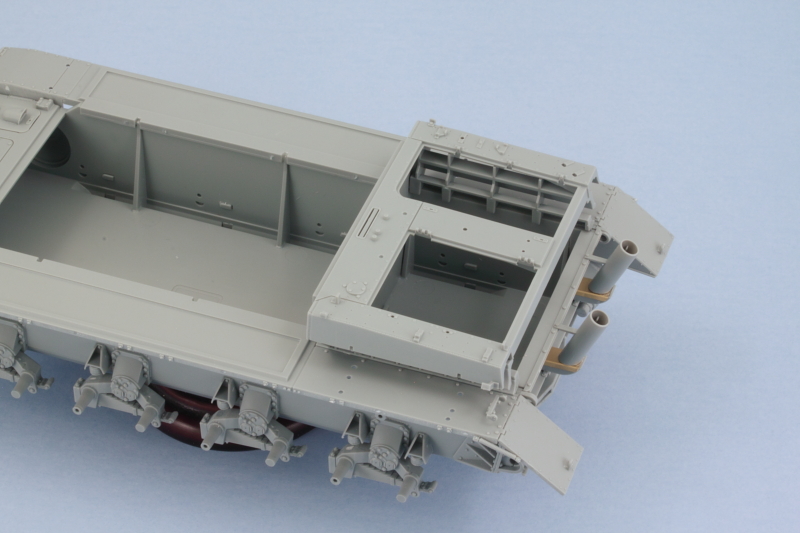 Careful use of glue on the deck means you can also use the casemate to ensure the deck lines up correctly and aligns as it should. Once the glue had set, I added the appropriate rear plate, B28, for the long spare track rack. The other optional plate with a shorter rack is meant for vehicles equipped with the large cylinder exhaust type, so it's important to choose the right one. Because the long rack has some flex to it, I used a short run of 8 links of MK tracks to help it hold its shape while the glue set and ensure I wouldn't have problems fitting the spare track run later on. Rounding out things here I also added the two large engine deck hatches and their details but left off all the tools and equipment as it will get added after the vehicle has received its paint and camo schemes. 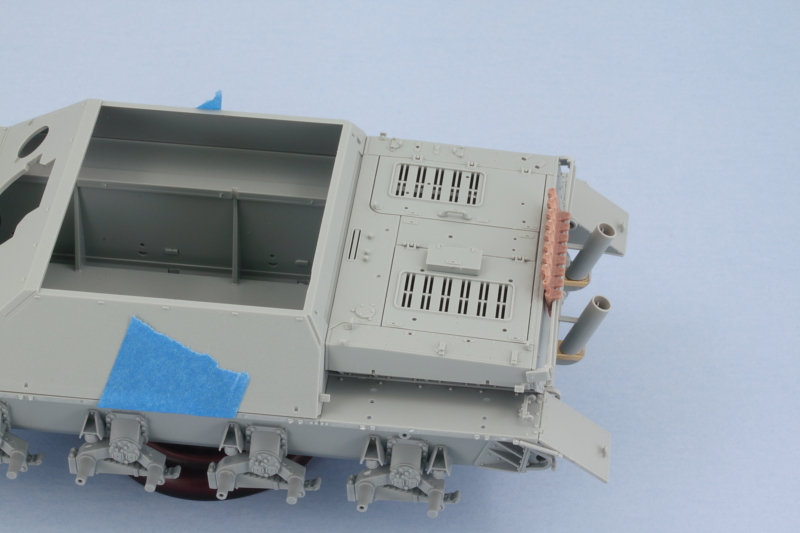 Up next will be working on the gun and casemate. |
|
|
|
Post by dupes on May 28, 2015 17:42:18 GMT -5
Starting to look like a Jagdpanzer!
|
|
|
|
Post by wbill76 on May 28, 2015 19:23:19 GMT -5
Thanks Dupes, always a good sign.  |
|