|
|
Post by dupes on Jul 1, 2013 11:30:07 GMT -5
I was so bad at English in school and i hated it sooooooo much this really did make me laugh out loud, but thanks anyway mate, glad you found me with or without your 'friends' help  . So apparently I've moved into 'friend' with air quotes status. NICE! Apparently Boyd just needs to spend more time on the forum.  |
|
Deleted
Member since: January 1970
Posts: 0
May 18, 2024 5:52:01 GMT -5
May 18, 2024 5:52:01 GMT -5
|
Post by Deleted on Jul 1, 2013 11:34:37 GMT -5
This is the type of thing this site lacks...builds where the paint ratios are measured in litres or complete aerosols...BRILLIANT! Excellent updateage as ever Gagman - the base coat colour looks superb, very smooth - yer got a scheme planned yet or yer just 'winging it' (pun intended) at this stage??? I concur. This is a modeling experience unequaled in modern times. G |
|
thenylongag
Full Member
 Sept2013 MoM Winner
Member since: June 2012
Yes, we have 'NO' bananas
Posts: 304
Jun 7, 2012 11:20:57 GMT -5
Jun 7, 2012 11:20:57 GMT -5
|
Post by thenylongag on Jul 2, 2013 8:38:45 GMT -5
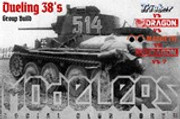
Morning Everyone, Thanks for stopping by and for the comments. So, everybody ready, this is gunna go fast so hold on tight, keep your arms inside the vehicle, Oh and there will be a quiz later Friday I continued to apply the hairspray and salt on the underside. 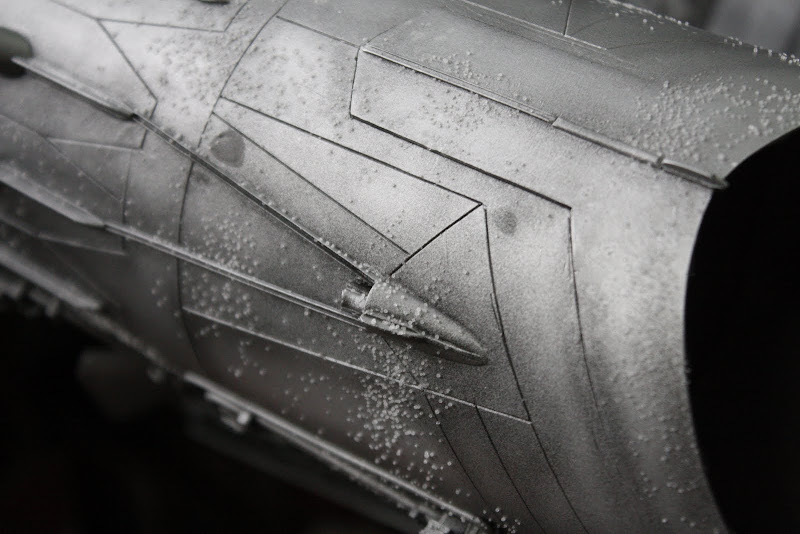 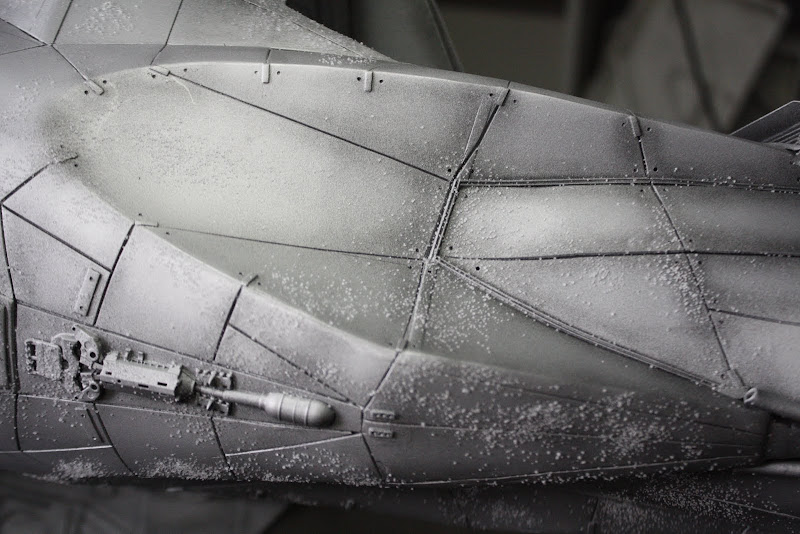 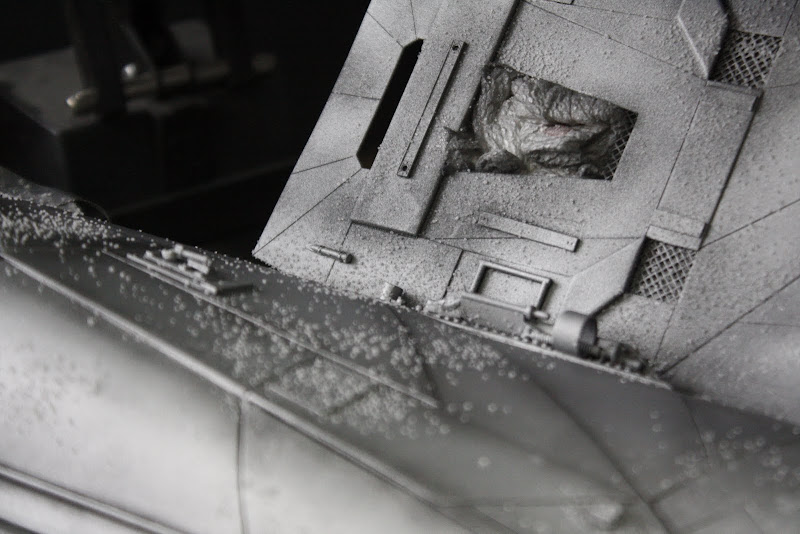 I then sprayed each panel individually with my base colour, Flat white, light grey, crome silver and a spot of buff, starting in the center working outwards. This took about 4,1/2 hours with a few breaks to let my compressor cool down.     When the paint was dry I removed the salt with a stiff brush and various tooth picks and chop sticks, this took me about 3 hours and was a bit fiddly to get all the salt out of all the nooks and crannies, I got most of it, I think  . The overall effect is very subtle but I was going for the 'less is more' look, with a couple of washes I think it will look ok.  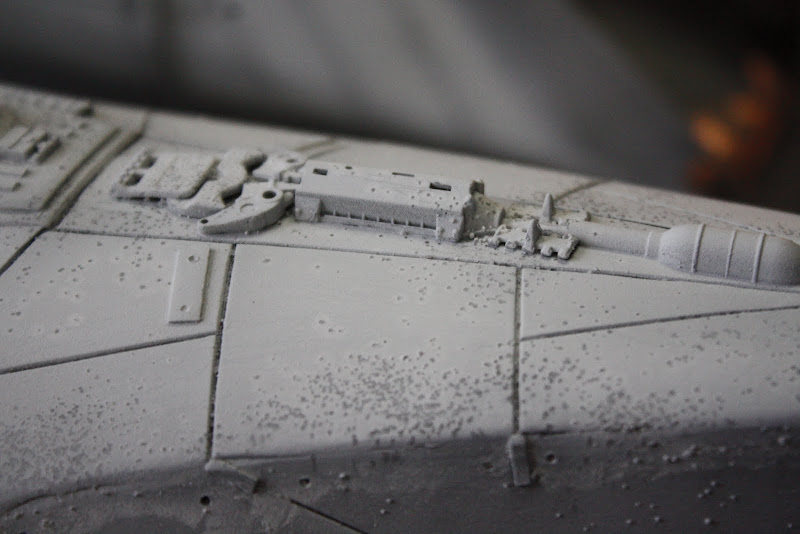 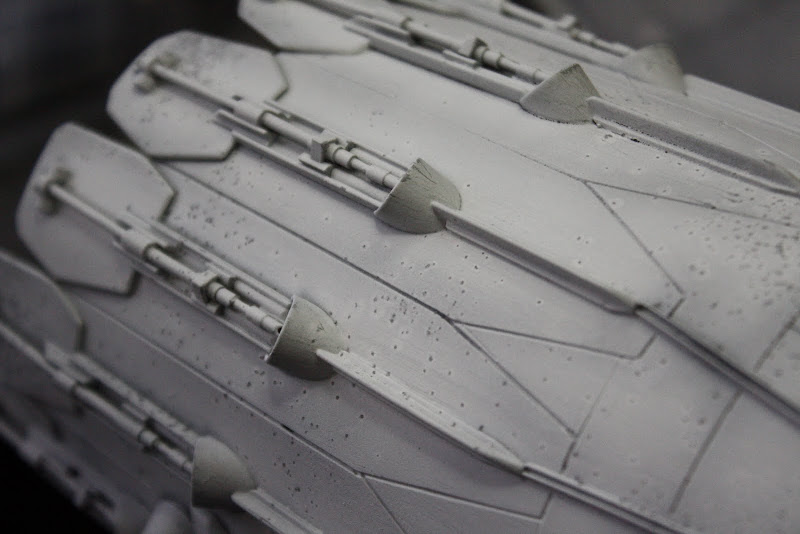 I did the same on the canopy frame and added the Outside Thingy's (technical term)    Last night I masked and painted various small pieces. Airlock door seal 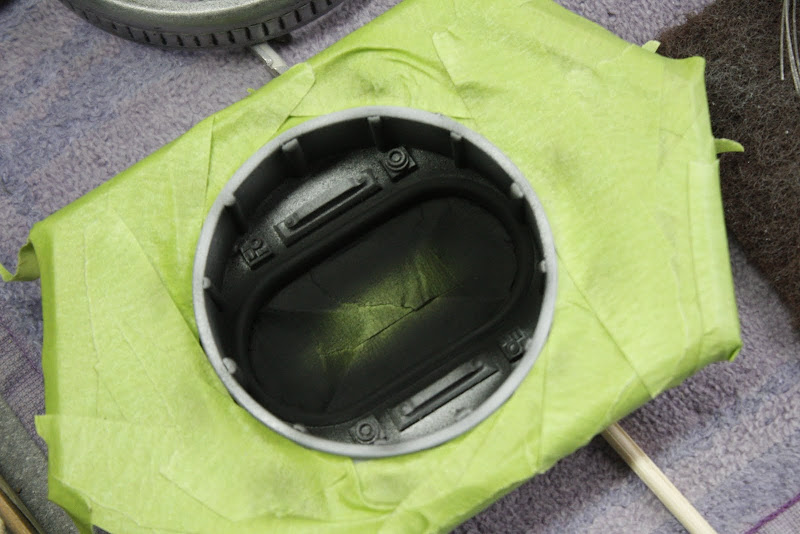  Some underwing deflectors  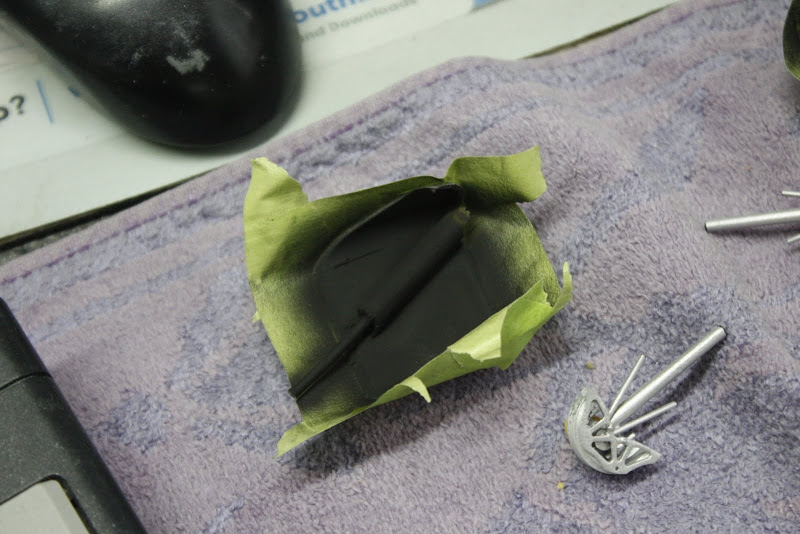 Two panels on the inside of the canopy frame 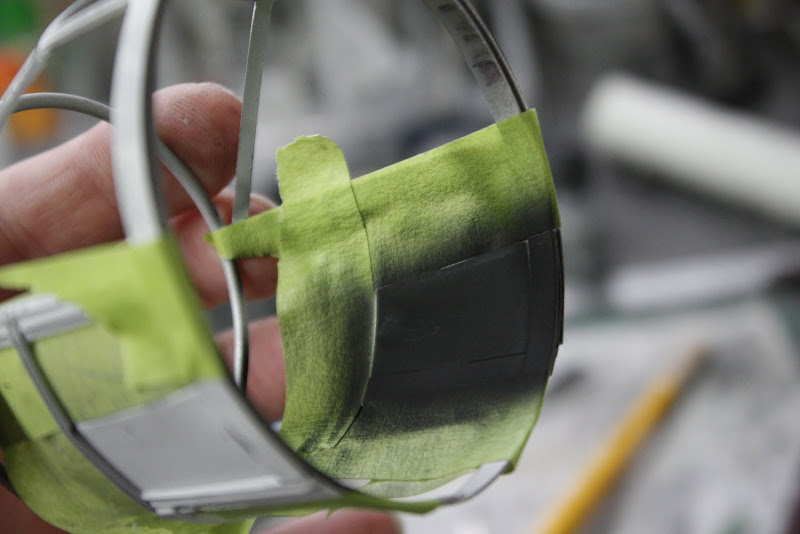 The thingy mounting points on the canopy glass  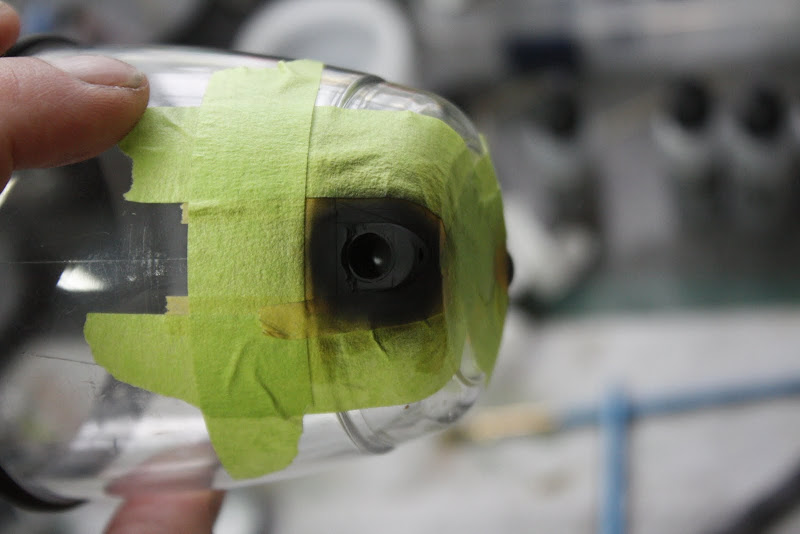 And two panels on the underside of the wings that will get tubing added over the top later.  Thats all so far. Progress seems very slow to me at the mo and I am still losing sleep over the final pattern, I have the colours but nothing is really clicking so far. I think i will just try to do what i said and focus on the top panelling first and worry about that when its time but at 3AM my brain forgets this.  Anyhoo, till next time. Take care Gag |
|
|
|
Post by Leon on Jul 2, 2013 9:16:47 GMT -5
Achieving some great results with the salt Gag .Very impressive work. |
|
|
|
Post by dupes on Jul 2, 2013 11:36:41 GMT -5
By "final pattern", are you thinking some sort of additional color scheme other than the overall gray?
|
|
thenylongag
Full Member
Sept2013 MoM Winner
Member since: June 2012
Yes, we have 'NO' bananas
Posts: 304
Jun 7, 2012 11:20:57 GMT -5
Jun 7, 2012 11:20:57 GMT -5
|
Post by thenylongag on Jul 2, 2013 12:54:40 GMT -5
By "final pattern", are you thinking some sort of additional color scheme other than the overall gray? Yes. It will only be on the top surfaces i think. I thought maybe some sort of futuristic camo. I really am clueless, i have the colours like i said and a few very vague ideas but its getting very frustrating. Any ideas? Gag |
|
|
|
Post by deafpanzer on Jul 2, 2013 14:58:49 GMT -5
I like what Dicky is thinking... splinter camo! Grey and blue... maybe even grey and dark red?
|
|
thenylongag
Full Member
Sept2013 MoM Winner
Member since: June 2012
Yes, we have 'NO' bananas
Posts: 304
Jun 7, 2012 11:20:57 GMT -5
Jun 7, 2012 11:20:57 GMT -5
|
Post by thenylongag on Jul 2, 2013 17:16:28 GMT -5
Ok,thanks for the tips looked at few splinter camos might be interesting But this is the picture that inspired my colours Don't tell anyone, this is an MSC exclusive 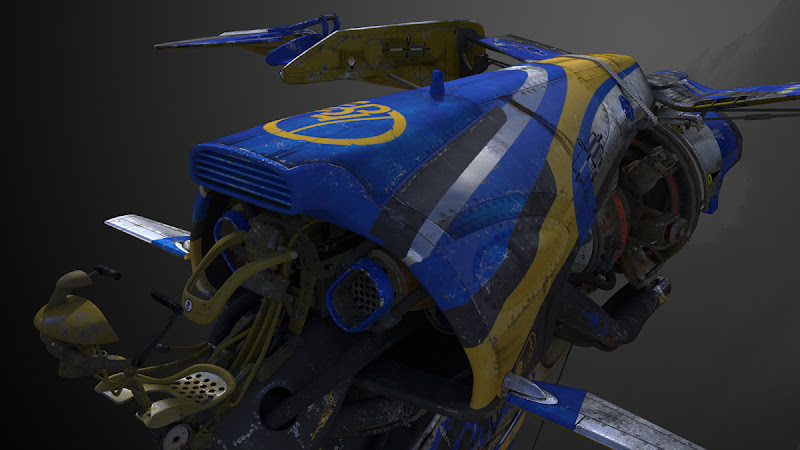 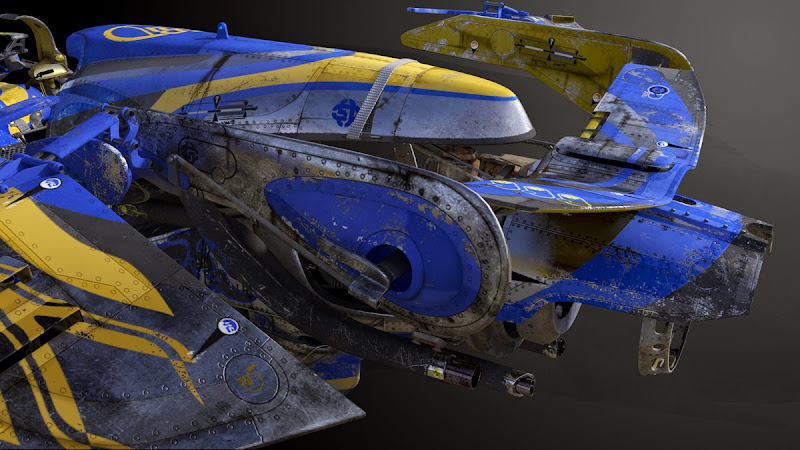 I don't want it all over i want the silver to shine through like in the pictures So what do you think now chaps Gag |
|
|
|
Post by deafpanzer on Jul 2, 2013 19:59:35 GMT -5
WHOA! I think I have fallen in love...
|
|
|
|
Post by dupes on Jul 2, 2013 21:01:14 GMT -5
What. Is. This.  |
|
|
|
Post by dupes on Jul 2, 2013 21:03:45 GMT -5
Spent a bunch of time googling things like "spacecraft camo" and variations on that...a lot of what I came up with is splinter-y type things like Dicky suggested (a la WWI/II battleships)
Another idea might be some sort of shape overlaid on the top, vaguely Klingon bird-of-prey-esque?
Then of course this colorful thing you've got going on up here is just ridiculous. Anything along those lines you could pull off? Going to need a lot of paint! (Probably a new compressor, too, at this rate)
|
|
wetsellery
Full Member
Member since: June 2013
Posts: 130 
|
Post by wetsellery on Jul 3, 2013 2:56:04 GMT -5
WOW ! You take scratchbuilding to a whole new level. I've never seen so much "home-made" details on a model.
Great work.
|
|
thenylongag
Full Member
Sept2013 MoM Winner
Member since: June 2012
Yes, we have 'NO' bananas
Posts: 304
Jun 7, 2012 11:20:57 GMT -5
Jun 7, 2012 11:20:57 GMT -5
|
Post by thenylongag on Jul 3, 2013 6:20:00 GMT -5
What. Is. This. Thanks for the suggestions brothers. In my search for ideas regarding colour and shape i googled concept spaceships, i looked at thousands of picture until one day i saw these colours and, like you Andy, i was in love. I had my colours. And that is how i came across this guy, he did some design work for the Star Wars prequels coliewertz.com/You have to check out his stuff, it really is very cool indeed I think i might have a plan, it just came to me this morning So stay tuned Gagsterman |
|
Tony Thunder
Full Member
Member since: January 2012
Posts: 591
Jan 30, 2012 18:22:10 GMT -5
Jan 30, 2012 18:22:10 GMT -5
|
Post by Tony Thunder on Jul 3, 2013 6:55:26 GMT -5
Yep its time for a WOW!

|
|
legend
Full Member
Member since: November 2011
Posts: 577
Nov 30, 2011 13:49:32 GMT -5
Nov 30, 2011 13:49:32 GMT -5
|
Post by legend on Jul 4, 2013 1:23:31 GMT -5
Lost for words mate!!!!!! wow!
bill
|
|
thenylongag
Full Member
Sept2013 MoM Winner
Member since: June 2012
Yes, we have 'NO' bananas
Posts: 304
Jun 7, 2012 11:20:57 GMT -5
Jun 7, 2012 11:20:57 GMT -5
|
Post by thenylongag on Jul 5, 2013 16:38:14 GMT -5
Afternoon Brothers Thanks for stopping by everyone On thursday at work i printed, 4 to a page, plan view pictures of the ship and have 15 variations so far just using a yellow marker and a blue marker to try an get the final design in my head. No luck so far  If i haven't got anything soon i might post the picture so the brother hood can all have a go, make it a mini-competition out of it. I'll just keep trying. But now on with the fun, painting....yippee(sarcastic)  Masking, painting, masking, painting, masking, painting......etc. Yippee Pix 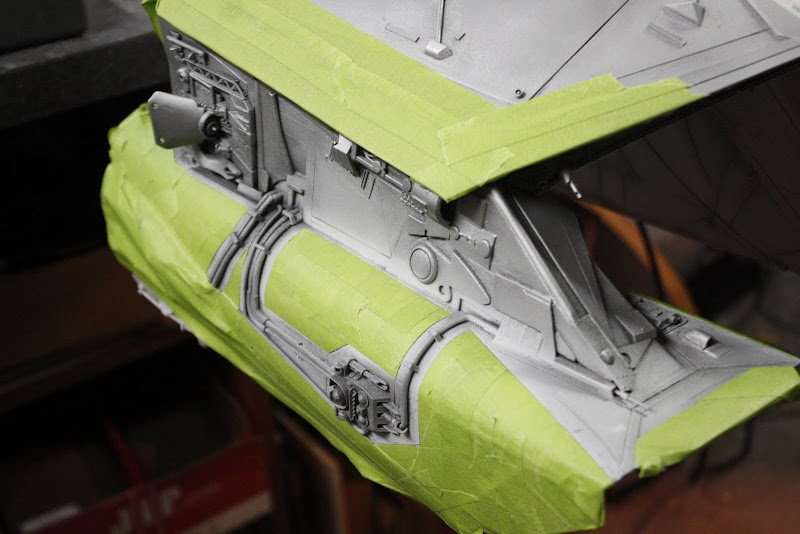 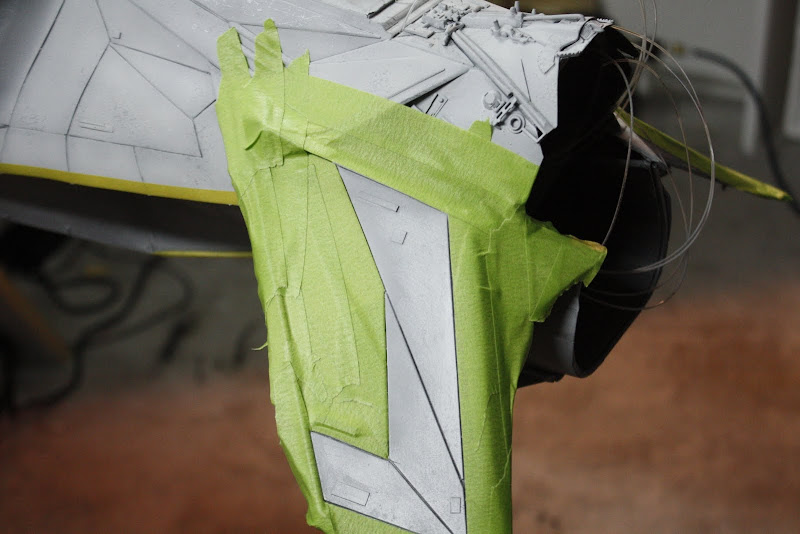 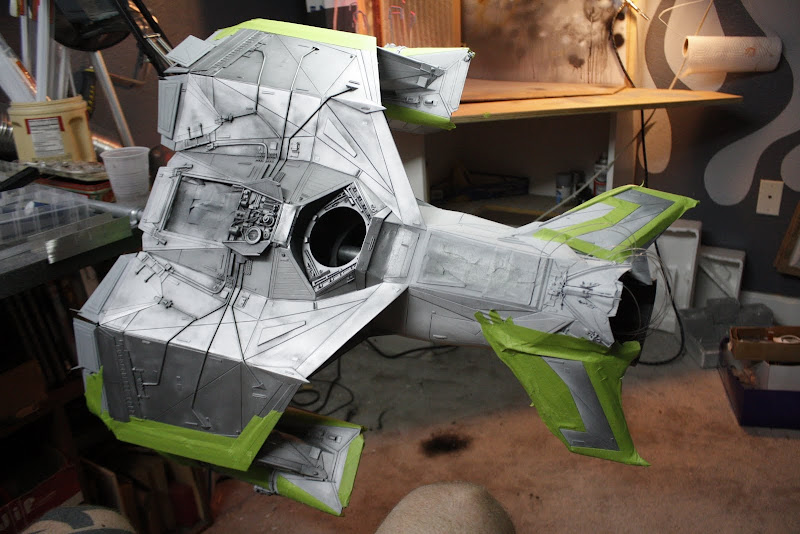 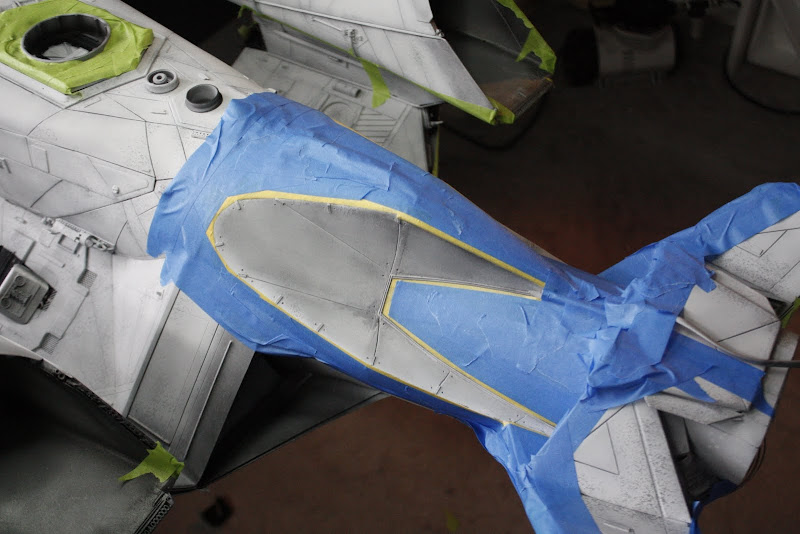 Wanted the cut out to be a bit different from everything else. A pre-shade with flat black 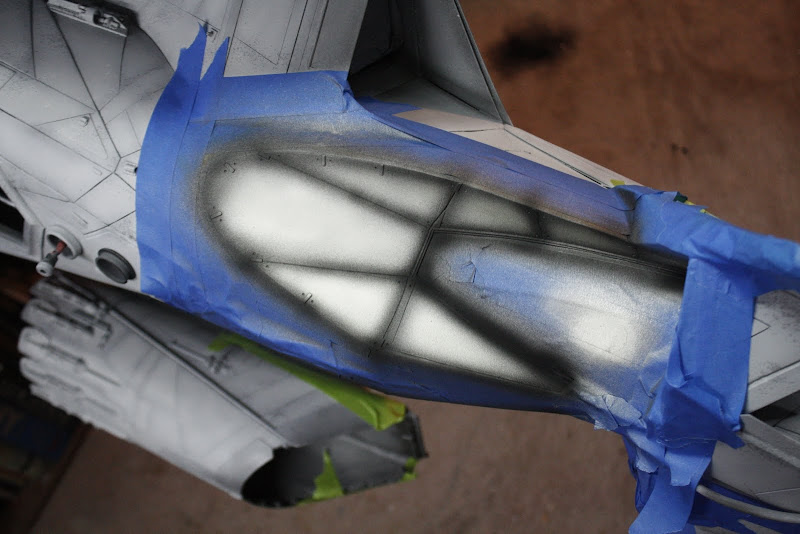 Then a base coat from the center of each panel with Titanium silver (X-32) and a very fine dust with Crome silver (X-11)   Masking removed  Then did a bit more work on the Airlock also gave this a quick blast with the Titanium silver and a bit of fine shading with some flat black 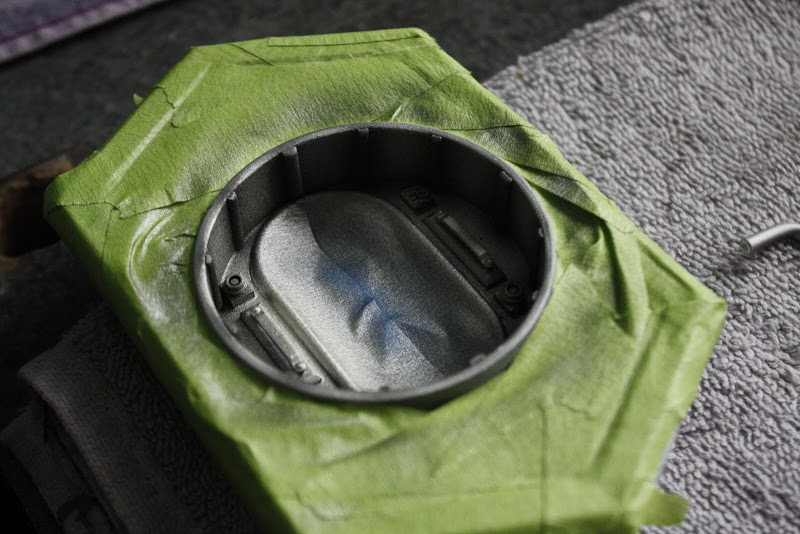 Removed the masking and did some detail painting with a brush 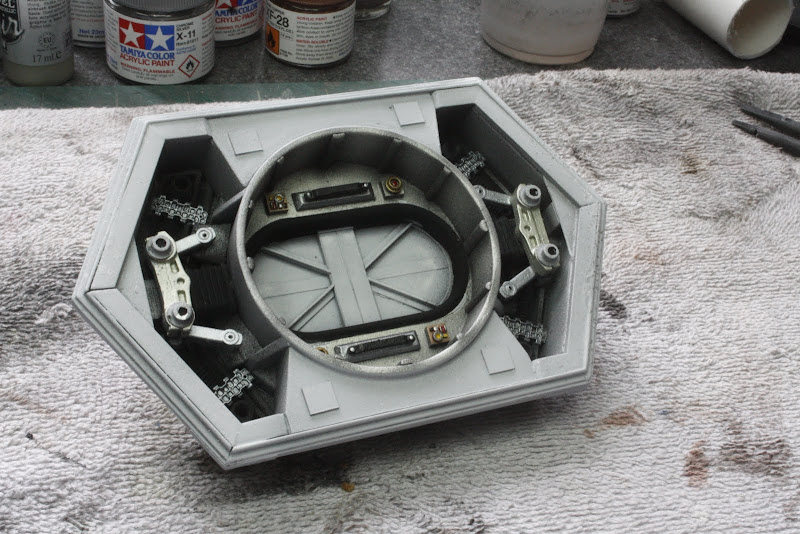 Then applied masking for the other part of the cutout  Then a very similar process as before, pre-shade  Then fill in each panel from the center out again, this time with metallic grey (XF-56) and a light dust with Crome silver (X-11)  Then free handed some exhaust outlet pipes  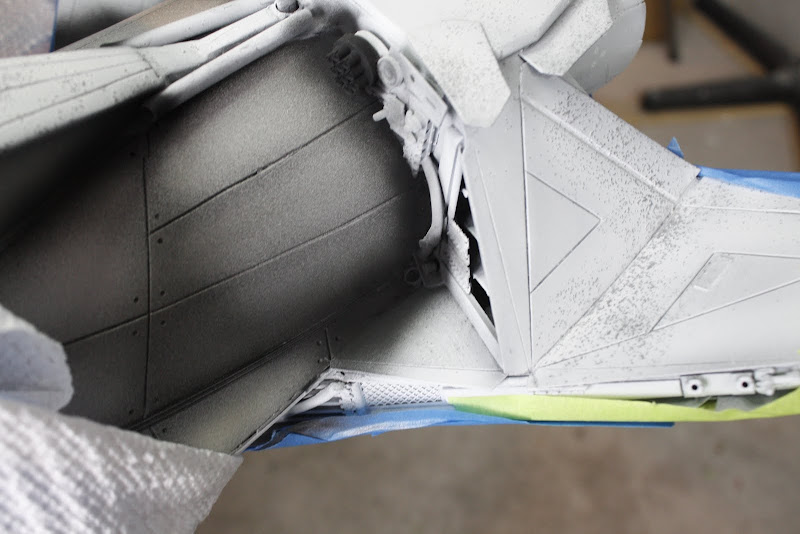 Then i started pre-shading the sides and the front winglets ready for their 'panelling' to be painted  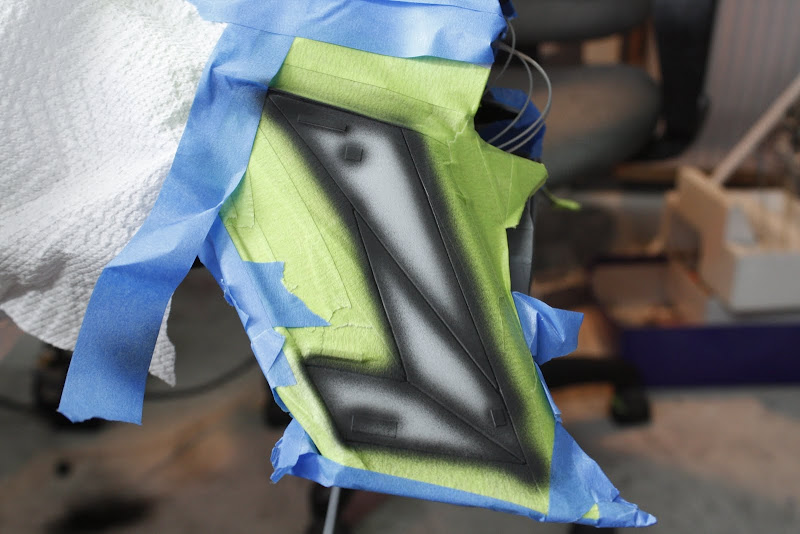 Noticed a tiny bit of overspray on the underside so i wraped her up this time. 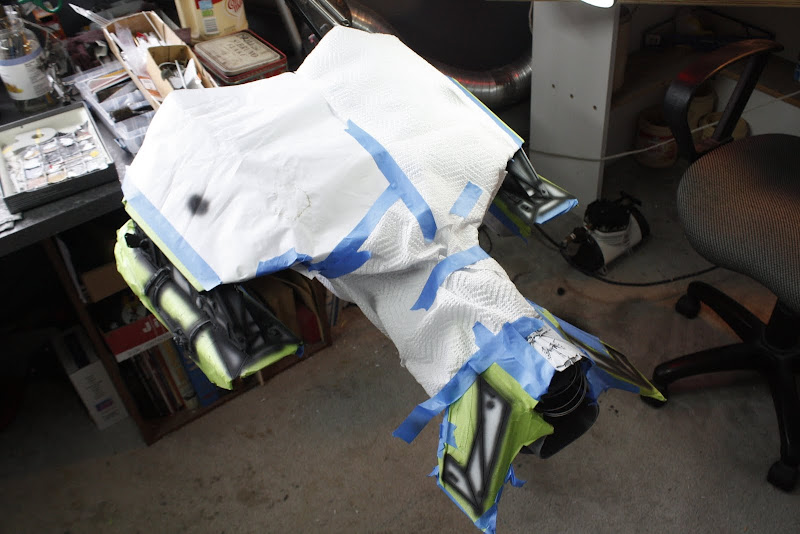 I'm pretty pleased with the progress so far, i'm just experiencing some problems with my airbrush spitting water when it gets to hot, i have a separator, which i drain regularly but it doesn't seem to help  But anyhoo, if the problem persists i'll go and get my craftsman from the garage, that has a tank and a regulator, because at this stage i cant have water stains spoiling me paint job ;D Take care Gag |
|
thenylongag
Full Member
Sept2013 MoM Winner
Member since: June 2012
Yes, we have 'NO' bananas
Posts: 304
Jun 7, 2012 11:20:57 GMT -5
Jun 7, 2012 11:20:57 GMT -5
|
Post by thenylongag on Jul 5, 2013 17:25:24 GMT -5
I have a moisture trap on the comp outlet and one on my AB Gag and it's a constant emptying job....great work here. I'm kinda glad you're struggling to work out a scheme for this - such a stunning build deserves exactly the right paintjob and just 'rushing in' there and whacking some colour on would be tantamount to criminal activity Personally I like the idea of gettin' the guys to volunteer some schemes onto your drawings and whilst I'm sure no one would necessarily come up with the perfect idea the suggestions would reap benefits I'm sure and you could possibly combine several approaches eh? Ok, Dicky, you convinced me mucker, here is the plan view 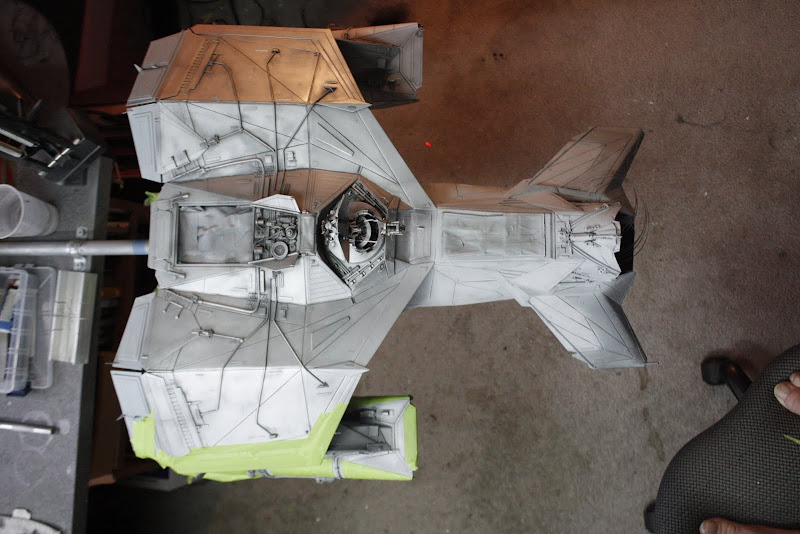 The colours are Tamiya spray cans, TS-44 brilliant blue and TS-34 Camel yellow, you don't have to be exact,obviously, but that will tell you the type of blue and yellow i will be using. Here are the reference pictures again. 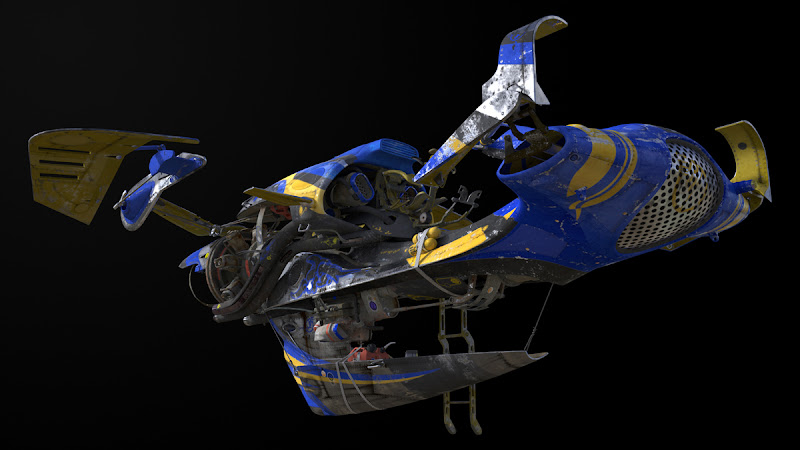 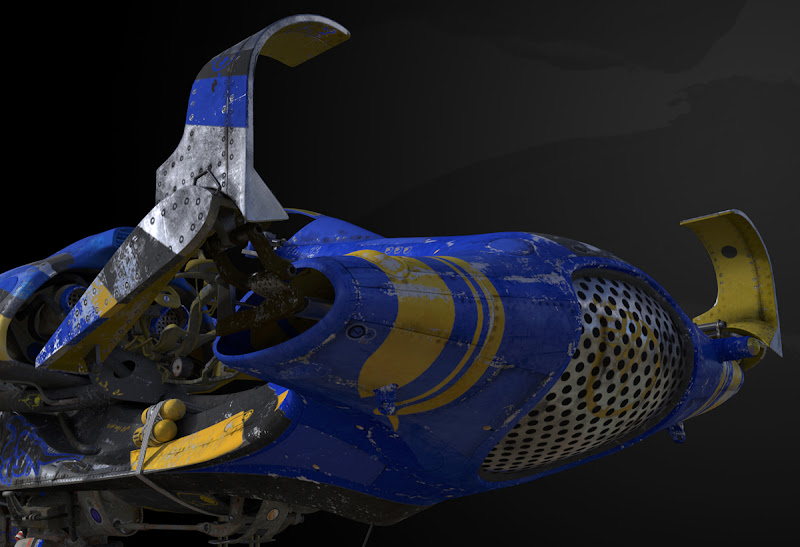 Ideally, i would like more silver to show through but just 'go for it' chaps, i will be extremely grateful to you for any ideas that you give me. If i use some part of your design or all of your design or non of your design there will be a prize for the best one. Gag |
|
|
|
Post by Leon on Jul 5, 2013 19:25:38 GMT -5
Gag,i defo like the blue and yellow scheme. |
|
thenylongag
Full Member
Sept2013 MoM Winner
Member since: June 2012
Yes, we have 'NO' bananas
Posts: 304
Jun 7, 2012 11:20:57 GMT -5
Jun 7, 2012 11:20:57 GMT -5
|
Post by thenylongag on Jul 8, 2013 7:58:40 GMT -5
Morning Everyone Thanks for stopping by to Mask-Fest 2013, I'm seriously regretting not buying shares in a masking tape company at this point. I don't know how many rolls i've used, all i know is i've bought three in the last 4 weeks. On with the mask..........I mean painting. Because i'm heavy handed and rubbish at painting i managed to obliterate my pre-shading. So, i decided to change my plans and just build up 'metalised' panel details on the outer engine support then go in with a brush to pick out smaller details. Titanium silver Pre-shade, Now you see it.  Now you don't 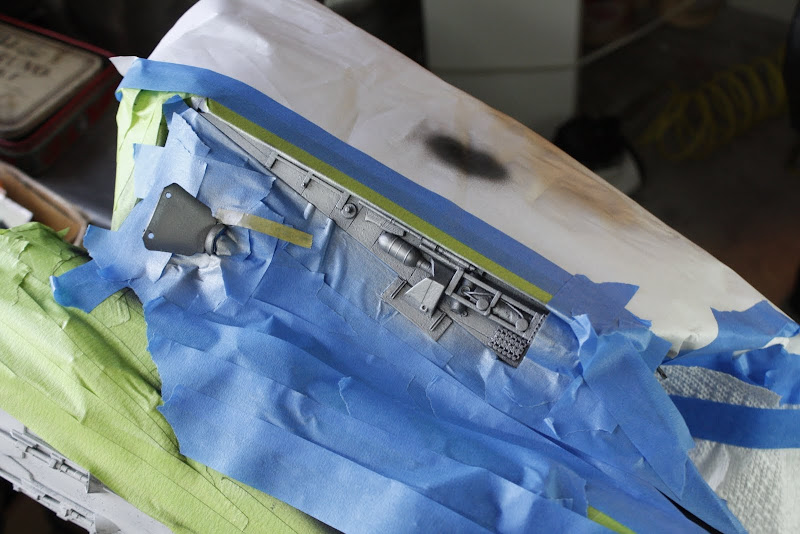 Flat aluminium 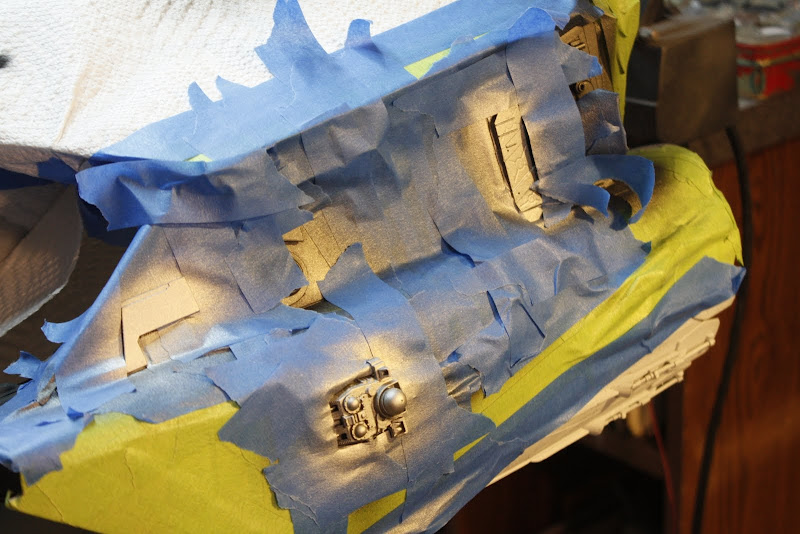 Crome silver 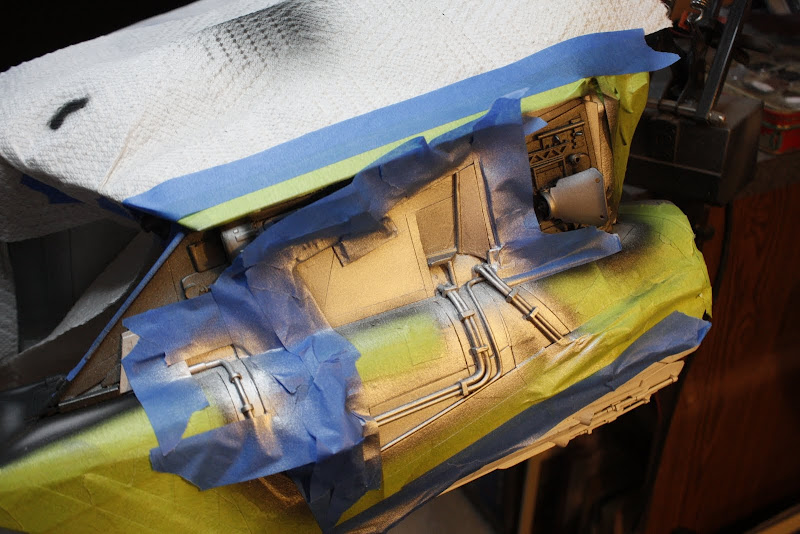 Also did a gun metal pass but didn't take a picture I then i brushed steel, bright brass and gold to pick out various details. I removed all the masking and was left with this. A good base for the weathering but not 100% sure i like it.    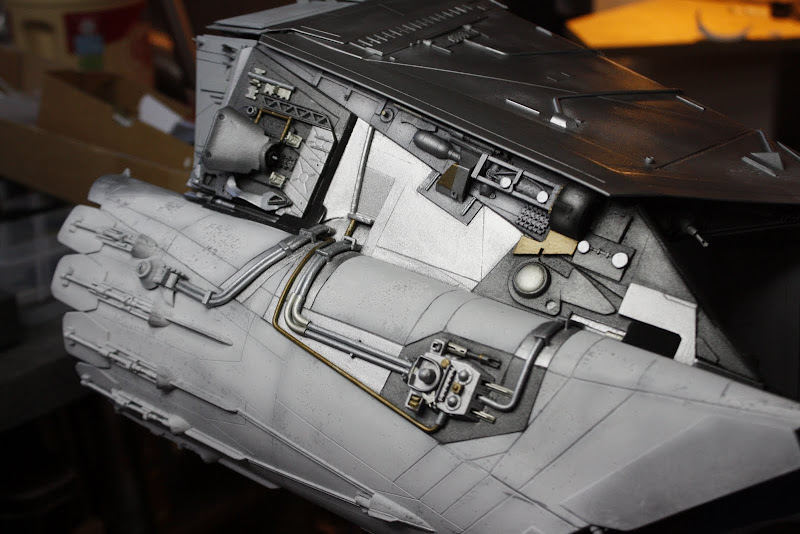 The leading edge panel on both the main wings and front wings will be done with alclad chrome, also a few of the leading edge panels on the engine fairing will also be alclad. I think the contrast will look cool between the chipped grey and the raw metal panels finish and the bright polished leading edge and on top of that there will be a 2 coloured pattern on the upper wing surfaces. What do you guys think, do you think i should overspray the sides with more chipped grey or leave it as is? I do like that its a bit different and not your average space ship grey, but does it look 'wrong' to you guys? Let me know what you think because I am on the fence a bit with this and would appreciate some input. That's all for now folks Till next time, take care Gag out. (heavy Weight Masking Champion of the World) |
|
thenylongag
Full Member
Sept2013 MoM Winner
Member since: June 2012
Yes, we have 'NO' bananas
Posts: 304
Jun 7, 2012 11:20:57 GMT -5
Jun 7, 2012 11:20:57 GMT -5
|
Post by thenylongag on Jul 14, 2013 18:00:55 GMT -5
Evenin All, Had a very busy weekend on the MK.1 The painting continues, lets have a look see I did some prep for the hitch 'dumbell' This is going to be painted with Alclad chrome so first i had to get all the pieces together A washing up bottle lid, two vodka pouring spouts, hollowed out and put back to back and two clear christmas tree decorations, one with a hole all the way through and the other with just a hole one side. I then sanded the balls to remove seam lines and give them a uniform finish.   Then hit them with primer, Mmmmmmmmmmm primer  And finally with Alclad gloss black  I then did a bit of detail painting of the pump assembly on the top of the wing. I first masked of the area 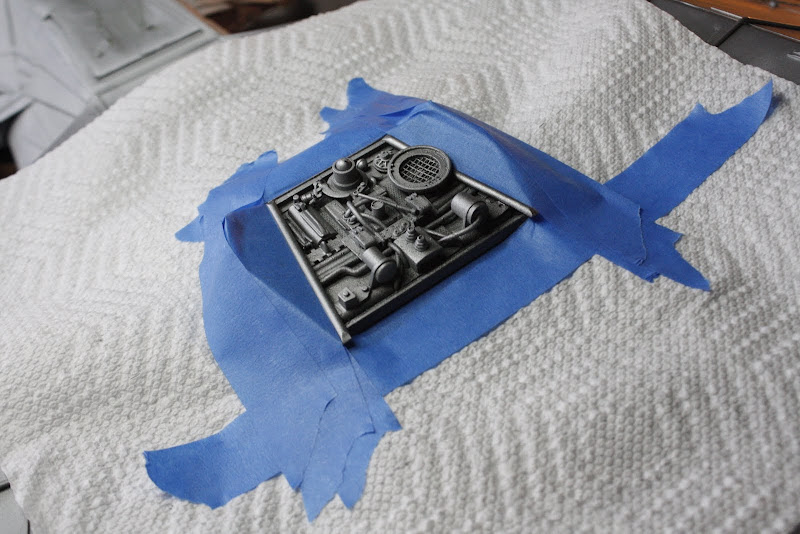 Then painted the whole thing with Titanium silver, i then picked out the details with gold, black, copper, steel and chrome silver 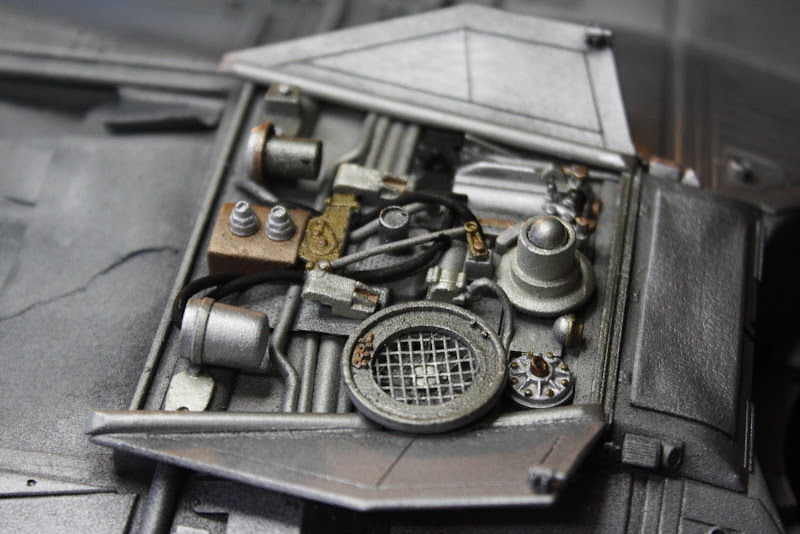 Next was the main wing top panels but first i had to attach the rear flap assemblies, i did this with some tiny screws. I was during this process i discovered that i had lost one of my small assemblies designed to hide the large screw that holds the engine fairing on. i looked everywhere but couldn't find it so i had to make some new ones from tubing and some styrene detail pieces and a tank track After i gave it a coat of flat black it blends in ok, you can see the screw but it doesn't look to bad 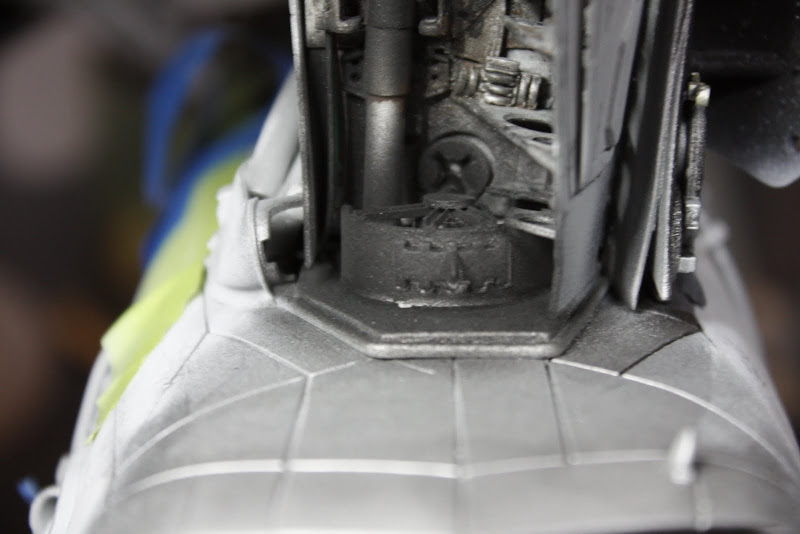 ![]() [/img] 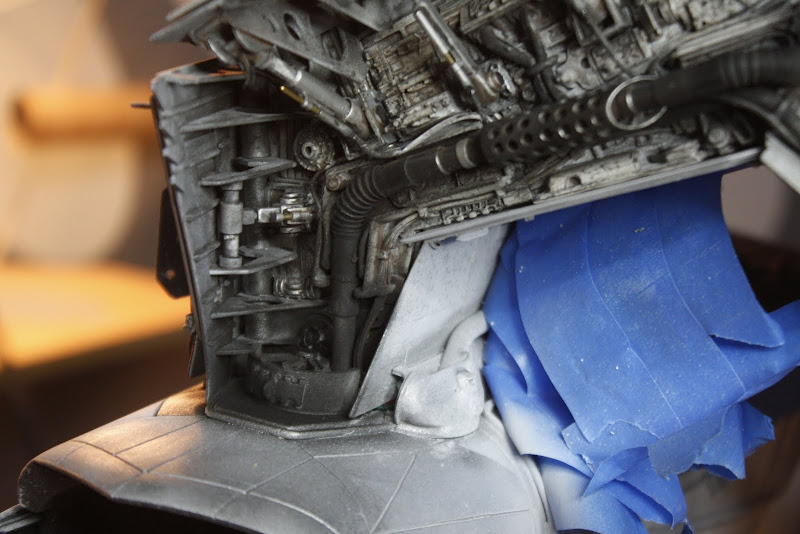 Then it was on with the main panels, the idea was to mask off different sets and hit them with a different process and colour combo each time. I first did some of the flap control details. Mask  Paint with A mix of Titanium silver some gold with a splash of chrome silver 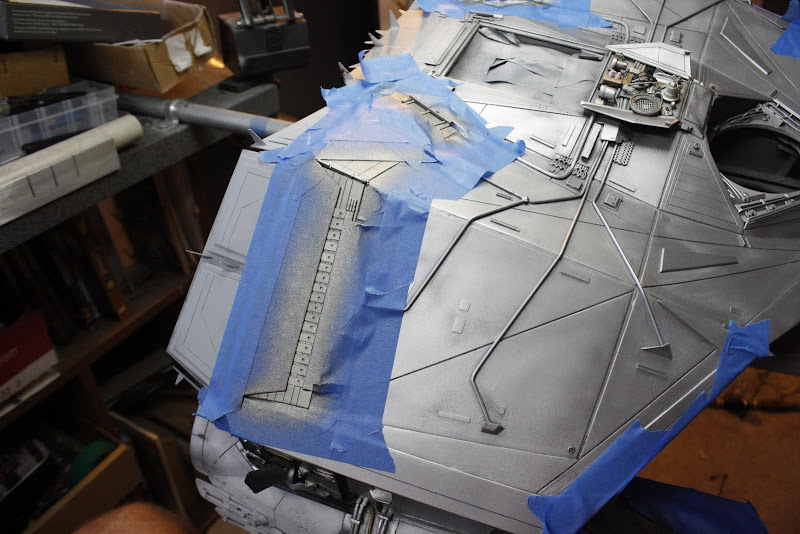 Next set, mask  Paint with metallic grey around the edges and over the pipes, that were also masked, followed by chrome silver in the middle working out then a very light dusting with steel and silver mix then another edge pass and i also picked out some details with flat black  Remove masking  Next set, Mask  Paint with metallic grey mainly on the front and outer edges of the panels and again over the pipes and flat aluminium in the center working out  De-mask, It looks very harsh in the pictures but in real life its a very subtle look with a slight difference from one set of panels to the other  Then it was on to the leading edge of both the main and front wings with a few panels on the engine fairings and around the side intakes Mask and first coat with Alclad gloss black    Then a layer of Alclad chrome.    Then this morning i removed all the masking and put the cockpit and radar assemblies on. 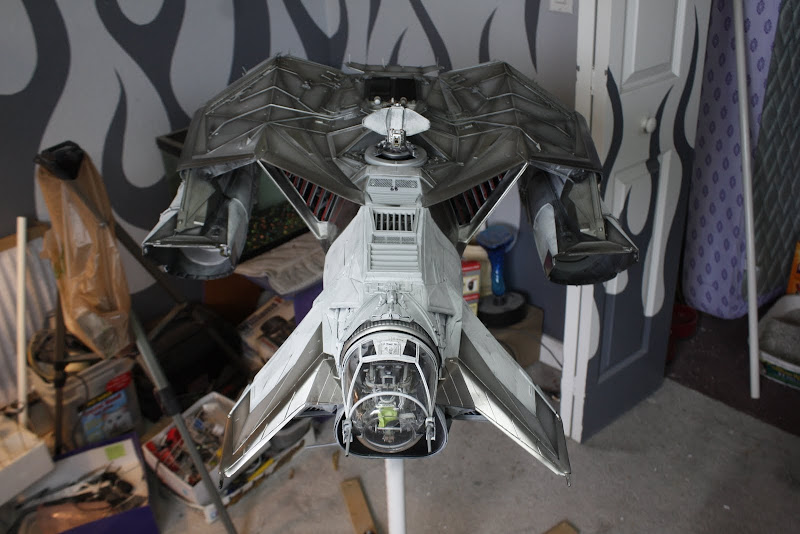   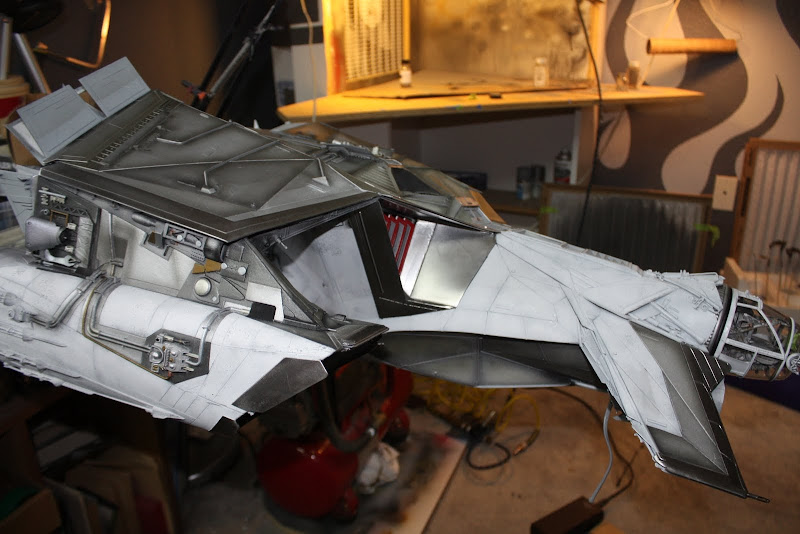 Did a few panels with different shades (mainly to hide a few sections of over spray) and finished the rear flaps with matallic grey edges and flat aluminium centers with a bit of shading with flat black. And this is what i've got now. 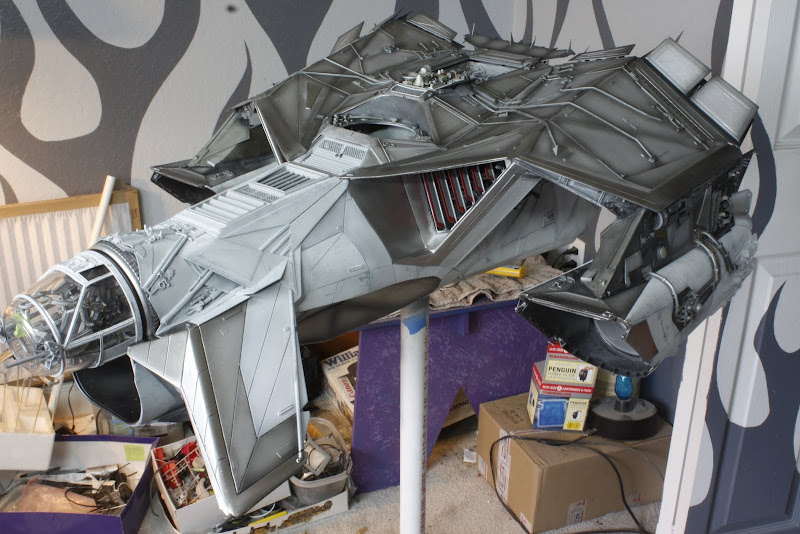   Next is to hit a few random panels with a brown wash mix. But thats next time Stay tuned my friends Take care Gagster |
|
|
|
Post by dupes on Jul 15, 2013 14:09:17 GMT -5
We don't have a "jaw dropping" emoticon, or I would use it about 3 times. Maybe 4.
|
|
Deleted
Member since: January 1970
Posts: 0
May 18, 2024 5:52:01 GMT -5
May 18, 2024 5:52:01 GMT -5
|
Post by Deleted on Jul 15, 2013 14:23:05 GMT -5
If you don't already work for a Film Studio, then you missed your calling! Fantastic scratch building!!
|
|
|
|
Post by deafpanzer on Jul 16, 2013 12:58:49 GMT -5
Catching up here... now I am very afraid to ask you how many rolls of tapes did you use so far? LOL Still following your build with keen interest!
|
|
stevereid
Full Member
Member since: November 2011
Posts: 556
Nov 16, 2011 16:17:33 GMT -5
Nov 16, 2011 16:17:33 GMT -5
|
Post by stevereid on Jul 16, 2013 13:08:55 GMT -5
Gagster-
modeling like this takes exceptional ability in several areas. Project management for one!
It impresses me that modelers on your level can envision something like this and then pull it off. If I were to list all of the skills required to do this, scratchbuilding (macro and micro), painting, working with clear plastic, cockpit detailing, lighting, etc, etc, etc.
I have some of these skills- but your skills are superior in all categories. This is amazing really!
Steve
|
|
madairbrush
Full Member
November 2012 MoM Winner
Member since: May 2012
Cheers!! Matt
Posts: 488
May 30, 2012 14:22:05 GMT -5
May 30, 2012 14:22:05 GMT -5
|
Post by madairbrush on Jul 16, 2013 15:07:47 GMT -5
This is just insane!! It looks better and better.
|
|
venom1
Full Member
Member since: October 2012
Posts: 1,369
Oct 10, 2012 2:40:03 GMT -5
Oct 10, 2012 2:40:03 GMT -5
|
Post by venom1 on Jul 17, 2013 9:31:38 GMT -5
|
|
bbrowniii
Full Member
Member since: March 2012
If you are not part of the solution, you are part of the precipitate.
Posts: 1,233
Mar 25, 2012 22:08:04 GMT -5
Mar 25, 2012 22:08:04 GMT -5
|
Post by bbrowniii on Jul 17, 2013 19:22:26 GMT -5
Yeah, I think Sam summed it up... |
|
thenylongag
Full Member
Sept2013 MoM Winner
Member since: June 2012
Yes, we have 'NO' bananas
Posts: 304
Jun 7, 2012 11:20:57 GMT -5
Jun 7, 2012 11:20:57 GMT -5
|
Post by thenylongag on Jul 18, 2013 20:03:31 GMT -5
Evenin Every Peeps, Thank you for the comments, at this stage, more than ever, i appreciate everyone who takes the time to leave a message. Its getting close to crunch time and i am nervous because i could really bugger this up if i don't chose the appropriate final paint pattern. Only i can decide, i have done maybe 35-40 variations but nothing has 'spoken' to me, yet. But thats later, First, we must do some touch ups. I seem to of missed this back section entirely whilst painting, to much Voddy maybe. So i was back to the usual routine, mask. 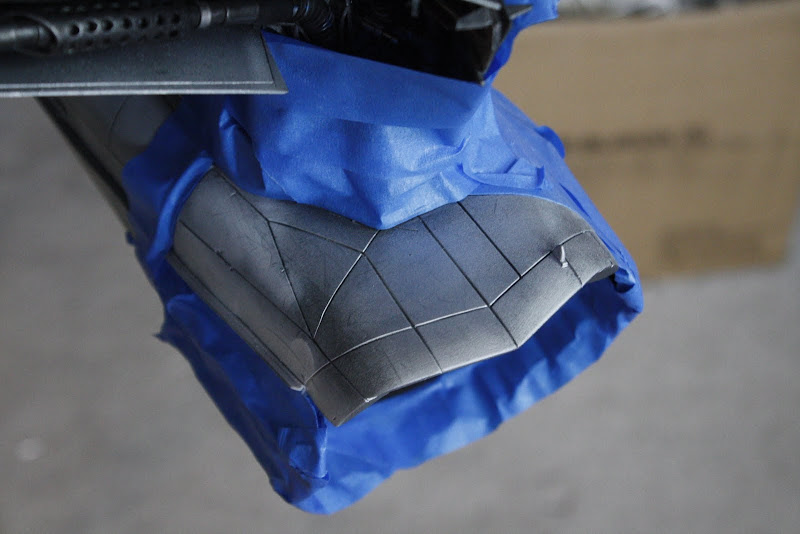 Base colour of metallic grey 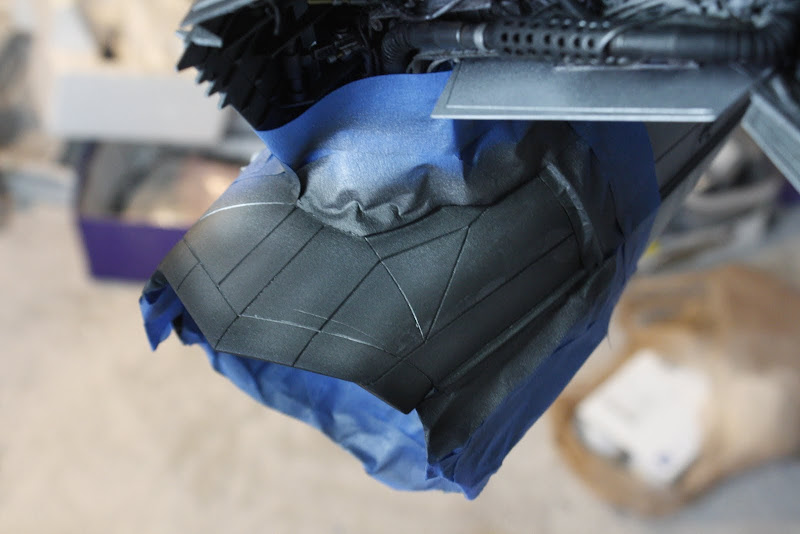 Matt black 'scorch' marks 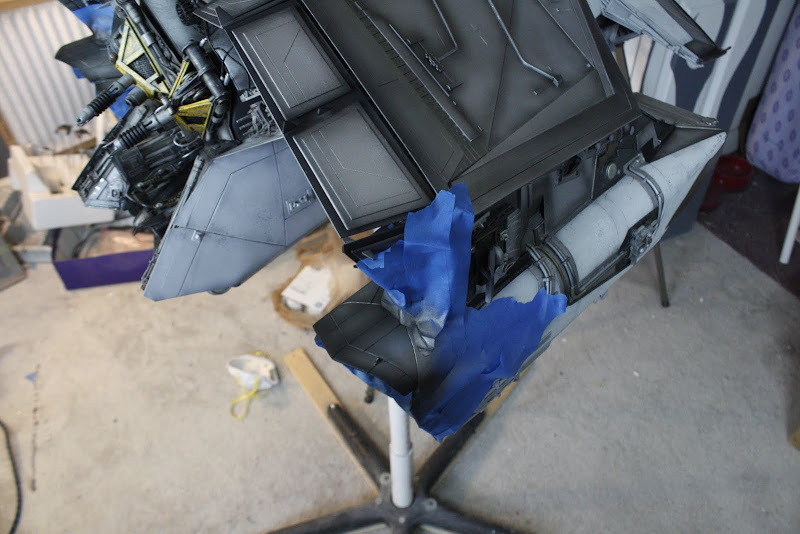 De-mask  I then masked off various random panels and gave them a light shot with some different shades of grey. 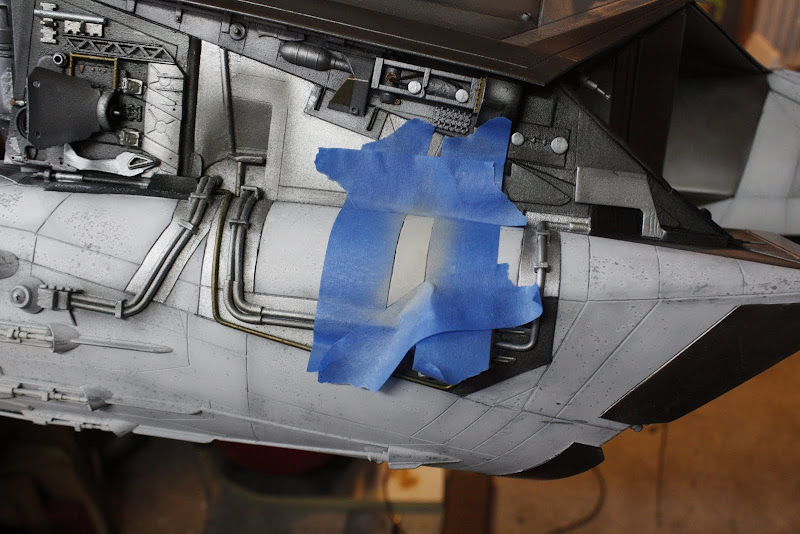  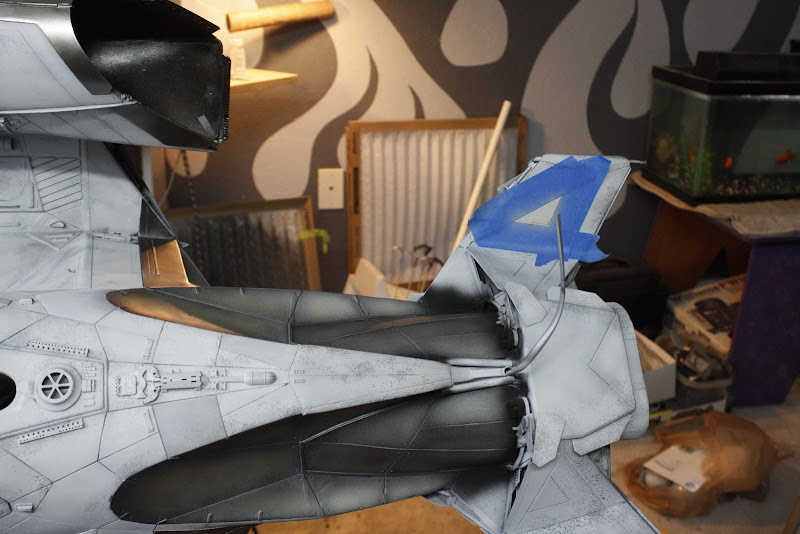 After looking at the ship for quite some time i decided something didn't flow right, in this picture there seemed to me that there was a deffinate disconnect between the front wing section and the main wing section Can you see what i mean. 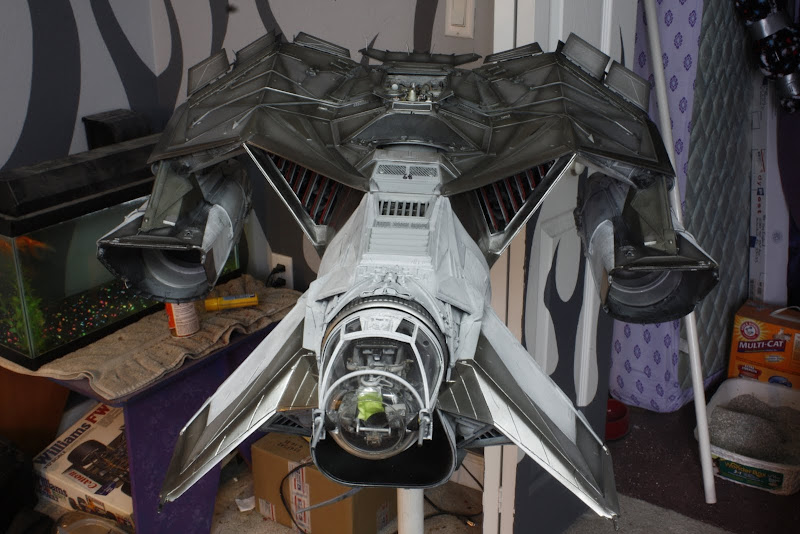 So i masked off the small intake section on the front and gave it the metallic grey edge, crome silver center, matt black low lights treatment 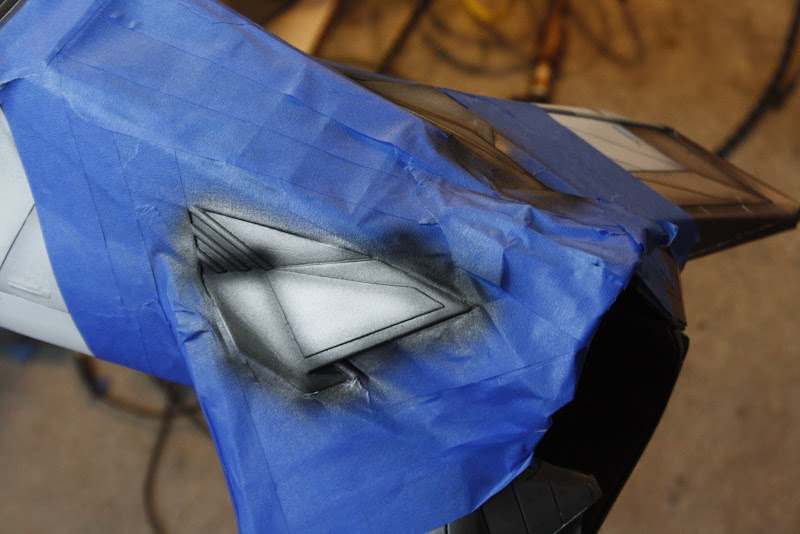 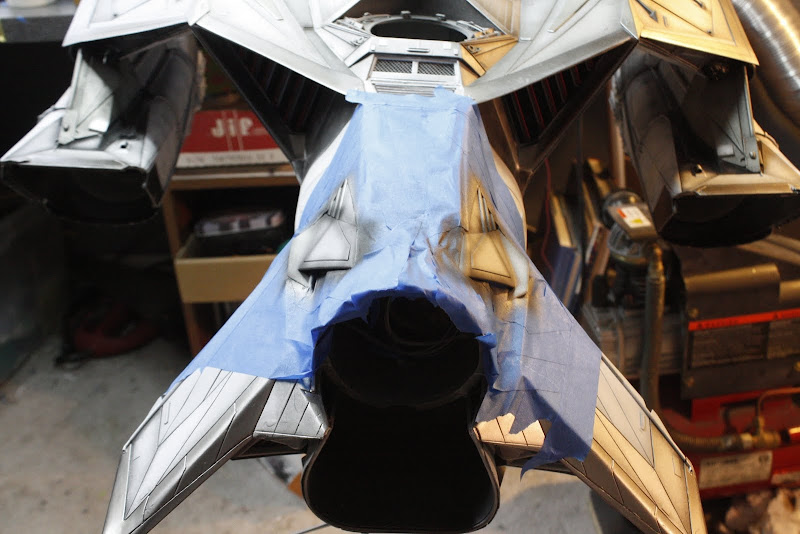 I then masked the top vents, inserting a piece of paper to cover the inside details, gave them a shot of gloss black then some Alclad chrome.  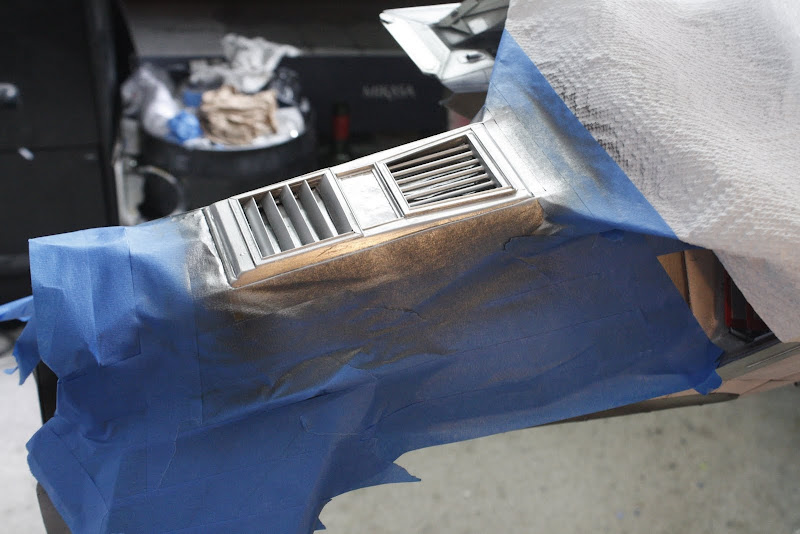 Then did the same for the rear grill 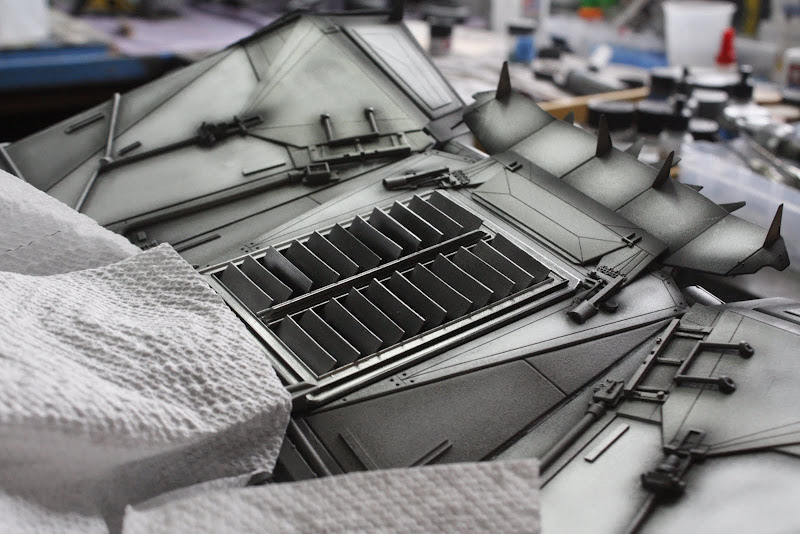 Personally, i think it looks better 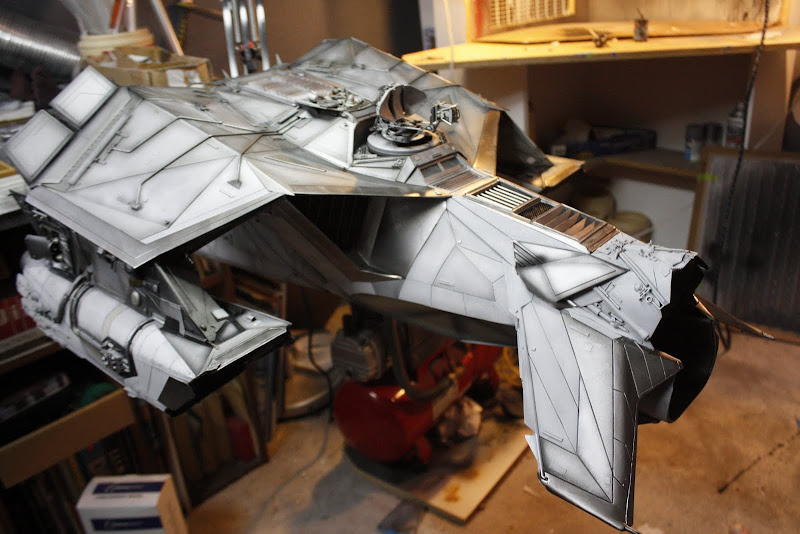 Now comes the tricky bit. I added some yellow and blue masking tape to represent my favourite pattern idea so far I don't want to cover the rear upper wing details with the colour but i do want it to be an interesting shape and not just boring pin stripe lines, i think they have to be straight as curved just looks random and wrong to me. I figure that 'Kiko', my pilot, is an individual dude (like me) and wants some colour on his ride he's handy with a spray gun so he can custom paint it himself but he appreciates the asthetic lines of the ship so wants to compliment them and not destract from them. Got it, piece of cake right. I need opinions folks, this is driving me crazy, i am, quite literally, losing sleep over this. I think i have an overactive brain. Help me people Best design (so far) done with tape. 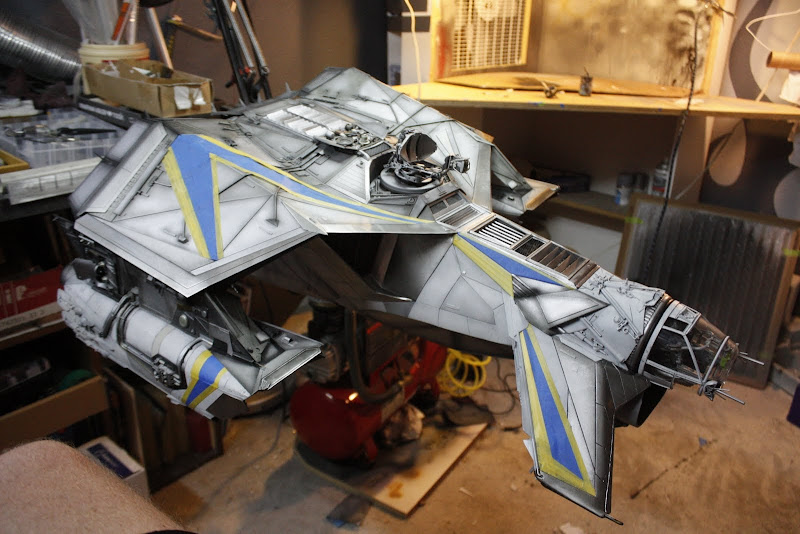 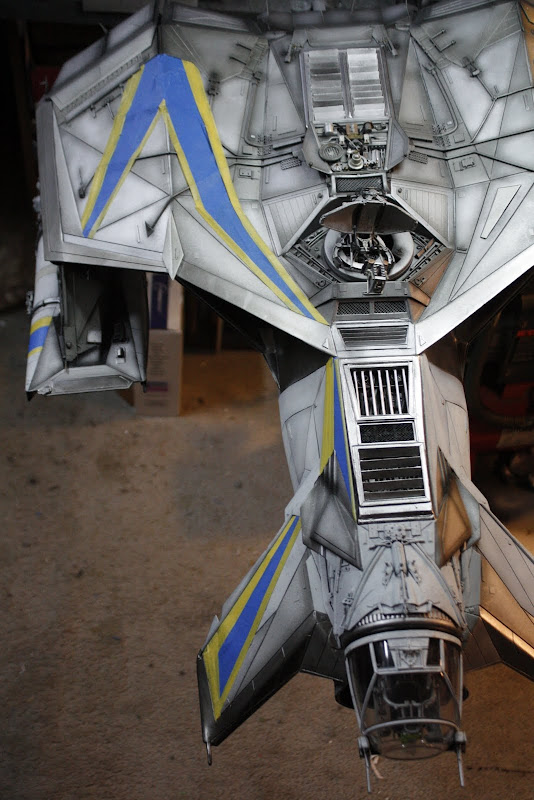 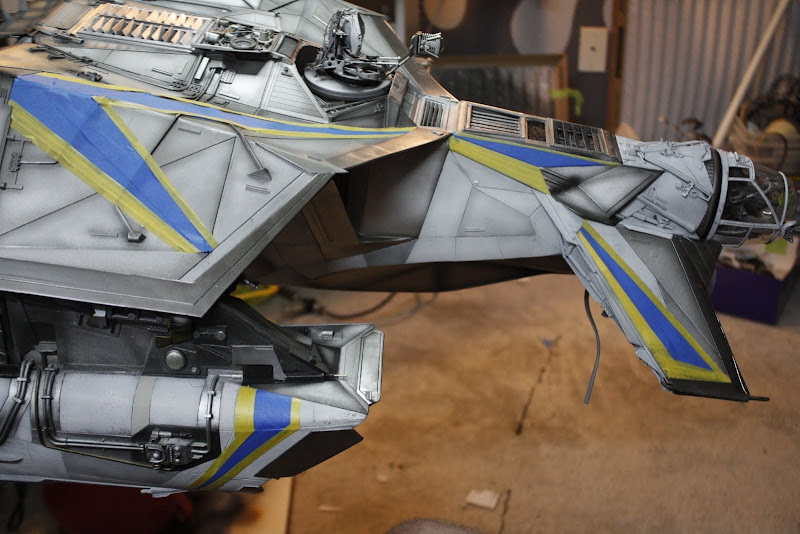 The missus is in Vegas for a few days with work so i'm 'Home Alone' till early Monday morning, so if i'm not at my bench, i'm gunna be sleepin or cookin, or i might go to the movies to see Pacific Rim tomorrow morning for a bit of inspiration. You know i've never been to the movies by myself. OK people, pizzas is done, dinner time. Let the weathering begin, after a few more little odds and sods. Stay tuned my brothers and sisters Gagsterman OUT |
|
|
|
Post by Leon on Jul 18, 2013 20:30:17 GMT -5
Gag,i like the look of the blue and yellow design you have there :)just enough color so that it doesn't detract from the rest of your paint scheme ;)staying tuned in for more exciting progress. |
|
Deleted
Member since: January 1970
Posts: 0
May 18, 2024 5:52:01 GMT -5
May 18, 2024 5:52:01 GMT -5
|
Post by Deleted on Jul 18, 2013 22:30:15 GMT -5
That is spectacular!
She's in Vegas eh? I shipped mine to Chicago for two weeks. The silence is deafening...........................
G
|
|


 .
. 

 .
.