johnt
Full Member
 Feb 2012 MoM and 2012 Model of the Year Winner
Member since: November 2011
Posts: 1,174
Nov 15, 2011 5:38:32 GMT -5
Nov 15, 2011 5:38:32 GMT -5
|
Post by johnt on Nov 26, 2012 10:30:09 GMT -5
Hi Bill nice T34 mate! And thanks for your expalining the processes you used.  Cheers JT |
|
|
|
Post by wbill76 on Nov 26, 2012 12:13:45 GMT -5
Tony, dots are what makes the world go 'round! Wouter, thanks as well, glad you like where this one's headed. Rob, MKs of course! Tracks are built already, just need to get them painted and ready for the pigment process. I'm also debating with myself whether or not to apply a thinned white filter/wash to the rubber portions of the wheels as a foundation for the pigment weathering to give a little hint of snow mixed in with mud/dirt...after looking at some winter vehicle photos and seeing how dark the rubber looks now as-is, I'm thinking that might provide a nice additional layer to help bring that out some as well. Plenty of time to ponder on that this week I guess. Spud, appreciate your comments as well! JT, always happy to explain the steps in case someone else wants to try out something crazy (or how to avoid doing someting crazy depending!).
|
|
|
|
Post by wbill76 on Dec 2, 2012 20:35:22 GMT -5
Big progress to report on this build as the weathering has been completed and it has crossed the finish line! First up were the tracks, these were airbrushed with MM enamel Burnt Umber and dry-brushed with MM enamel Steel to prep them for the pigment weathering.  Next I applied a light wash of MM Flat White to the rubber portions of the road wheels to give them a little added color also in prep for the pigment weathering. The entire finish was sealed using MM Lusterless Flat in the spray can and left to sit overnight.  Pigments were applied using a dry mix of MIG Dark Mud and Russian Earth added to regular tap water with a drop of dish-washing soap added to break the surface tension and make it easy to apply with a brush. This was allowed to air dry before making additional adjustments.  I used a series of stiff bristled brushes to remove the excess pigment while wearing a sanding mask to avoid inhaling the fine particles. More adjustments were made using both wet and dry Q-tips to get things to where I wanted them.  Tracks were weathered separately using the same pigment combo and adjustment process. After the pigments were done, I went back over the track contact surfaces and lightly dry-brushed some MM Steel to show a little wear.  Then the Beute Baby got her shoes fitted and the idlers adjusted slightly to get the sag and tension needed.  The clear lenses were added to the front headlights and the glass blocks installed into the cupola. The cupola was fixed permanently in position and I also added a flexible rubber mount and RB Models brass 2m antenna as another common 'beute' feature.  Then it was time to take the walk-arounds and check for any last-minute adjustments that the camera might reveal. More finished pics can be found up in the Gallery: modelerssocialclub.proboards.com/index.cgi?board=gallery&action=display&thread=922&page=3 |
|
stevereid
Full Member
Member since: November 2011
Posts: 556
Nov 16, 2011 16:17:33 GMT -5
Nov 16, 2011 16:17:33 GMT -5
|
Post by stevereid on Dec 2, 2012 21:22:43 GMT -5
Bill-
I really enjoyed following this blog and the result is awesome!
Terrific effect you achieved with the pigments and really nice catch noticing the German antenna base on the Russian antenna pot!
More please!
Steve
|
|
bigjohn
Reviews member 
Member since: December 2011
John Hale
Posts: 3,438
Dec 21, 2011 2:17:45 GMT -5
Dec 21, 2011 2:17:45 GMT -5
|
Post by bigjohn on Dec 2, 2012 21:27:16 GMT -5
Nice Bill, Congrats on the finish! Whats next?
|
|
|
|
Post by deafpanzer on Dec 2, 2012 21:30:38 GMT -5
Another stunning work from Bill's factory!!! Weathering around the tracks and wheels look great! It is completed just in time so you can start your new build during the holidays. Of course I have to ask what will be the next victim...
|
|
|
|
Post by 406 Silverado on Dec 2, 2012 21:30:53 GMT -5
wow that looks fantastic Bill. I love the earth effects. It really stands out against the w/w, but not too much.
|
|
|
|
Post by eastrock on Dec 2, 2012 22:15:52 GMT -5
I'm with the guys, Bill  |
|
|
|
Post by bullardino on Dec 3, 2012 4:20:22 GMT -5
Wonderful T-34, Bill Thanks for sharing the mudding technique. It looks very effective and realistic. |
|
reserve
Senior Member

Member since: July 2012
Si vis pacem para bellum
Posts: 2,368
Jul 11, 2012 9:11:45 GMT -5
Jul 11, 2012 9:11:45 GMT -5
|
Post by reserve on Dec 3, 2012 10:16:57 GMT -5
As always a beautiful job, endless eye appeal here. I like in particular the way you've done the dirt/mud thing against the WW, convincing and visible yet subtle at the same time. 10+
Regards,
Mark
|
|
|
|
Post by wbill76 on Dec 3, 2012 12:29:49 GMT -5
Thanks guys, appreciate the comments! For the curious, the next victim arrived courtesy of the Black Friday sales a couple of days ago and is waiting patiently on deck for its turn during the month of December. 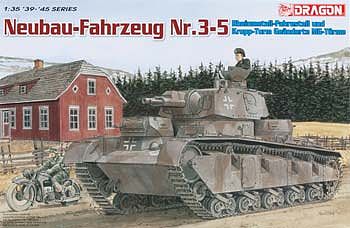 |
|
|
|
Post by tonylee on Dec 3, 2012 13:05:35 GMT -5
Not Bad Bill not bad atall  That next one should keep you busy for a week or two  Tony |
|
|
|
Post by bullardino on Dec 3, 2012 14:15:01 GMT -5
Wow, nice one Bill. I'll follow very interested, that awkward tank was absolutely useless, yet very fascinating |
|
|
|
Post by wbill76 on Dec 3, 2012 18:47:52 GMT -5
Thanks Tony! The Neubau will probably take a little bit longer...it's got more turrets! Luigi have to agree with you there...the 'land ship' style of designs that were popular in the '30s in terms of multi-turreted designs probably sounded great on paper but not so good in actual combat situations. Heavy and slow, lightly armored, etc. are not exactly redeeming qualities! Between these and the tankette designs, you often have to wonder what some of the designers were thinking when they came up with them. |
|
|
|
Post by bbd468 on Dec 3, 2012 23:43:12 GMT -5
Bill, i absolutely love this T-34....magnificent!!! Thanks guys, appreciate the comments! For the curious, the next victim arrived courtesy of the Black Friday sales a couple of days ago and is waiting patiently on deck for its turn during the month of December. OH BOY!!!  Bill, i cant wait to see this one built! I got this same kit for Christmas last year. It will be a pleasure to see it come together in your hands. When you start...IM IN!!! Gary |
|
|
|
Post by wbill76 on Dec 4, 2012 12:21:51 GMT -5
Thanks Gary! I never thought I'd see the day when a Neubau was available in styrene so when it was announced I had to wait patiently for the prices to come down to reasonable levels before snagging one. The stars aligned this sale season and I'm looking forward to it. I've already started looking through the box and was surprised that it doesn't really have that many parts, mostly because there's zero interior provided for any of the turrets and the tracks alone account for ~260 of the 'over 530' parts attributed on the box top. |
|
|
|
Post by wing_nut on Dec 4, 2012 12:25:03 GMT -5
That is just plain old plastic porn right there.
|
|
|
|
Post by wbill76 on Dec 4, 2012 12:36:07 GMT -5
LMAO Marc, have to say that's a first in terms of descriptions for a build! ;D
|
|
|
|
Post by bbd468 on Dec 4, 2012 12:51:54 GMT -5
That is just plain old plastic porn right there. ;D ;D ;D LOL ;D ;D ;D......W-N, your a word-smith! ;D Gary |
|