afvfan
Senior Member
   
Member since: December 2012
Bob
Posts: 1,772
Dec 10, 2012 17:32:38 GMT -5
Dec 10, 2012 17:32:38 GMT -5
|
Post by afvfan on Jan 19, 2014 0:54:17 GMT -5
|
|
|
|
Post by wbill76 on Jan 19, 2014 11:11:50 GMT -5
I've always loved the look of these mobile pill-box vehicles. You've done well with this one Bob! Neat camo pattern and the different color barrel adds a nice contrast touch.
|
|
|
|
Post by deafpanzer on Jan 20, 2014 0:04:01 GMT -5
Love the camo! Did the rust steaks too... great work!
|
|
afvfan
Senior Member
   
Member since: December 2012
Bob
Posts: 1,772
Dec 10, 2012 17:32:38 GMT -5
Dec 10, 2012 17:32:38 GMT -5
|
Post by afvfan on Jan 20, 2014 1:27:42 GMT -5
Bill and Andy - Thanks for taking the time to comment, guys. Glad to hear that you like what I've tried to do with it. As usual, I just can't quite get the feel of the actual model in my photographs....but I am getting closer! 
|
|
Hinksy
Full Member
  
Member since: June 2012
THE ENGLISH LIONHEART - HINKSY!
Posts: 1,016
Jun 22, 2012 16:46:21 GMT -5
Jun 22, 2012 16:46:21 GMT -5
|
Post by Hinksy on Jan 20, 2014 11:24:12 GMT -5
Nice! Great work! I've got the Dragon Sig 33 in the stash ready to go (with the interior, kit #6713 with Aluminium barrel). You asked for constructive pointers - there would have been two fine pieces of wire going around the raised hatch on top of the casemate to stop grenades getting pushed in. My new kit has these supplied but when I built my old Cyber Hobby one I used 5 Amp fuse wire. Leave the piece facing forward clear of wire though. I did the same with my original build and omitted this wiring but someone picked me up on this too. Here's my newer one (yet to be built): www.dragon-models.com/d-m-item.asp?pid=DRA6713I can't find any photos of my old build with the guard in place but here's a dodgy photo showing one with what seems to be a single wire?  Hope this helps dude! Ben  |
|
|
|
Post by dupes on Jan 20, 2014 11:29:19 GMT -5
Neat squiggly pattern!
|
|
afvfan
Senior Member
   
Member since: December 2012
Bob
Posts: 1,772
Dec 10, 2012 17:32:38 GMT -5
Dec 10, 2012 17:32:38 GMT -5
|
Post by afvfan on Jan 20, 2014 12:23:36 GMT -5
Ben - That, my friend, is exactly the kind of comment I'm looking for. I've got the perfect wire to use, and should be able to add it without a problem. While I appreciate the "looking good", "nice job" type of comments, it's stuff like this and having build mistakes pointed out, that helps me improve my skills.  That newer kit looks good. I might need to keep an eye out for one. Dupes - Glad you like the camo pattern. I really need to build something earlier, or later, and get away from the yellow/green. I think the last 3 German things I've built have been done in it.
|
|
|
|
Post by wbill76 on Jan 20, 2014 17:26:20 GMT -5
Bill and Andy - Thanks for taking the time to comment, guys. Glad to hear that you like what I've tried to do with it. As usual, I just can't quite get the feel of the actual model in my photographs....but I am getting closer!  Going by the photos you've posted Bob it looks like you're relying on natural lighting to take your photos. That's always a difficult proposition to get a 'true' rendering of the model as the light, being natural, is not controllable!  Have you thought about creating a little light tent or similar setup for yourself to take photos with? It's a easy thing to do as a DIY effort, try this link as one possible way to do it if you're interested: www.wikihow.com/Create-an-Inexpensive-Photography-Lightbox and here's another, similar, way as well: digital-photography-school.com/how-to-make-a-inexpensive-light-tent |
|
afvfan
Senior Member
   
Member since: December 2012
Bob
Posts: 1,772
Dec 10, 2012 17:32:38 GMT -5
Dec 10, 2012 17:32:38 GMT -5
|
Post by afvfan on Jan 21, 2014 0:50:04 GMT -5
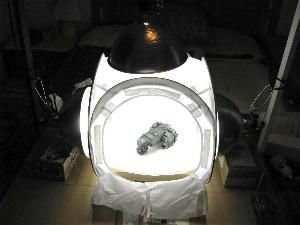
Hey Bill, I do own a light tent. I've set it up using three 150w color balanced CFMs for the light source, and am using a Canon 8meg A720 camera.... with miserable results. For some reason, I just can not get the camera settings right.  One of these days I'll stumble on the correct combination, but until then, good sunlight is my friend. Here's a picture of the set up:  |
|
afvfan
Senior Member
   
Member since: December 2012
Bob
Posts: 1,772
Dec 10, 2012 17:32:38 GMT -5
Dec 10, 2012 17:32:38 GMT -5
|
Post by afvfan on Jan 21, 2014 16:17:34 GMT -5
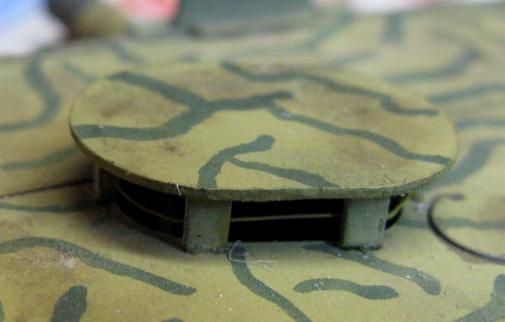
You asked for constructive pointers - there would have been two fine pieces of wire going around the raised hatch on top of the casemate to stop grenades getting pushed in. I can't find any photos of my old build with the guard in place but here's a dodgy photo showing one with what seems to be a single wire? Ben  I went with the photo you posted and just added one wire to the cover. I stripped down some light gauge speaker wire and used one of the strands out of it. It was kind of tricky getting it installed and painted with the cover already mounted. Here's a close up of it now:  |
|
|
|
Post by wbill76 on Jan 21, 2014 18:13:23 GMT -5
Hey Bill, I do own a light tent. I've set it up using three 150w color balanced CFMs for the light source, and am using a Canon 8meg A720 camera.... with miserable results. For some reason, I just can not get the camera settings right.  One of these days I'll stumble on the correct combination, but until then, good sunlight is my friend. Here's a picture of the set up:  Could be your choice of background. Have you tried a light blue instead of white? My Canon seems to prefer blue over white when it comes to the pics for whatever reason. Could also be your WB settings, usually Canon cameras allow you to use a 'custom WB' setting instead of going with a default. Those two elements could be what's undoing your efforts. |
|
afvfan
Senior Member
   
Member since: December 2012
Bob
Posts: 1,772
Dec 10, 2012 17:32:38 GMT -5
Dec 10, 2012 17:32:38 GMT -5
|
Post by afvfan on Jan 21, 2014 23:15:19 GMT -5
Thanks for the insight, Bill. When I get some time I'll play around with those factors. It'd be nice to actually use the equipment instead of having to wait for a sunny day.
|
|
Hinksy
Full Member
  
Member since: June 2012
THE ENGLISH LIONHEART - HINKSY!
Posts: 1,016
Jun 22, 2012 16:46:21 GMT -5
Jun 22, 2012 16:46:21 GMT -5
|
Post by Hinksy on Jan 22, 2014 11:09:12 GMT -5
Ben - That, my friend, is exactly the kind of comment I'm looking for. I've got the perfect wire to use, and should be able to add it without a problem. While I appreciate the "looking good", "nice job" type of comments, it's stuff like this and having build mistakes pointed out, that helps me improve my skills.  That newer kit looks good. I might need to keep an eye out for one. No problem dude! You're like me - it feels great to have the fellas say what a great build you've done BUT I always appreciate little pointers to help me with accuracy and knowledge for use on future builds I wouldn't have known about this had I not built my old Cyber Hobby Sig - iirc someone pointed the exact same thing out to me. I don't know if the wire for the viewing hatch was factory-fitted or field-fitted by the crew but I think it's an important addition as I've seen it on nigh on every Sig 33 Pz.III model I've seen. My new kit has a superb looking interior and three paint scheme options. There's a 1942 StuG.Abt.177,Stalingrad option which is just a plain Panzer Grey but some tidy work with the colour modulation could really make that plain old grey really pop. Otherwise there are a couple of other schemes for Eastern Front vehicles from 1943 involving a DY base - both from Pz.Rgt.201, 23.Pz.Div.
I am not usually into interiors but this one will have the full monty interior. A bit of scratchbuilt extras and some rounds for the gun will look great. There's no way that I can leave part of the Casemate removeable to expose the full interior as it's all part of the structure but there's the top hatch and two nice size rear hatches that can be posed open? I've already got the Winterketten Friuls for her so it's going to be a fun build. I wouldn't be surprised if it appears on my bench before long! The wire looks great my friend - I used simple 5 amp fuse wire on mine which worked great and looks to be about the same size as the wire you used. What's next up? Ben  |
|
|
|
Post by Leon on Jan 22, 2014 11:21:22 GMT -5
Great work on the SIG Bob.Really like the camo pattern.  |
|
afvfan
Senior Member
   
Member since: December 2012
Bob
Posts: 1,772
Dec 10, 2012 17:32:38 GMT -5
Dec 10, 2012 17:32:38 GMT -5
|
Post by afvfan on Jan 22, 2014 12:43:08 GMT -5
Ben - You're like me - it feels great to have the fellas say what a great build you've done BUT I always appreciate little pointers to help me with accuracy and knowledge for use on future builds - Amen to that!  I don't know if the wire for the viewing hatch was factory-fitted or field-fitted by the crew but I think it's an important addition as I've seen it on nigh on every Sig 33 Pz.III model I've seen. - It really makes sense, given the size of that hole. I'm actually surprised that they didn't have a better all around vision system on the vehicle. Talk about running blind.I am not usually into interiors but this one will have the full monty interior. A bit of scratchbuilt extras and some rounds for the gun will look great. There's no way that I can leave part of the Casemate removeable to expose the full interior as it's all part of the structure but there's the top hatch and two nice size rear hatches that can be posed open? - Maybe you could modify it to flip open, similar to what Carl did on his Sturmtiger. It just seems a shame to go through all the work doing a full interior and not be able to show it off.What's next up? - I'm piddling with a StuG F8, a Maus, and another S35 Somua while I wait for my Char 2C kit to arrive.------------------------------------------------------------------------------------------------------------------ Leon - Thanks! I appreciate the comment!
|
|