brandonk
Full Member
   Jan '24 Showcased Model Awarded
Member since: May 2023
Posts: 1,286
Member is Online
May 14, 2023 13:45:45 GMT -5
May 14, 2023 13:45:45 GMT -5
|
Post by brandonk on May 24, 2023 10:42:24 GMT -5
That is looking incredible. Great idea on the air filter. I will definitely add that to my list of tricks.
|
|
406 Silverado
Global Administrator     
Member since: November 2011
Posts: 10,263
Member is Online
MSC Staff
|
Post by 406 Silverado on May 26, 2023 5:51:47 GMT -5
That is looking incredible. Great idea on the air filter. I will definitely add that to my list of tricks. Thanks Brandon! Glad you're here man.  |
|
406 Silverado
Global Administrator     
Member since: November 2011
Posts: 10,263
Member is Online
MSC Staff
|
Post by 406 Silverado on May 29, 2023 16:37:41 GMT -5
Just moved this thread under the Group Build thread. No other progress will be made till June 1st
|
|
406 Silverado
Global Administrator     
Member since: November 2011
Posts: 10,263
Member is Online
MSC Staff
|
Post by 406 Silverado on Jun 2, 2023 8:32:57 GMT -5
OK gang. To catch everyone up on where I'm at with this build. Here is the completed LT-1 350 engine: 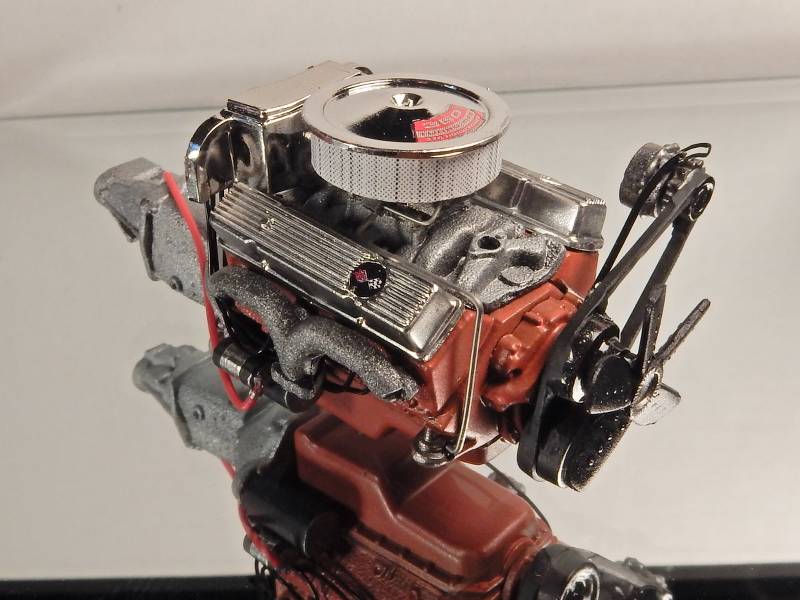  Corrected stance and wheel/ tire location repositioned inward towards the center of the car from this: 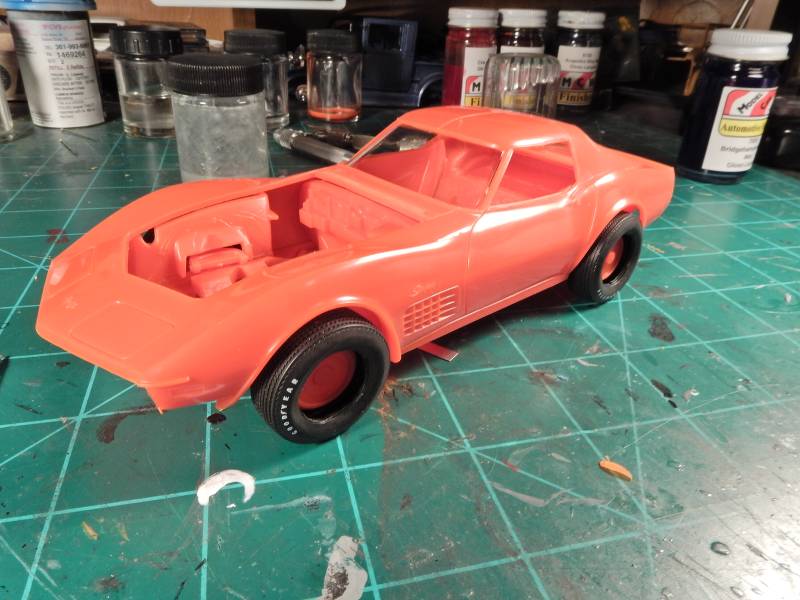 To this: 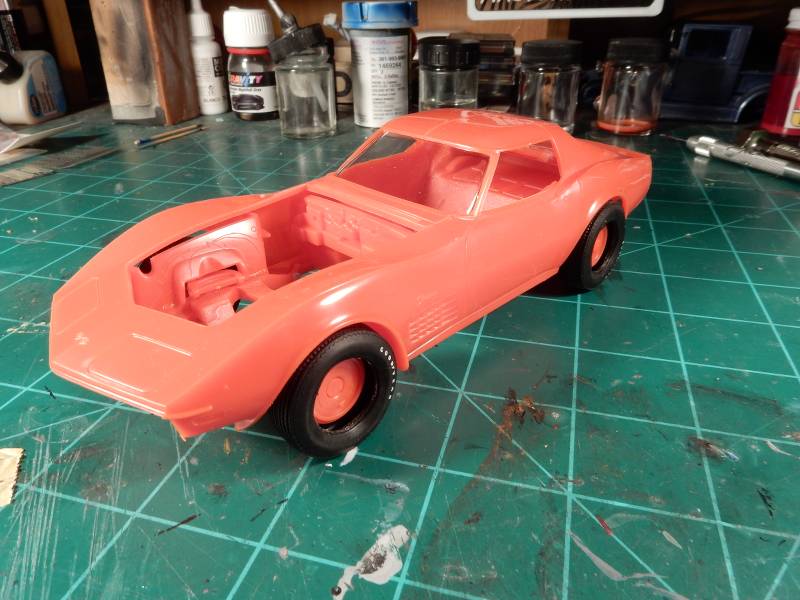 and just this morning a little progress on the interior. My OTHER favorite part of auto building. If there's one thing I cannot STAND it's molded in foot pedals. They just look so dang fake!! The fix......is to remove the toe board on the drivers side. 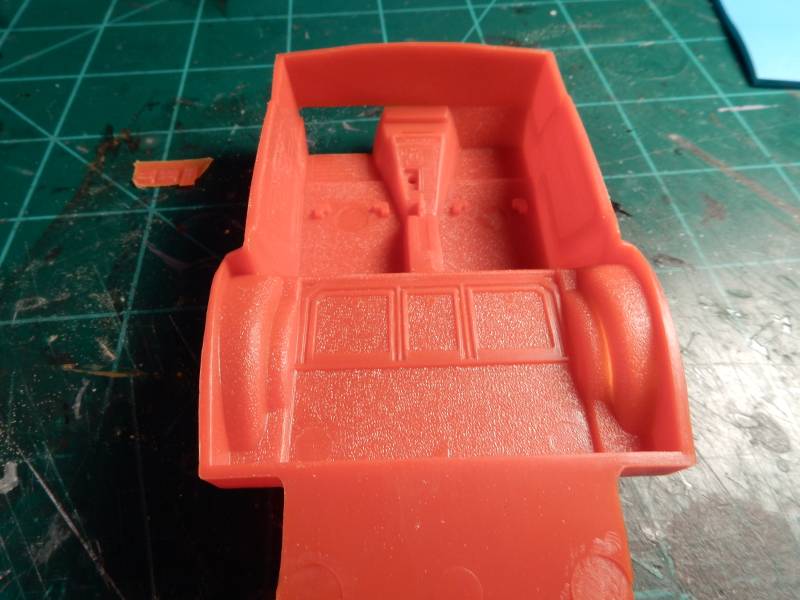 What'll happen is that I'll use either PE foot pedals or pedals from another kit and use needles as the swing levers and mount them on the back side of the dash. The following photos show this process when I built my Dyno Don Ford Maverick. The results speak for themselves.......  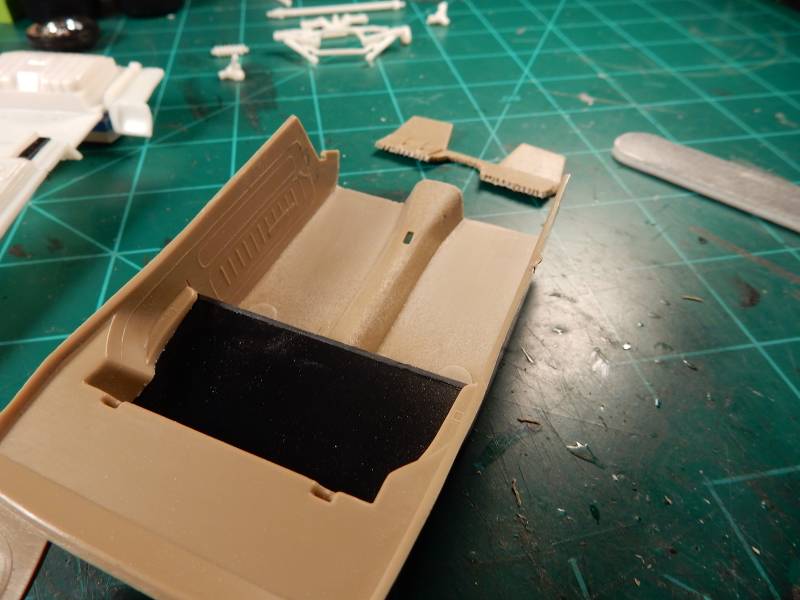 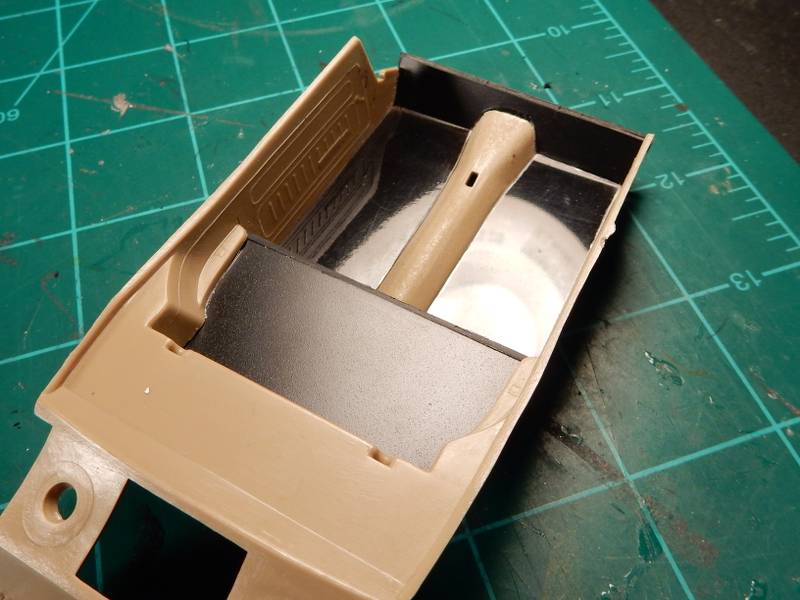 In the case of my Maverick, I used foot pedals from an AMT Mustang kit that I had  And cut the levers off leaving the pedals and using the needles pictured above for the levers 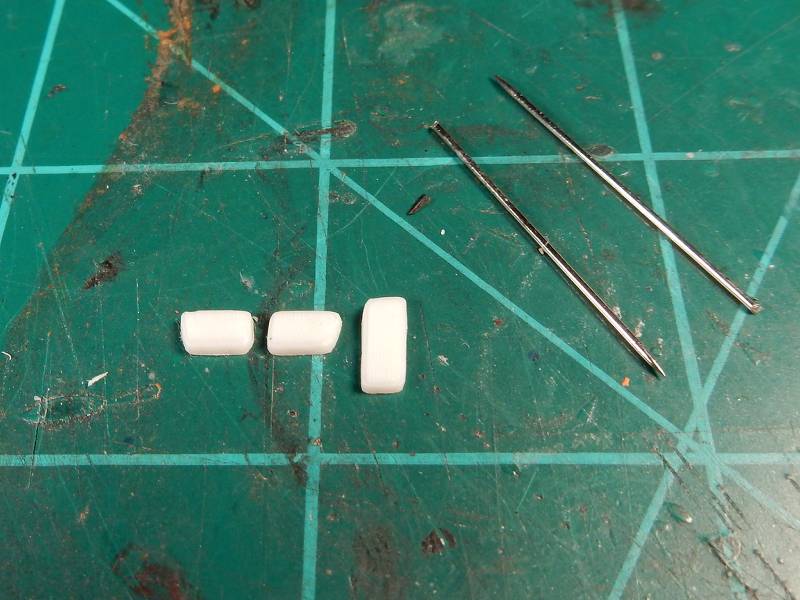 Mounted to the rear of the dash in the following shot: 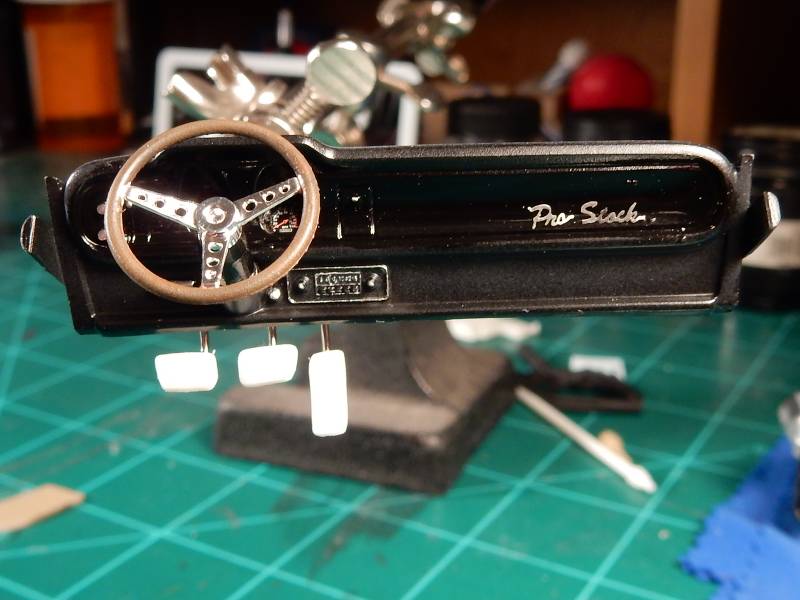 The turn out is just SO much better of a result: 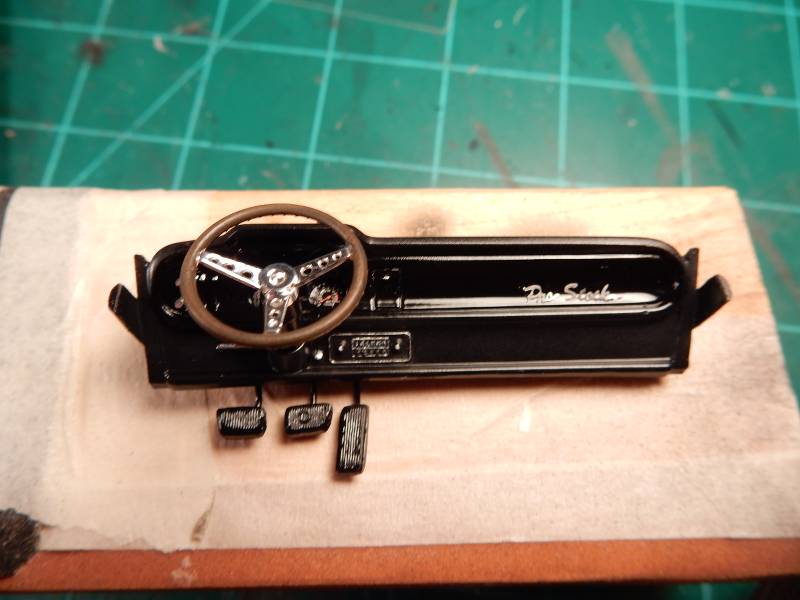 |
|
|
|
Post by deafpanzer on Jun 2, 2023 8:42:41 GMT -5
Nice work on the engine and dashboard!
|
|
406 Silverado
Global Administrator     
Member since: November 2011
Posts: 10,263
Member is Online
MSC Staff
|
Post by 406 Silverado on Jun 2, 2023 8:44:50 GMT -5
Nice work on the engine and dashboard! Thanks for the good word on the engine Andy. Oh we aint EVEN started on the dash just yet.....that's just the whole process explained as I used it on the Maverick before I get to that part on this car. I've got all kinds of stuff planned out for the dash on this Vette. |
|
70 STING
Full Member
  
Member since: April 2023
Posts: 544
Apr 10, 2023 11:44:31 GMT -5
Apr 10, 2023 11:44:31 GMT -5
|
Post by 70 STING on Jun 3, 2023 10:12:58 GMT -5
Great idea with the pedals! Will definitely be trying that on my next convertible build.
And the air filter. :^)
|
|
|
|
Post by chromdome35 on Jun 3, 2023 10:24:26 GMT -5
Joe, that engine is sublime, very nice work!
|
|
406 Silverado
Global Administrator     
Member since: November 2011
Posts: 10,263
Member is Online
MSC Staff
|
Post by 406 Silverado on Jun 4, 2023 6:51:21 GMT -5
Great idea with the pedals! Will definitely be trying that on my next convertible build. And the air filter. :^) It was one of those things that I just so happened to look at on the Maverick build and suddenly....I realized that molded in pedals were a bad idea.  The air filter idea came when I saw the bar code on the back of one of my paint jars that was laying next to the air cleaner. Reminds me of the old Reese's peanut butter cups commercial back in the day. lol |
|
406 Silverado
Global Administrator     
Member since: November 2011
Posts: 10,263
Member is Online
MSC Staff
|
Post by 406 Silverado on Jun 4, 2023 6:53:33 GMT -5
Joe, that engine is sublime, very nice work! Thanks for checkin' in Brian. I've got some definite goodies to spice up the interior a little more. |
|
406 Silverado
Global Administrator     
Member since: November 2011
Posts: 10,263
Member is Online
MSC Staff
|
Post by 406 Silverado on Jun 5, 2023 20:40:31 GMT -5
I cut a thin piece of clear Evergreen plastic this morning and glued it into place. After that I cut the same shape from some sandpaper so the floor carpeting wouldn't be lost and adhered that on top of the clear panel. I'll be hitting the sandpaper with some gloss to give everything a uniform base to start with and then we'll be going with the color. I'll be going with a black interior but it won't be boring. 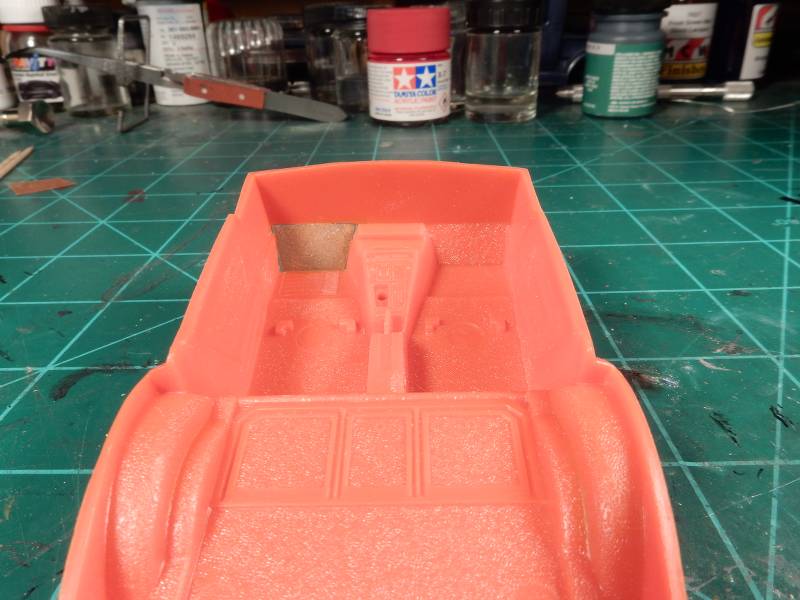 Something else that caught my attention was the molded in park brake handle. This........will change.  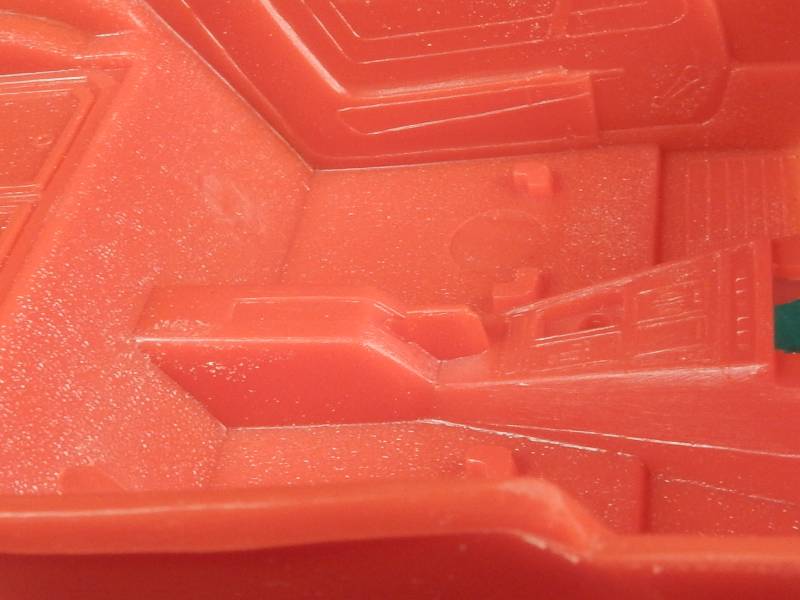 And lastly....there'll be a few items from this sheet ending up in the interior. Thank God for The MCG..... 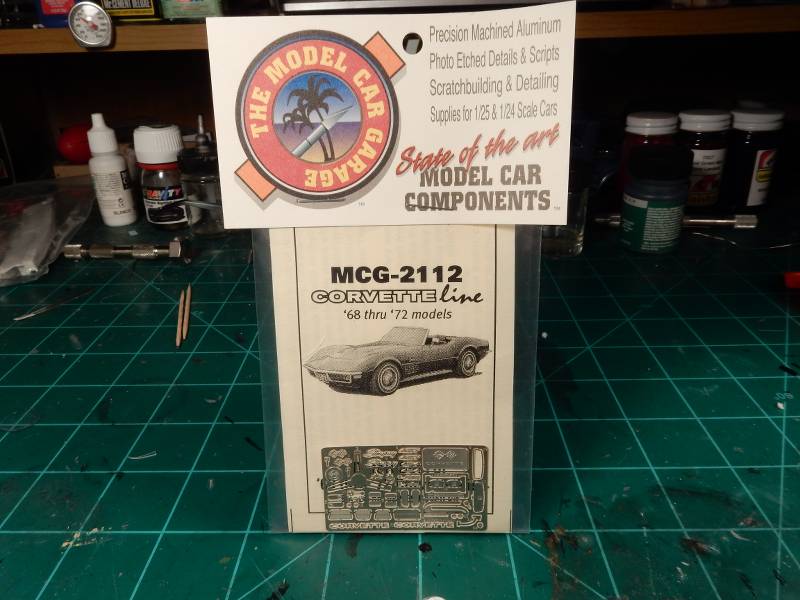 |
|
|
|
Post by deafpanzer on Jun 6, 2023 9:49:36 GMT -5
Good catch on the park brake handle! Why would they do that as it doesn't look good molded.
|
|
406 Silverado
Global Administrator     
Member since: November 2011
Posts: 10,263
Member is Online
MSC Staff
|
Post by 406 Silverado on Jun 6, 2023 10:19:52 GMT -5
Good catch on the park brake handle! Why would they do that as it doesn't look good molded. Thanks Andy. Sometimes the auto manufacturers take some short cuts but this one's easy enough to deal with. Actually, their 2017 Camaro "Fifty" was a beauty of a kit to build. The chassis/ suspension had over 50 parts and is VERY detailed out. Here's a shot of the completed chassis on that car. They really stepped up thier game on this "Fiftieth Anniversary" Camaro...... 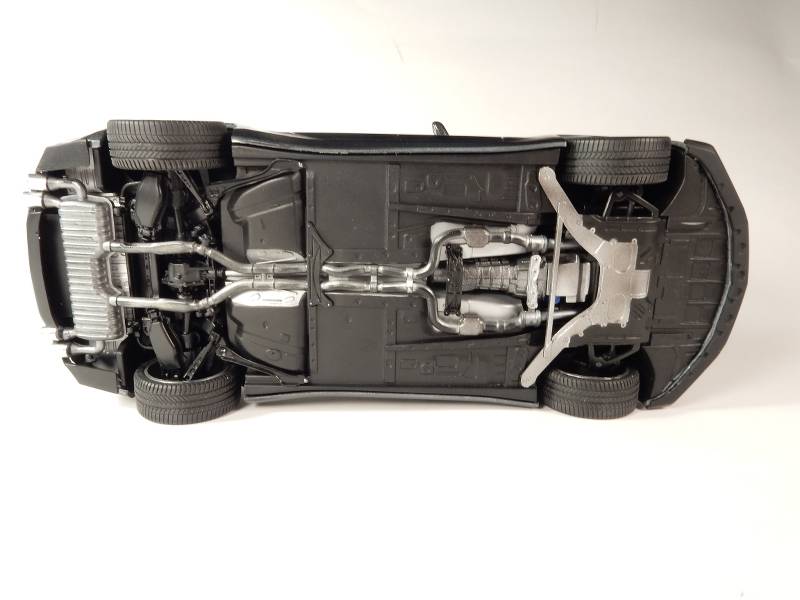 |
|
70 STING
Full Member
  
Member since: April 2023
Posts: 544
Apr 10, 2023 11:44:31 GMT -5
Apr 10, 2023 11:44:31 GMT -5
|
Post by 70 STING on Jun 6, 2023 15:36:33 GMT -5
When I built mine I took a tiny saw and cut out the lower portion of the handle. Knowing you, you’ll fashion your own handle from scratch and it’ll look terrific. :^)
|
|
lowlife
Junior Member
 
Member since: April 2023
Posts: 97 
|
Post by lowlife on Jun 6, 2023 18:06:35 GMT -5
Looks terrific Joe, great engine detail !
I'm looking forward to the interior, I've seen your last one and it was incredible !
|
|
406 Silverado
Global Administrator     
Member since: November 2011
Posts: 10,263
Member is Online
MSC Staff
|
Post by 406 Silverado on Jun 10, 2023 8:16:26 GMT -5
When I built mine I took a tiny saw and cut out the lower portion of the handle. Knowing you, you’ll fashion your own handle from scratch and it’ll look terrific. :^) I'm still working on this part and I think I've got an idea now that I've had a few days to think on it. Thank you for the comments bud. |
|
406 Silverado
Global Administrator     
Member since: November 2011
Posts: 10,263
Member is Online
MSC Staff
|
Post by 406 Silverado on Jun 10, 2023 8:20:06 GMT -5
Looks terrific Joe, great engine detail ! I'm looking forward to the interior, I've seen your last one and it was incredible ! Martin, thank you for the very encouraging comments bro. My bench time has been limited this week but I'm looking forward to spending a little more time with it in the coming week. I've got the interior tub painted with a base coat of black primer and painted the door panels and console in a semi-gloss black. Driver's toe board where the swing pedals were is pretty much blended in at this point in the build. Since I've painted it, I've re-thought the situation some and have decided to open up a panel for displaying a little more detail. Here's where we're at right now..... 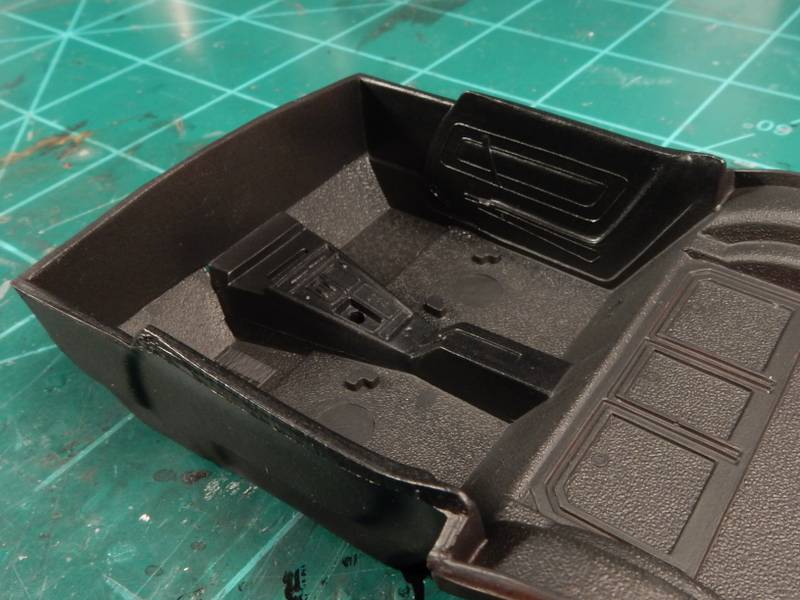 |
|
406 Silverado
Global Administrator     
Member since: November 2011
Posts: 10,263
Member is Online
MSC Staff
|
Post by 406 Silverado on Jun 23, 2023 17:39:19 GMT -5
Alright gang. I've been making some progress on this one over the course of the week. I decided to open the battery compartment up behind the drivers seat and have painted a battery all up and detailed it already. I'll be cutting the drivers seat to display it in the forward position to allow visibility back to the battery compartment in the coming updates. I've started on both door panels by painting the wood grain paneling & outlining the chrome strips on the panel as well as installing PE window crank handles. I've also begun the center console detailing process. 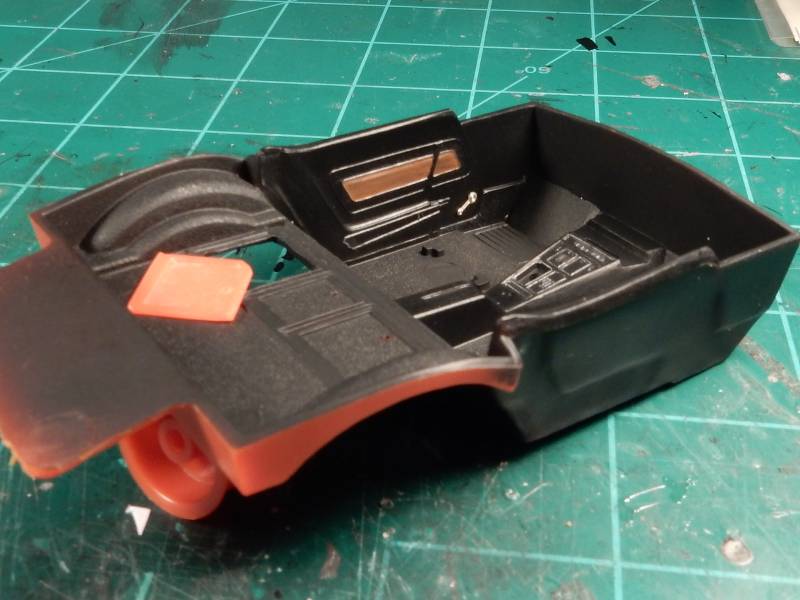 |
|
70 STING
Full Member
  
Member since: April 2023
Posts: 544
Apr 10, 2023 11:44:31 GMT -5
Apr 10, 2023 11:44:31 GMT -5
|
Post by 70 STING on Jun 23, 2023 22:00:36 GMT -5
Geez, you’re going all out on this one. :^)
|
|
406 Silverado
Global Administrator     
Member since: November 2011
Posts: 10,263
Member is Online
MSC Staff
|
Post by 406 Silverado on Jun 24, 2023 9:15:39 GMT -5
Geez, you’re going all out on this one. :^) Thanks for the good word bud. I dunno about going all out on it but I thought I'd add a little "bling" here and there. |
|
|
|
Post by deafpanzer on Jul 3, 2023 10:12:09 GMT -5
You are getting there! While I was in New Orleans, I don't remember seeing so many Corvettes and sport cars on Canal Street. I suspect the drivers just wanted to show off their big toys and drove in loops for hours.
|
|
garydavis-Rest In Peace
Full Member
  
Member since: March 2023
RIP- September 2023
Posts: 440 
|
Post by garydavis-Rest In Peace on Jul 3, 2023 11:37:32 GMT -5
You are getting there! While I was in New Orleans, I don't remember seeing so many Corvettes and sport cars on Canal Street. I suspect the drivers just wanted to show off their big toys and drove in loops for hours. Yep...the good ol' cruiz-in. Haven't done one of those since 2018 at the GOOD GUYS SHOW up here at the fair grounds in Puyallup Wa. ALOT of cool cars for sure.... |
|
|
|
Post by keavdog on Jul 3, 2023 11:43:26 GMT -5
|
|
406 Silverado
Global Administrator     
Member since: November 2011
Posts: 10,263
Member is Online
MSC Staff
|
Post by 406 Silverado on Jul 7, 2023 6:03:14 GMT -5
keavdog : LOL. Thanks bud. I've been on this one pretty much every day trying to get things right on it. Thanks goes out to handiabled for supplying me with some interior shots of his car which reminded me that the seats are NOT all semi gloss/ leather. The comfort weave pattern in the center of the seats is actually matte in appearance so I masked off and replicated the look. I also cut the drivers seat in half and put it back together like it is now to display it folded forward as to give a better view to the battery box behind the seat. OOB shifter is now installed after reworking and trimming it up to keep it from looking like a blob sticking out of the console and making it a bit more defined. I also installed the PE door handles and picked out the details on the center console around the shifter as well. Battery is all painted up and detailed and this mock up shows what I've been building towards for the past few weeks. I may go back and paint the interior of the battery box area semi gloss black to add contrast between the interior and the compartment for added interest. 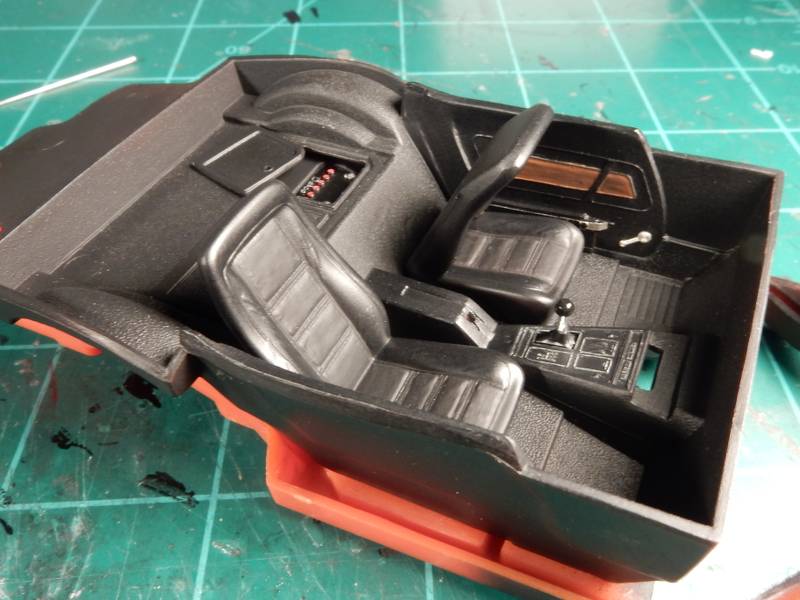
|
|
70 STING
Full Member
  
Member since: April 2023
Posts: 544
Apr 10, 2023 11:44:31 GMT -5
Apr 10, 2023 11:44:31 GMT -5
|
Post by 70 STING on Jul 7, 2023 8:11:12 GMT -5
Lookin’ good Joe! Nice fine lines on the shifter plate… you must have a bionic eye and the steady hand of a surgeon.
I cut the side panels off on my build to allow better access for detail painting and they still don’t look anywhere near as sharp as yours. 8^o
|
|
garydavis-Rest In Peace
Full Member
  
Member since: March 2023
RIP- September 2023
Posts: 440 
|
Post by garydavis-Rest In Peace on Jul 7, 2023 9:38:43 GMT -5
That interior is really looking good Joe!
|
|
406 Silverado
Global Administrator     
Member since: November 2011
Posts: 10,263
Member is Online
MSC Staff
|
Post by 406 Silverado on Jul 7, 2023 12:10:45 GMT -5
Lookin’ good Joe! Nice fine lines on the shifter plate… you must have a bionic eye and the steady hand of a surgeon. I cut the side panels off on my build to allow better access for detail painting and they still don’t look anywhere near as sharp as yours. 8^o Actually, I used a silver Prismacolor pencil as they work perfect for small details like this. Still gotta build the park brake handle, the swing pedals and the dash & related parts and this part of the build will be done. I almost hate seeing interior builds end because they are really my favorite part of any auto build. |
|
406 Silverado
Global Administrator     
Member since: November 2011
Posts: 10,263
Member is Online
MSC Staff
|
Post by 406 Silverado on Jul 7, 2023 12:10:59 GMT -5
That interior is really looking good Joe! Thanks Gary!! |
|
70 STING
Full Member
  
Member since: April 2023
Posts: 544
Apr 10, 2023 11:44:31 GMT -5
Apr 10, 2023 11:44:31 GMT -5
|
Post by 70 STING on Jul 7, 2023 13:32:52 GMT -5
Lookin’ good Joe! Nice fine lines on the shifter plate… you must have a bionic eye and the steady hand of a surgeon. I cut the side panels off on my build to allow better access for detail painting and they still don’t look anywhere near as sharp as yours. 8^o Actually, I used a silver Prismacolor pencil as they work perfect for small details like this. Still gotta build the park brake handle, the swing pedals and the dash & related parts and this part of the build will be done. I almost hate seeing interior builds end because they are really my favorite part of any auto build. Thanks for the tip… I’ll have to look up those Prismacolor pencils. |
|
406 Silverado
Global Administrator     
Member since: November 2011
Posts: 10,263
Member is Online
MSC Staff
|
Post by 406 Silverado on Jul 7, 2023 18:28:54 GMT -5
Actually, I used a silver Prismacolor pencil as they work perfect for small details like this. Still gotta build the park brake handle, the swing pedals and the dash & related parts and this part of the build will be done. I almost hate seeing interior builds end because they are really my favorite part of any auto build. Thanks for the tip… I’ll have to look up those Prismacolor pencils. Those thing work like magic. You'll see what I mean when you use yours for the first time. I started on the dash today by drilling out all the holes for the gauges/ instruments. I picked up a gauge set from "Best Model Car Parts" that's going to help with the realism effect big time on this. OOB dash on the left. 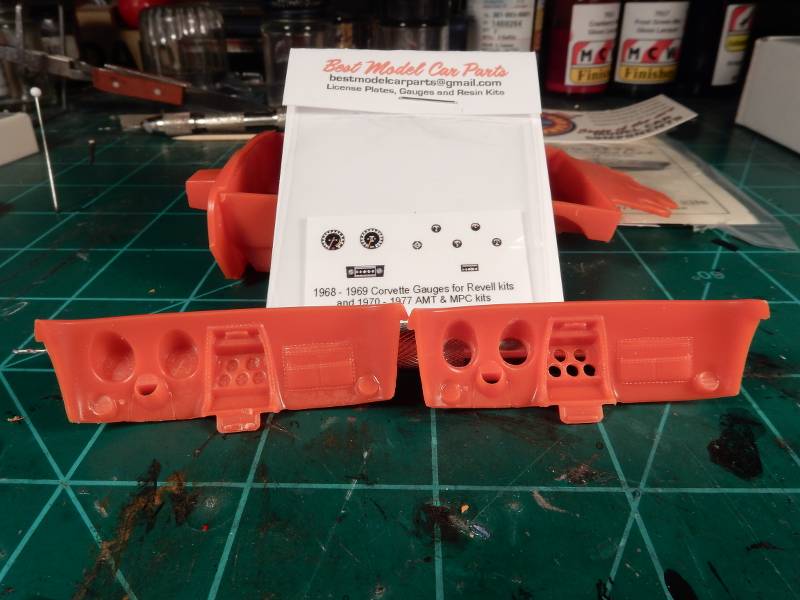 |
|