Deleted
Member since: January 1970
Posts: 0
May 3, 2024 22:57:56 GMT -5
May 3, 2024 22:57:56 GMT -5
|
Post by Deleted on Mar 23, 2013 13:25:34 GMT -5
Being a huge red bull f1 fan I'd be happy to see the logo on a model, but your right this build is unique and I think the paint scheme should reflect that!
|
|
|
|
Post by bbd468 on Mar 24, 2013 15:36:26 GMT -5
Gag...this is pure ferkin GENIUS!!!!!  |
|
|
|
Post by 406 Silverado on Mar 25, 2013 7:21:55 GMT -5
Can only agree with the others. What a great piece and very creative building. Agree with jackwagon, it will come to you, and better not to 'copy'.
|
|
thenylongag
Full Member
 Sept2013 MoM Winner
Member since: June 2012
Yes, we have 'NO' bananas
Posts: 304
Jun 7, 2012 11:20:57 GMT -5
Jun 7, 2012 11:20:57 GMT -5
|
Post by thenylongag on Mar 27, 2013 11:38:18 GMT -5
I think i have figured out the colours i want to use, now i just have to think about their location on the ship.
As for a logo, still mulling over if i even need one now?
Thanks for your input, its very much appreciated.
Just a quick video with both side engine fairings permanently attached and all the lights hard wired up.
Still blending the fairings to the wing.
Thanks for stopping by
Gag
|
|
|
|
Post by dupes on Mar 27, 2013 12:09:40 GMT -5
This entire project continues to astound. AWESOME!
|
|
|
|
Post by deafpanzer on Mar 27, 2013 12:57:08 GMT -5
God, this is freaking cool! I think you should be working for Lucas Film or somebody better...
|
|
Deleted
Member since: January 1970
Posts: 0
May 3, 2024 22:57:56 GMT -5
May 3, 2024 22:57:56 GMT -5
|
Post by Deleted on Mar 27, 2013 14:37:06 GMT -5
Your doing a fine job there sir, as for the paint job are you thinking less is more!
|
|
|
|
Post by fightnjoe on Mar 28, 2013 11:18:24 GMT -5
absolutely stunning what you have done here. it is quite honestly the most imaginative build i have had the pleasure of viewing. from the subject matter to the way you have tackled each component. simply outstanding doesnt cover it.
joe
|
|
thenylongag
Full Member
Sept2013 MoM Winner
Member since: June 2012
Yes, we have 'NO' bananas
Posts: 304
Jun 7, 2012 11:20:57 GMT -5
Jun 7, 2012 11:20:57 GMT -5
|
Post by thenylongag on Mar 28, 2013 18:02:49 GMT -5
Thanks for all the comments guy's, much appreciated. Blending the fairings into the main wings, continued.......   Started on outer edge details, front. [img src="https://lh3.googleusercontent.com/-Hg9_JiakGXE/UVS_ImlIeqI/AAAAAAAAKco/rCdqdq_rE3E/s800/Picture%2520194.jpg" style="MAX-W IDTH:100%;"]   Outer edge details, back    Dry fit  With everything fixed i started to build detail on the outer wing   Made new nose profile for the engine fairings. 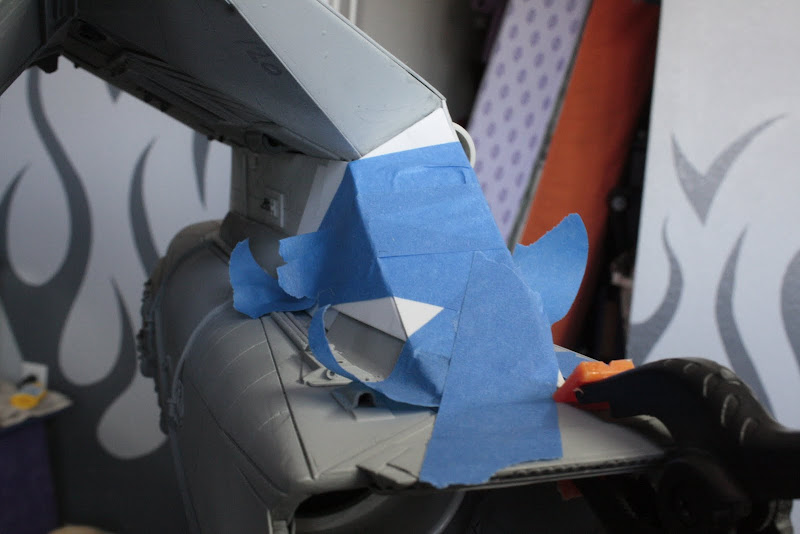 After sanding.  Finally, some primer, Mmmmmmmmm.   Added final front wing element.    Started at the bench at 10am, got a few friends popping in for sausages, chilli and beer, then i will be back. Stay tuned Gag |
|
|
|
Post by Leon on Mar 28, 2013 19:17:33 GMT -5
 Just keeps getting better.
|
|
reserve
Senior Member

Member since: July 2012
Si vis pacem para bellum
Posts: 2,355
Jul 11, 2012 9:11:45 GMT -5
Jul 11, 2012 9:11:45 GMT -5
|
Post by reserve on Apr 6, 2013 1:17:38 GMT -5
Seems as tho you may be approaching the wire with this project, gonna be a sad day for me as I'll have to find something else to get my good god how did he do that fix. Do be sure to enter it in the Model of the Month contest as it will be a more than worthy entry
Regards,
Mark
|
|
|
|
Post by deafpanzer on Apr 6, 2013 9:32:52 GMT -5
Loving this! Funny thing I can even identify more than half of spares stuff you used...
|
|
venom1
Full Member
Member since: October 2012
Posts: 1,369
Oct 10, 2012 2:40:03 GMT -5
Oct 10, 2012 2:40:03 GMT -5
|
Post by venom1 on Apr 6, 2013 10:02:03 GMT -5
I have been consistently following this build and I keep trying to think of something to say to express my level of amazement toward this high degree of awesome. I'm gonna have to learn a different language, 'cos I only speak English, and I got nuthin'. Wow dude. Just wow. Cheers, Sam  |
|
thenylongag
Full Member
Sept2013 MoM Winner
Member since: June 2012
Yes, we have 'NO' bananas
Posts: 304
Jun 7, 2012 11:20:57 GMT -5
Jun 7, 2012 11:20:57 GMT -5
|
Post by thenylongag on Apr 7, 2013 11:02:25 GMT -5
Morning Everyone, Thanks again for stopping by and leaving comments, it realy does help me with this thing. Well, i didn't manage to get back to the MK1, to many sausages, to much beer. ;D Had a frustraiting week trying to get a direction going for the wing tops detailing, wanted to incorperate tubing, some panels, maybe some other small details. The biggest problem for me is that because the ship is a bit twisted the two side are not symetrical so this became very obvious to me during this detailing process. Lets have a look at what i managed to come up with.....PIX The front 'blend' part of the wings needed someting to snaz it up a bit and add some interest.  Ran tubing lines from the central pumping/distribution hub.   I needed to fit the back detail sections so i could work on the blend area between the flaps and the main wing surface. So i painted the underside of the wing flaps in the same 90% white, grey, silver, buff mix. I had already pre-shaded this.   I then removed the masking and temporarily fitted the detail sections, took a few beauty pixs.  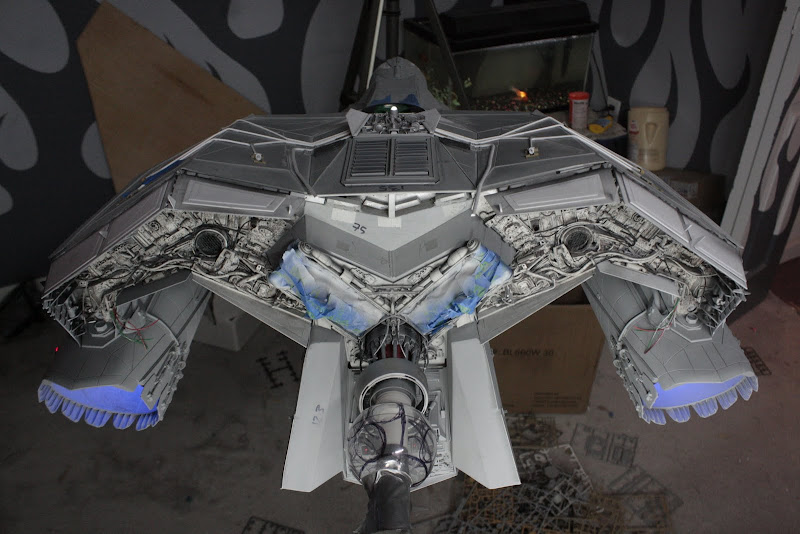 Then moved on to the upper wing/flap blend.    The small pieces are only glued close to the tan greeblie, then the transition piece is glued on the outer edge of the small pieces. 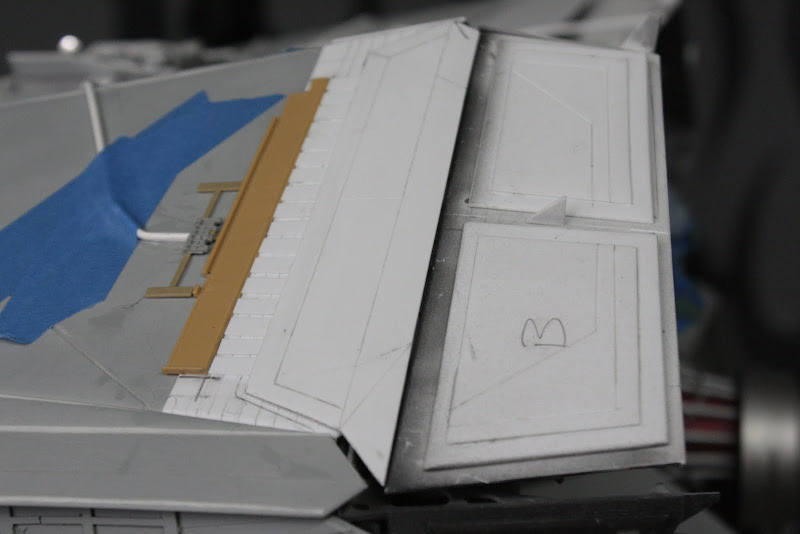 This top section is then floating a bit and will give when the flap is opened.    Added tubing and other gubbins to the top flap assembly. 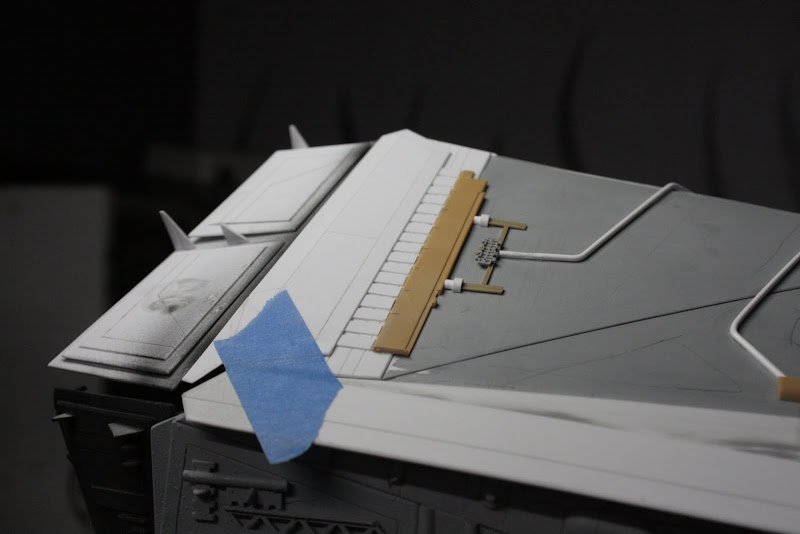 Did the same for the inner flap but this section doesn't move.  Added some smaller details all over    Then just to see how everything looked a quick squirt of Primer on one side. Mmmmmmmmmmm ;D    Quick vid. www.youtube.com/watch?v=YtGTc64wNeEAnd thats about it so far, there are a few gaps that need filling on the upper wing, some scribing, some additional panels, we shall see what happens. Take care Gagster McGee |
|
Deleted
Member since: January 1970
Posts: 0
May 3, 2024 22:57:56 GMT -5
May 3, 2024 22:57:56 GMT -5
|
Post by Deleted on Apr 7, 2013 12:35:15 GMT -5
It's going to take you months to pick out the detail with paint, To quote Murray Walker " I have run out of superlatives!!!  |
|
heiner
Full Member
Member since: December 2012
Posts: 111
Dec 18, 2012 11:12:39 GMT -5
Dec 18, 2012 11:12:39 GMT -5
|
Post by heiner on Apr 7, 2013 15:05:34 GMT -5
What Kind of drugs do you use ? .... I Need the same Respect !!!! Heiner |
|
reserve
Senior Member
Member since: July 2012
Si vis pacem para bellum
Posts: 2,355
Jul 11, 2012 9:11:45 GMT -5
Jul 11, 2012 9:11:45 GMT -5
|
Post by reserve on Apr 7, 2013 20:38:42 GMT -5
If there's an alignment/symmetry flaw in this I sure can't see it...I'm pretty sure no one else can either what with all the snazzy busy detail you've rendered so well.
Regards,
Mark
|
|
rondriaan
Full Member
Member since: March 2012
Posts: 613
Mar 27, 2012 2:07:40 GMT -5
Mar 27, 2012 2:07:40 GMT -5
|
Post by rondriaan on Apr 8, 2013 6:06:52 GMT -5
Just one word FANTASTIC |
|
Deleted
Member since: January 1970
Posts: 0
May 3, 2024 22:57:56 GMT -5
May 3, 2024 22:57:56 GMT -5
|
Post by Deleted on Apr 8, 2013 10:35:46 GMT -5
Wow!! I just went through all 7 pages of this post, cleaned up the drool, and now I must say what a fabulous job you are doing on this.
If I'm honest, I joined this site because of this post...really to tell you what a fabulous your doing on it. I hope to do the same type of thing starting soon. I have identified some donor kits and am now searching for base items to get it started with.
Thanks very much for the inspiration.
|
|
thenylongag
Full Member
Sept2013 MoM Winner
Member since: June 2012
Yes, we have 'NO' bananas
Posts: 304
Jun 7, 2012 11:20:57 GMT -5
Jun 7, 2012 11:20:57 GMT -5
|
Post by thenylongag on Apr 10, 2013 14:14:39 GMT -5
|
|
Deleted
Member since: January 1970
Posts: 0
May 3, 2024 22:57:56 GMT -5
May 3, 2024 22:57:56 GMT -5
|
Post by Deleted on Apr 10, 2013 15:15:16 GMT -5
Superb series of updates, I'm still amazed at the details your adding to nearly every part of her.. Lucas? Disney? Why not go for the best... Mr Scott's Prometheus |
|
|
|
Post by Leon on Apr 10, 2013 15:23:01 GMT -5
Super update Gag.Still looking awesome. |
|
|
|
Post by TRM on Apr 10, 2013 15:28:55 GMT -5
Nothing wrong with a little Vodka Gag!! LOL!! Phenomenal building!!! Getting a great kick out of watching you plaster all the spares on this...I chuckle a bit when I am recognizing all the parts and they then seamlessly blend right into this Bird!
|
|
Deleted
Member since: January 1970
Posts: 0
May 3, 2024 22:57:56 GMT -5
May 3, 2024 22:57:56 GMT -5
|
Post by Deleted on Apr 11, 2013 8:05:44 GMT -5
Nice update!!! I like the polypropel-plasticy thingee!!! LOL I love the idea of the foil. I await to see how it turns out. |
|
|
|
Post by fightnjoe on Apr 11, 2013 15:10:47 GMT -5
i am another that just cannot find the right words for this. it is beyond anything or any other project i have had the pleasure to watch. the jawdropping results of your incredible imagination. my words do not convey properly the amazement, respect, or envy i have for what you have done here.
i am in awe sir and wait anxiously for your next update.
joe
|
|
thenylongag
Full Member
Sept2013 MoM Winner
Member since: June 2012
Yes, we have 'NO' bananas
Posts: 304
Jun 7, 2012 11:20:57 GMT -5
Jun 7, 2012 11:20:57 GMT -5
|
Post by thenylongag on Apr 11, 2013 18:51:46 GMT -5
Wow,
Thank you my friends,
I'm glad your enjoying this as much as me.
Gag
|
|
thenylongag
Full Member
Sept2013 MoM Winner
Member since: June 2012
Yes, we have 'NO' bananas
Posts: 304
Jun 7, 2012 11:20:57 GMT -5
Jun 7, 2012 11:20:57 GMT -5
|
Post by thenylongag on Apr 12, 2013 23:30:03 GMT -5
Ello Peeps, Lot's to get through so this is gunna go fast. There will be a quiz  Already shown you on the video but here's the new detail i added on the back bit. 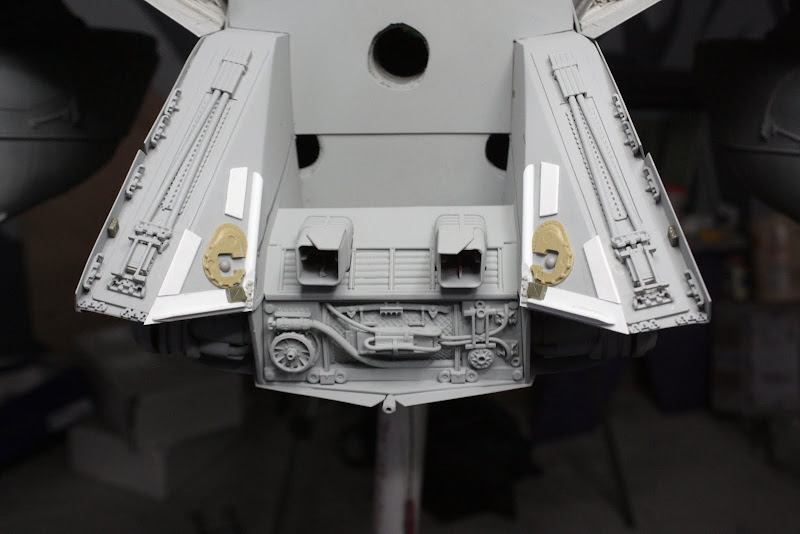 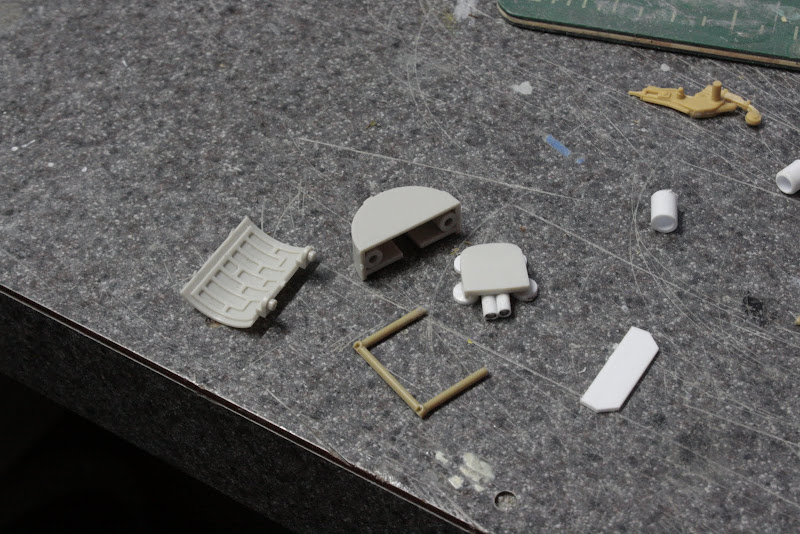 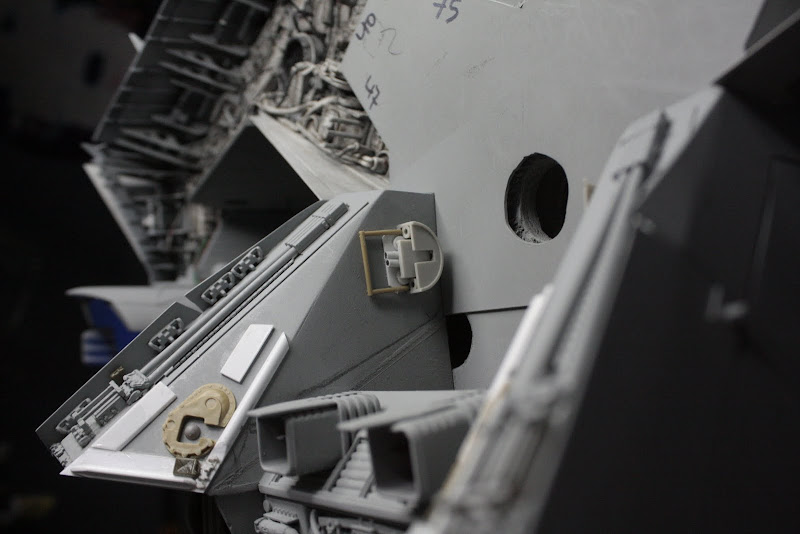   Mmmmmmmmmmmmmm Primer  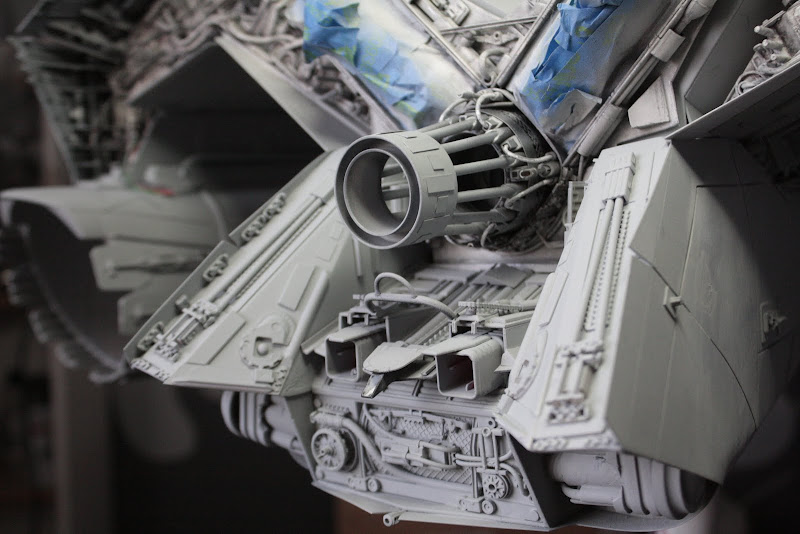 This is how the foil experiment worked, pretty bloomin good. It's actually going to represent a huge sprung loaded ram. 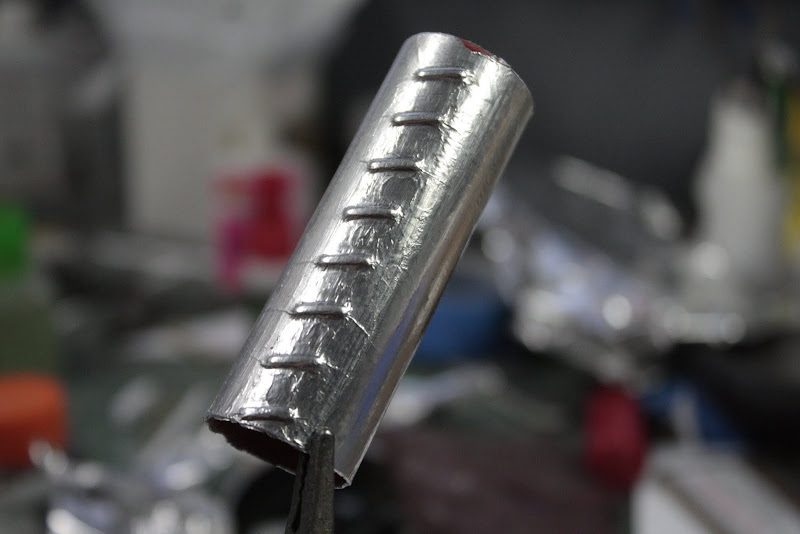 Here it is in position.  These two pieces go underneath the wings to deflect flow over the opening.  Primer 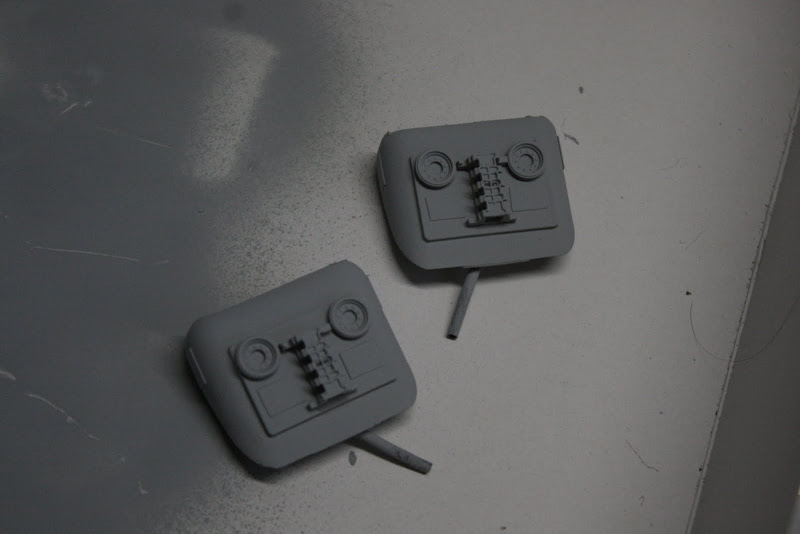 These pieces will cover the screw heads that hold the engines on to the wings 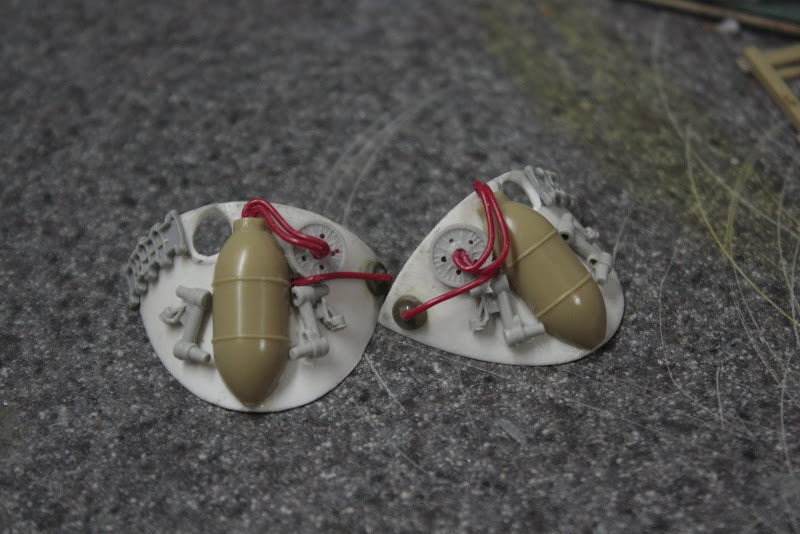 And dry fit in position. 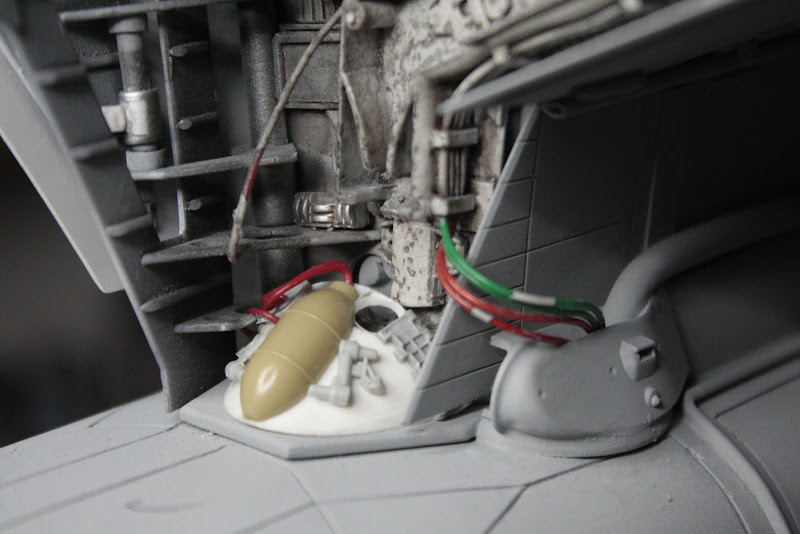 Because of my body 'twist' issues, fitting the rear central flap assembly is going to be a nightmare. 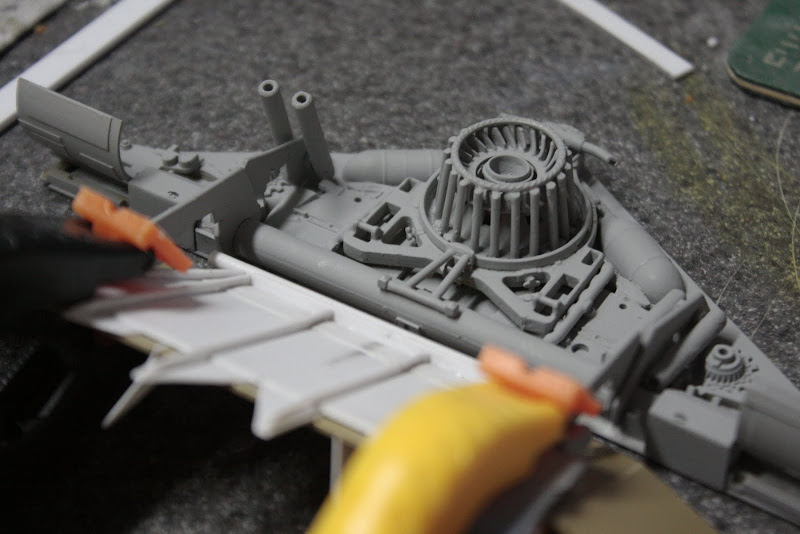 Primer 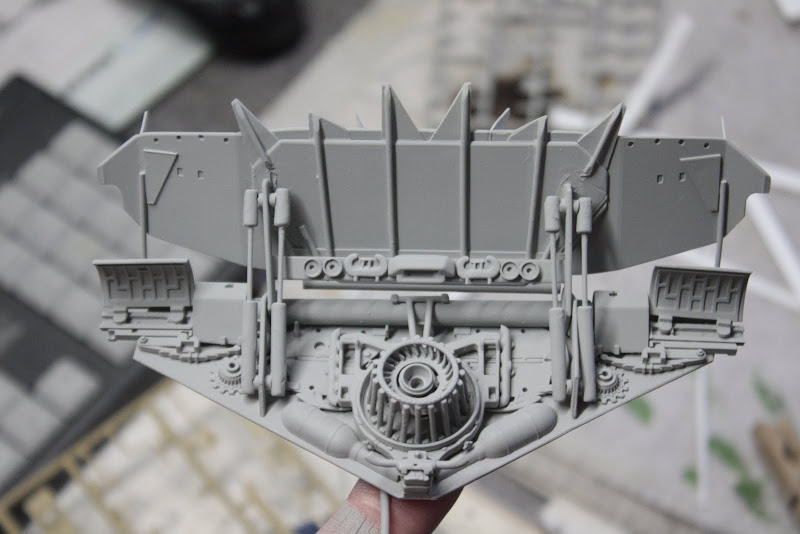 Didn't like the front much, felt it needed some detailing and i needed to hide some big gaps.   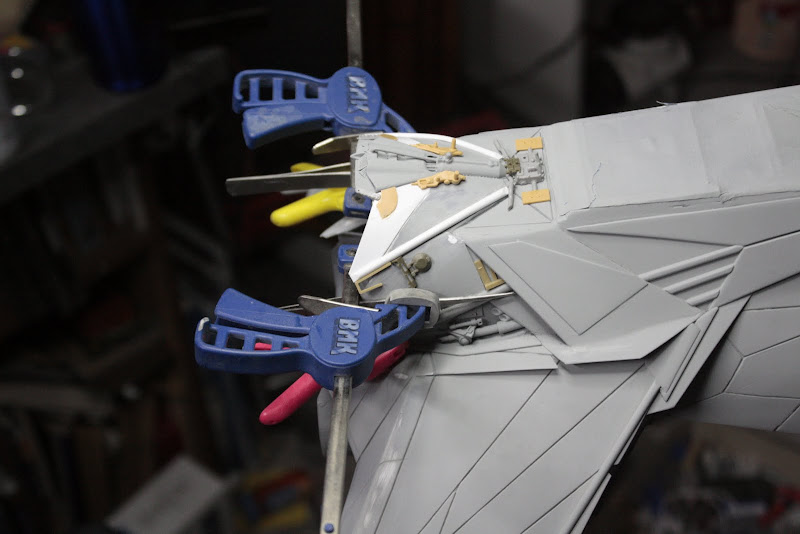  And then the manditory Primer shots. Mmmmmmmmmmmmmmmm Primer 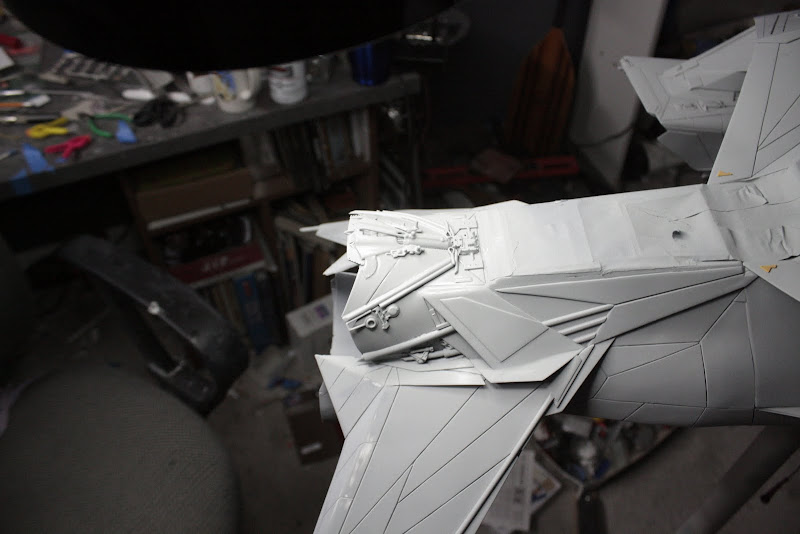 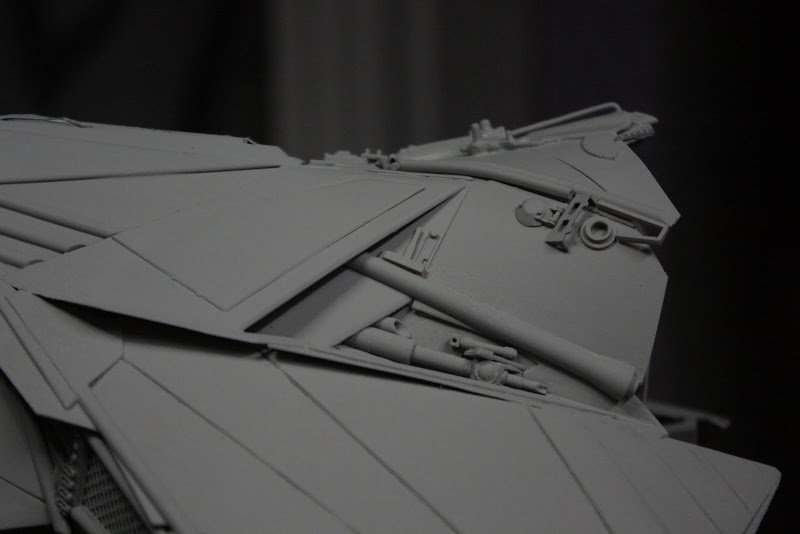 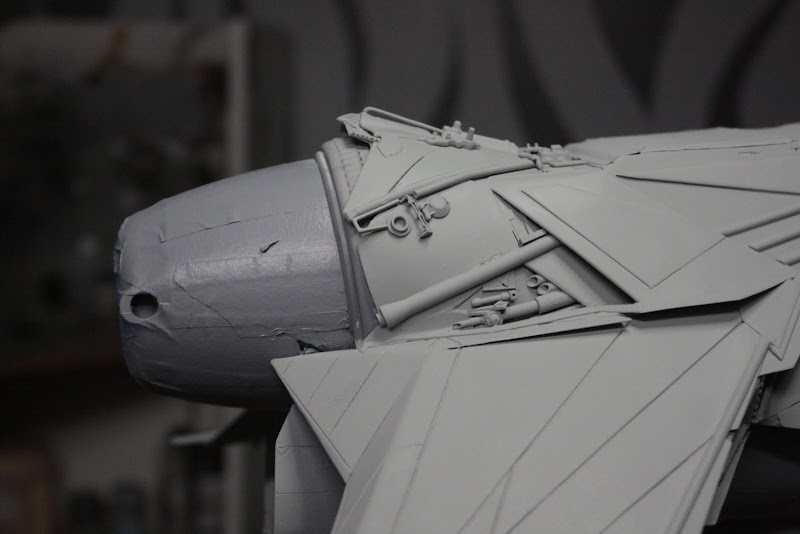 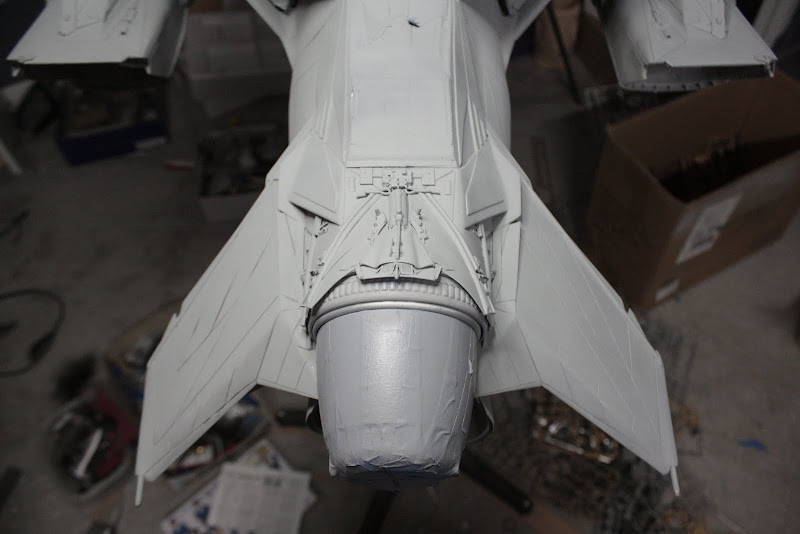 Apart from the cockpit and the detail area under the radar dish I think that's most of the building done. I got my pilot figures in the mail today and i'm a bit disapointed with their quality but nothing some Apoxie scuplt won't fix. Might start splashing some paint around tomorrow. Stay tuned Take care Gag |
|
|
|
Post by fightnjoe on Apr 12, 2013 23:54:46 GMT -5
absolutely stunning. absolutely stunning.
joe
|
|
|
|
Post by deafpanzer on Apr 13, 2013 18:56:21 GMT -5
Ditto!!! Can't wait to see paint on it next!!!
|
|
Deleted
Member since: January 1970
Posts: 0
May 3, 2024 22:57:56 GMT -5
May 3, 2024 22:57:56 GMT -5
|
Post by Deleted on Apr 14, 2013 12:49:41 GMT -5
I can't wait for the paint to start flying Come on give us a clue as to how you are going to finish it. |
|


 Just keeps getting better.