handiabled
Administrator      Apr '23 Showcased Build Awarded
Member since: February 2023
Posts: 4,382  Member is Online
MSC Staff
|
Post by handiabled on Nov 3, 2023 8:02:05 GMT -5
Wowzers what a great camo job! The paint looks like it sprayed out perfectly! Brilliant!
|
|
|
|
Post by dupes on Nov 3, 2023 17:50:29 GMT -5
Thanks guys!! Those Tamiya lacquers are pretty stellar.
Currently I'm deciding how to go about getting the tracks mounted - I think I should try to paint as much of them on the sprue as possible, leaving the attachment points clean so they can be glued, and then go back afterwards and touch everything up. Would likely result in a lot less overspray. 🤔
|
|
|
|
Post by 406 Silverado on Nov 3, 2023 18:22:28 GMT -5
Thanks guys!! Those Tamiya lacquers are pretty stellar. Currently I'm deciding how to go about getting the tracks mounted - I think I should try to paint as much of them on the sprue as possible, leaving the attachment points clean so they can be glued, and then go back afterwards and touch everything up. Would likely result in a lot less overspray. 🤔 That sounds like a good plan Marc. Looking forward to seeing the results bud. |
|
|
|
Post by dupes on Nov 6, 2023 10:37:20 GMT -5
Moving on! Got a little bit of time this morning to get in the paint booth before work. This was DEFINITELY the way to go - that was a lot of paint. I would have had overspray everywhere. After wrapping these around the roadwheels, all I'll have to do is a bit of touch up. Tamiya XF Dark Iron, trying to avoid the attachment points as best as I could to facilitate better gluing.  |
|
|
|
Post by dupes on Nov 7, 2023 22:54:53 GMT -5
It worked! Tracks are on. Just need to spray a bit of touch up paint, and everything will look much better.  |
|
jeaton01
Full Member
   Sept '23 Showcased Model Awarded
Member since: October 2013
Posts: 1,267 
|
Post by jeaton01 on Nov 8, 2023 0:03:18 GMT -5
I was wondering what color to use on my tracks for a base coat. Dark iron sounds like a better choice than steel.
|
|
|
|
Post by dupes on Nov 8, 2023 8:36:43 GMT -5
Dark iron sounds like a better choice than steel. Anything black/brown or vaguely rust-ish tends to get it done (at least as far a the base coat goes). A couple of paint manufacturers even have "track color" in their lineups. |
|
|
|
Post by Tojo72 on Nov 8, 2023 10:24:13 GMT -5
Yeah,my base color of choice is now Tamiya XF-84 Dark Iron
|
|
|
|
Post by dupes on Nov 8, 2023 10:53:38 GMT -5
Yeah,my base color of choice is now Tamiya XF-84 Dark Iron Same (obviously)! I find that the LP dark iron isn't the same shade as the XF, which is odd. It's a good bit darker. |
|
|
|
Post by dupes on Nov 8, 2023 15:19:46 GMT -5
We have tracks! The next step will be to do some detail painting. I have to get the tools done, and the ambush-camo dots applied. Hopefully tonight!  |
|
|
|
Post by Tojo72 on Nov 8, 2023 17:28:37 GMT -5
Very nice,sometimes it's hard to scale found the csmo to 1/48,you nailed it.
|
|
|
|
Post by dupes on Nov 8, 2023 17:53:19 GMT -5
Thanks Tojo! I'm pretty happy with it so far. Now I just need to not F it up.  |
|
buddho
Forum Moderator     
Member since: February 2019
Posts: 1,287 
MSC Staff
|
Post by buddho on Nov 8, 2023 18:51:57 GMT -5
Awesome camou... beautiful Panther.🤓
|
|
|
|
Post by 406 Silverado on Nov 9, 2023 5:50:17 GMT -5
Good LORD man! You are a modeling WILDMAN with how quickly things are progressing now. I've never built an armor subject before but I am sure learning a lot in following all of these armor threads that are ongoing. Beautiful work so far and good tip on the Dark Iron for the tracks.
|
|
Joe Rix
Forum Moderator     
Member since: January 2023
Posts: 1,524 
MSC Staff
|
Post by Joe Rix on Nov 9, 2023 8:27:35 GMT -5
Fantastic progress Dupes. You are doing an absolutely amazing job on the painting. Great job on the tracks. I am paying a lot of attention to how you are going about those. You are pumping me with a lot of positive energy my friend.
|
|
|
|
Post by dupes on Nov 9, 2023 10:21:04 GMT -5
Fantastic progress Dupes. You are doing an absolutely amazing job on the painting. Great job on the tracks. I am paying a lot of attention to how you are going about those. You are pumping me with a lot of positive energy my friend. Glad to hear it! Now I REALLY need to not screw this up.  |
|
|
|
Post by dupes on Nov 9, 2023 10:22:00 GMT -5
Good LORD man! You are a modeling WILDMAN with how quickly things are progressing now. I've never built an armor subject before but I am sure learning a lot in following all of these armor threads that are ongoing. Beautiful work so far and good tip on the Dark Iron for the tracks. Just you wait until I get rolling for real. I'm frustrated at how slow this one is going right now!! Couple of side projects have been occupying my modeling time, and I don't like it. |
|
reserve
Senior Member
   
Member since: July 2012
Si vis pacem para bellum
Posts: 2,372
Jul 11, 2012 9:11:45 GMT -5
Jul 11, 2012 9:11:45 GMT -5
|
Post by reserve on Nov 9, 2023 18:48:52 GMT -5
Great work here D it looks very good
|
|
|
|
Post by dupes on Nov 14, 2023 21:22:08 GMT -5
Great work here D it looks very good Hey, thanks Mark! |
|
|
|
Post by dupes on Nov 14, 2023 21:25:33 GMT -5
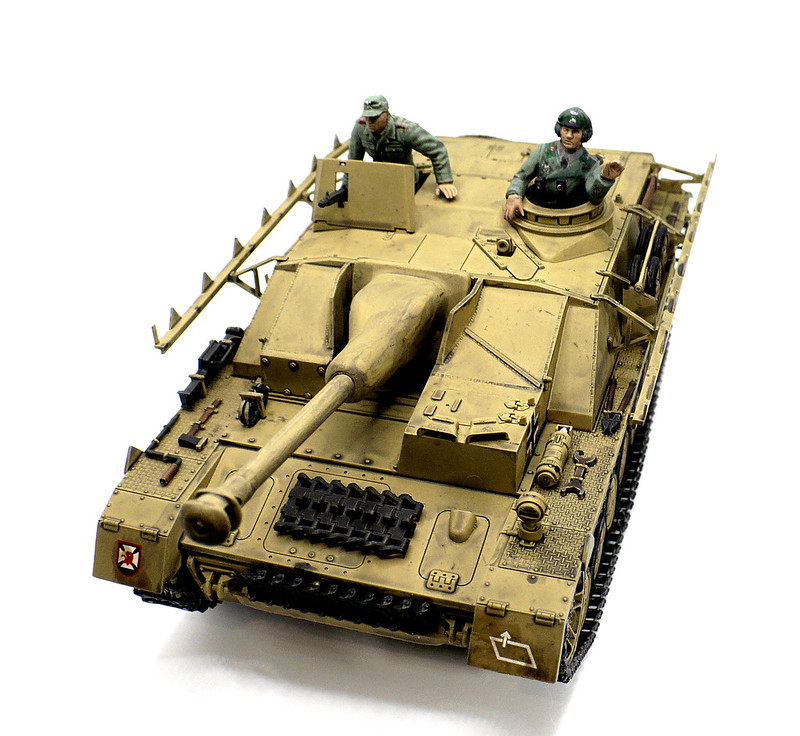
Some progress! I won't lie, this stage worried me. I spent a good deal of time studying the ambush pattern, and messing around with different size brushes painting dots. Used the same Lacquer Painto I airbrushed earlier...turns out it hand-bruses pretty well, too! Think I got the spacing/sizing pretty on. The lighting over my upstairs bench isn't stellar, but this will give you an idea:  Next up - either more detail painting, or some future and then decals. I need to decide, I'd like to get rolling on this thing. 🤔 |
|
|
|
Post by Tojo72 on Nov 14, 2023 21:47:31 GMT -5
You nailed it pretty good,nice.
|
|
|
|
Post by tcoat on Nov 15, 2023 8:17:09 GMT -5
Some progress! I won't lie, this stage worried me. I spent a good deal of time studying the ambush pattern, and messing around with different size brushes painting dots. Used the same Lacquer Painto I airbrushed earlier...turns out it hand-bruses pretty well, too! Think I got the spacing/sizing pretty on. The lighting over my upstairs bench isn't stellar, but this will give you an idea:  Next up - either more detail painting, or some future and then decals. I need to decide, I'd like to get rolling on this thing. 🤔 Have you ever considered trying tinted Future as a first step for weathering? This is a perfect candidate for it. With that paint job it would make details pop while just adding a hint of "dirty". Just a large(ish) blob of any old cheap water colour mixed in with an ounce of Future is all that was used on this.  . |
|
Joe Rix
Forum Moderator     
Member since: January 2023
Posts: 1,524 
MSC Staff
|
Post by Joe Rix on Nov 15, 2023 8:21:09 GMT -5
Absolutely stellar Dupes. Your patience and diligence paid off in spades. That is a sharp looking camo paint job.
|
|
|
|
Post by dupes on Nov 15, 2023 9:26:54 GMT -5
Thanks Joe and Tojo!
Tcoat - are you talking as an overall-wash kind of thing? Or, more so, a wash plus decal-prep all in one step?
|
|
|
|
Post by tcoat on Nov 15, 2023 10:09:50 GMT -5
Thanks Joe and Tojo! Tcoat - are you talking as an overall-wash kind of thing? Or, more so, a wash plus decal-prep all in one step? An overall wash which also works as your decal prep. I use this on all armour, figures and most aircraft. It is very effective for blending camo, bringing out detail and creating false "shadows" and I can't imagine not doing it anymore. Just brush it on all surfaces and let the Future's self leveling properties do their magic. Of course practice on something first to get the mix right and see just how much you need. Don't panic when you first put it on and it looks way over done since a flat coat will tone it was down. Base coat paint. Detail sort of just blends in. Rivets almost invisible. .jpg.17e0155686509533b7665e7982734469.jpg) Tinted Future wash to whole thing. Both raised and sunken details highlighted with minimal change to actual paint colour. .jpg.436b677c8afeb63c11d1db61d55776d0.jpg) Flat coat over Future to knock off gloss and make effect even more subtle. .jpg.641b6c1036c0aa968bdbe48fe8a1b2b1.jpg) |
|
|
|
Post by dupes on Nov 15, 2023 10:42:28 GMT -5
Innnnnnnteresting! I can see how this would work well with larger builds, especially. Or sci-fi stuff. Do you have any idea what your paint/future ratio is?
|
|
|
|
Post by tcoat on Nov 15, 2023 11:12:24 GMT -5
Innnnnnnteresting! I can see how this would work well with larger builds, especially. Or sci-fi stuff. Do you have any idea what your paint/future ratio is? It varies depending upon what I am using for pigment. Been doing it for so long I just sort of wing it. You want to make the Future completely opaque. Usually about 3 pea sized globs of acrylic will do it. I usually use cheap dollar store tubes but anything that will dissolve in acrylic will do the job. This sort of stuff.  It works well for any scale since it will spread out all it's own when brushed out. You can also do sort of a pinwash on specific spots to make it a bit darker in details. If you put to much in a spot you just wipe your brush and touch the spot and it will wick it right up. It does dry fast so you have to put it on where you want and LEAVE IT ALONE. If you try to brush over it once it has set up a bit you will have a mess. Luckily a little Windex will wipe it right up even when dry. 1/48 snowspeeder with and without Future. No other effects have been used. .jpg.72f5fbfee6d6ba4ac9489692f96ecded.jpg) 1/350 Sub deck before and after. Again only tinted Future   With tint before and after flat coat. Consider that those hatches are the size of a pin head yet you can now distinctly see the line between the hatch and the housing.   |
|
|
|
Post by dupes on Nov 15, 2023 11:29:49 GMT -5
An ounce of future, with a bit of paint. I'll have to experiment with this! I certainly like the end result. I don't have any of those acrylic tubes, but I have a ton of "craft" paints that I use to mix up washes. I'll check to see if they'll mix into future (I can't imagine they wouldn't).
|
|
|
|
Post by tcoat on Nov 15, 2023 11:35:43 GMT -5
An ounce of future, with a bit of paint. I'll have to experiment with this! I certainly like the end result. I don't have any of those acrylic tubes, but I have a ton of "craft" paints that I use to mix up washes. I'll check to see if they'll mix into future (I can't imagine they wouldn't). I have used craft paint before. Just need more of it. I also forgot to say that you get different effects over gloss and flat. Flat will give you that slightly "dirty" look since the Future sticks more as is levels. Over gloss it will only really do low spots or directly around raised detail. Over gloss and finished with Dullcoat .jpg.c20a8a56912587e4d9b5a0409decbf7d.jpg) .jpg.93cc2dc9f95d74b2c540bb5ab25570fa.jpg) |
|
handiabled
Administrator      Apr '23 Showcased Build Awarded
Member since: February 2023
Posts: 4,382  Member is Online
MSC Staff
|
Post by handiabled on Nov 16, 2023 3:25:12 GMT -5
An ounce of future, with a bit of paint. I'll have to experiment with this! I certainly like the end result. I don't have any of those acrylic tubes, but I have a ton of "craft" paints that I use to mix up washes. I'll check to see if they'll mix into future (I can't imagine they wouldn't). I have used craft paint before. Just need more of it. I also forgot to say that you get different effects over gloss and flat. Flat will give you that slightly "dirty" look since the Future sticks more as is levels. Over gloss it will only really do low spots or directly around raised detail. Over gloss and finished with Dullcoat Thanks for the tips on this! I am going to experiment with this a bit myself |
|