modelcarjr
Full Member

Member since: March 2023
Posts: 385
Mar 3, 2023 13:07:26 GMT -5
Mar 3, 2023 13:07:26 GMT -5
|
Post by modelcarjr on Nov 25, 2023 22:28:04 GMT -5
I bought this Testors kit years ago, mid-90s I think, on a mark down at Larry's Hobby Shop which has been gone for about 20 years. I don't even have the box anymore and the parts and instructions have been stored in another box. I have most of the parts painted, mainly body, engine, and chassis parts. I don't know if I'll be able to finish tomorrow as it is suppose to rain. But I have plenty to get started with. I painted the fender unit Dupli-Color Universal Black and the body parts are Dupli-Color Flash Red. So I am off to a good start. Thanks for looking!   |
|
|
|
Post by kyledehart5 on Nov 26, 2023 6:41:50 GMT -5
Oh, heck yeah. We're going Cadillac V-16 crazy around here and I love it. This is a really cool example. Great color combo there. This is going to look awesome!
|
|
|
|
Post by Leon on Nov 26, 2023 6:53:22 GMT -5
You're off to a good start! I like that color combo.
|
|
modelcarjr
Full Member
Member since: March 2023
Posts: 385
Mar 3, 2023 13:07:26 GMT -5
Mar 3, 2023 13:07:26 GMT -5
|
Post by modelcarjr on Nov 26, 2023 20:56:19 GMT -5
Thanks, Kyle and Leon! I appreciate your comments! Off to a good start I think. I put the frame together and everything looks square. I also built the engine and it is in the frame. I would have wired it up but I don't have a pre-wired distributor for a 16 cyl. engine and I don't think I can drill 16 holes in this distributor. I finished all the other painting today as it didn't rain. Cool and breezy but the humidity was good. I'll rub out the paint tomorrow and move on to the chassis exhaust and suspension. Thanks for looking! 😎   |
|
|
|
Post by kyledehart5 on Nov 27, 2023 2:55:45 GMT -5
Thanks, Kyle and Leon! I appreciate your comments! Off to a good start I think. I put the frame together and everything looks square. I also built the engine and it is in the frame. I would have wired it up but I don't have a pre-wired distributor for a 16 cyl. engine and I don't think I can drill 16 holes in this distributor. I finished all the other painting today as it didn't rain. Cool and breezy but the humidity was good. I'll rub out the paint tomorrow and move on to the chassis exhaust and suspension. Thanks for looking! 😎 wonderful progress. The frame and engine look good. I also briefly considering wiring my ‘31 and then thought better of it. No way I was getting 16 holes drilled in my distributor either. I don’t think it will take away from the engine at all. Looking forward to what’s next. |
|
handiabled
Community Relations Moderator 
Member since: February 2023
Posts: 2,441 
MSC Staff
|
Post by handiabled on Nov 27, 2023 14:47:19 GMT -5
Great progress so far, I don't blame you for skipping the distributer cap wiring.
|
|
modelcarjr
Full Member
Member since: March 2023
Posts: 385
Mar 3, 2023 13:07:26 GMT -5
Mar 3, 2023 13:07:26 GMT -5
|
Post by modelcarjr on Nov 27, 2023 22:32:54 GMT -5
Thanks, Kyle and Handlabled! I appreciate your comments! Finished the chassis today. I kept looking for problems in these old instructions or parts that didn't fit but I haven't found anything yet. Everything went together well with good pins and pin locating holes. Gas tank, exhaust pipes, front and rear suspensions, engine, and driveshaft all located well and are complete. I knocked off an exhaust tip but I'll wait and add it back after its on wheels. I also rubbed out the fender unit and in the morning I'll get started putting the interior together. Thanks for looking! 😎    |
|
|
|
Post by kyledehart5 on Nov 28, 2023 5:38:00 GMT -5
You’re going to reach the end before me!! Chassis looks outstanding. Looks like this offering from Italeri is pretty nice
|
|
|
|
Post by 406 Silverado on Nov 28, 2023 6:04:44 GMT -5
Now this is a pretty dang cool build right here JR. I'm right there with you on the sixteen holes in the distributor bit (no pun intended....but now that I think about it.....it'd have to be a pretty small bit to accomplish drilling all of those holes!!) This is a cleanly built up car so far with everything looking like it just fits into place with no problems. As far as pre wired distributors......I'm wondering if ConnKur couldn't print something up. I just saw this site the other day and will more than likely use these guys for an upcoming project: ConnKur Model Accessories |
|
|
|
Post by kyledehart5 on Nov 28, 2023 6:11:19 GMT -5
Now this is a pretty dang cool build right here JR. I'm right there with you on the sixteen holes in the distributor bit (no pun intended....but now that I think about it.....it'd have to be a pretty small bit to accomplish drilling all of those holes!!) This is a cleanly built up car so far with everything looking like it just fits into place with no problems. As far as pre wired distributors......I'm wondering if ConnKur couldn't print something up. I just saw this site the other day and will more than likely use these guys for an upcoming project: ConnKur Model AccessoriesI've never asked them to make anything specific like for a V-16 Cadillac but i have used the V8 prewireds they offer before and they look really fantastic. I like these Connkurs and the MADs. the best of the ones I've used. |
|
|
|
Post by 406 Silverado on Nov 28, 2023 6:13:00 GMT -5
Now this is a pretty dang cool build right here JR. I'm right there with you on the sixteen holes in the distributor bit (no pun intended....but now that I think about it.....it'd have to be a pretty small bit to accomplish drilling all of those holes!!) This is a cleanly built up car so far with everything looking like it just fits into place with no problems. As far as pre wired distributors......I'm wondering if ConnKur couldn't print something up. I just saw this site the other day and will more than likely use these guys for an upcoming project: ConnKur Model AccessoriesI've never asked them to make anything specific like for a V-16 Cadillac but i have used the V8 prewireds they offer before and they look really fantastic. I like these Connkurs and the MADs the best of the ones I've used. I've used the MAD distributors but only saw these folks a couple of days ago. From what I'm seeing of their products, I may have to give these guys a whirl. |
|
|
|
Post by kyledehart5 on Nov 28, 2023 6:42:06 GMT -5
I've never asked them to make anything specific like for a V-16 Cadillac but i have used the V8 prewireds they offer before and they look really fantastic. I like these Connkurs and the MADs the best of the ones I've used. I've used the MAD distributors but only saw these folks a couple of days ago. From what I'm seeing of their products, I may have to give these guys a whirl. I'll have to go back through my builds and figure out where i've used them. The aluminum base and shaft is a really nice touch as it takes away the work entirely. No need to paint it and glue it on like the MAD ones. And they provide some boot material, for straight boots at least. Still have a couple of them in stash. I tried to photograph one just now but mostly failed entirely  Now imagine that for a V-16 Caddy. I'd be all about it. |
|
modelcarjr
Full Member
Member since: March 2023
Posts: 385
Mar 3, 2023 13:07:26 GMT -5
Mar 3, 2023 13:07:26 GMT -5
|
Post by modelcarjr on Nov 28, 2023 21:00:52 GMT -5
Thanks, Kyle and Joe. I appreciate your comments and discussion. I've only used MAD pre-wired distributors and haven't seen the Connkur before. But I don't know where you'd put the other end of the wire on a 16 cyl. dist. There are 4 intake ports and eight exhaust ports on each side of the engine - where would the spark plug hole go? I looked at a few photos of this Caddy and decided I would jazz this one up a little. I foiled the steering column and installed it. But I should have installed it before the engine as it was a real challenge installing it after the engine is in on the inside of the frame rail, especially since the bottom of the frame is closed off around the engine. I enjoy foiling but it does take a lot of time and patience. I started by foiling the edges of the fender unit on the left side. But after a couple of hours, I took a break and then when returning thought about getting another body painted since its gonna rain on Thursday. I picked a 65 Ford Galaxie 500 XL out of the closet and prepped the body. This model has an opening trunk but I have glued it shut. Tomorrow, I'll foil the small lettering on the trunk, hood, and front fender before paint to be revealed after paint. I'm also gonna put on a vinyl top, using masking tape since the border is already built into the body. Next is paint for the body which will be Tamiya Maroon. The interior will be black and white. But for now, I just get the body painted and continue on the Caddy. Thanks for looking! 😎    |
|
jeaton01
Full Member
Member since: October 2013
Posts: 934
|
Post by jeaton01 on Nov 29, 2023 2:30:01 GMT -5
|
|
|
|
Post by kyledehart5 on Nov 29, 2023 4:48:28 GMT -5
Great stuff JR. I always enjoy a Galaxie as well. The Caddy is coming along nicely. I did the exact same thing on mine and forgot to install the Steering column before the engine. Talk about a face palm. But I got it in there.
|
|
|
|
Post by kyledehart5 on Nov 29, 2023 4:49:07 GMT -5
Excellent article and look at these gorgeous powerplants. Pure art. I'm in love with the valve covers and tried to emulate that look as best I could. |
|
|
|
Post by 406 Silverado on Nov 29, 2023 5:16:09 GMT -5
modelcarjr: Progress is looking good on the Caddy and that's some good time management getting the Galaxie prepped for paint.....especially with the weather coming up. jeaton01: What a good article packed with some good info on that beast of an engine. 165hp at 3400 rpm was quite a feat back in the day and the torque numbers were off the charts as well. Sheesh!!! Thanks for sharing that John.
|
|
modelcarjr
Full Member
Member since: March 2023
Posts: 385
Mar 3, 2023 13:07:26 GMT -5
Mar 3, 2023 13:07:26 GMT -5
|
Post by modelcarjr on Nov 29, 2023 21:41:49 GMT -5
Thanks, John, Kyle and Joe! I appreciate your comments! Thanks, John, for the nice article. Now I see that the spark plugs are in the valley. So if the model was wired then the wires would all go under the valley cover. It wouldn't be much detail at all!
|
|
modelcarjr
Full Member
Member since: March 2023
Posts: 385
Mar 3, 2023 13:07:26 GMT -5
Mar 3, 2023 13:07:26 GMT -5
|
Post by modelcarjr on Nov 30, 2023 23:32:11 GMT -5
Here's where I am so far. No big issues yet. The windshield frame was difficult to foil and I might have painted it with Alclad but I never have had much luck with that. One benefit to foil is that I didn't need to use any glue for the windshield. Its in tight without it. I'm sure I'm in for it when I try to put the body sides and rear on. Should be fun. Thanks for looking! 😎 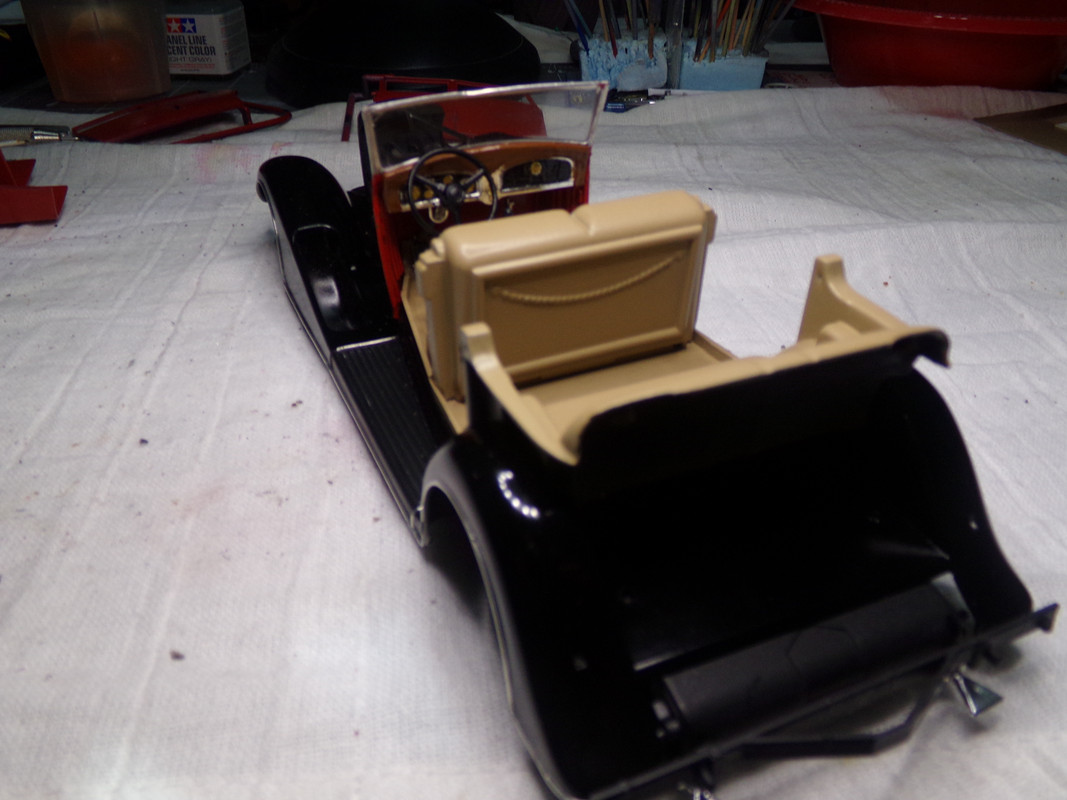   |
|
jeaton01
Full Member
Member since: October 2013
Posts: 934
|
Post by jeaton01 on Nov 30, 2023 23:39:53 GMT -5
Sweet!
|
|
|
|
Post by kyledehart5 on Dec 1, 2023 0:01:23 GMT -5
Gorgeous work. That’s looking wonderful.
|
|
|
|
Post by 406 Silverado on Dec 1, 2023 0:42:04 GMT -5
Such clean work. Looks like you bolted everything together. Verrrrry tidy work JR.
|
|
dean48ws
Full Member
Member since: October 2023
Posts: 240
|
Post by dean48ws on Dec 1, 2023 1:52:14 GMT -5
This is a great looking build, looks the real deal. Nice work with the foil!
|
|
modelcarjr
Full Member
Member since: March 2023
Posts: 385
Mar 3, 2023 13:07:26 GMT -5
Mar 3, 2023 13:07:26 GMT -5
|
Post by modelcarjr on Dec 1, 2023 22:08:50 GMT -5
Thanks, John, Kyle, Joe and Dean! I appreciate your comments! I've been working all day on this one and I think I am finally making some progress toward the final product. I really didn't pay much attention to the sprue attachment spots on the hood and thought I could live with them when I first started this kit. But after further inspection, I can't live with them. So I sanded off the edges and the raised engraved edge that I think was meant to be foiled down the center of the hood. It never got less than 60% humidity today. I added a half-round piece of plastic strip to the middle of the hood after gluing the halves together and painted it with some primer. I'll have to wait for the rest of the painting later as it started raining again this evening. I did manage to get the left door foiled, windows in, interior door panels, door handles and window cranks installed and then mounted the door. One more door to finish and I can get this one on wheels and do all the final hardware. I think it will work out that the top will snap in place and I won't have to glue it. I would keep my fingers crossed but then I wouldn't get much done! Thanks for looking! 😎      |
|
|
|
Post by deafpanzer on Dec 1, 2023 22:55:04 GMT -5
I really am digging the colors! Interior looks great too. I can see the light reflection on the black paint!
|
|
|
|
Post by tcoat on Dec 1, 2023 23:20:53 GMT -5
|
|
jeaton01
Full Member
Member since: October 2013
Posts: 934
|
Post by jeaton01 on Dec 2, 2023 0:19:05 GMT -5
Sweeter!
|
|
|
|
Post by kyledehart5 on Dec 2, 2023 2:17:41 GMT -5
Gorgeous work! I am fascinated seeing the difference in your kit and mine. Other than the obvious 2 year model year difference the cars appear to be quite similar. I love what you’re doing. It looks awesome.
|
|
handiabled
Community Relations Moderator
Member since: February 2023
Posts: 2,441
MSC Staff
|
Post by handiabled on Dec 2, 2023 4:23:36 GMT -5
You are making this look every bit of classy as it should! I love all the chrome accent details!
|
|
midnightprowler
Full Member
Member since: February 2016
Posts: 701
|
Post by midnightprowler on Dec 2, 2023 9:53:27 GMT -5
Beautiful. Looks like italeri used the Johan tools.
|
|