Mike
Full Member
  
Member since: December 2023
Posts: 377
Dec 28, 2023 0:41:00 GMT -5
Dec 28, 2023 0:41:00 GMT -5
|
Post by Mike on Mar 2, 2024 19:21:34 GMT -5
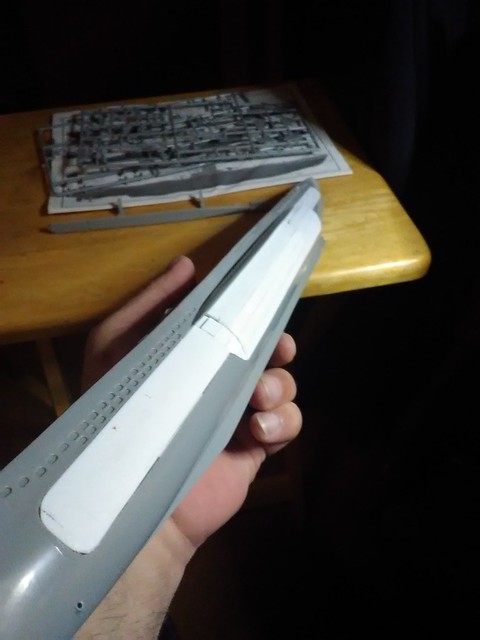
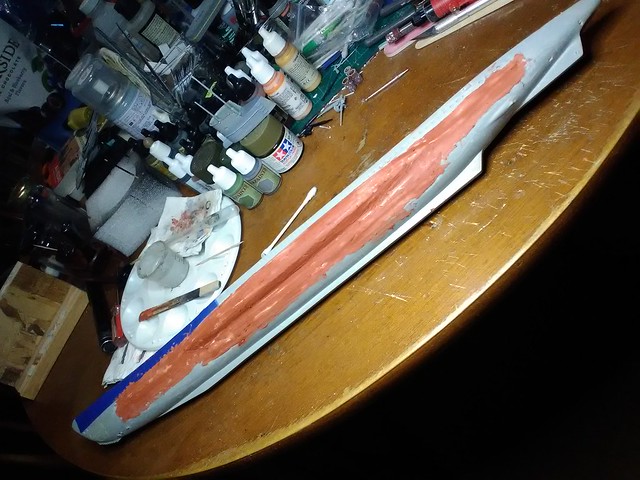
I've had this kit for many years and the open-sided hull for the abysmal interior has driven me bonkers as soon as I opened up the box. I planned on just adding a ton of stretched sprue to make it look almost accurate, but it seriously made my head spin just thinking about it. That's the reason I kept it as a partially started shelf queen for so many years. A couple of days ago I decided to just close up the side and make it a full hull. I started with thin sheet styrene vertical "ribs" to form the shape of the hull and start the first layer of closing up the hull.  U-boat U-boat by Mike Brindos, on Flickr  IMG_20240228_195530 IMG_20240228_195530 by Mike Brindos, on Flickr The "ribs" were attached to the inside of the Hull while the halves were apart and then I glued the halves together. After that I measured and fitted a thick styrene plate to the port bow side. It was troublesome to get it to conform and I decided to "plank" the rest of the hull to conform to the curvature. The horizontal planks worked out very well. It was a simple thing to sand down the planks to the curvature after that.  Revell U-47 Revell U-47 by Mike Brindos, on Flickr  Revell 1/125 U-47 Revell 1/125 U-47 by Mike Brindos, on Flickr  Revell 1/125 U-47 Revell 1/125 U-47 by Mike Brindos, on Flickr I tackled the conning tower somewhere in-between these steps already mentioned. I was much easier to fill. The only trick was adding the rib along the side.  Revell U-47 Revell U-47 by Mike Brindos, on Flickr  Revell U-47 Revell U-47 by Mike Brindos, on Flickr  Revell U-47 Revell U-47 by Mike Brindos, on Flickr I think I've got that cleaned up pretty well. I'll know more after I make more progress with the hull and finally attached it to the deck. Today after adding the horizontal planking I started shaping Milliput over the port side. The blister is a solid chunk of Miliput and it does make the port side heavy. I've intentionally made the blister and the Milliput over the planks over-scale so I have plenty of room to sand things down into proper shape later.  Revell U-47 Revell U-47 by Mike Brindos, on Flickr  Revell U-47 Revell U-47 by Mike Brindos, on Flickr  Revell U-47 Revell U-47 by Mike Brindos, on Flickr So now it's down to waiting for a couple of days to let it cure fully before i get to work with the power tools lol. If this turns out half as cool as I hope it will then I'll be very happy indeed! |
|
|
|
Post by 406 Silverado on Mar 2, 2024 19:27:31 GMT -5
Not bad Mike. Not bad at all. Daunting task but looks like you've got this one going the direction you wanted. Looking forward to more buddy.
|
|
|
|
Post by kyledehart5 on Mar 2, 2024 19:40:40 GMT -5
Hey that’s pretty cool. Looking good!
|
|
reserve
Senior Member
   
Member since: July 2012
Si vis pacem para bellum
Posts: 2,373
Jul 11, 2012 9:11:45 GMT -5
Jul 11, 2012 9:11:45 GMT -5
|
Post by reserve on Mar 2, 2024 19:40:58 GMT -5
Hay that's not a tank
Looks like you got the sides to match up that could not have been easy
|
|
Mike
Full Member
  
Member since: December 2023
Posts: 377
Dec 28, 2023 0:41:00 GMT -5
Dec 28, 2023 0:41:00 GMT -5
|
Post by Mike on Mar 2, 2024 19:42:03 GMT -5
Thank you, thank you. I love the shape of the Type VII-C U-Boats. That open side was a sore spot to me and the interior is what I will call "Playschool" levels of detail. Very basic and not convincing at all. The figures provided also look too small to me. Thinking about it still makes my head spin. lol.
|
|
Mike
Full Member
  
Member since: December 2023
Posts: 377
Dec 28, 2023 0:41:00 GMT -5
Dec 28, 2023 0:41:00 GMT -5
|
Post by Mike on Mar 2, 2024 19:43:48 GMT -5
Hey that’s pretty cool. Looking good! Thank you. I'm really anticipating the painting I get to do on this model after I get it completed.  |
|
Mike
Full Member
  
Member since: December 2023
Posts: 377
Dec 28, 2023 0:41:00 GMT -5
Dec 28, 2023 0:41:00 GMT -5
|
Post by Mike on Mar 2, 2024 19:46:21 GMT -5
Hay that's not a tank Looks like you got the sides to match up that could not have been easy No, its not a tank lol! It's a long metal tube full of seamen! I have to wait for a couple of days before I can start sanding down the Milliput. It's definitely not matched on both sides yet. I'm going to be burning through the sanding sticks for sure! |
|
handiabled
Administrator      Apr '23 Showcased Build Awarded
Member since: February 2023
Posts: 4,508 
MSC Staff
|
Post by handiabled on Mar 3, 2024 7:38:28 GMT -5
Great solution for the cutaways! Following with interest!
|
|
lyle
Forum Moderator     
Member since: May 2013
On the sunny side of the dirt
Posts: 1,657 
MSC Staff
|
Post by lyle on Mar 3, 2024 7:50:27 GMT -5
That looks amazing. Great building skills there!
|
|
Mike
Full Member
  
Member since: December 2023
Posts: 377
Dec 28, 2023 0:41:00 GMT -5
Dec 28, 2023 0:41:00 GMT -5
|
Post by Mike on Mar 3, 2024 15:40:39 GMT -5
Thank you for following. I'll try not to let it get too boring.
Great skills? I don't know about that. Thank you though. Lol
I've got this model sitting in front of me but I know I want to wait one more day just to be sure the Milliput is fully hardened before I start sanding.
Maybe I feel like painting to pass the time. I've got tanks and figures that need painting.
The adventure never really ends, does it?
|
|
Mike
Full Member
  
Member since: December 2023
Posts: 377
Dec 28, 2023 0:41:00 GMT -5
Dec 28, 2023 0:41:00 GMT -5
|
Post by Mike on Mar 5, 2024 18:14:41 GMT -5
I've been slowly whittling away at this thing for two days and I'm getting close to the sides matching up by eye. I tried using my sanding sticks but the Milliput gums up the sticks way too quickly. So instead I've been using a mini battery powered dremel knock-off I received as a gift at Christmas this last year that's been extremely handy simply because its a lot easier to hold precisely for this job. I know my Dremel would make quicker work of this but its unwieldly when I need to make this as accurate as I can lol.  Revel 1/125 U-boat Revel 1/125 U-boat by Mike Brindos, on Flickr I'll keep slowly and carefully sanding until I have the general shape as close to finished as I can make it and then I'll switch to my Bondo Spot Glazing putty I rely on so much to smooth out the final shape. I basically have quite a long ways before I reach the finish line with this project, But I can see the end of it drawing near now. |
|
handiabled
Administrator      Apr '23 Showcased Build Awarded
Member since: February 2023
Posts: 4,508 
MSC Staff
|
Post by handiabled on Mar 6, 2024 2:17:08 GMT -5
Achieving symmetry on the sides must be challenging indeed. Definitely looks like you are getting there
|
|
|
|
Post by Leon on Mar 6, 2024 5:21:11 GMT -5
Nice work closing up the side!
|
|
|
|
Post by 406 Silverado on Mar 6, 2024 6:33:29 GMT -5
The great work on this one continues Mike!! Say.......if you want to put some interior detail on the interior of a U-Boat you could always go for Trumpy's 1/48 scale version of it. Just sayin'   LOTS of interior details......  |
|
Mike
Full Member
  
Member since: December 2023
Posts: 377
Dec 28, 2023 0:41:00 GMT -5
Dec 28, 2023 0:41:00 GMT -5
|
Post by Mike on Mar 6, 2024 16:06:32 GMT -5
Achieving symmetry on the sides must be challenging indeed. Definitely looks like you are getting there Symmetry is difficult to achieve by eye, but yes, it is getting there. Thank you for following! |
|
Mike
Full Member
  
Member since: December 2023
Posts: 377
Dec 28, 2023 0:41:00 GMT -5
Dec 28, 2023 0:41:00 GMT -5
|
Post by Mike on Mar 6, 2024 16:07:10 GMT -5
Nice work closing up the side! Thank you! |
|
Mike
Full Member
  
Member since: December 2023
Posts: 377
Dec 28, 2023 0:41:00 GMT -5
Dec 28, 2023 0:41:00 GMT -5
|
Post by Mike on Mar 6, 2024 16:09:38 GMT -5
The great work on this one continues Mike!! Say.......if you want to put some interior detail on the interior of a U-Boat you could always go for Trumpy's 1/48 scale version of it. Just sayin'   LOTS of interior details......  I've taken a notice of the build thread on this kit. It's amazing. But I'm not looking for a kit with an interior. The 1/144 "Das Boot" kit caught my eye though. |
|
dodgy
Full Member
  
Member since: January 2024
Posts: 525
Jan 1, 2024 16:23:41 GMT -5
Jan 1, 2024 16:23:41 GMT -5
|
Post by dodgy on Mar 6, 2024 20:44:54 GMT -5
Superb work my friend. I have both versions of this kit and after looking at the so called 'interior detail' and comparing it to references, I put it back on the shelf and started on the full hull version. That is now sitting on the shelf because I struggle once I get past the building stage. Painting scares me. Very impressed with your solution to filling in the hull. Now bookmarked.
|
|
Mike
Full Member
  
Member since: December 2023
Posts: 377
Dec 28, 2023 0:41:00 GMT -5
Dec 28, 2023 0:41:00 GMT -5
|
Post by Mike on Mar 6, 2024 23:07:13 GMT -5
|
|
jeaton01
Full Member
   Sept '23 Showcased Model Awarded
Member since: October 2013
Posts: 1,306 
|
Post by jeaton01 on Mar 6, 2024 23:38:45 GMT -5
What I use for rough work like that is either a four in hand or more likely for a job like this, a mill bastard file. A light touch gets more done and the coarser file does not plug as much.
|
|
handiabled
Administrator      Apr '23 Showcased Build Awarded
Member since: February 2023
Posts: 4,508 
MSC Staff
|
Post by handiabled on Mar 7, 2024 2:21:46 GMT -5
A bit more sanding and you will be super close to putting some color on this
|
|
|
|
Post by 406 Silverado on Mar 7, 2024 6:20:29 GMT -5
Coming along good so far Mike. Watching for more on this build.
|
|
Mike
Full Member
  
Member since: December 2023
Posts: 377
Dec 28, 2023 0:41:00 GMT -5
Dec 28, 2023 0:41:00 GMT -5
|
Post by Mike on Mar 8, 2024 21:21:43 GMT -5
Spent some time scratch building the rails on the conning tower. The kit provided rails were heavy with flash, fragile, and didn't even fit well.  Revell 1/125 U-boat Revell 1/125 U-boat by Mike Brindos, on Flickr With the help of a paper clip for the uppermost rail the rest were made from stretched sprue. |
|
Mike
Full Member
  
Member since: December 2023
Posts: 377
Dec 28, 2023 0:41:00 GMT -5
Dec 28, 2023 0:41:00 GMT -5
|
Post by Mike on Mar 10, 2024 3:05:43 GMT -5
|
|
handiabled
Administrator      Apr '23 Showcased Build Awarded
Member since: February 2023
Posts: 4,508 
MSC Staff
|
Post by handiabled on Mar 10, 2024 3:58:50 GMT -5
The hull looks great! Great scratch work with the railings!
|
|
dodgy
Full Member
  
Member since: January 2024
Posts: 525
Jan 1, 2024 16:23:41 GMT -5
Jan 1, 2024 16:23:41 GMT -5
|
Post by dodgy on Mar 11, 2024 18:08:31 GMT -5
Great work with the railings. The hull is looking good too. I reckon you've nailed that.
|
|
|
|
Post by kyledehart5 on Mar 11, 2024 19:04:16 GMT -5
That looks mighty good.
|
|
Mike
Full Member
  
Member since: December 2023
Posts: 377
Dec 28, 2023 0:41:00 GMT -5
Dec 28, 2023 0:41:00 GMT -5
|
Post by Mike on Mar 11, 2024 20:48:08 GMT -5
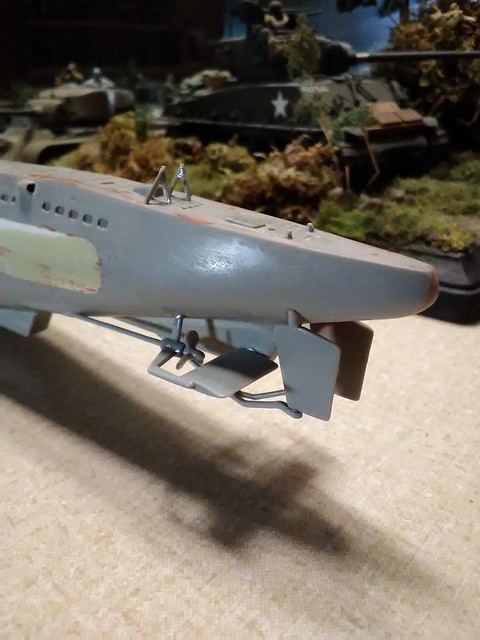
I've made some progress with the final bits of assembly. I'm just waiting for glue to dry lol. Aside from the many, many ejector pin marks and the plentiful amount of flash on most of the parts I've got to a point where I'm almost ready for a coat of primer.  Revell 1/125 U-boat Revell 1/125 U-boat by Mike Brindos, on Flickr  Revell 1/125 U-boat Revell 1/125 U-boat by Mike Brindos, on Flickr  Revell 1/125 U-boat Revell 1/125 U-boat by Mike Brindos, on Flickr Thanks for the cudos, guys! The hull is mostly symmetrical, although not exact. It looks like a type VII U-Boat and I'm very much looking forward to painting this inaccurate model very soon. |
|
|
|
Post by deafpanzer on Mar 12, 2024 13:18:37 GMT -5
Nice work on the scratch built rail! You are getting there...
|
|
Mike
Full Member
  
Member since: December 2023
Posts: 377
Dec 28, 2023 0:41:00 GMT -5
Dec 28, 2023 0:41:00 GMT -5
|
Post by Mike on Mar 12, 2024 21:32:48 GMT -5
I'm ready for primer! I'm just waiting for my paint-blob (isolators, or floats?) on the wires to dry before I spray it.  Revell 1/125 U-boat Revell 1/125 U-boat by Mike Brindos, on Flickr Can someone tell me what the wires are? My current guess is a radio wire, hence my assumption that there are isolators on it. Floats just don't make any sense to me. |
|
 U-boat by Mike Brindos, on Flickr
 IMG_20240228_195530 by Mike Brindos, on Flickr
 Revell U-47 by Mike Brindos, on Flickr
 Revell 1/125 U-47 by Mike Brindos, on Flickr
 Revell 1/125 U-47 by Mike Brindos, on Flickr
 Revell U-47 by Mike Brindos, on Flickr
 Revell U-47 by Mike Brindos, on Flickr
 Revell U-47 by Mike Brindos, on Flickr
 Revell U-47 by Mike Brindos, on Flickr
 Revell U-47 by Mike Brindos, on Flickr
 Revell U-47 by Mike Brindos, on Flickr
 U-boat by Mike Brindos, on Flickr
 IMG_20240228_195530 by Mike Brindos, on Flickr
 Revell U-47 by Mike Brindos, on Flickr
 Revell 1/125 U-47 by Mike Brindos, on Flickr
 Revell 1/125 U-47 by Mike Brindos, on Flickr
 Revell U-47 by Mike Brindos, on Flickr
 Revell U-47 by Mike Brindos, on Flickr
 Revell U-47 by Mike Brindos, on Flickr
 Revell U-47 by Mike Brindos, on Flickr
 Revell U-47 by Mike Brindos, on Flickr
 Revell U-47 by Mike Brindos, on Flickr


