kyledehart5
Forum Moderator      Dec '23 Showcased Model Awarded
Member since: July 2023
Posts: 7,135
Member is Online
MSC Staff
|
Post by kyledehart5 on Nov 5, 2024 20:02:59 GMT -5
This is so nice I don’t even know what to say. It looks incredible
|
|
handiabled
Administrator      Apr '23 Showcased Build Awarded
Member since: February 2023
Posts: 4,427 
MSC Staff
|
Post by handiabled on Nov 6, 2024 3:12:28 GMT -5
Gorgeous so far John. Looking forward to your paint work especially the 1ManArmy stencil and markings.
|
|
TJ
Senior Member
    June '23 Showcased Model Awarded
Member since: May 2023
Posts: 2,172
May 14, 2023 18:18:36 GMT -5
May 14, 2023 18:18:36 GMT -5
|
Post by TJ on Nov 6, 2024 4:18:58 GMT -5
Well the spare parts bin came through again. Great fix
|
|
jkim
Full Member
  
Member since: October 2023
Posts: 116
Oct 19, 2023 12:36:27 GMT -5
Oct 19, 2023 12:36:27 GMT -5
|
Post by jkim on Nov 7, 2024 16:04:07 GMT -5
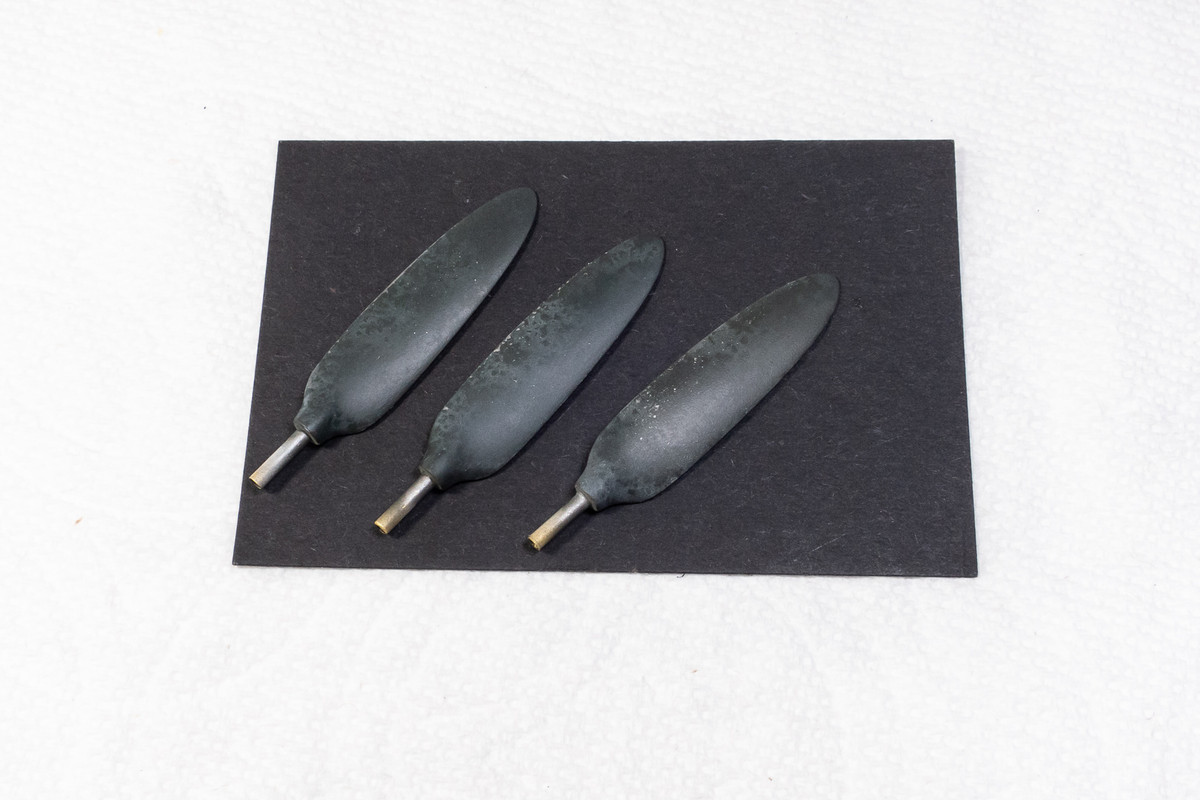
Thanks guys! Have been occupied with other things that have been impacting my bench time... preparing a trip to India at the end of the month... daughter visiting over the weekend... charity poker event that I'm hosting this weekend... etc. But I've managed to work on several items. The Barracuda prop blades have been painted. The base is Tamiya AS-12 Silver in a spray can that I decanted into my airbrush. I mixed in a small amount of Tamiya Flat Black because I'm going to do some hairspray chipping and I've found that a flat finish holds the hairspray better than a shiny one. After the silver color is applied, liquid hairspray is sprayed through the airbrush onto the blades. After the hairspray dries, the RLM 70 Black Green (Mr Hobby Aqueous H65) is sprayed on. Hairspray is water-soluble so it creates an unstable layer under the green. Using a stiff paint brush dipped in water and simply rubbing, you can get small fragments of the green paint to lift off the model creating random paint chips. The heaviest chipping was reserved for the back tips and this area was further degraded by Micromeshing the green color.   An additional layer of wear effects were put on the blades by way of what I call "salt weathering". The surface of the prop blades are wet with water and salt crystals are sprinkled on. The salt dries and forms a random mask pattern of splotches. A highly thinned mixture of a lighter color is then misted over the blades. In this case, I used Tamiya Deck Tan thinned down with isopropyl alchohol (10:1 thinner: paint ratio).  I am looking for a very subtle effect and it can be very difficult to gauge when spraying the thinned mixture. You just have to spray and hope. This is the result. It's ok but a little heavier in spots than I would like so I adjust by rubbing areas down with Micromesh.  This is what the prop blades look like after adjustment.  The Airscale prop spinner has also been painted.  The prop blades are mounted.  Here is the painted prop assembly temporarily mounted onto the fuselage.  I've also painted the landing gear legs. Brake lines via copper wire were added, secured into place using small sections of brass tubing affixed with strips of aluminum tape. The terminal looped sections of the brake lines were lead wire and added after painting.   |
|
dukemaddog
Full Member
  
Member since: March 2023
Virtuoso of Miniatures
Posts: 623 
|
Post by dukemaddog on Nov 7, 2024 16:23:15 GMT -5
This is so magnificent! It's a thrill to see your work again!
|
|
Mike
Full Member
  
Member since: December 2023
Posts: 372
Dec 28, 2023 0:41:00 GMT -5
Dec 28, 2023 0:41:00 GMT -5
|
Post by Mike on Nov 8, 2024 4:05:37 GMT -5
And you call my work neat... Yo, I haven't done effects like, well, not even this good in a long time. I'm flabbergasted, John. Your combination of techniques and your control over them is IMPRESSIVE.
|
|
TJ
Senior Member
    June '23 Showcased Model Awarded
Member since: May 2023
Posts: 2,172
May 14, 2023 18:18:36 GMT -5
May 14, 2023 18:18:36 GMT -5
|
Post by TJ on Nov 8, 2024 5:04:19 GMT -5
I can't say it enough. Your attention to detail is Inspiring
|
|
handiabled
Administrator      Apr '23 Showcased Build Awarded
Member since: February 2023
Posts: 4,427 
MSC Staff
|
Post by handiabled on Nov 8, 2024 9:52:42 GMT -5
Your multi layered approach to weathering is outstanding!
|
|
|
|
Post by hasenpfeffer on Nov 8, 2024 10:02:26 GMT -5
Very cool effects. I think I'll try the salt dealio on my current project as I've been meaning to do so. What did you use for the shiny silver bits? AK chrome marker or the like?
|
|
jkim
Full Member
  
Member since: October 2023
Posts: 116
Oct 19, 2023 12:36:27 GMT -5
Oct 19, 2023 12:36:27 GMT -5
|
Post by jkim on Nov 9, 2024 15:39:48 GMT -5
|
|
Mike
Full Member
  
Member since: December 2023
Posts: 372
Dec 28, 2023 0:41:00 GMT -5
Dec 28, 2023 0:41:00 GMT -5
|
Post by Mike on Nov 9, 2024 19:43:57 GMT -5
Sooooo beautiful!
|
|
handiabled
Administrator      Apr '23 Showcased Build Awarded
Member since: February 2023
Posts: 4,427 
MSC Staff
|
Post by handiabled on Nov 10, 2024 2:49:12 GMT -5
She stands! Do you use pastels to get the effect you do on the tires?
|
|
|
|
Post by Steve Zuleski on Nov 10, 2024 23:38:55 GMT -5
This is shaping up pretty sweet-like!
|
|
|
|
Post by dupes on Nov 11, 2024 0:26:13 GMT -5
This is crazy. You're going to have more aftermarket than kit! Fabulous work.
|
|
jkim
Full Member
  
Member since: October 2023
Posts: 116
Oct 19, 2023 12:36:27 GMT -5
Oct 19, 2023 12:36:27 GMT -5
|
Post by jkim on Nov 11, 2024 16:12:57 GMT -5
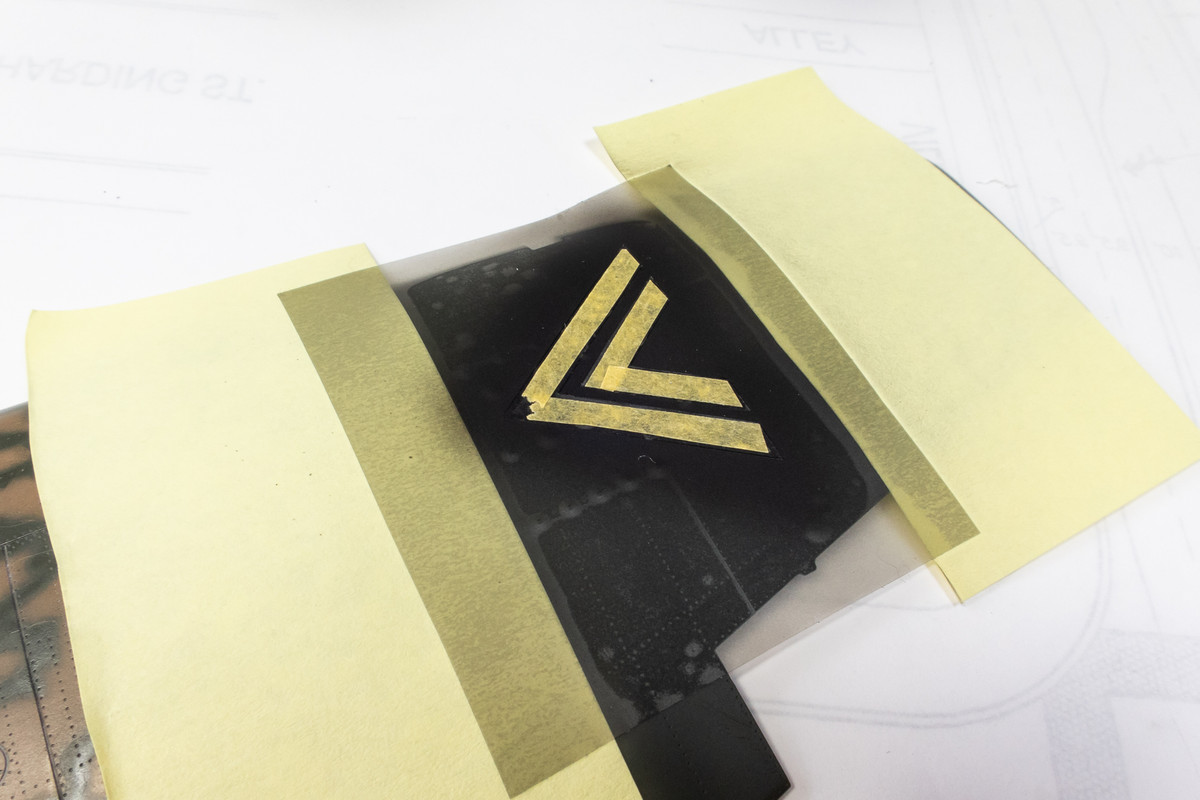
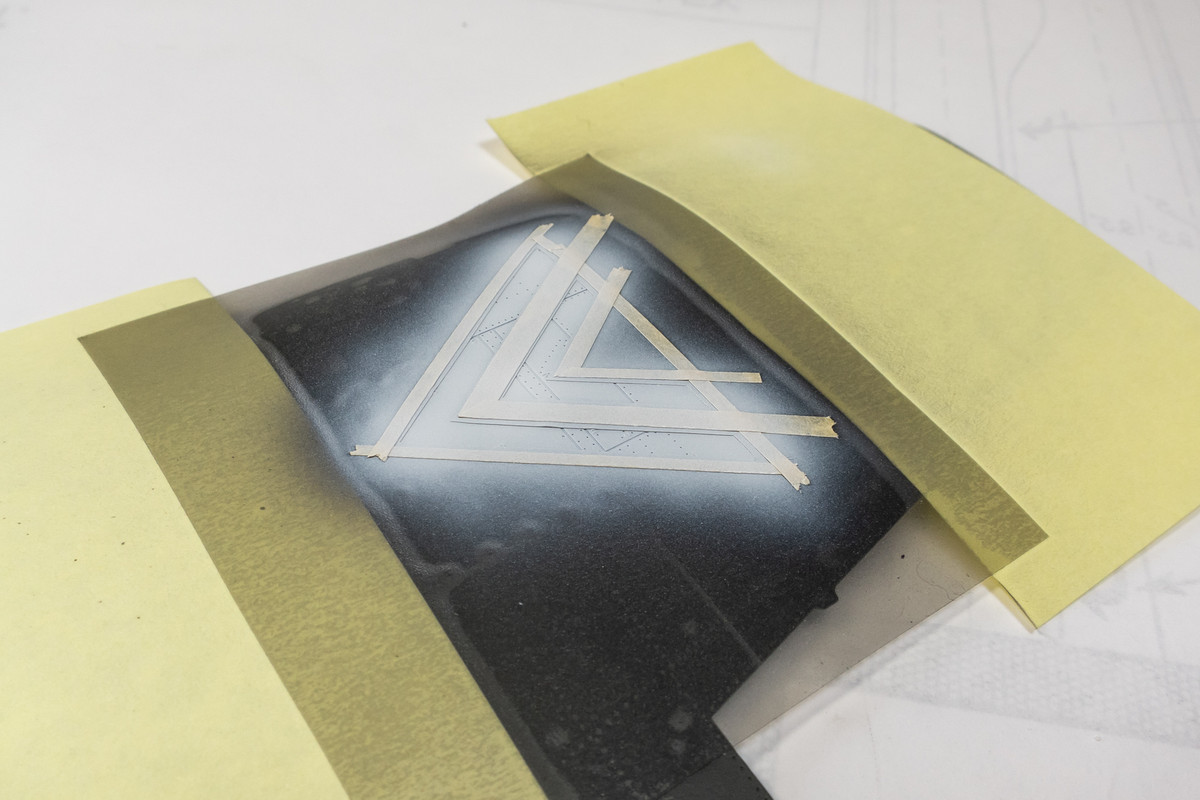
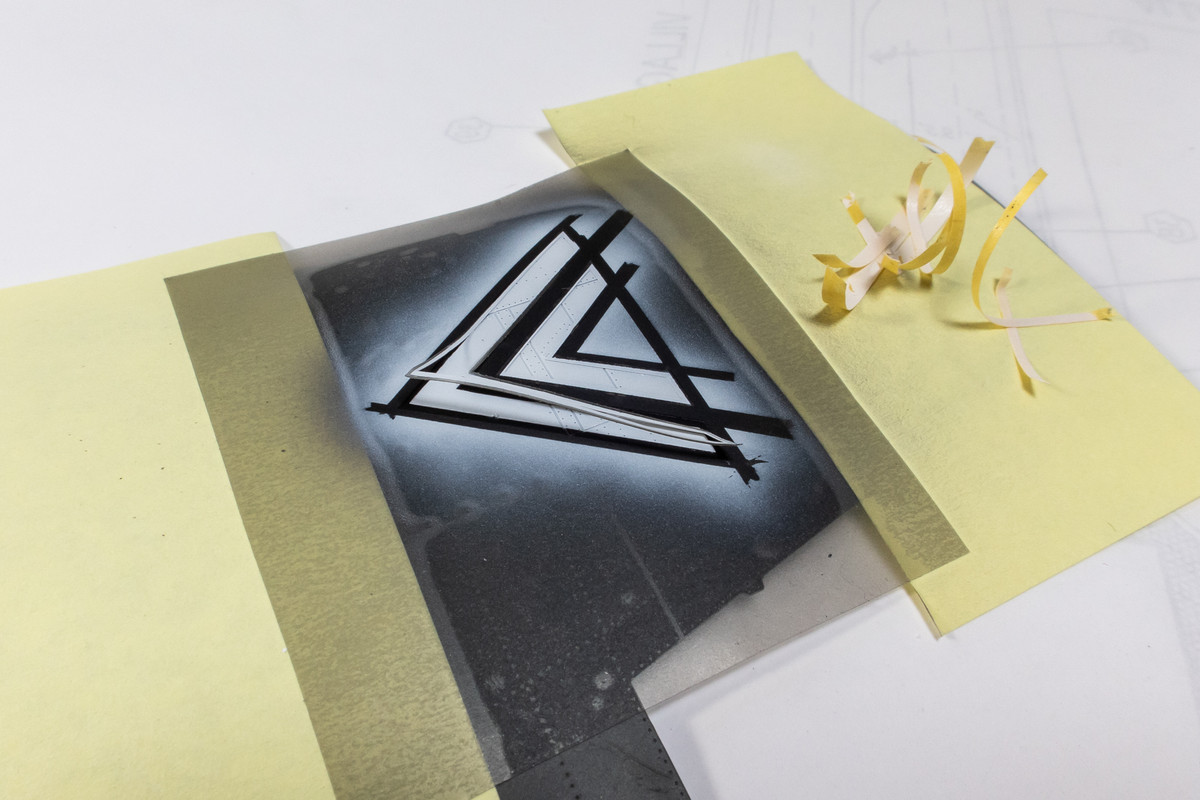
Thanks guys! As always, appreciate the positive feedback. She stands! Do you use pastels to get the effect you do on the tires? After the tires are airbrushed with mixtures of brown and dark grey, getting lighter as you go from hub to tread, the final wear effects are with a tan pastel wash. This is done after a flat coat has been applied to the tires. The liquid pastel wash tends to spread out and create tide stains on a flat finish so I use this to create stain effects. I lik3 creating some "edge" to the stains since anything you do with the airbrush is so diffuse. The Revell kit contains the decal markings for the aircraft I want to model, which is Major Hannes Trautloft's G-2. The decals are made by Cartograph, which usually means excellent quality so the decals are definitely usable. But painted markings can look better than decals so I am planning to use custom cut paint masks for the larger markings. Masks with narrow borders can be tricky to do so I wanted to test the use of paint masks on the large double chevron of Trautloft's G-2. The decal sheet has been scanned and then inserted into an AutoCAD drawing. The chevron is then traced in AutoCAD. This is used to produce a paint mask using a Silhouette Portrait craft cutter.  The first step is applying the overall outer mask to the paint mule.  The chevron is two colors, white with a narrow black border. Two ways to paint this, black first or white first. For multi-color masks, my standard procedure is to work from the outside, going inwards. This helps eliminate possible color bleed. For example, if I sprayed the white first and then the black, I may get traces of white on the outer border of the chevron. So a coat of black is sprayed onto the mask pattern.  After that is dry, I can apply the thin border mask. I find it much easier to link together all of the inner elements using tape and transporting the inner elements into the outline mask. Spacing and alignment are preserved when you do it this way as the thin border, by itself, is difficult to manipulate.    The innermost mask elements of the chevrons can then be removed, leaving the thin border.  The joint between the thin border mask and outline mask my not be perfect. To avoid paint leak, I like to seal this joint. On circular or irregular shapes, I use liquid mask but since the chevron is made up of straight lines, I found it easier to use strips of tape.  White is then sprayed onto the masked area. You can immediately see the benefits of painted markings as all of the underlying panel lines and rivets are preserved.  After the white paint is allowed to dry, the mask elements can now be removed. I like to remove in reverse order of application.   The large outline mask is removed last.  Painting the chevron with a paint mask didn't present any problems and the result looks good so the test was a success.  |
|
|
|
Post by 406 Silverado on Nov 11, 2024 22:11:33 GMT -5
Thanks guys! Appreciate the comments! As far as the shiny part of the landing gear oleos, I didn't do anything there. I am using replacement landing gear legs produced by a small company called Synthetic Ordnance Works. They are resin cast over a metal core and the oleo part is a shiny metal tube. So all I had to do is mask it off prior to painting. I'm still in process of cleaning up joints but while I'm doing that, I've managed to paint the landing gear components. This is the tail wheel, which is a Reskit product. I added the whitewall because that's what I see on photographs of Trautloft's G-2.  The main wheels are also from Reskit. The hubs are a bit shiny so I may put a little clear flat on them to tone that down.  Alright John. You're gonna have to describe the process you use to get the tires to look like that man. I've got a set of Reskit wheels/ tires coming for my Ta-152 and I want this look. For such a busy guy, you sure are making a sizeable and quality dent in this build. My hat goes off to you bud.  |
|
handiabled
Administrator      Apr '23 Showcased Build Awarded
Member since: February 2023
Posts: 4,427 
MSC Staff
|
Post by handiabled on Nov 12, 2024 4:04:09 GMT -5
Your masking technique is fabulous! +1 karma for your very detailed walk through of them and your effect with the tires.
|
|
jkim
Full Member
  
Member since: October 2023
Posts: 116
Oct 19, 2023 12:36:27 GMT -5
Oct 19, 2023 12:36:27 GMT -5
|
Post by jkim on Nov 12, 2024 13:03:28 GMT -5
Alright John. You're gonna have to describe the process you use to get the tires to look like that man. I've got a set of Reskit wheels/ tires coming for my Ta-152 and I want this look. For such a busy guy, you sure are making a sizeable and quality dent in this build. My hat goes off to you bud.  Thanks Joe! As for the tires, everyone has a different way of doing things so I would never claim that this is the best way. Just a general SOP that I've developed over time. First thing to note is that Luftwaffe wheel hubs are often black in color. To create more contrast between the wheels and tires, I paint the wheels black and the tires varying shades of brown/dark grey. And it gets lighter as you go from the sidewalls to the tread area. This lightening leads to my treatment of the tread recesses. Most modelers paint their tires dark and run a lighter color as a wash into the tread pattern. Which I think is fine in some cases. But when I look at my car tires, I see that the tread recesses are darker than the contact surfaces and that's what I like to do on my models. After running a dark wash into the treads, I seal the paint work with a flat coat. Airbrushing effects are so diffuse that you can't really produce realistic stain effects on small parts. So I use other methods like salt weathering and pastels to create more scale-representative staining. I've noticed that applying liquid pastel washes to a matte surface can cause staining and tide marks as the drops of the wash spread out and dry in irregular patterns. I use this behavior to create the last layer of stain marks on my tires... adding little drops of a lighter pastel wash to the tire. They'll spread out and dry and I'll wipe the patterns off but not completely. Repeated a few times, you can work up a nice level of wear staining this way. Hope that helps! |
|
kyledehart5
Forum Moderator      Dec '23 Showcased Model Awarded
Member since: July 2023
Posts: 7,135
Member is Online
MSC Staff
|
Post by kyledehart5 on Nov 14, 2024 4:26:14 GMT -5
I am astonished at your abilities, my friend. Everything looks so good I scarcely know what to say. And what skillful and effective masking techniques.
|
|