|
|
Post by Steve Zuleski on Sept 5, 2024 21:15:07 GMT -5
BroSki , small tip sbs or whatever you want to call it . Take a steel ruler [ something metal ] and splooge some Elmers white or a wood glue on it . Any size splooge , large or small dots . Then [ while the glue is wet ] sprinkle some super fine sand on it. You can get this just about anywhere , ......... smaller grains the better . Once dry choose your choice of colors and paint said splooge . When dry take a chisel blade and lift it off . I just did this in about ten mins. and just used some varied greens as an example . I usually just paint wet , various greens on wood for the moss lichen effects but the raised moss in this case I've used and has its benefits . Your larger scale could use some of this . Well that's a pretty slick trick, tanks, Bro! I just might find a spot for this. I don't have a static gun, if you can believe that, but this will help with the low down stuff. Tanks again. I'll check on your post, too. Pretty ingenious method of constructing these barrels! I think they look outstanding! Thanks, Brother. When in doubt, YT it, and you're gonna find it, more than likely. I don't know what to say. This work so far is just mind blowing. You make is all look effortless. Thanks, Amigo. Bump around in the dark long enough and you're bound ta hit somethin, right? lol  |
|
|
|
Post by 406 Silverado on Sept 6, 2024 5:14:41 GMT -5
BroSki , small tip sbs or whatever you want to call it . Take a steel ruler [ something metal ] and splooge some Elmers white or a wood glue on it . Any size splooge , large or small dots . Then [ while the glue is wet ] sprinkle some super fine sand on it. You can get this just about anywhere , ......... smaller grains the better . Once dry choose your choice of colors and paint said splooge . When dry take a chisel blade and lift it off . I just did this in about ten mins. and just used some varied greens as an example . I usually just paint wet , various greens on wood for the moss lichen effects but the raised moss in this case I've used and has its benefits . Your larger scale could use some of this . postimg.cc/fkHhfS4F]  [/url] postimg.cc/bZncP6Gc]  [/url] postimg.cc/ykJ2hfyg]  [/url] [/quote] I brought that whole mini tutorial forward one page so everyone could readily see it Glenn. Excellent tip bud. +1 Karma to ya |
|
|
|
Post by Steve Zuleski on Sept 14, 2024 19:29:53 GMT -5
Building Up AccessoriesI’ve been busy building accessories that would be commonly found in a work shed/lean-to and I have decided to make this part of a winery. I’m not going full blown-out crazy, there isn’t enough room to add too much, but I can give it that flavor. The Harley will be taking up a lot of space, so I’ll be adding just enough tools to add interest and keep the eyes moving throughout the scene as much as possible. I built a buck saw using a broken scroll saw blade and wire with pine scrap as well as a few block and tackles. Looking on line once again at YT was a time saver, great tool. I’m still undecided how I will attach at least one of the B&T’s to the rafters, but the other will be on the deck. 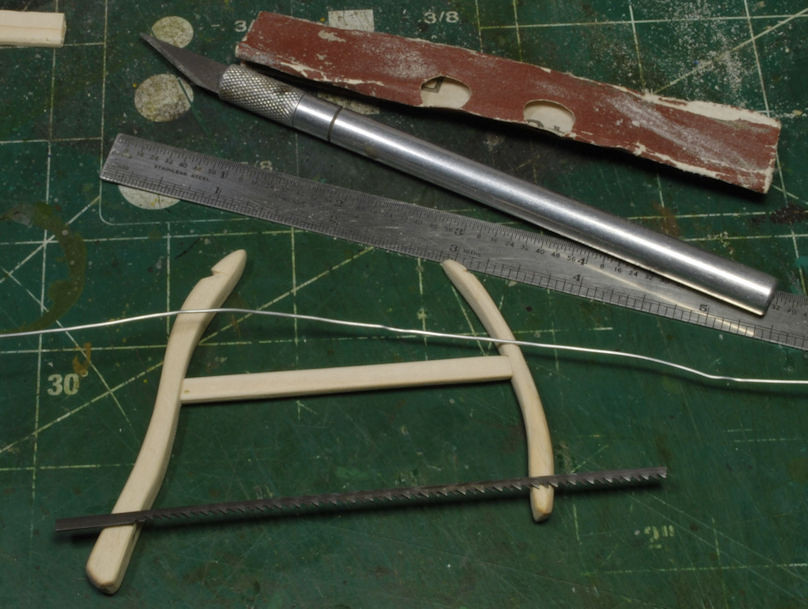 Looking over some photos of B&T’s I was able to come up with a simple design that would be practical for my need and easy enough to make using scrap pine and brass sheet strips plus some 12ga copper wire for the hooks. 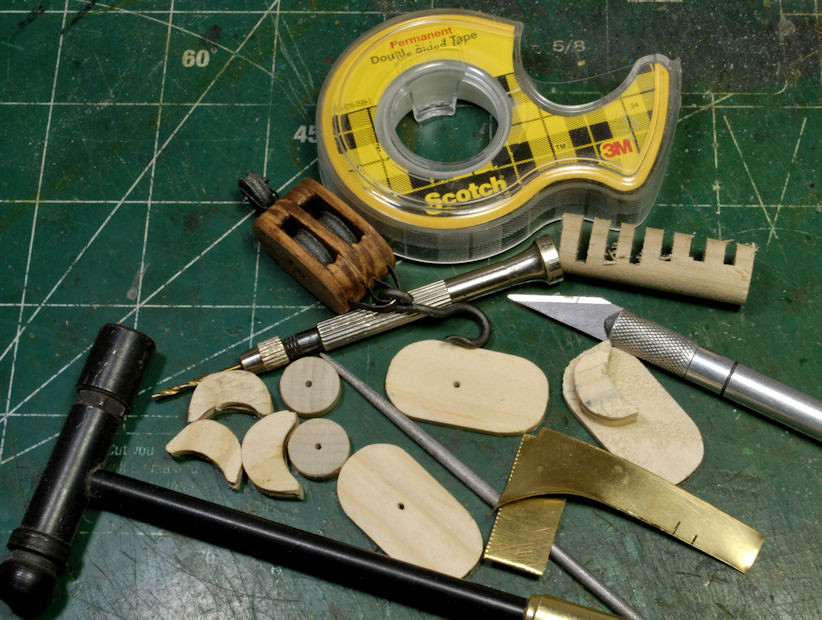 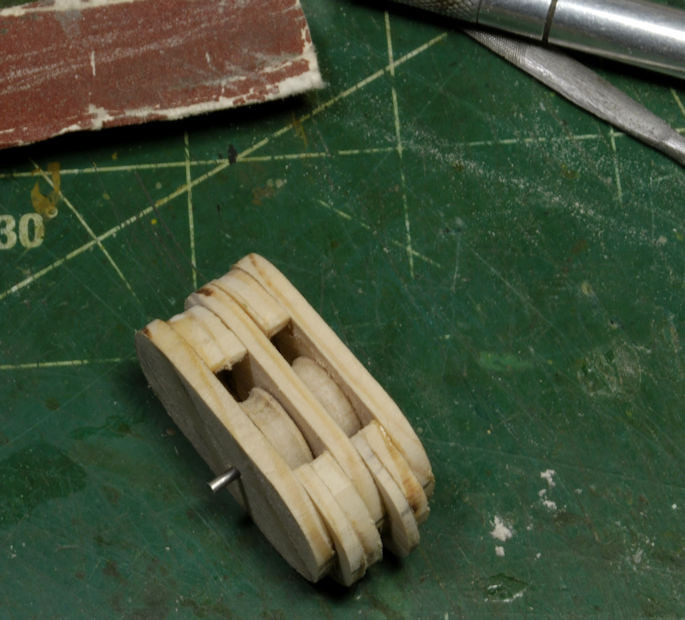 The rope for these B&T’s was first coated with water thinned Elmer’s Carpenter’s glue, then given a Burnt Umber oil wash to give it definition.  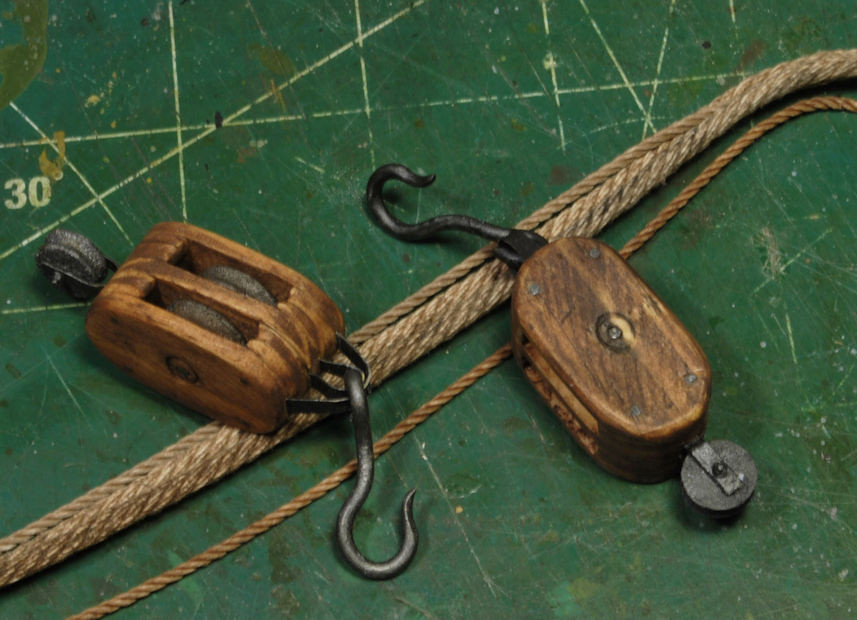 For the chain I used the old “shake and bake” method. Wet the cheap chain with black or Burnt Umber oil paints and drop into a sandwich bag with rust tone pigments, then shake it up. Once you pull the chain out of the bag give it a quick snap and most of the excess flies off. I’ll be going back over this chain with an old tooth brush to clean it up, touch up the rust tones, and finish it off. An old Dremel lathe was used to turn the shovel handle out of some dowel chunks. This unit is so weak it was easier to use the sand paper than try to turn it. 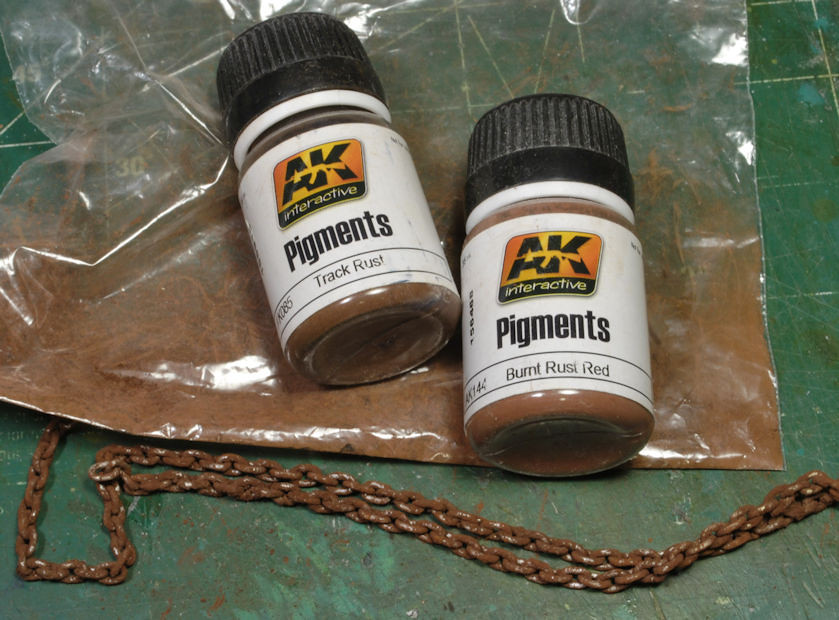 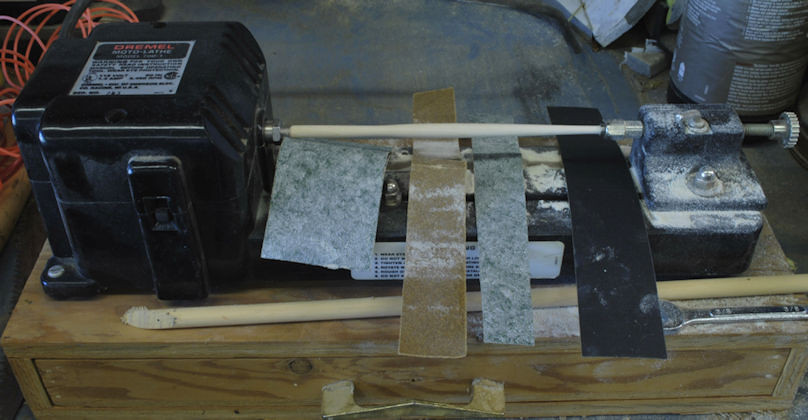 Next up, after weathering the wine barrel, I built a barrel dolly from pine scrape and shaped most of it on the belt sander. Cutting thicker sheet brass for the base and supports for the wheels was necessary. The wheels are rollers from a tank long ago scrapped and they were perfect for this purpose. 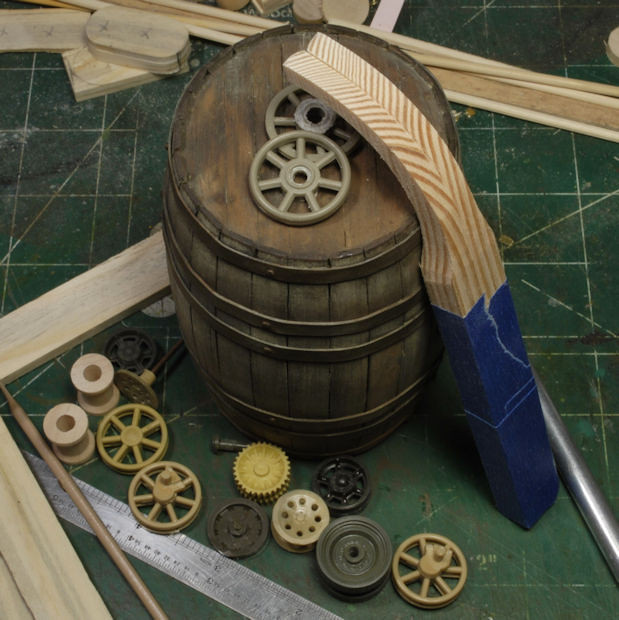 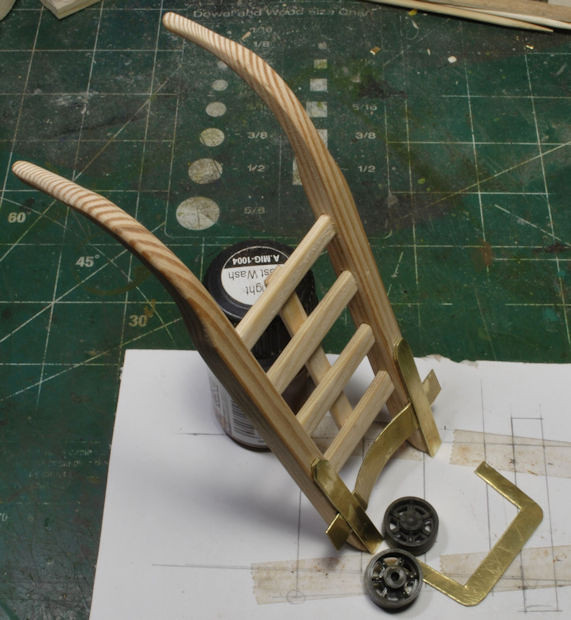 After making a grid pattern for the dolly layout it all went together rather quickly. I Dremel’d out the cross-member slots which made the assembly very sturdy. I soldered the base and support bars together before gluing the unit to the dolly frame. Then I followed up with pins down the supports to retain the brass base assembly. 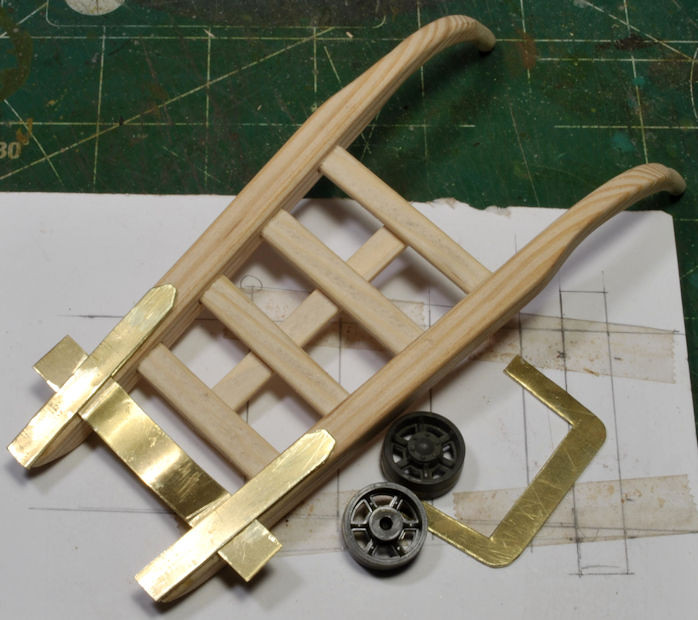  Once the brass was primed I painted the metal parts and wheels with Tamiya’s Metallic Grey XF-56 and then painted the wood using Burnt Sienna oils. The standard rust and weathering applications were used to make the dolly look used and abused and now neglected. 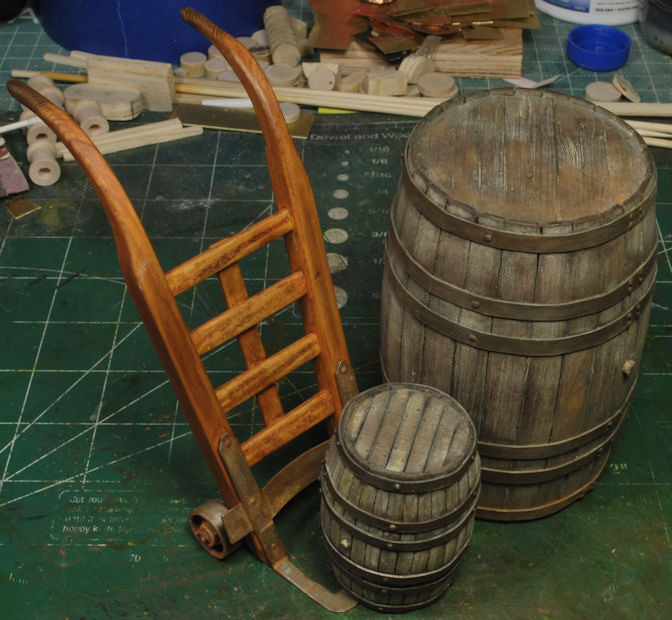 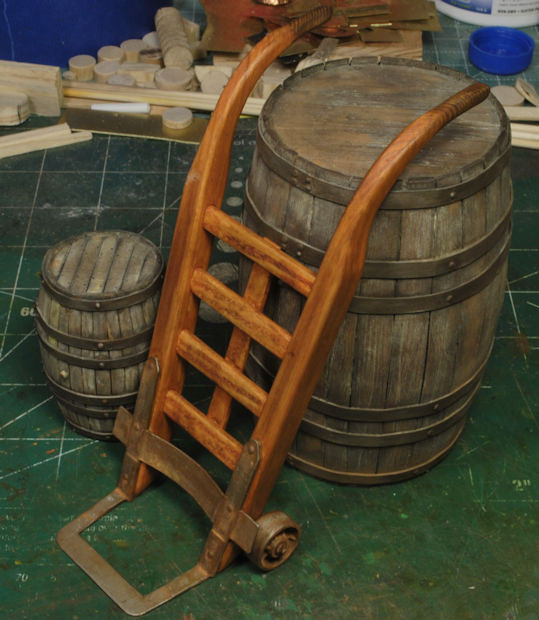 So, with the major accessories made I will make a few more tools and give everything a good weathering. The dusting to mesh the accessories to the base will be the last step before securing each item in place. 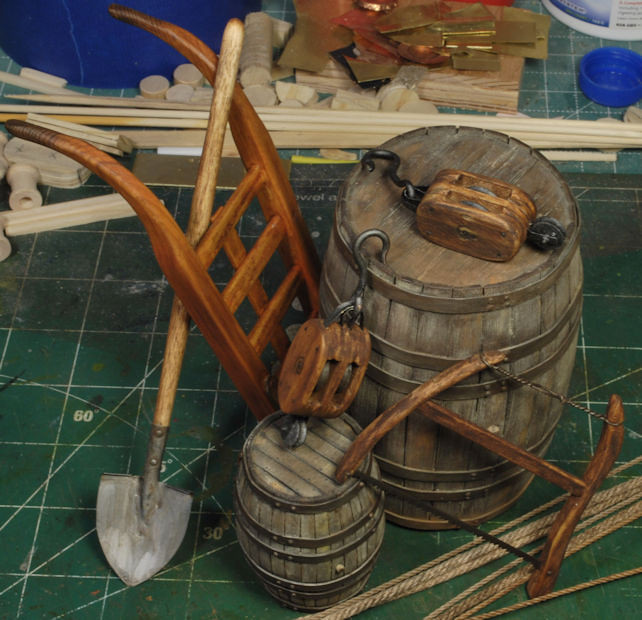 More to follow soon and thanks for watchin. Cheers, Ski.
|
|
cheyenne
Full Member
   December '24 Showcased Model Awarded
Member since: January 2024
Posts: 258
Jan 17, 2024 5:29:21 GMT -5
Jan 17, 2024 5:29:21 GMT -5
|
Post by cheyenne on Sept 14, 2024 20:34:12 GMT -5
Beautiful work man !!!!!!
|
|
|
|
Post by kyledehart5 on Sept 14, 2024 21:20:42 GMT -5
Really great work Ski!! That’s amazing.
|
|
handiabled
Administrator      Apr '23 Showcased Build Awarded
Member since: February 2023
Posts: 4,585 
MSC Staff
|
Post by handiabled on Sept 15, 2024 3:57:17 GMT -5
Once again Steve you blow me away with your creative scratchwork using scrap.
|
|
|
|
Post by Steve Zuleski on Sept 15, 2024 14:40:46 GMT -5
Beautiful work man !!!!!! Thank you, Ma Brotha! Really great work Ski!! That’s amazing. Thanks, Kyle. Once again Steve you blow me away with your creative scratchwork using scrap. Thanks, Brett. I'm tellin ya, any time you've got an idea for a scene and wonder how to do it, check YT, somebody has more than likely done it and the learning curve is diminished considerably. |
|
|
|
Post by Steve Zuleski on Sept 26, 2024 16:05:27 GMT -5
Building Wine Crates and BottlesThis is pretty much a repeat from the “Embarrassing Moments” dio, but in a slightly larger scale. The process being the same I used the larger hot glue sticks for a more in scale appearance. Just melt the tip and let it drip. Actually, there’s a lot more to it than that, but you get the idea. The crate designs are different, but strangely enough, I used some of the same crate labels, oops. Must be a popular wine in Normandy I recon. Ya, that’s it! Making these crates is very straight forward. I used some balsa wood for the sides and thin pin strips for the supports and handles and all of that is being held together with trusty old Elmer’s Wood glue. 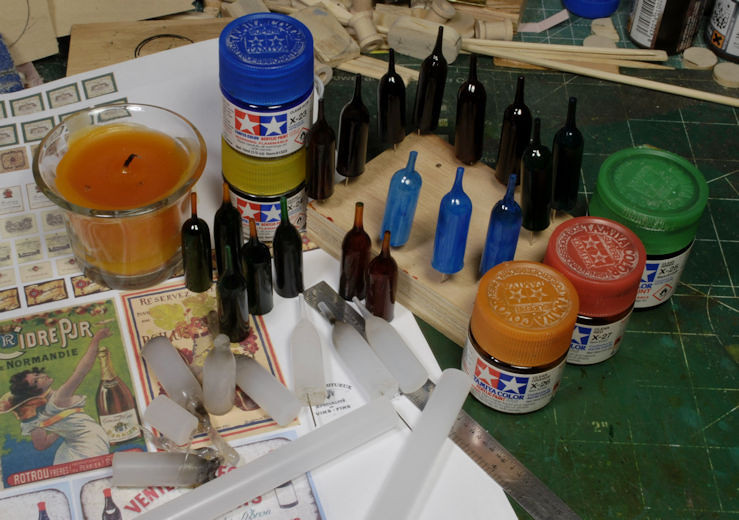 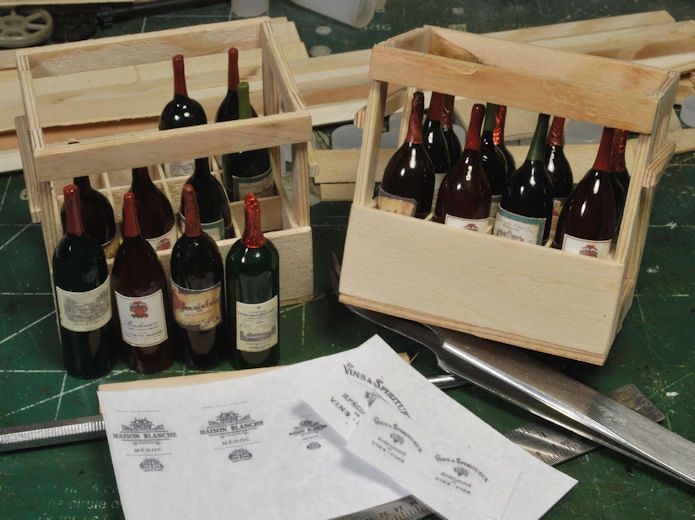 This Tamiya clear color really is great for making these bottles and dries to a high gloss. I tried to follow what actual wine bottles look like for different wines. Some of the bottles would be considered clear glass and others would be tinted green or dark green and some a dark reddish tone. I varied the colors for a variety to mix things up a bit. If you wished you could make a bottle look partially full or completely empty just by the number of layers of paint you apply. I didn’t bother making any partially full, but I will have one opened. Drilling a hole in the top of one of these is going to be a real pain, but I’ll get one hollowed out somehow. The Ranger is enjoying some vino with his cheese and sausage, so he’s got to have an opened bottle. 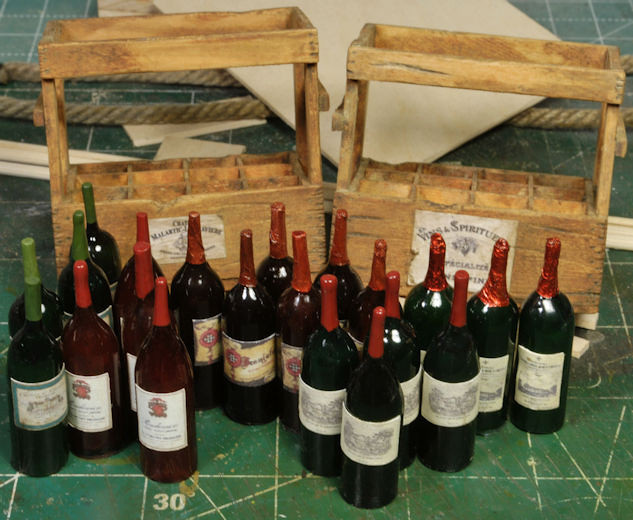 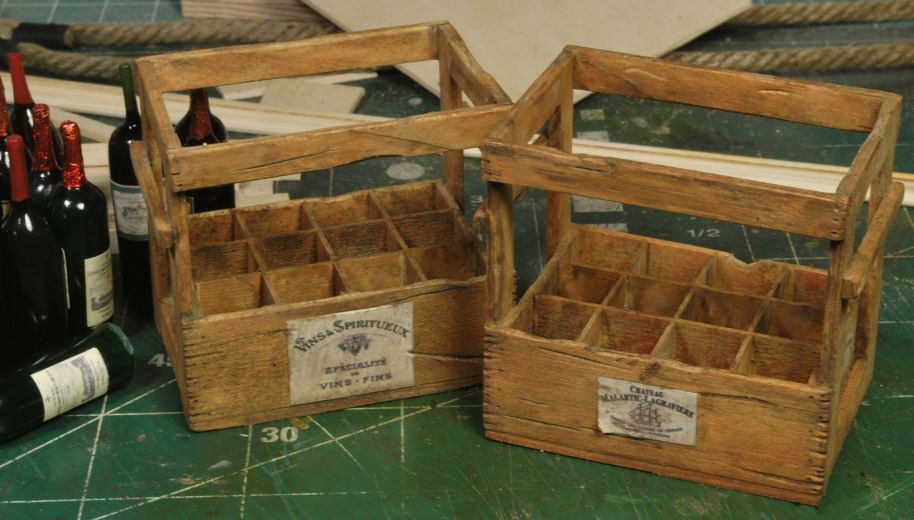 The bottle labels were taken from pics on the inet, printed, and glued in place. Some of the bottle tops have candy wrapper foil on them and painted with mixed Tamiya clear colors for variety. The others are just dipped in paint and allowed to dry upside down, then re-dipped at the top and dried again. It’s easy enough to replicate the cork top by how many times you dip the top. 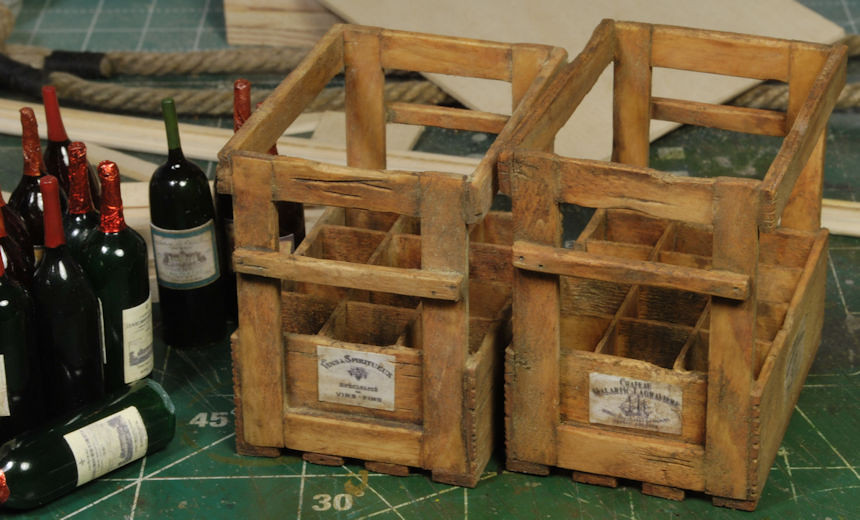 Once the crates were given an initial Burnt Umber oil wash I gave them some battle damage with dings, scrapes, chips, and heavily worn areas. I added the nails in the appropriate locations using a HB lead pencil, then gave each crate a good layer of Dull Coat before weathering and dusting. These are now set aside while I build the grape baskets, tools/clippers, and other shed items. Making the bottles and crates was a fun diversion and will help add realism and character to the scene. Thanks for watchin and more to follow soon. Cheers, Ski.
|
|
|
|
Post by keavdog on Sept 26, 2024 18:26:56 GMT -5
So you make the bottles out of glue sticks? I'd like to see that process!
|
|
cheyenne
Full Member
   December '24 Showcased Model Awarded
Member since: January 2024
Posts: 258
Jan 17, 2024 5:29:21 GMT -5
Jan 17, 2024 5:29:21 GMT -5
|
Post by cheyenne on Sept 26, 2024 18:28:19 GMT -5
Beautiful and ingenious work BroSki !!!!
The bottles are outstanding , brilliant !!!
|
|
|
|
Post by Steve Zuleski on Sept 27, 2024 0:13:32 GMT -5
So you make the bottles out of glue sticks? I'd like to see that process! It's simple, but can be difficult at times. I won't be videoing this, but a quick explanation is this: heat the tip over a candle and just let it start to turn clear, meaning the glue is ready to start moving. Don't over heat too much, just enough to get it to start to drip as you tip it straight up and down. The hot glue will begin to form a cone that gets smaller as it drips. If you do it right, you'll end with a decent sized bottle neck, not too thin, not too fat. Let it cool inverted, then dip in water to chill it. Cut the butt to length, paint, label and cap. Peice of cake, but you'll go thru quite a few sections till ya get it right, just how that works. Beautiful and ingenious work BroSki !!!! The bottles are outstanding , brilliant !!! Tanks, Broski! |
|
handiabled
Administrator      Apr '23 Showcased Build Awarded
Member since: February 2023
Posts: 4,585 
MSC Staff
|
Post by handiabled on Sept 27, 2024 0:37:38 GMT -5
The bottles and crates look stellar Steve! I caught a video were the creator was using stir sticks for the bottle necks. Might save you the hassle of drilling the open bottle?
|
|
cheyenne
Full Member
   December '24 Showcased Model Awarded
Member since: January 2024
Posts: 258
Jan 17, 2024 5:29:21 GMT -5
Jan 17, 2024 5:29:21 GMT -5
|
Post by cheyenne on Sept 27, 2024 4:28:54 GMT -5
Handiabled , good idea man , logged in me melon for future ret. !!!
|
|
|
|
Post by 406 Silverado on Sept 27, 2024 8:36:20 GMT -5
This is just crazy Steve. Your ingenuity and fabrication are among the best I've seen and the realism that you're bringing to the table with this is inspiring to say the least. Progress is coming along nicely brother.
|
|
|
|
Post by Steve Zuleski on Oct 25, 2024 20:20:16 GMT -5
Sorry for the tardy replies, Gents, been a busy Fall season. Thanks for the compliments, yall. No joke, and I'm behind, big time. First it was upgrading the Poultry Palace, then firewood. I was thinking of having a log splitting party, cause working in between rainy days is making things a bit slower. Due to the dry Sept the wood wasn't done until now and I've never been this late. I just hope it's done by the snow fly.  "Easy Pickins" will resume upon completion of winter prep, wish me luck. Cheers, Ski. |
|
handiabled
Administrator      Apr '23 Showcased Build Awarded
Member since: February 2023
Posts: 4,585 
MSC Staff
|
Post by handiabled on Oct 26, 2024 3:29:23 GMT -5
I don't miss the work but I miss the wood heat. It gives the house a completely different feeling of warmth.
|
|
|
|
Post by Steve Zuleski on Oct 26, 2024 12:39:31 GMT -5
Dang, Brett, I hit the edit button instead of quote, yikes. Sorry Bro. I agree, wood heat and a fireplace are great, but running late is tense, crunch time.
|
|
|
|
Post by Steve Zuleski on Nov 25, 2024 11:29:54 GMT -5
Building the AccessoriesBuilding up the accessories is another fun part of the build and usually signals we’re getting close to finishing the project, but not always. A lot of times I’ll work the accessories in between other larger portions of the build to keep the momentum going. In this case, after almost twelve years, we’re getting very close to being done. Ya, this isn’t the first glacial build I’ve done, but I plan on it being the last, and that goes for the huge base foot print, too. HA! Since I’ve built the out-building/work shop there needed to be enough junk and tools placed around the area to give it a well-worn aged appearance. The veggies will make a big difference in telling the age of the structure, but so will weathering, and the rusted, worn-out tools, junk, and old equipment. Looking over old sheds and structures from Normandy in the 40’s I didn’t find too many detailed photos, but enough to get an idea of French country style builds. Yes, many were stone and brick, but several were wooden structures, so this will fly nicely. After rummaging through tons of photos I ran across some old milk jugs, wooden buckets, brooms, shovels, and tools of all kinds. I made the milk jug out of scrap roof flashing and copper wire. The wine grape bucket was made in the same fashion as the barrels, a pretty simple process. But that gear “thingy majigey” is made from a hand full of gears from some old toys I found in my oldest son’s old toy stash. Call it whatever you want, but it could have been from an old conveyer system, who knows?    The cutters are a bit large for the scale, but they'll have to do. As you can see it’s made from 12ga. wire hammered flat on one end and bent to shape for the hand grips. I used actual broom thistles cut very thin for the old-style broom and chunks of resin to form the sledge hammers. The pry bars are heavy gage wire bent and shaped and the old-style oil can is made from very thin sheet metal. There’s even a funky old-style candle lantern that will hang from the rafter beams. I knew those old beer bottle tops would come in handy someday.  I also made a loaf of bread, a round of cheese, some sausage, and a convenient picnic blanket to round out the scenario. Oh ya, one of those wine bottles will be opened, guaranteed. I do believe I’ve got enough accessories to round out this shop in decent fashion, but if anyone can think of anything I might be missing, please holler, there might still be room for more small items. Next up, planning the ground work and veggies. This is going to take some time planning the flow of the pour and placement. More to follow soon. Thanks for watchin. Cheers, Ski.
|
|
jeaton01
Full Member
   Sept '23 Showcased Model Awarded
Member since: October 2013
Posts: 1,316 
|
Post by jeaton01 on Nov 25, 2024 13:45:46 GMT -5
Looks very lifelike, Steve. When I first saw the gear arrangement I thought of an old WW II hand operated winch we used to have on a drilling rig that was used to start the derrick over to lower it. Just needs a crank!
|
|
cheyenne
Full Member
   December '24 Showcased Model Awarded
Member since: January 2024
Posts: 258
Jan 17, 2024 5:29:21 GMT -5
Jan 17, 2024 5:29:21 GMT -5
|
Post by cheyenne on Nov 25, 2024 18:07:40 GMT -5
Beautiful BroSki , if you didn't tell anyone it was small scale , they would think it was real 1/1 scale stuff !!!!! ................. including the bike !!!!!
|
|
|
|
Post by 406 Silverado on Nov 25, 2024 18:56:33 GMT -5
Sorry for the tardy replies, Gents, been a busy Fall season. Thanks for the compliments, yall. No joke, and I'm behind, big time. First it was upgrading the Poultry Palace, then firewood. I was thinking of having a log splitting party, cause working in between rainy days is making things a bit slower. Due to the dry Sept the wood wasn't done until now and I've never been this late. I just hope it's done by the snow fly. "Easy Pickins" will resume upon completion of winter prep, wish me luck. Cheers, Ski. Yeesh!! We used to have to prep like that for every winter when mom and dad had a wood stove. Keep at 'er Steve and we've got your placed warmed up here when you get back to the bench brother. |
|
|
|
Post by kyledehart5 on Nov 26, 2024 1:13:24 GMT -5
Nice work Ski!! Really looking super cool.
|
|
handiabled
Administrator      Apr '23 Showcased Build Awarded
Member since: February 2023
Posts: 4,585 
MSC Staff
|
Post by handiabled on Nov 26, 2024 2:26:54 GMT -5
Magnificent scratch work sir! Everything has a real "vintage" look to it.
|
|
|
|
Post by Steve Zuleski on Nov 26, 2024 18:23:56 GMT -5
Many thanks, all yall! Sheesh, I'm done gone red-neck, HA! All kiddin aside, it's good to be back in the groove. Logistics for the base are underway, so should be pouring soon.
thanks for watchin, Gents.
|
|