Hinksy
Full Member

Member since: June 2012
THE ENGLISH LIONHEART - HINKSY!
Posts: 1,016
Jun 22, 2012 16:46:21 GMT -5
Jun 22, 2012 16:46:21 GMT -5
|
Post by Hinksy on Jun 22, 2012 16:55:09 GMT -5
Hello guys,
Mr Deafpanzer has recommended this exciting new board to me - brilliant! I've just signed up and hope to call this 'home'!
It's late here in England so I'll update this thread with my photos of the Firefly tomorrow.
What a superb site!
|
|
|
|
Post by 406 Silverado on Jun 22, 2012 17:45:12 GMT -5
Hiya Ben, welcome to MSC bud. look forward to the pics.
|
|
|
|
Post by bbd468 on Jun 22, 2012 19:42:15 GMT -5
Hello there Fella! Looking forward to your Firefly. Andy steared you right man. This site is the most fun, friendly, and supportive that ive had the privilege to be a part of. Have fun man!!! ;D
Gary
|
|
|
|
Post by deafpanzer on Jun 22, 2012 20:57:57 GMT -5
Hey buddy! Welcome my ol' Brit mate! Trust me you will like it here. Folks are very friendly... none of hostility here.
Can't wait to see how your Firefly comes out... like I said I have to buy the kit whenever it is on a sale.
|
|
|
|
Post by TRM on Jun 22, 2012 21:55:34 GMT -5
Welcome Aboard Ben!!! Looks like the MSC UK Family is growing!!! I know you will enjoy it here!! Friendly and helpful, just the way it should be!!! Looking forward to seeing some of you stuff soon!!! Have Fun!!!
|
|
bigjohn
Reviews member 
Member since: December 2011
John Hale
Posts: 3,438
Dec 21, 2011 2:17:45 GMT -5
Dec 21, 2011 2:17:45 GMT -5
|
Post by bigjohn on Jun 23, 2012 10:06:30 GMT -5
I thought I posted on this last night but don't see it. I must be loosing my mind.  Anyway, Glad to have you here. Looking forward to another Sherman build. I like em...... ;D |
|
danb
Reviews member
March 2013 MoM Winner
Member since: November 2011
Posts: 2,808
Nov 17, 2011 9:22:52 GMT -5
Nov 17, 2011 9:22:52 GMT -5
|
Post by danb on Jun 23, 2012 14:11:34 GMT -5
Cant wait to see the firefly hope you enjoy your new home you wont be dissapointed.
Dan B
|
|
|
|
Post by robbo on Jun 23, 2012 14:14:22 GMT -5
Welcome to the site mate, look forward to seeing the firefly
|
|
|
|
Post by eastrock on Jun 24, 2012 4:48:15 GMT -5
Welcome to MSC, looking forward with you firefly  |
|
Hinksy
Full Member
Member since: June 2012
THE ENGLISH LIONHEART - HINKSY!
Posts: 1,016
Jun 22, 2012 16:46:21 GMT -5
Jun 22, 2012 16:46:21 GMT -5
|
Post by Hinksy on Jun 24, 2012 11:06:19 GMT -5
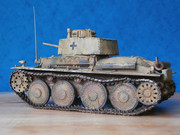
Hi guys, Here is my promised update. The assembly so far has been very uneventful - this was the update that I started typing out yesterday: "My RB Barrel arrived this morning which was handy as I only ordered it yesterday and I'm limited to what I can do regarding the turret assembly. Luckily it's now fully assembled and looks superb - I can't wait to start getting her Green! I thought this build was going to be really difficult judging by the crazy build guide BUT it's been a real gem. The RB models 17pdr barrel really kicks it off - I did try the kit one but it had a split muzzle brake and really didn't cut it. The 4 sprue attachment point meant a lot of clean up and left it looking a bit shabby The RB Barrel is a beauty, 3mm too long according to various various sources but otherwise a really well made piece - I can live with 3mm. Anyway - I haven't attached (as in glued together) the upper and lower hull halves yet as I've got a bit more work to do on the PE Fenders and hopefully they will work! I've got the plastic option should they not. I've changed all kit grab handles with thin Brass rod versions. The corect Periscopes are in use and overall I am so pleased with how this is turning out! I've made a couple of minor errors but all have been sorted. The only thing I cannot change is the stwoage box at the back of the turret - I've fitted it to show it sitting flush with the radio box in fron that attached to the back of the turret but it looks like the base should be flush and the top should protude above the radio box but again, I can live with that! Finally prior to painting, all I have to do is fit the 'conical' antennae mounting and some additional PE strips along the hull sides and at the rear and then simply drop that piece in that groove between the gearbox housing and the light guards. Also, some Mr Surfacer 500 will be needed to cover the section where the turret 'top' meets the base section. After painting it's stowage and tools. I'm definately feeling the love for Shermans right now (My Dad knows my Grandad drove one in North Africa and later on in France but what variant(s) we don't know as we cannot find his war details, medals or photos ) so a Tasca 'Jumbo' might be on the cards for Christmas! I hope you like her so far - PLEASE leat me have all of your suggestions and viewpoints etc.!         Paint to come next (obviously). Tools and stowage after that and tracks are the DS type so no Friuls this time. Thanks for looking guys - sorry for the photo quality but the lighting was obviously pretty poor - I MUST make a proper light box now I have a better camera." That's it for now - I'm definately going to be building more Allied Armour now! I've loved this build! Take care my friends - what a great new site! Ben  |
|
|
|
Post by 406 Silverado on Jun 24, 2012 11:18:44 GMT -5
Very clean build Ben. Also great to have you here mate. We've been around for a couple of years Ben, the old forum was dying out, too slow, so I started the social club in Nov. Hope to see more of you and your builds here.
|
|
Hinksy
Full Member
Member since: June 2012
THE ENGLISH LIONHEART - HINKSY!
Posts: 1,016
Jun 22, 2012 16:46:21 GMT -5
Jun 22, 2012 16:46:21 GMT -5
|
Post by Hinksy on Jun 24, 2012 11:26:21 GMT -5
Very clean build Ben. Also great to have you here mate. We've been around for a couple of years Ben, the old forum was dying out, too slow, so I started the social club in Nov. Hope to see more of you and your builds here. Hi buddy, It looks like a great site. I've just read up on posting images from Photobucket so it will be done correctly next time! Sorry! I might try and sort them out now actually. The 'old' site is full of faces I don't know anymore and know that I've found where the missing faces have gone I think this will be my main site now  I'll still be taking part in the odd GB on there but this seems superb  It seems very relaxed here which I like. Many thanks, Ben |
|
|
|
Post by 406 Silverado on Jun 24, 2012 11:31:24 GMT -5
Yeah Ben, many of the regs from other forums have found their way here. Main rule here is to have fun. Build what you like when you like and how you like it. Just enjoy the hobby. We do give constructive comments respecting other modelers skill set and most important, we respect each other.
Enjoy the forum Mate, it's here for you and anyone who like to build models
|
|
Hinksy
Full Member
Member since: June 2012
THE ENGLISH LIONHEART - HINKSY!
Posts: 1,016
Jun 22, 2012 16:46:21 GMT -5
Jun 22, 2012 16:46:21 GMT -5
|
Post by Hinksy on Jun 24, 2012 11:54:45 GMT -5
Ahhh man - I'm in heaven! I've got a few more PE additions to make to this then she'll be primed and painted. Unlike most of my builds the weathering will be kept to 'the elements' weathering i.e dust and rain - no real rust or paint chips or damage from shells etc. This Firefly has been assembled as a battlefield fresh tank so it's yet to get beaten and bruised. I'm thinking pigment and streaking effects and a bit of spoilt fuel (the Mig Grease stain stuff which looks great when thinned down). My main concerns and  lay in the colour of basecoat to use and how to paint the road wheels as they won't rotate - I had glued them so they would but they stusk fast! I'm assuming that glue must have spread? I can weather them to cover up the wheels so I'm not overly concerned but the basecoat colour troubles me? I'm thinking XF-62 Olive Drab lightened with Tamiya 'Sky' and darkened with (not sure) applied in a modulation style if I'm able to do it? Any help would be great - obviously I have an air brush but my skills are limited and Allied colours are very new to me. There's still a bit of assembly to go so I'm not worrying yet. I've got to assemble the tools for fitting post basecoat. They need PE clamps making up which should be fun! The .50 cal will look great though! Oh yeah - the rear idler? Is that a solid piece to be painted all green? No rubber? Thanks for any help you can provide lads, Ben |
|
bigjohn
Reviews member
Member since: December 2011
John Hale
Posts: 3,438
Dec 21, 2011 2:17:45 GMT -5
Dec 21, 2011 2:17:45 GMT -5
|
Post by bigjohn on Jun 24, 2012 12:34:25 GMT -5
Nice looking firefly! I have this kit in the stash waiting its turn. You will love the Tasca Jumbo. The Tasca kits pretty much build them selves. modelerssocialclub.proboards.com/index.cgi?board=armor&action=display&thread=301Like the others have said, A fine pointed brush will take care of the rubber portion on the road wheels. Here is a paint mix that I ran across on the web. I haven't tried it yet, but I'll post it just in case you would like to consider it. British SCC no 15 paint mix Tamiya paints 5 parts XF61 2 parts XF62 2 Parts XF3 Looking forward to the next update. |
|
Hinksy
Full Member
Member since: June 2012
THE ENGLISH LIONHEART - HINKSY!
Posts: 1,016
Jun 22, 2012 16:46:21 GMT -5
Jun 22, 2012 16:46:21 GMT -5
|
Post by Hinksy on Jun 24, 2012 13:54:45 GMT -5
Oi - some of us "old faces" are still on that "old" site as well as here. But I do know what you mean with the new faces bit. Mind you, it wasn't so long ago you were one of them yourself... LOL! You are indeed quite true - 3 and a bit years ago I was a total newbie! You have to agree that it's not the same at the minute though. A great place but it's nice to find somewhere different that is so laid back! Thanks for the painting info btw! I also meant to say (re my Firefly) that it will be marked up as a 7th Armoured Machine. I've even managed to find the 'Antifreeze' warning decal re a very generous friend - the 'Dutchy'!
The kit decals give a Coldstream variant which is wrong anyway (I'm told). The other two are Polish machines and I really wanted a 7th Armoured Firefly.Back to work tomorrow (aghhh!) so next weekend I'll complete assembly and get her primed and then decide on wether to start the basecoating or make up the PE clamps and sort the tools. It depends on the weather because at the minute my airbrush is set up outside in our workshop and I'm waiting until it gets warmer before commiting to painting so I'll wait and see.Ben |
|
|
|
Post by deafpanzer on Jun 24, 2012 21:05:16 GMT -5
Looking great!!! Hope you like it here... it has a better balance of US and UK modelers along with others from many countries which works just great for me.
I must get this kit... hope Dragon will offer this on sale thru Facebook promotion soon one day.
|
|
|
|
Post by bbd468 on Jun 24, 2012 23:56:26 GMT -5
Ben, That is a great build man! And the kit detail looks fantastic. Ive got to get my hands on one of those....someday  ;D Gary |
|
|
|
Post by wbill76 on Jun 25, 2012 16:19:02 GMT -5
Off and running with this one Ben, sounds like a neat project and will be following with interest. |
|
|
|
Post by TRM on Jun 25, 2012 16:53:38 GMT -5
Looking great Ben!! Keep it going! Thinking you are on the right track with the painting! As for the road wheels, tiny A$$ brush is the trick (lol was mentioned). If you thin the a dark or medium grey down, like you would if you were going to AB it on, apply it with the tiny brush and it should work with a capillary action into the groove between the rubber and rim rather nicely, no cut in. It will go on thin, but 2 to 3 quick coats you will be in business. And, you won't have to get into the corners as close on the second and third coat as you will see that the paint will cover.!! Good luck!!
|
|
Hinksy
Full Member
Member since: June 2012
THE ENGLISH LIONHEART - HINKSY!
Posts: 1,016
Jun 22, 2012 16:46:21 GMT -5
Jun 22, 2012 16:46:21 GMT -5
|
Post by Hinksy on Jun 25, 2012 18:55:26 GMT -5
Cheers guys, Thanks for all the painting pointers - very handy. I'll be completing the build this weekend and assembling the tools / PE clamps. Hopefully painting can start on the following weekend. Ben |
|
Hinksy
Full Member
Member since: June 2012
THE ENGLISH LIONHEART - HINKSY!
Posts: 1,016
Jun 22, 2012 16:46:21 GMT -5
Jun 22, 2012 16:46:21 GMT -5
|
Post by Hinksy on Jun 28, 2012 17:46:35 GMT -5
Hey lads, I know Andy and Boo amongst others are very keen to build this kit so I'll highlight a stupid newbie type error that I made last weekend. I didn't realise until last night and being a bit OCD I HAD to sort it there and then! I was looking through the instructions and noted that on the very last step you are asked to fit long strips of PE that are no more than 3mm in height. They go along the edges of the upper hull where the top part of the hull stops and the overhang over the suspensions begin (basically underneath the side armour plates). In an earlier step - the step I worked on at the weekend - they ask you to fit the 3 armour plates but make no mention of the PE and the fact that you MUST leave enough room below them for these side strips! Normally I would read the entire build guide and mark what to leave off but as the instructions are so busy I missed these strips. Had I seen them I would have left the armour plates until last and fitted them AFTER the PE strips. I managed to cleanly remove and save 2 plates but one snapped. Luckily they provide another set of similar proportions so I'll use them. I had to file the glue marks down and it's ok now but there was potential for disaster! Had there not been spares thick plasticard would do the job but weld marks and cutting torch effects would be needed on the card. Anyway - Andy Deafpanzer and Boo etc - FIT THE PLATES LAST after the PE strips so you know you have enough room. Looking at photos the build needs them too for accuracy. One word, compliments of Homer Simspon - DOH!  Oh btw Dragon - this should be mentioned in the instructions, I wonder how many people have made this error!? Why not leave the plate fitting until last after the PE strips? Godarnnit Anyway, nearly there now! Completion of assembly due this weekend! Ben |
|
multicam
Senior Member

Member since: January 2012
Nate
Posts: 2,039
Jan 10, 2012 14:35:41 GMT -5
Jan 10, 2012 14:35:41 GMT -5
|
Post by multicam on Jun 29, 2012 10:22:39 GMT -5
Nice to have you here Ben. I've been away on a Whirlwind tour of London/France so I'm just catching up. Sherman looks great so far:)
|
|
Hinksy
Full Member
Member since: June 2012
THE ENGLISH LIONHEART - HINKSY!
Posts: 1,016
Jun 22, 2012 16:46:21 GMT -5
Jun 22, 2012 16:46:21 GMT -5
|
Post by Hinksy on Jun 29, 2012 17:56:30 GMT -5
Cheers MC, The plan now is to complete the entire assembly over the weekend and do a bit more homework. I want to get some more photos together - if anyone can help that would be great btw! I'm going to start on the tools and get the clamps sorted but apart from some Vallejo Primer and an initial LIGHT first coat of Dark Green prior to the OD etc I'm holding back on the painting until I know exactly what I'm doing. Give me a Panzer I and I'll be laughing as I've done a basic German Grey scheme so many times but OD Green and British? Still unsure but luckily there's no rush! I might look at a base tomorrow and get some ideas together. I'll post a picture post primer and post first coat of Dark Green over the weekend. Cheers fellas - should be fun Take care, Ben |
|
Hinksy
Full Member
Member since: June 2012
THE ENGLISH LIONHEART - HINKSY!
Posts: 1,016
Jun 22, 2012 16:46:21 GMT -5
Jun 22, 2012 16:46:21 GMT -5
|
Post by Hinksy on Jun 30, 2012 15:22:56 GMT -5
Nice to have you here Ben. I've been away on a Whirlwind tour of London/France so I'm just catching up. Sherman looks great so far:) Cheers MC, Well, I'm pretty darn peed off! I have just had an on-line web-cam chat with the modelling guru who is Alan, the great leader of the LEICESTER MODELLERS! DUM DUM DAH  Alan is a BIG early Sherman fan but hasn't built any Firefly variants - luckily he is a supreme modeller! If you look back on this page a few posts and you'll see that I've mentioned not leaving enough clear space between the bottoms of the Applique armour plates for the PE strip that runs the entire length of each side - this reulted in me removing all three plates which was a real PITA and took ages leaving lots of cleanup. I've shown this to Alan and he has looked at the instructions - we've now decided that the PE strips have to overhang (he phoned a buddy who loves building Fireflys) and he has confirmed that, no, the plates could have stayed on! GODAMMIT (continued): Look at MA7, MA9 and MA11 on the instruction photo below. On the early Sherman this length fits so the bottom of the lengths fit flush with the bottom of the upper hull which is what I though! The good thing is he has said leave this final stage of the build and go to his house tomorrow at 10am and he'll get this problem sorted AND he'll show me how to assemble the PE fenders and fit them (I was going to use the kit plastic fender option as I'm still a newbie with PE). I'm really pleased with this as the PE fenders look great and as he is a Shermaholic he'll help me get everything sorted so when I leave the assembly stage will be complete and she'll be ready for primer! I must add that Alan has said he will NOT do the work for me - he will be there to give guidance only (and supply the solder) and I'll be doing the work which is good as this is my build and it wouldn't be fair to claim I'd done this great PE work when I hadn't! Anyway - what I said on the previous post can be ammended - just remember the PE strips OVERHANG! I'm so glad I didn't proceed past this point without airing my concerns! Photo update tomorrow guys! Ben |
|
Hinksy
Full Member
Member since: June 2012
THE ENGLISH LIONHEART - HINKSY!
Posts: 1,016
Jun 22, 2012 16:46:21 GMT -5
Jun 22, 2012 16:46:21 GMT -5
|
Post by Hinksy on Jun 30, 2012 16:42:28 GMT -5
Nice one Ben this is so handy for me and anyone else building this soon, I'm bookmarking this for reference. Thanks for the tips. Have fun with that PE too, it'll be good to have the guidance and again that will benefit others too. That ok Boo - I'm so glad that I'm able to turn the tables and provide help instead of asking for it! Do you have this kit yet? Any plans? Ben |
|
|
|
Post by wbill76 on Jul 1, 2012 15:53:12 GMT -5
Sorry to hear about the trouble Ben but sounds like you've got it figured out and will get some nice PE-tutoring in the bargain. It's not as tricky as you might think...just remember that soldering irons get hot very fast and can't tell the difference between metal and flesh. |
|
Hinksy
Full Member
Member since: June 2012
THE ENGLISH LIONHEART - HINKSY!
Posts: 1,016
Jun 22, 2012 16:46:21 GMT -5
Jun 22, 2012 16:46:21 GMT -5
|
Post by Hinksy on Jul 4, 2012 18:21:05 GMT -5
I do indeed have the kit Ben, it's one of my only armour kits in my stash now. I just bought it on a whim to be honest as I was trying to get my mojo back at the time and planned for an out of the box build. On seeing how nice it is I would like to try to make the most of it and maybe get some PE extras and put it in a small scene. No solid plans yet but its definitely one I'll be building sooner rather than later. Hey Boo, I'll look forward to your build! Well, I learnt a LOT about PE on the Sunday just gone from my buddy Alan. I'm ok with the small stuff but the fenders for the front of these are soooo much better than the plastic offerings that the kit also supply-the thing is they are complex and big and I didn't know where to start. I know that my PE folder needs improving! I made the two fenders on my own - Alan has the same kit too and started it on Sunday too. We built the PE together and it was pretty easy. The main bit was making sure we got the folds done in the right order and the curves rolled into them properly. I learnt all about using 400 grit wet & dry to remove the tiny burrs and that glue for sticking on womens false nails for holding tiny parts! I'll be fitting them this weekend - should be good. Ben |
|
Hinksy
Full Member
Member since: June 2012
THE ENGLISH LIONHEART - HINKSY!
Posts: 1,016
Jun 22, 2012 16:46:21 GMT -5
Jun 22, 2012 16:46:21 GMT -5
|
Post by Hinksy on Jul 5, 2012 18:54:47 GMT -5
Lol don't act all unknowledgeable Boo it'll be the same stuff you use for your falsies!!!! :} Heh heh heh! Well it comes in a small pot with a screw top that has a brush fitted - basically like a plastic nail varnish bottle! I'm not sure if it's CA based but it certainly is strong, it just allows you more time to move the little bit's of PE about on the larger areas as it takes less time to set. If needs be additional CA can be added when fitted correctly. I've just ordered a Brass Antennae base (£3) as the PE one was pretty crappy and no plastic option! I'll have some photos downloaded for the weekend! Ben |
|
|
|
Post by bbd468 on Jul 5, 2012 19:14:10 GMT -5
Hey Ben,
Can you post a pic of the bottle or brand of Nail glue that you use for your PE. My sister may have something similar i could try. And im always ready to learn new tricks...in modeling of course. ;D
Gary
|
|


 lay in the colour of basecoat to use and how to paint the road wheels as they won't rotate - I had glued them so they would but they stusk fast! I'm assuming that glue must have spread? I can weather them to cover up the wheels so I'm not overly concerned but the basecoat colour troubles me? I'm thinking XF-62 Olive Drab lightened with Tamiya 'Sky' and darkened with (not sure) applied in a modulation style if I'm able to do it?
 ;D
;D