paulh.
Senior Member
   
Member since: November 2011
build, fail, learn, succeed - ENJOY
Posts: 2,389
Nov 15, 2011 15:54:51 GMT -5
Nov 15, 2011 15:54:51 GMT -5
|
Post by paulh. on May 25, 2012 13:24:41 GMT -5
I’ve moved variously between dumping it, picking out some usable spares( not many), through to building it and covering it with a tarp as suggested by Nemo. In the end though, I’ve decided to go ahead and just build it in the hope that a half-reasonable paint job might be able to make it turn out ….? Boys is this sooooooo different from the Tamiya 2a6; this is basically a detail soft flash-fest- to the point where I’ve removed something as flash that might actually be meant to be detail. The only reason I’m even thinking that is because it doesn’t fit where it’s supposed to.  ...note the hole  I decided very early on not to waste my limited Tamiya extra-thin on this thing ‘cause it aint going to be a tidy build tbh. Given the issues with fit the ET or indeed most liquid poly will be wasted on this Instead I made plans for judicious use of Humbrol yellow poly and copious amounts of filler. The hull tub is built up from a base and hull sides. The base in this one was a bit warped, but it puller together into something approximating the proper shape when the sides were added. Once this was cured I hit the inner corners with some thick CA to get a start on filling any gaps that still remained. However, filler will still be needed in a few places. For finer gaps I usually use Vallejo plastic putty – a little goes a long way and it can be worked with a damp finger or brush. It does go off quite quickly so you don’t have much time , but with practice you can work it so that a minimum of sanding is required. 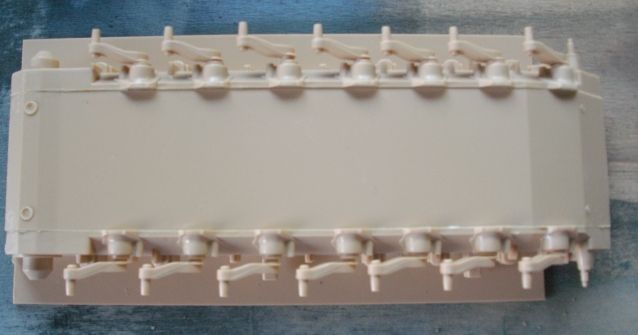 Suspension & running gear: The suspension arms are sided so can’t be put in the wrong place but that is probably the only good thing to say about them . Mine suffered from a combination of ejector pin marks and shrink holes that also seemed to be sided. So time for more filler & sanding.  Road wheels and idlers have rather soft detail and the definition between wheel and rubber is very indistinct.  Hull top: A reasonable over all fit. A minimum of detail to be added here; Coolling fan grilles, air intakes, integrated stowage box hatches, lights and tow hooks. No tools need to be added- they’re already moulded in place!!!! 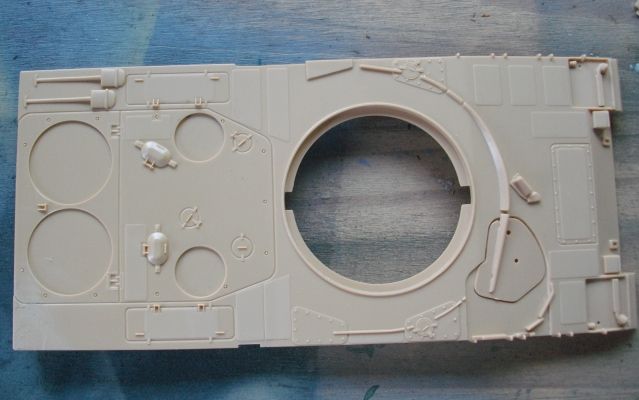 Moving on to the turret; Mercifully this mainly consists of a large single casting of the characteristic slab sided box(to which turret stowage baskets are added to the rear). This is offered up to a single piece base and goes together reasonably well. There are a couple of gaps that I wasn’t able to close up with clamping, but these are on the underside of the whole assembly and will be ok with Vallejo putty 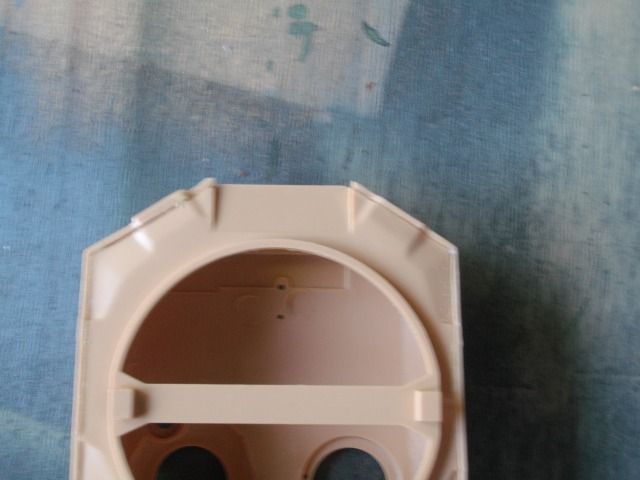 However, the stowage basket/bustle at the rear is somewhat different I had great difficulty getting this to line up but to no avail. The bottom of this should create a flush line with the existing turret lines- as you can see from the pic below what I got was an obvious step. No amount of sanding is going to sort this and I don’t have the inclination to try tbh. 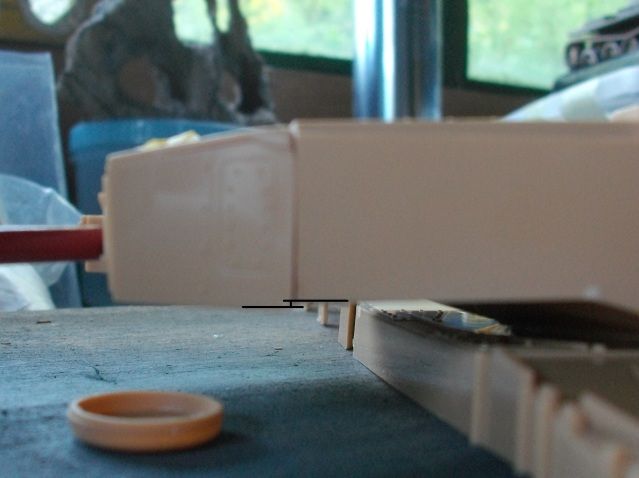 The kit provided both standard (German) and Dutch model smoke dischargers with associated guard rails, but….there are no location holes or even marks for correct placement of these so callipers and accurate plans will be needed to sort this out –bit I got that covered courtesy of the Tankograd specials. Even if I manage to sort that out, I am beginning to doubt however, that even a decent paintjob can actually save this cat – there might still be need for a visit to the vet….. Another gripe: the decal sheet includes markings for a Swiss vehicle. However, Swiss Leos had a significant muffler addition to the exhaust system that is not provided within the kit. If you want a Swiss Leo then some scratcherizing is going to be required! Laters peeps….  |
|
|
|
Post by TRM on May 25, 2012 13:51:45 GMT -5
Despite the short comings Paul, looking forward to this!! Hey you can always have a nice build with this: for discussion purposes only  Just a thought....looka t the nice camop and rain marks, not to mention no suspension arms!!!  |
|
paulh.
Senior Member
   
Member since: November 2011
build, fail, learn, succeed - ENJOY
Posts: 2,389
Nov 15, 2011 15:54:51 GMT -5
Nov 15, 2011 15:54:51 GMT -5
|
Post by paulh. on May 25, 2012 14:55:12 GMT -5
I'm tempted Dicky- sorely tempted -maybe in a dio with a T-72 for a "what if..."
|
|
paulh.
Senior Member
   
Member since: November 2011
build, fail, learn, succeed - ENJOY
Posts: 2,389
Nov 15, 2011 15:54:51 GMT -5
Nov 15, 2011 15:54:51 GMT -5
|
Post by paulh. on May 27, 2012 16:06:17 GMT -5
Time for a progress report : mating up the upper and lower hull resulted in a reduiculous lip between both glacis, this has received a liberal amount of VA plastc putty that was then wiped back with a dampcloth to minimse clean up when dry. As you can see from the pic its still not quite finshed but once this is fully cured i should be able to even things out wiyh jus a little more putty 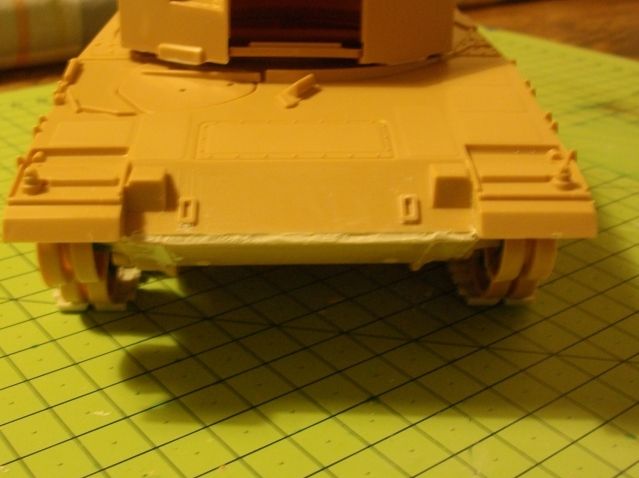 Ive also got a start on the link & length tracks: The wheels are temporarily fitted to the suspension and then the first length of track is attached. This will be left overnight to cure and then the more fiddley individual links will be added 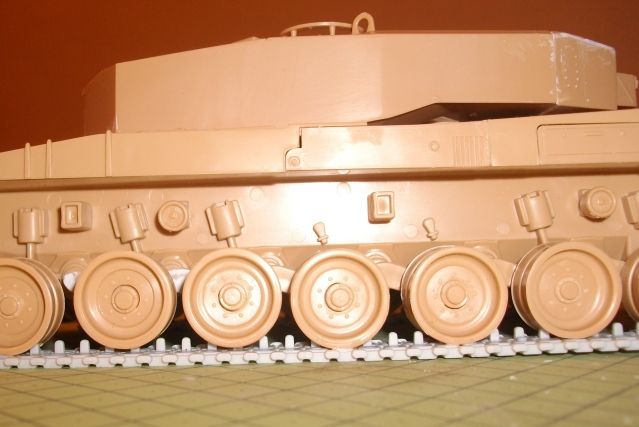 Also got quite a bit done with the turret and gun. A bit more tweaking will be requiredbefore I'm happy with this , including a welded shut ammo reloading hatch in the turret wall. A few shots of the major sub-assemblies to date dry fitted;  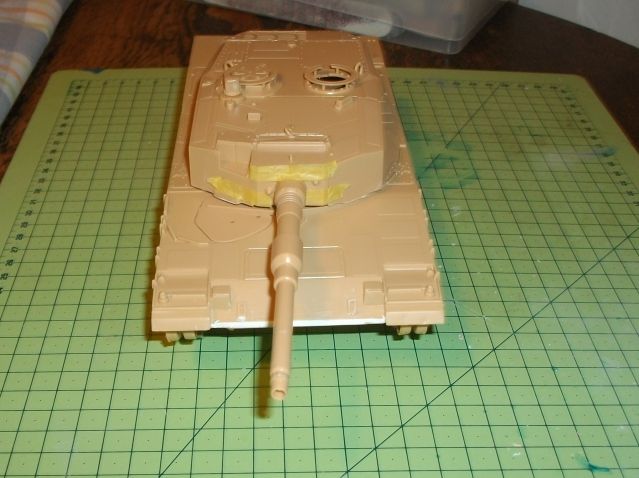 TTFN P |
|
|
|
Post by wbill76 on May 27, 2012 19:23:39 GMT -5
Hang in there with it Paul and beat it into submission!  |
|
|
|
Post by TRM on May 27, 2012 20:47:11 GMT -5
Keep it going Paul!!! Starting to shape up!!!  |
|
paulh.
Senior Member
   
Member since: November 2011
build, fail, learn, succeed - ENJOY
Posts: 2,389
Nov 15, 2011 15:54:51 GMT -5
Nov 15, 2011 15:54:51 GMT -5
|
Post by paulh. on May 28, 2012 9:19:55 GMT -5
Chers guys!
I have an ever growing spares box for Leopards alone, so I might be able to make something useful out of this pigs ear yet.
P
|
|
paulh.
Senior Member
   
Member since: November 2011
build, fail, learn, succeed - ENJOY
Posts: 2,389
Nov 15, 2011 15:54:51 GMT -5
Nov 15, 2011 15:54:51 GMT -5
|
Post by paulh. on May 28, 2012 15:06:37 GMT -5
For the link & length option the running gear was temporarily attached and then the tracks built up as per instructions using CA. Things were left insitu overnight to ensure a good solid fix. I did have some problems with one of the top runs fitted back to front but that was sorted without too much (or noticeable) damage. Once complete and secure it will then be carefully removed for painting; for the running gear a primer coat of black was used to also provide a base coat for tracks and wheel rubber. 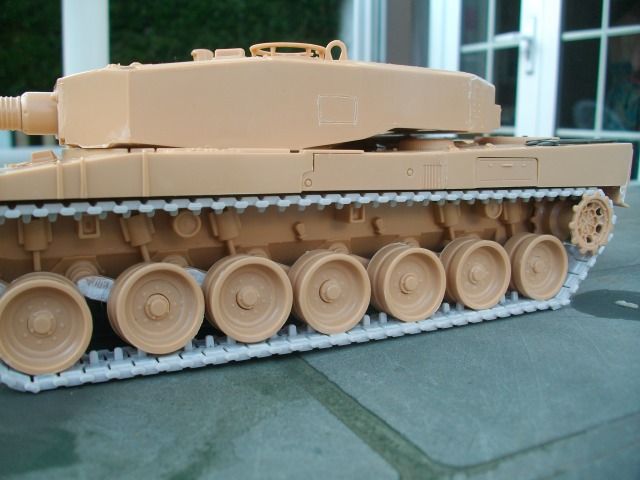 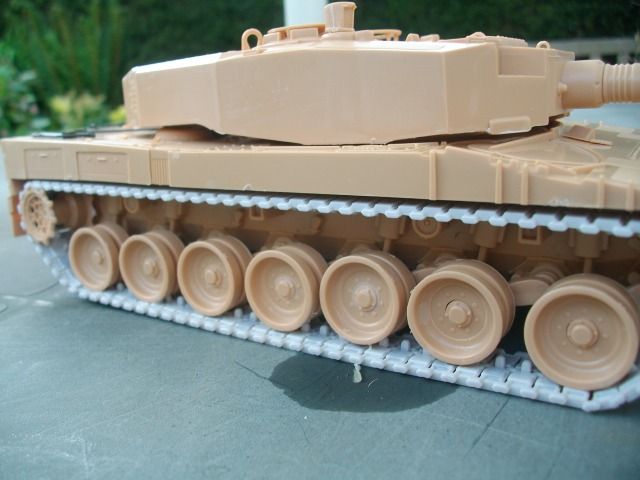 After the words of encouragement from you all, I decided a visit to the spares box was in order: The god –awful shovels were removed with a fresh blade and replaced with comparable items, I also added the idler tensioning tool (this is not yet complete as it will an additional part scratch built) and bow-saw.  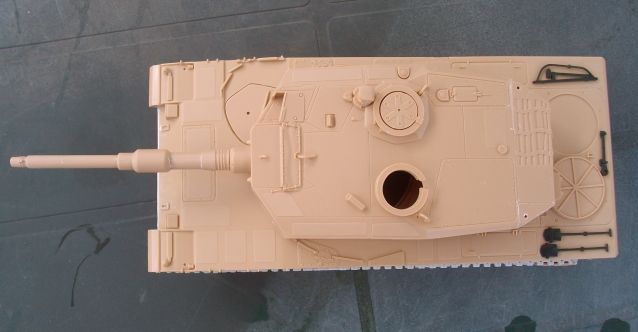 As always ACW P |
|
paulh.
Senior Member
   
Member since: November 2011
build, fail, learn, succeed - ENJOY
Posts: 2,389
Nov 15, 2011 15:54:51 GMT -5
Nov 15, 2011 15:54:51 GMT -5
|
Post by paulh. on May 28, 2012 16:04:41 GMT -5
Cheers jackwagon  A few more tweaks and then out come the AB . Not sure what colour(s) just yet but whatever it ends up I feel some heavy weathering comming on for this. |
|
danb.
Reviews member     March 2013 MoM Winner
Member since: November 2011
Posts: 2,808
Nov 17, 2011 9:22:52 GMT -5
Nov 17, 2011 9:22:52 GMT -5
|
Post by danb. on May 28, 2012 17:07:08 GMT -5
Looking good Paul it wont be long until the paint goes im looking forward to this one.
Dan B
|
|
jackh.
Full Member
  
Member since: December 2011
Posts: 1,195
Dec 15, 2011 2:51:27 GMT -5
Dec 15, 2011 2:51:27 GMT -5
|
Post by jackh. on May 29, 2012 1:12:19 GMT -5
Count me in Paul, You're doing great ;D because I remember this it was the first Leopard 2 kit I made after getting back into the hobby and it's a real dog of a kit  |
|
paulh.
Senior Member
   
Member since: November 2011
build, fail, learn, succeed - ENJOY
Posts: 2,389
Nov 15, 2011 15:54:51 GMT -5
Nov 15, 2011 15:54:51 GMT -5
|
Post by paulh. on May 29, 2012 10:30:37 GMT -5
Dan, Jack, thank you both very much.
Hope to have some fun getting some paint on this very soon.
P
|
|
|
|
Post by 406 Silverado on May 29, 2012 12:34:52 GMT -5
Very nice progress Paul. Ready for paint !!
|
|
paulh.
Senior Member
   
Member since: November 2011
build, fail, learn, succeed - ENJOY
Posts: 2,389
Nov 15, 2011 15:54:51 GMT -5
Nov 15, 2011 15:54:51 GMT -5
|
Post by paulh. on May 29, 2012 12:59:49 GMT -5
Cheers Boss, - not far off now !
As I'm not going away over the Jubilee holiday weekend I think some colour is on its way.
Well thats the plan any how...
|
|
paulh.
Senior Member
   
Member since: November 2011
build, fail, learn, succeed - ENJOY
Posts: 2,389
Nov 15, 2011 15:54:51 GMT -5
Nov 15, 2011 15:54:51 GMT -5
|
Post by paulh. on May 29, 2012 13:26:46 GMT -5
Cheers Chris - its the Queens Jubilee celebration weekend so we have an extra public holidaqy tagged on to the normal Witsun holiday - a 4 day weekend!
|
|
paulh.
Senior Member
   
Member since: November 2011
build, fail, learn, succeed - ENJOY
Posts: 2,389
Nov 15, 2011 15:54:51 GMT -5
Nov 15, 2011 15:54:51 GMT -5
|
Post by paulh. on May 29, 2012 15:01:27 GMT -5
WHEY - HEY ;D, first bit of paint has gone on! The tracks and wheels have had a blast of some Krylon matt black as combined primer and base coat  and this stuff has gripped quite well shrunk right back and actually helped to pick out some of the soft detail on the wheels ;D This should hopefully minimise the 'detail' paintng to a picking out of the wheels, idlers & sprockets in whatever colour I finally decide on  The next job is to finish off some of the detailing on the hull and turret and then the 'real' painting can start ;D ;D ;D |
|
|
|
Post by wbill76 on May 29, 2012 19:06:22 GMT -5
Looking good paul, I always love to go "shopping" in the spares bin...after many years it's built up into quite a collection and I'm always surprised at what I find that I'd forgotten was in there.  |
|
paulh.
Senior Member
   
Member since: November 2011
build, fail, learn, succeed - ENJOY
Posts: 2,389
Nov 15, 2011 15:54:51 GMT -5
Nov 15, 2011 15:54:51 GMT -5
|
Post by paulh. on May 30, 2012 1:29:43 GMT -5
Cheers Bill  Have to say I do enjoy a bit of spares-box diving myself ;D I'd love to build something just out of the spares box -but mine is so small at the moment I don't think it would be too impressive  |
|
paulh.
Senior Member
   
Member since: November 2011
build, fail, learn, succeed - ENJOY
Posts: 2,389
Nov 15, 2011 15:54:51 GMT -5
Nov 15, 2011 15:54:51 GMT -5
|
Post by paulh. on May 30, 2012 14:40:50 GMT -5
HERE ! Gawd your sooo pushy   A combined primer and base coat of olive green - courtesy of some krylon paint I'd forgotten I had. Dries absolouey flat every time. great stuff. Very much like Halfords in the way it looks like you've applied too much when wet, but shrinks back nicely on drying. This will defo be a decent base on which to work up from. Obviously some bts and pieces still to be attached- turret grab rails, smoke grenade launchers, ariel mounts and sshooty thing for turret top. 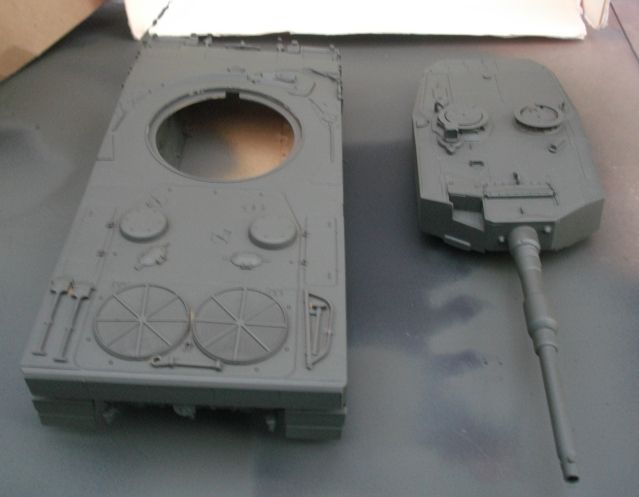   as always ladies and germs, AC&SVGW P |
|
|
|
Post by wbill76 on May 31, 2012 12:11:35 GMT -5
Always nice to clear the primer stage and see paing, looking good Paul!
|
|
paulh.
Senior Member
   
Member since: November 2011
build, fail, learn, succeed - ENJOY
Posts: 2,389
Nov 15, 2011 15:54:51 GMT -5
Nov 15, 2011 15:54:51 GMT -5
|
Post by paulh. on May 31, 2012 12:17:09 GMT -5
Right folks, In need of some input/advice on this: Struggling to decide on a paint scheme for this. I dont want to rust her up (sorry Boss  - herasy I hear you shout  What I'm currently considering ; NATO 3 tone -Winter Scheme with green replaced with white Heavily faded olive drab(ish) Sand And before anyone suggets leopard spots - NO ;D Any sensible suggestions considered! P |
|
paulh.
Senior Member
   
Member since: November 2011
build, fail, learn, succeed - ENJOY
Posts: 2,389
Nov 15, 2011 15:54:51 GMT -5
Nov 15, 2011 15:54:51 GMT -5
|
Post by paulh. on May 31, 2012 13:37:28 GMT -5
My prefered option as well tbh  - just as something different really. I need to find some decent pics! I've got some from missing-lynx but need some more. |
|
paulh.
Senior Member
   
Member since: November 2011
build, fail, learn, succeed - ENJOY
Posts: 2,389
Nov 15, 2011 15:54:51 GMT -5
Nov 15, 2011 15:54:51 GMT -5
|
Post by paulh. on Jun 2, 2012 13:43:00 GMT -5
Hi all, i've managed to get my hands on a part built and painted Italeri Leo2A4. not sure if I can rescue it  but it has given me a nice stask of spare parts. Hopefully I can post an update or two before Bettys party is over   P |
|
paulh.
Senior Member
   
Member since: November 2011
build, fail, learn, succeed - ENJOY
Posts: 2,389
Nov 15, 2011 15:54:51 GMT -5
Nov 15, 2011 15:54:51 GMT -5
|
Post by paulh. on Jun 4, 2012 6:02:08 GMT -5
Block colour time; For this I'm using the LC NATO Merdec scheme Black & Earth Red I've had a few problems with my airbrush so I gave up with it arfter trying to get the black on so things are looking a wee bit ropey at the mo  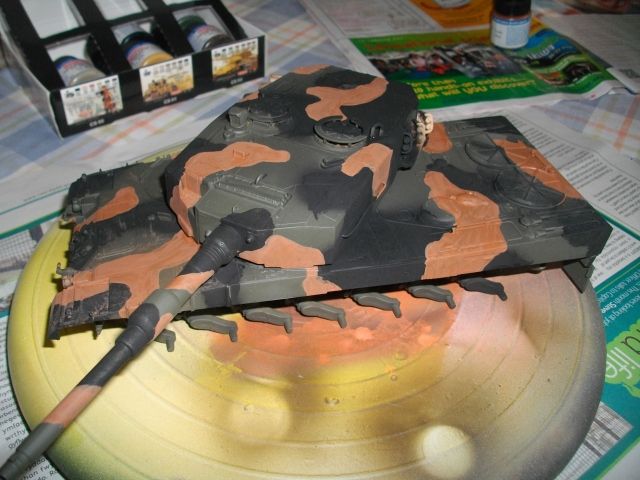 Hopefully a couple of filters should soften out the contrasts. The plan is to then over paint the green and possibly some of the black/brown with a blotchy white Some work still needed on the dischargers as well as some gunking up of the running gear etc ACW P |
|
|
|
Post by spud on Jun 4, 2012 6:17:05 GMT -5
looking good paul, that run on teh turret musta pissed ya right off, still tough you could cover it with somthing  |
|
|
|
Post by 406 Silverado on Jun 4, 2012 8:07:13 GMT -5
Looking good with paint on her Paul. best part is yet to come.
|
|
paulh.
Senior Member
   
Member since: November 2011
build, fail, learn, succeed - ENJOY
Posts: 2,389
Nov 15, 2011 15:54:51 GMT -5
Nov 15, 2011 15:54:51 GMT -5
|
Post by paulh. on Jun 4, 2012 11:46:33 GMT -5
Hi Spud- not wrong about that run, but the plan is that after a couple of filters to draw coluors together all of the green areas, and possibly a bit of the black & brown will get a coating or two of white.
That should, hopefully, also cover up any problem areas like runs etc, then a hit with a filter or two also to soften it out a bit more.
Cheers Rob. I think this one might just by default be a wee bit messier than my last one!
P
|
|
paulh.
Senior Member
   
Member since: November 2011
build, fail, learn, succeed - ENJOY
Posts: 2,389
Nov 15, 2011 15:54:51 GMT -5
Nov 15, 2011 15:54:51 GMT -5
|
Post by paulh. on Jun 4, 2012 16:03:49 GMT -5
I know what you mean guys- it was the change in plan that threw me a bit with the AB acting up  Its been a while since I used a hairy brush for anything other than detail painting  I think I had problems with the LC stuff before  , so I'm going to change back to ModelAir for the overpaint of white, - well I'm hoping its the paint 'cause the AB's a new one  P |
|
paulh.
Senior Member
   
Member since: November 2011
build, fail, learn, succeed - ENJOY
Posts: 2,389
Nov 15, 2011 15:54:51 GMT -5
Nov 15, 2011 15:54:51 GMT -5
|
Post by paulh. on Jun 4, 2012 16:43:30 GMT -5
LC's own brand thinner, to about 70/30 paint- to- thinner.
|
|
paulh.
Senior Member
   
Member since: November 2011
build, fail, learn, succeed - ENJOY
Posts: 2,389
Nov 15, 2011 15:54:51 GMT -5
Nov 15, 2011 15:54:51 GMT -5
|
Post by paulh. on Jun 4, 2012 16:57:22 GMT -5
Could be a pressure thing- 'cause the brush is thoroughly cleaned after each session, but willl go back and check all options, Thanks for the input jackwagon.
P
|
|


 and this stuff has gripped quite well shrunk right back and actually helped to pick out some of the soft detail on the wheels ;D


 but it has given me a nice stask of spare parts.


